
ハイライト
iOS 18 はドキュメント系 app に新しい起動画面を提供。
DocumentGroupLaunchSceneで背景、装飾 view、テンプレート作成ボタンをカスタマイズ可能——iOS 18 SDK で再コンパイルするだけでゼロコードで新デザインを取得。
主要内容
ドキュメント系 app には長年、起動時の尷尬がありました:ユーザーが見るのはシステム標準のドキュメントブラウザ——ブランド感のない冷たいファイル一覧。あなたの app が執筆ツール、キャンバス、コードエディタであっても、開いた瞬間はすべてのドキュメント app と同じに見えます。
iOS 18 が答えを出しました。iOS 18 SDK で再コンパイルするだけで、SwiftUI の DocumentGroup と UIKit の UIDocumentViewController が自動的に新起動画面を表示——中央の app 名、目立つ作成ボタン、内蔵ドキュメントブラウザ、すべてシステム提供で新コード不要。
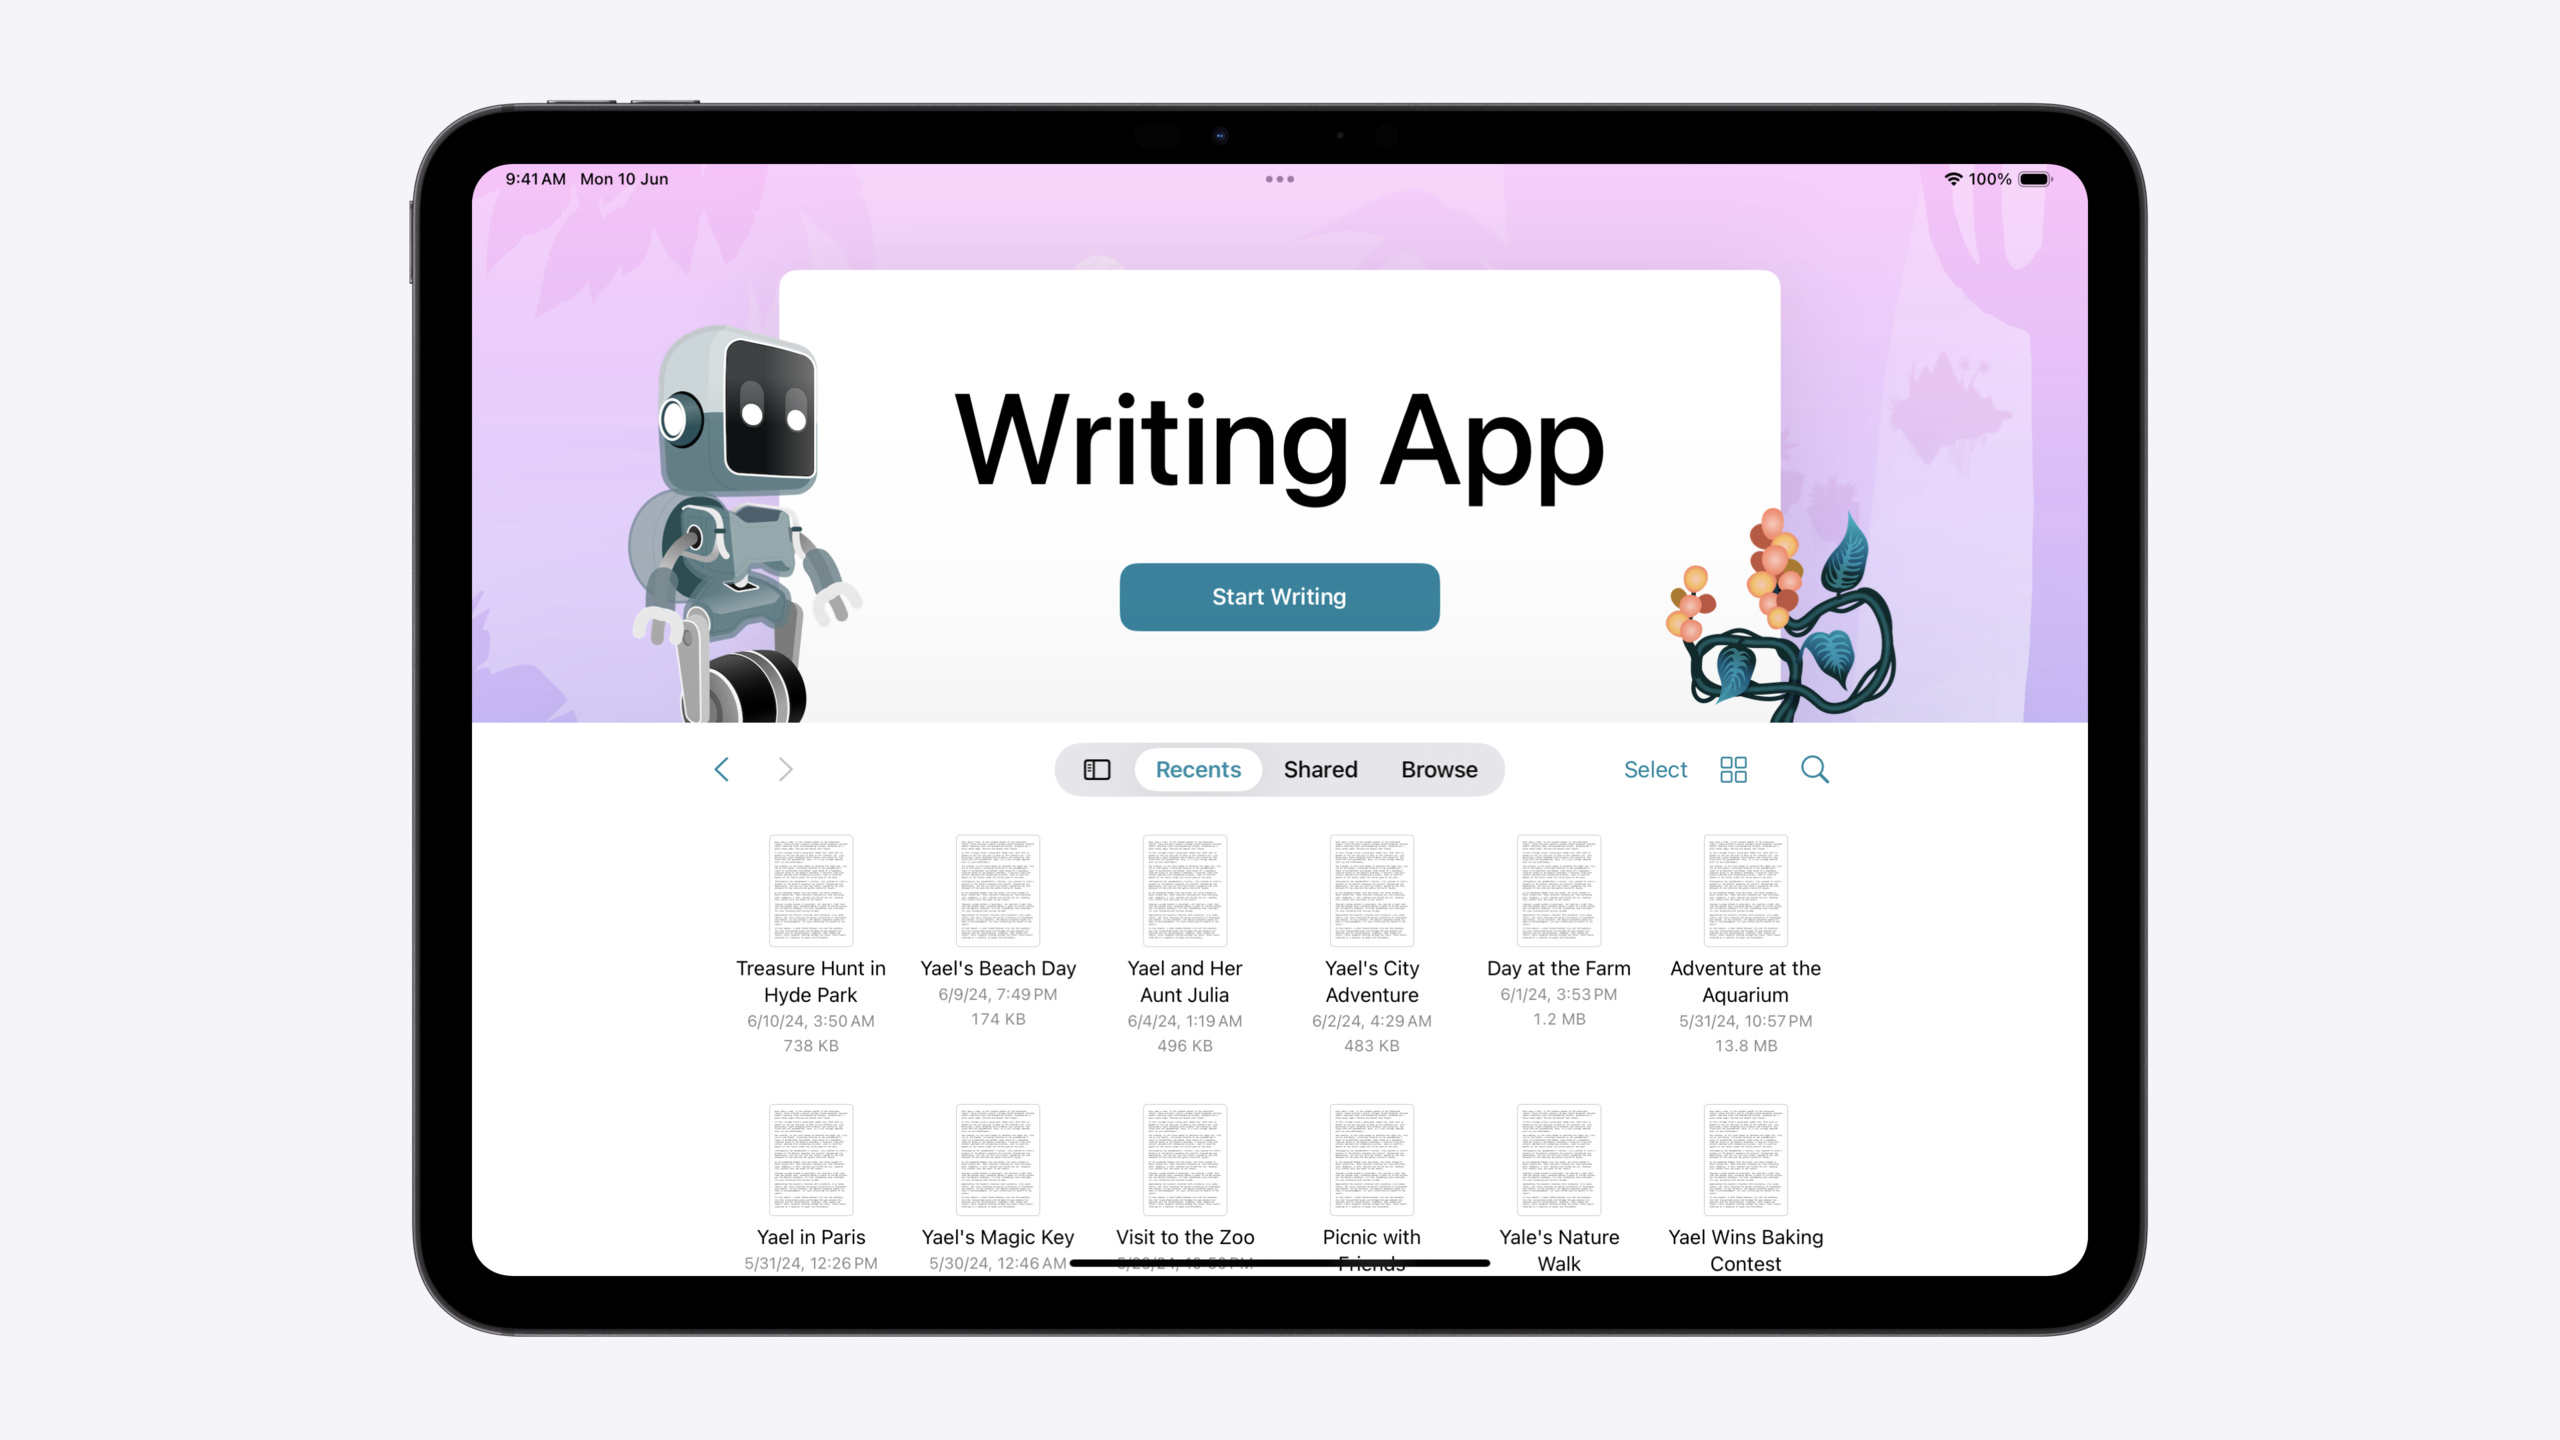
これは起点に過ぎません。Apple は同時に DocumentGroupLaunchScene API を公開し、背景画像の差し替え、装飾 view の追加、ボタン文言のカスタマイズ、テンプレートからのドキュメント作成まで可能に。Swift Playgrounds は既にこの API で Byte キャラクターを起動画面に配置——初回起動から app の個性を伝えられます。
詳細
SwiftUI:ゼロコードアップグレード + 段階的カスタマイズ
最も基本的な SwiftUI ドキュメント app 構造(02:38):
@main
struct WritingApp: App {
    var body: some Scene {
        DocumentGroup(newDocument: { StoryDocument() }) { file in
            StoryView(document: $file.document)
        }
    }
}
キーポイント:
DocumentGroupはドキュメントタイプと編集 view を同時に宣言- iOS 18 SDK でコンパイル後、コード変更なしで app 起動時に新 launch 画面を自動表示
起動画面をカスタマイズするには App body に DocumentGroupLaunchScene を追加(04:38):
DocumentGroup(
    newDocument: { StoryDocument() }
) { file in
    StoryView(document: $file.document)
}

DocumentGroupLaunchScene {
    NewDocumentButton("Start Writing")
} background: {
    Image(.pinkJungle)
        .resizable()
        .aspectRatio(contentMode: .fill)
}
キーポイント:
DocumentGroupLaunchSceneはDocumentGroupと並列宣言NewDocumentButton("Start Writing")でデフォルト “Create Document” ボタン文言を置換backgroundクロージャは任意の SwiftUI View を受け付け、ここでは画像で充填
装飾 view:geometry で配置
装飾要素追加時は overlayAccessoryView クロージャでレイアウト情報を取得(05:53):
DocumentGroupLaunchScene {
    NewDocumentButton("Start Writing")
} background: {
    Image(.pinkJungle)
        .resizable()
        .aspectRatio(contentMode: .fill)
} overlayAccessoryView: { geometry in
    ZStack {
        Image(.robot)
            .position(
                x: geometry.titleViewFrame.minX,
                y: geometry.titleViewFrame.minY
            )
        Image(.plant)
            .position(
                x: geometry.titleViewFrame.maxX,
                y: geometry.titleViewFrame.maxY
            )
    }
}
キーポイント:
geometry.titleViewFrameでタイトル view の正確な frame(minX/minY/maxX/maxY)- 装飾 view はタイトル view の前後に配置し层次感を形成
position()またはoffset()で配置——システムは自動レイアウトしない
テンプレートからドキュメント作成
2 つ目の NewDocumentButton でテンプレート作成をサポート(07:56):
@State private var creationContinuation: CheckedContinuation<StoryDocument?, any Error>?
@State private var isTemplatePickerPresented = false

DocumentGroupLaunchScene {
    NewDocumentButton("Start Writing")
    NewDocumentButton("Choose a Template", for: StoryDocument.self) {
        try await withCheckedThrowingContinuation { continuation in
            self.creationContinuation = continuation
            self.isTemplatePickerPresented = true
        }
    }
    .sheet(isPresented: $isTemplatePickerPresented) {
        TemplatePicker(continuation: $creationContinuation)
    }
}
テンプレートピッカーでユーザーが選択後、continuation でドキュメントを返却(08:07):
struct TemplatePicker: View {
    @Binding var creationContinuation: CheckedContinuation<StoryDocument?, any Error>?

    var body: some View {
        Button("Three Act Structure") {
            creationContinuation?.resume(returning: StoryDocument.threeActStructure())
            creationContinuation = nil
        }
    }
}
キーポイント:
NewDocumentButtonの async クロージャはドキュメントインスタンスを返す必要あり——SwiftUI が自動保存CheckedContinuationでクロージャをサスペンドし、ユーザーがテンプレート選択完了まで待機- 使用後 continuation を nil に——二重 resume を防止
UIKit:launchOptions でカスタマイズ
UIKit app は UIDocumentViewController の launchOptions でカスタマイズ(06:11):
class DocumentViewController: UIDocumentViewController {
    override func viewDidLoad() {
        super.viewDidLoad()

        // Update the background
        launchOptions.background.image = UIImage(resource: .pinkJungle)

        // Add foreground accessories
        launchOptions.foregroundAccessoryView = ForegroundAccessoryView()
    }
}
UIKit テンプレート作成は UIDocument.CreationIntent(08:29):
extension UIDocument.CreationIntent {
    static let template = UIDocument.CreationIntent("template")
}

launchOptions.secondaryAction = LaunchOptions.createDocumentAction(with: .template)
launchOptions.browserViewController.delegate = self

// In delegate method:
func documentBrowser(
    _ browser: UIDocumentBrowserViewController,
    didRequestDocumentCreationWithHandler importHandler: @escaping (URL?, ImportMode) -> Void
) {
    switch browser.activeDocumentCreationIntent {
    case .template:
        presentTemplatePicker(with: importHandler)
    default:
        let newDocumentURL = // ...
        importHandler(newDocumentURL, .copy)
    }
}
キーポイント:
- UIKit app が新画面を得る前提は
UIDocumentViewControllerが window の rootViewController であること - 旧アーキテクチャの
UIDocumentBrowserViewControllerを root にするパターンは調整が必要 activeDocumentCreationIntentで異なる作成意図を区別し、テンプレート選択ロジックにルーティング
重要ポイント
-
何をするか:ドキュメント系 app にブランド化起動画面を追加。なぜ価値があるか:初回起動からプロダクトのトーンを感じさせ、汎用システム UI ではなく。始め方:既存 SwiftUI
DocumentGroupプロジェクトを iOS 18 SDK でコンパイルしてゼロコードで新画面取得、背景と装飾を段階的に追加。 -
何をするか:3〜5 個の厳選ドキュメントテンプレートを提供。なぜ価値があるか:新規ユーザーのドキュメント作成ハードルを下げ、テンプレートに構造とスタイルが含まれ空白ページから始めなくてよい。始め方:
DocumentGroupLaunchSceneにNewDocumentButton("Choose a Template", for:)を追加、CheckedContinuationでテンプレート選択フローを実装。 -
何をするか:装飾 view で app のストーリーを伝える。なぜ価値があるか:装飾要素が起動画面を機能 UI からブランド接点へ——Swift Playgrounds の Byte キャラクターが成功例。始め方:
overlayAccessoryViewでgeometry.titleViewFrameを使いブランドキャラクターやアイコンを配置、1〜2 要素で十分——過度な装飾は注意散漫に。 -
何をするか:UIKit ドキュメント app の rootViewController を移行。なぜ価値があるか:
UIDocumentViewControllerを root に設定した場合のみ新起動画面を取得——UIDocumentBrowserViewControllerを root にする旧パターンは不要。始め方:UIDocumentBrowserViewController階層を削除、UIDocumentViewControllerを root に設定、viewDidLoadでlaunchOptionsを設定。
関連セッション
- Build better document-based apps with UIKit — UIKit ドキュメント app の基礎アーキテクチャ更新、UIDocumentViewController の完全な使い方
- Demystify SwiftUI containers — SwiftUI コンテナ view の仕組みを深く理解、DocumentGroup の底层原理
- What’s new in SwiftUI — SwiftUI 年次更新総覧、DocumentGroupLaunchScene の文脈含む
- Extend your app’s controls across the system — システムレベルコントロール拡張、起動画面ボタンカスタマイズと補完関係
コメント
GitHub Issues · utterances