
ハイライト
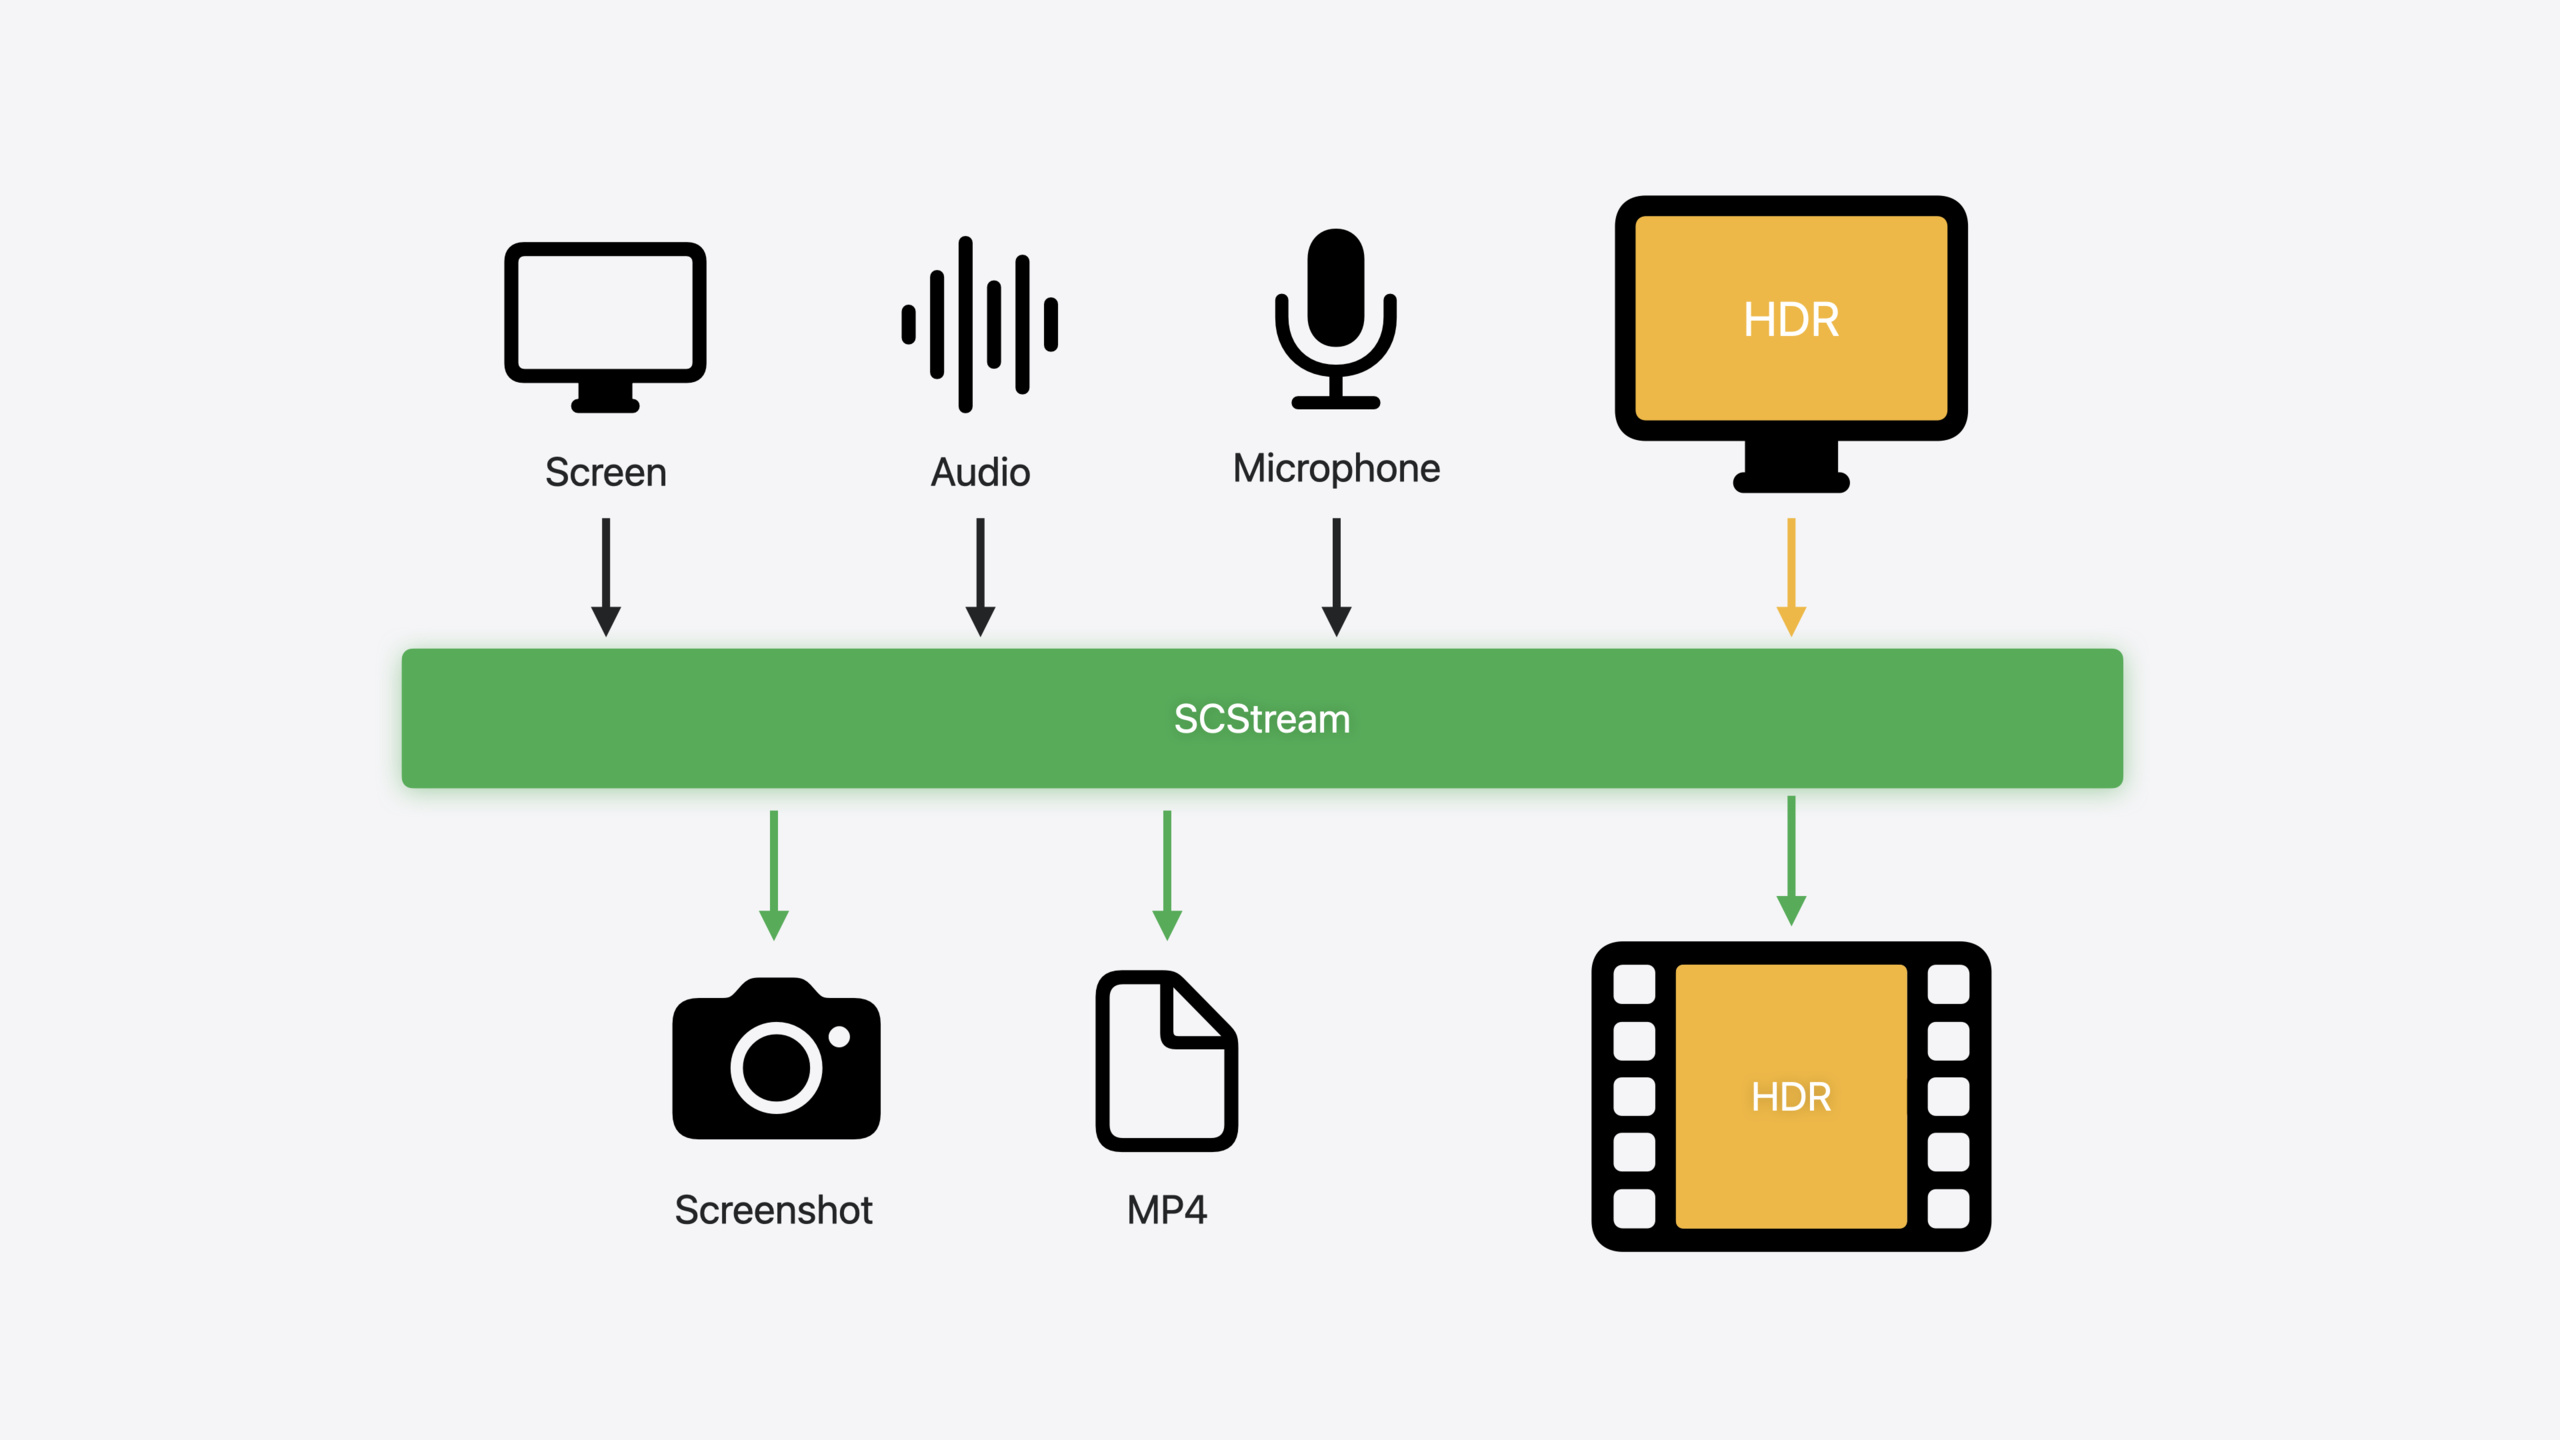
ScreenCaptureKit は macOS で画面共有、スクリーンショット、リモートデスクトップの中核フレームワークです。今年の更新は 3 シナリオをカバー:HDR コンテンツキャプチャ、マイク収録、録画出力。
主要内容
画面共有やリモートデスクトップ App でよくある問題:ユーザー画面の HDR コンテンツ(4K HDR 動画、ゲーム画面)を共有すると SDR のように灰っぽく見える。理由は単純——SCStream はデフォルトで SDR のみ出力。colorSpace、pixelFormat、colorMatrix を自分で設定しないと、色がすぐずれる。
今年 ScreenCaptureKit は 2 つの HDR プリセットを提供:captureHDRStreamLocalDisplay は同一マシンで収録と描画、captureHDRStreamCanonicalDisplay は他の HDR デバイスへ共有。プリセットが colorSpace(Display P3 PQ / HLG)、pixelFormat(10-bit YCbCr)、colorMatrix をすべて設定——1 行で正しい HDR 画面を取得。
2 つ目の痛点はナレーション収録。従来 SCStream は画面とシステムオーディオのみ。ナレーションには AVAudioEngine で別途マイクを開き、タイムスタンプ整合も自力。今は SCStream が .microphone 出力タイプをネイティブサポート——画面、システムオーディオ、マイクが同一ストリームから出て、タイムスタンプは自然に揃う。
3 つ目は録画。CMSampleBuffer 取得後に AVAssetWriter ロジックを自前実装——ファイル形式、エンコーダー選択、エラー回復。コード量が多くバグも出やすい。新しい SCRecordingOutput がすべてを封装:URL、ファイルタイプ、エンコーダーを指定し stream に追加すれば自動録画。完了後すぐ使えるファイル。
詳細
HDR キャプチャの 2 つのプリセット
HDR と SDR の核心差は輝度範囲と色域。HDR は 10-bit 以上の色深度と PQ/HLG 転送関数で、影とハイライトのディテールを保持。SCStreamConfiguration に今年 captureDynamicRange が追加。.hdrLocalDisplay または .hdrCanonicalDisplay で HDR 有効。
2 プリセットの違い:Local Display は同一マシンで収録・描画を想定——色マッピングはローカルディスプレイ経路。Canonical Display は他デバイス送信を想定——標準 HDR 転送経路。
Canonical Display プリセットで HDR ストリームをキャプチャする完全コード(5:22):
// Get content that is currently available for capture.
let availableContent = try await SCShareableContent.current

// Create instance of SCContentFilter to record entire display.
guard let display = availableContent.displays.first else { return }
let filter = SCContentFilter(display: display, excludingWindows: [])

// Create a configuration using preset for HDR stream canonical display.
let config = SCStreamConfiguration(preset: .captureHDRStreamCanonicalDisplay)

// Create a stream with the filter and stream configuration.
let stream = SCStream(filter: filter, configuration: config, delegate: self)

// Add a stream output to capture screen content.
try stream.addStreamOutput(self, type: .screen, sampleHandlerQueue: nil)

// Start the capture session.
try await stream.startCapture()
キーポイント:
SCShareableContent.currentで現在キャプチャ可能なディスプレイとウィンドウ一覧SCContentFilterでキャプチャ範囲。全ウィンドウ除外=ディスプレイ全体.captureHDRStreamCanonicalDisplayプリセットが colorSpace、pixelFormat、colorMatrix を自動設定- 必要ならプリセット上で個別プロパティを上書き
スクリーンショットにも HDR プリセット。SCScreenshotManager に captureHDRScreenshotLocalDisplay と captureHDRScreenshotCanonicalDisplay(6:40):
// Create an SCStreamConfiguration with preset for HDR.
let config = SCStreamConfiguration(preset: .captureHDRScreenshotLocalDisplay)

// Call the screenshot API to get CMSampleBuffer representation.
let screenshotBuffer = try await SCScreenshotManager.captureSampleBuffer(contentFilter: filter, configuration: config)

// Call the screenshot API to get CGImage representation.
let screenshotImage = try await SCScreenshotManager.captureImage(contentFilter: filter, configuration: config)
キーポイント:
captureSampleBufferは CMSampleBuffer を返し、後続の動画処理パイプライン向けcaptureImageは CGImage を返し、直接表示や保存向け- 同一 configuration、出力形式のみ異なる
マイク収録
SCStreamConfiguration に 2 属性追加:captureMicrophone(スイッチ)と microphoneCaptureDeviceID(デバイス ID)。マイクデータは新しい .microphone 出力タイプで配信(8:05):
// Create instance of SCStreamConfiguration.
let config = SCStreamConfiguration()

// Enable microphone capture and set id of microphone to capture.
config.captureMicrophone = true
config.microphoneCaptureDeviceID = AVCaptureDevice.default(for: .audio)?.uniqueID

// Create an SCStream instance.
let stream = SCStream(filter: filter, configuration: config, delegate: self)

// Add stream outputs for capturing screen and microphone.
try stream.addStreamOutput(self, type: .screen, sampleHandlerQueue: nil)
try stream.addStreamOutput(self, type: .microphone, sampleHandlerQueue: nil)

// Start the capture session.
try await stream.startCapture()

// Implement SCStreamOutput function to receive samples.
func stream(_ stream: SCStream, didOutputSampleBuffer sampleBuffer: CMSampleBuffer, of type: SCStreamOutputType) {
    switch type {
    case .screen:
        handleLatestScreenSample(sampleBuffer)
    case .audio:
        handleLatestAudioSample(sampleBuffer)
    case .microphone:
        handleLatestMicrophoneSample(sampleBuffer)
    }
}
キーポイント:
captureMicrophone = trueがマイク収録の前提microphoneCaptureDeviceIDは AVCaptureDevice から取得。特定マイク指定可能.microphoneは.screen、.audioと並ぶ新 SCStreamOutputType- 3 種メディアのタイムスタンプはシステムが整合を保証
ファイルへの録画
SCRecordingOutput は手動 AVAssetWriter の代替(9:38):
// Create a recording output configuration.
let recordingConfiguration = SCRecordingOutputConfiguration()

// Configure the outputURL (optionally set file type and video codec).
recordingConfiguration.outputURL = url
recordingConfiguration.outputFileType = .mov
recordingConfiguration.videoCodecType = .hevc

// Create the recording output with the configuration.
let recordingOutput = SCRecordingOutput(configuration: recordingConfiguration, delegate: self)

// Add an SCRecordingOutput to the stream.
try stream.addRecordingOutput(recordingOutput)

// Start capturing (which will also start recording).
try await stream.startCapture()

// Stop recording.
try await stream.stopCapture()

// OR
// Stop recording, but keep stream running.
try stream.removeRecordingOutput(recordingOutput)
キーポイント:
outputURLで保存パス。outputFileTypeとvideoCodecTypeは任意.hevcは HDR と相性が良いaddRecordingOutput後startCaptureで録画も開始stopCaptureはストリームと録画を同時停止。removeRecordingOutputは録画のみ停止
録画状態は SCRecordingOutputDelegate で通知(10:27):
func recordingOutputDidStartRecording(_ recordingOutput: SCRecordingOutput) {
    // Recording started asynchronously after addRecordOutput.
}

func recordingOutput(_ recordingOutput: SCRecordingOutput, didFailWithError error: Error) {
    // Recording failed with error.
}

func recordingOutputDidFinishRecording(_ recordingOutput: SCRecordingOutput) {
    // Recording finished after calling either removeRecordOutput or stopCapture.
}
キーポイント:
recordingOutputDidStartRecordingは録画が非同期開始後に発火didFailWithErrorで録画中のエラー処理recordingOutputDidFinishRecording時点でファイル書き込み完了、すぐ利用可能
重要ポイント
-
画面共有ツールに HDR サポートを追加:ビデオ会議やリモートデスクトップで HDR 動画やゲーム画面共有時の体験が悪い。
captureHDRStreamCanonicalDisplayプリセットに切り替えれば解決——変更量は極小。既存のSCStreamConfiguration()をSCStreamConfiguration(preset: .captureHDRStreamCanonicalDisplay)に置換、他コードはそのまま。 -
録画ツールにナレーション機能を追加:チュートリアル録画や製品デモで画面と音声を同時収録。以前は AVAudioEngine でマイクを別途開き画面ストリームとマージ。今は
captureMicrophone = trueと.microphone出力タイプ追加だけ。3 種メディアを同一ストリームから取得。 -
手書き AVAssetWriter を SCRecordingOutput に置換:CMSampleBuffer 手動書き込みはコード量が多くバグも出やすい(エンコーダー誤り、ファイルヘッダー破損、タイムスタンプ不整合)。SCRecordingOutput は 3 行設定で同等。HDR・マイクともシームレス連携。SCRecordingOutputConfiguration を作成し URL とエンコーダーを設定、
stream.addRecordingOutputで AVAssetWriter ロジックを置換。
関連セッション
- Use HDR for dynamic image experiences in your app — HDR 画像の読み書きと表示。本 Session の HDR キャプチャと組み合わせ
- Discover media performance metrics in AVFoundation — AVFoundation の新メディア性能監視 API。録画成果物の再生品質分析向け
- Keep colors consistent across captures — Constant Color API で撮影色の一貫性。HDR キャプチャの色域管理と補完
- Build compelling spatial photo and video experiences — 空間写真・動画の収録と再生。同様の HDR とマルチストリーム処理
コメント
GitHub Issues · utterances