
ハイライト
SwiftUI は、iOS 17 の ScrollView 用に 5 つの新しい API を導入します。
safeAreaPaddingそしてcontentMarginsマージンを正確に制御し、scrollTargetBehaviorカスタムスクロールの配置、containerRelativeFrameコンテナベースのサイズ計算、scrollPositionScrollViewReader を置き換えるプログラムによるスクロール コントロール、およびscrollTransitionスクロール位置に基づいた視覚的なトランジション効果。
主な内容
ScrollView の基本
Harry は SwiftUI チームからスタートし、まず ScrollView の基本概念を確認しました。
- ScrollView にはスクロール方向を定義する軸があります
- コンテンツが ScrollView のサイズを超えると、コンテンツは切り取られるため、ユーザーはスクロールして表示する必要があります。
- ScrollView は安全領域をコンテンツの余白に解析します
- デフォルトでは、ScrollView はすべてのコンテンツを即座に計算します。遅延スタックを使用例してこの動作を変更できます。
- ScrollView 内のコンテンツの正確な位置は、コンテンツ オフセットと呼ばれます
安全領域とコンテンツの余白
(02:29) ScrollView に余白を追加する場合は、直接使用例してください.padding()コンテンツが切り取られることになります。正しいアプローチは次のように使用例することです.safeAreaPadding():
ScrollView(.horizontal) {
    LazyHStack(spacing: hSpacing) {
        ForEach(palettes) { palette in
            GalleryHeroView(palette: palette)
        }
    }
}
.safeAreaPadding(.horizontal, hMargin)
キーポイント:
.safeAreaPadding()安全領域にパディングを追加し、ScrollView が幅いっぱいになるようにします。- コンテンツには余白がありますが、次の要素が「覗く」可能性があります
- スクロールインジケーターも正しく配置されます
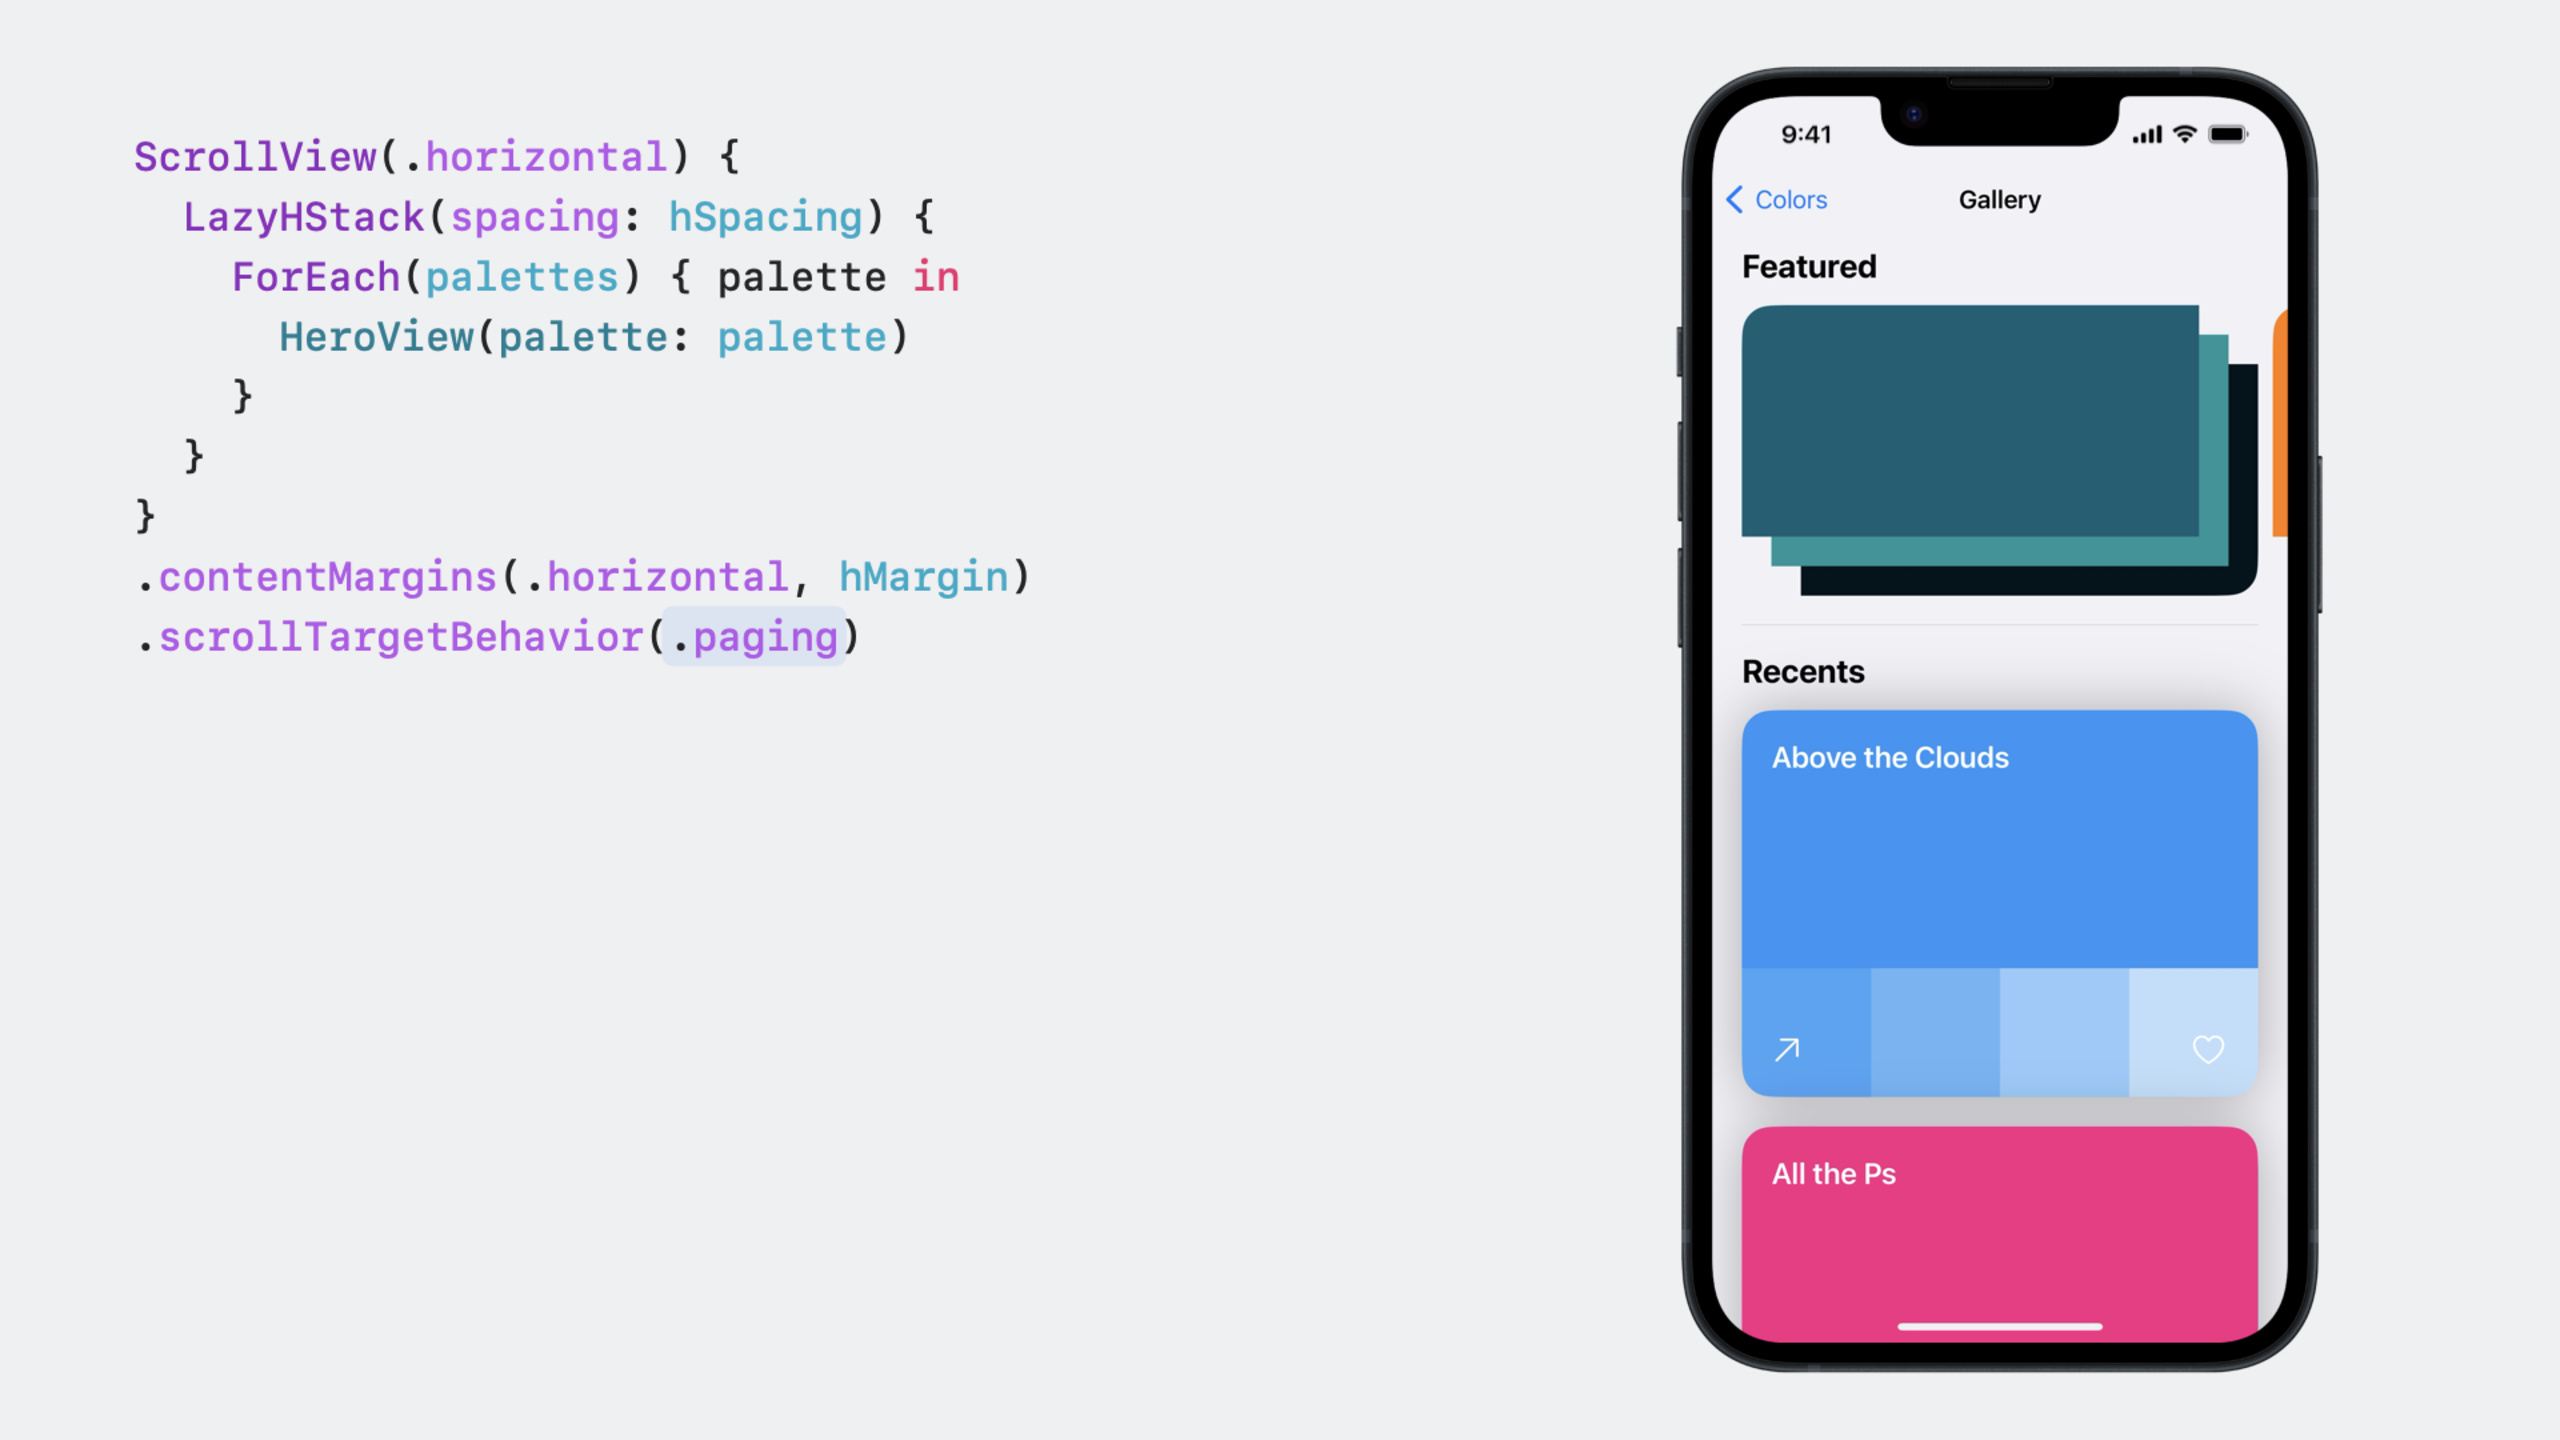
(04:00) コンテンツとスクロール インジケーターの余白を個別に制御する必要がある場合は、次を使用例します。contentMargins:
ScrollView(.horizontal) {
    LazyHStack(spacing: hSpacing) {
        ForEach(palettes) { palette in
            GalleryHeroView(palette: palette)
        }
    }
}
.contentMargins(.horizontal, hMargin)
キーポイント:
contentMarginsコンテンツやスクロールインジケーターを個別に挿入可能- セーフエリアでコンテンツごとに異なるインセットを設定できない問題を解決しました
Scroll Target Behavior
(04:46) デフォルトでは、ScrollView は標準の減速度を使用例してスクロール停止位置を計算します。新しい API により、この動作が変更される可能性があります。
ScrollView(.horizontal) {
    LazyHStack(spacing: hSpacing) {
        ForEach(palettes) { palette in
            GalleryHeroView(palette: palette)
        }
    }
    .scrollTargetLayout()
}
.contentMargins(.horizontal, hMargin)
.scrollTargetBehavior(.viewAligned)
キーポイント:
.paging: ScrollView のコンテナ サイズに基づいてページ全体を反転します。 -.viewAligned: サブビューに位置合わせされています。一致する必要があります.scrollTargetLayout()使用例 -.scrollTargetLayout()Lazy Stack 内の各サブビューをスクロール ターゲットとしてマークします。- iPadの場合
.viewAligned比較する.pagingページが大きくなりすぎないため、より適切です
カスタマイズScrollTargetBehavior:
struct MyScrollTargetBehavior: ScrollTargetBehavior {
    func updateTarget(_ target: inout ScrollTarget, context: TargetContext) {
        if target.rect.minY < 50 && context.velocity.dy > 0 {
            target.rect.origin.y = 0
        }
    }
}
キーポイント:
- 実現する
updateTargetスクロール対象を変更する方法 - SwiftUIはスクロール停止位置を計算するときにこのメソッドを呼び出します
- ScrollView サイズ変更などの他のシナリオにも適しています
Container Relative Frame
(07:42).containerRelativeFrame最も近いコンテナに基づいてビューのサイズを作成します。
GalleryHeroView(palette: palette)
    .aspectRatio(heroRatio, contentMode: .fit)
    .containerRelativeFrame(
        [.horizontal], count: columns, spacing: hSpacing
    )
キーポイント:
- コンテナーは、ScrollView、NavigationSplitView の列、またはウィンドウにすることができます。
-
countそしてspacingグリッドレイアウトを作成するためのパラメータ - コンテナの幅が変わると、ビューのサイズが自動的に更新されます
-
horizontalSizeClass環境プロパティがすべてのプラットフォームで利用できるようになりました
Scroll Position
(09:46)scrollPositionScrollViewReader を置き換え、よりシンプルなプログラムによるスクロール コントロールを提供します。
struct GalleryHeroContent: View {
    var palettes: [Palette]
    @Binding var mainID: Palette.ID?

    var body: some View {
        ScrollView(.horizontal) {
            LazyHStack(spacing: hSpacing) {
                ForEach(palettes) { palette in
                    GalleryHeroView(palette: palette)
                }
            }
            .scrollTargetLayout()
        }
        .contentMargins(.horizontal, hMargin)
        .scrollTargetBehavior(.viewAligned)
        .scrollPosition(id: $mainID)
        .scrollIndicators(.never)
    }
}
キーポイント:
scrollPositionオプションの ID へのバインディングを受け取ります- バインディングを記述すると、ScrollView は ID に対応するビューまでスクロールします
- スクロールすると、バインディングが現在の最前面のビュー ID に自動的に更新されます。
- 協力が必要です
.scrollTargetLayout()使用例
macOS でマウス ユーザー向けにページめくりボタンを追加します。
private func scrollToNextID() {
    guard let id = mainID, id != palettes.last?.id,
          let index = palettes.firstIndex(where: { $0.id == id })
    else { return }

    withAnimation {
        mainID = palettes[index + 1].id
    }
}
キーポイント:
-変更mainIDステータスはスクロールをトリガーすることができます
- ラッピング可能
withAnimationスムーズなスクロールを実現
Scroll Transitions
(12:34)scrollTransitionScrollView 内のビューの表示位置に基づいて視覚的な変更を適用します。
GalleryHeroView(palette: palette)
    .scrollTransition(axis: .horizontal) { content, phase in
        content
            .scaleEffect(
                x: phase.isIdentity ? 1.0 : 0.80,
                y: phase.isIdentity ? 1.0 : 0.80)
    }
キーポイント:
phase次の 3 つの状態があります。identity(中央)、topLeading(端に近い)、bottomTrailing(端から外れて)- のみをサポートします
VisualEffectプロトコル内の修飾子 (scaleEffect、回転、オフセットなど) - コンテンツ サイズ (フォントなど) を変更する修飾子は、ScrollView のレイアウトに影響するためサポートされていません。
- ビューが表示領域の中心にある場合、デフォルトでアイデンティティフェーズになります。
##詳細
ScrollViewの基本構造
(00:46) 基本的な ScrollView 構造:
struct Item: Identifiable {
    var id: Int
}

struct ContentView: View {
    @State var items: [Item] = (0 ..< 25).map { Item(id: $0) }

    var body: some View {
        ScrollView(.vertical) {
            LazyVStack {
                ForEach(items) { item in
                    ItemView(item: item)
                }
            }
        }
    }
}

struct ItemView: View {
    var item: Item

    var body: some View {
        Text(item, format: .number)
            .padding(.vertical)
            .frame(maxWidth: .infinity)
    }
}
キーポイント:
LazyVStack目に見えないコンテンツの作成を遅らせる -ScrollViewaxis パラメータはスクロール方向を指定します- コンテンツが範囲を超えた場合に自動的にスクロールを有効にする
ギャラリーの完全な実装
(02:29) すべての新しい API を組み合わせて使用例することを示す完全なギャラリー実装:
struct ContentView: View {
    @State var palettes: [Palette] = [
        .init(id: UUID(), name: "Example One"),
        .init(id: UUID(), name: "Example Two"),
        .init(id: UUID(), name: "Example Three"),
    ]

    var body: some View {
        ScrollView {
            GalleryHeroSection(palettes: palettes)
        }
    }
}

struct GalleryHeroSection: View {
    var palettes: [Palette]
    @State var mainID: Palette.ID? = nil

    var body: some View {
        GallerySection(edge: .top) {
            GalleryHeroContent(palettes: palettes, mainID: $mainID)
        } label: {
            GalleryHeroHeader(palettes: palettes, mainID: $mainID)
        }
    }
}

struct GalleryHeroContent: View {
    var palettes: [Palette]
    @Binding var mainID: Palette.ID?

    var body: some View {
        ScrollView(.horizontal) {
            LazyHStack(spacing: hSpacing) {
                ForEach(palettes) { palette in
                    GalleryHeroView(palette: palette)
                }
            }
            .scrollTargetLayout()
        }
        .contentMargins(.horizontal, hMargin)
        .scrollTargetBehavior(.viewAligned)
        .scrollPosition(id: $mainID)
        .scrollIndicators(.never)
    }
}

struct GalleryHeroView: View {
    var palette: Palette
    @Environment(\.horizontalSizeClass) private var sizeClass

    var body: some View {
        colorStack
            .aspectRatio(heroRatio, contentMode: .fit)
            .containerRelativeFrame(
                [.horizontal], count: columns, spacing: hSpacing
            )
            .clipShape(.rect(cornerRadius: 20.0))
            .scrollTransition(axis: .horizontal) { content, phase in
                content
                    .scaleEffect(
                        x: phase.isIdentity ? 1.0 : 0.80,
                        y: phase.isIdentity ? 1.0 : 0.80)
            }
    }

    private var columns: Int {
        sizeClass == .compact ? 1 : regularCount
    }
}
キーポイント:
GalleryHeroView使用例containerRelativeFrameコンテナの幅に基づいて寸法を自動的に計算します -columnsによるとhorizontalSizeClassiPhone では 1 列、iPad では 2 列を表示します -scrollTransition中心から外れたビューを 80% に縮小して、フォーカス効果を作成します。 -scrollPositionヘッダーのボタンでスクロールを制御できるようにする
スクロール インジケーターのスマートな動作
(08:54)scrollIndicators(.hidden) 的默认行为是:在使用例触控板等多点触控输入时隐藏指示器,在连接鼠标时显示指示器。这是因为鼠标用户难以执行滑动手势。
本当にインジケーターを常に非表示にする必要がある場合 (代替のスクロール方法を提供しながら)、次を使用例します。.scrollIndicators(.never)。
重要なポイント
-
カード スタイルのカルーセル
- やるべきこと: 左右にスライドして 1 枚のカードに自動的に配置できるカルーセルを実装する
- なぜそれを行う価値があるのか:
.scrollTargetBehavior(.viewAligned)協力する.scrollTargetLayout()カルーセル チャートの実装を「手動計算」から「宣言的構成」に変更します。 - 開始方法: を使用例します。
LazyHStackパッケージカード、追加.scrollTargetLayout()そして.scrollTargetBehavior(.viewAligned)
-
クロスデバイス適応グリッド ・対処法:iPhoneでは1列、iPadでは2~3列のグリッドを表示するレイアウト
- なぜそれを行う価値があるのか:
containerRelativeFrame協力するhorizontalSizeClassGeometryReader を使用例せずにレスポンシブなレイアウトを実現する - 開始方法: を使用例します。
.containerRelativeFrame([.horizontal], count: columns, spacing: spacing)、によるとhorizontalSizeClass設定columns
- なぜそれを行う価値があるのか:
-
スクロールによる視覚的なフィードバック
- 機能: リスト内のカードは、画面の中央までスクロールすると拡大し、スクロールして離れると縮小します。
- なぜそれを行う価値があるのか:
scrollTransitionこの効果を数行のコードで実現するため、コンテンツのオフセットを手動で追跡する必要がありません - 開始方法: リスト項目ビューに追加
.scrollTransition(axis: .vertical) { content, phase in content.scaleEffect(phase.isIdentity ? 1.0 : 0.9) }
-
プログラムされたスクロール ナビゲーション
- 対処方法: 「前へ」/「次へ」ボタンをクリックして、水平スクロール ビューを制御します。
- なぜそれを行う価値があるのか:
scrollPositionScrollViewReader よりもシンプルで双方向バインディングをサポート - 始め方: 定義
@State var currentID: Item.ID?、にバインドされています.scrollPosition(id: $currentID)、ボタンの変更currentIDそれでおしまい
-
カスタマイズされたスクロール吸着動作
- 対処方法: ScrollView が上部に近づいたときに自動的に上部にスナップするようにします。
- なぜそれを行う価値があるのか:
ScrollTargetBehaviorプロトコルによりスクロール動作のカスタマイズが簡単になります - 開始方法: フォローを作成する
ScrollTargetBehaviorの構造updateTarget速度と目標位置に応じて修正target.rect
関連セッション
- SwiftUI アニメーションを探索する — SwiftUI アニメーションの基本
- スプリングを使用例したアニメーション — 春のアニメーション
- SwiftUI で高度なアニメーションを使いこなす — キーフレーム アニメーションをスクロール トランジションに使用例できます
- SwiftUI の要点 — SwiftUI の基本概念
コメント
GitHub Issues · utterances