
ハイライト
ScreenCaptureKit Advanced: コンテンツ フィルターの 5 つのモード、フレーム メタデータの解釈 (ダーティ レククト、contentRect、contentScale、scaleFactor)、ストリーム構成の動的調整 (4K 60FPS と 720p 15FPS の間のリアルタイム切り替え)、およびウィンドウ ピッカーの構築方法を深く理解します。
主要内容
ScreenCaptureKit は macOS 13 でデビューし、古い CGDisplay ファミリの API を置き換えました。基本セッション「ScreenCaptureKit の紹介」では、ストリームの作成と画面とウィンドウのキャプチャの基本プロセスを紹介します。このセッションでは、キャプチャされるコンテンツを正確に制御する方法、各フレームのメタデータを理解する方法、実行時にフロー パラメーターを調整する方法、リアルタイム プレビューを備えたウィンドウ セレクターを構築する方法など、より複雑な実践的なニーズに焦点を当てます。
実際のアプリケーションでは、画面キャプチャには多くの微妙なシナリオがあります。 Zoom と Google Meet は単一のウィンドウを共有する必要がありますが、特定のプロンプト バーは除外されます。 OBS はディスプレイ全体をキャプチャする必要がありますが、特定のアプリケーション ウィンドウをスキップします。 Twitchストリーマーは、ゲームシーンを切り替えるときに解像度とフレームレートを調整する必要があります。 ScreenCaptureKit は、5 種類の ContentFilter およびフレーム メタデータ メカニズムを介してハッキングするのではなく、これらの問題を API 呼び出しに変換します。
この講義は、シングル ウィンドウのキャプチャから始まり、ディスプレイのマルチウィンドウ フィルタリング、ストリーム構成の動的な調整、フレーム メタデータの使用に徐々に広がり、最後に OBS Studio 統合のケースで終わります。
詳細
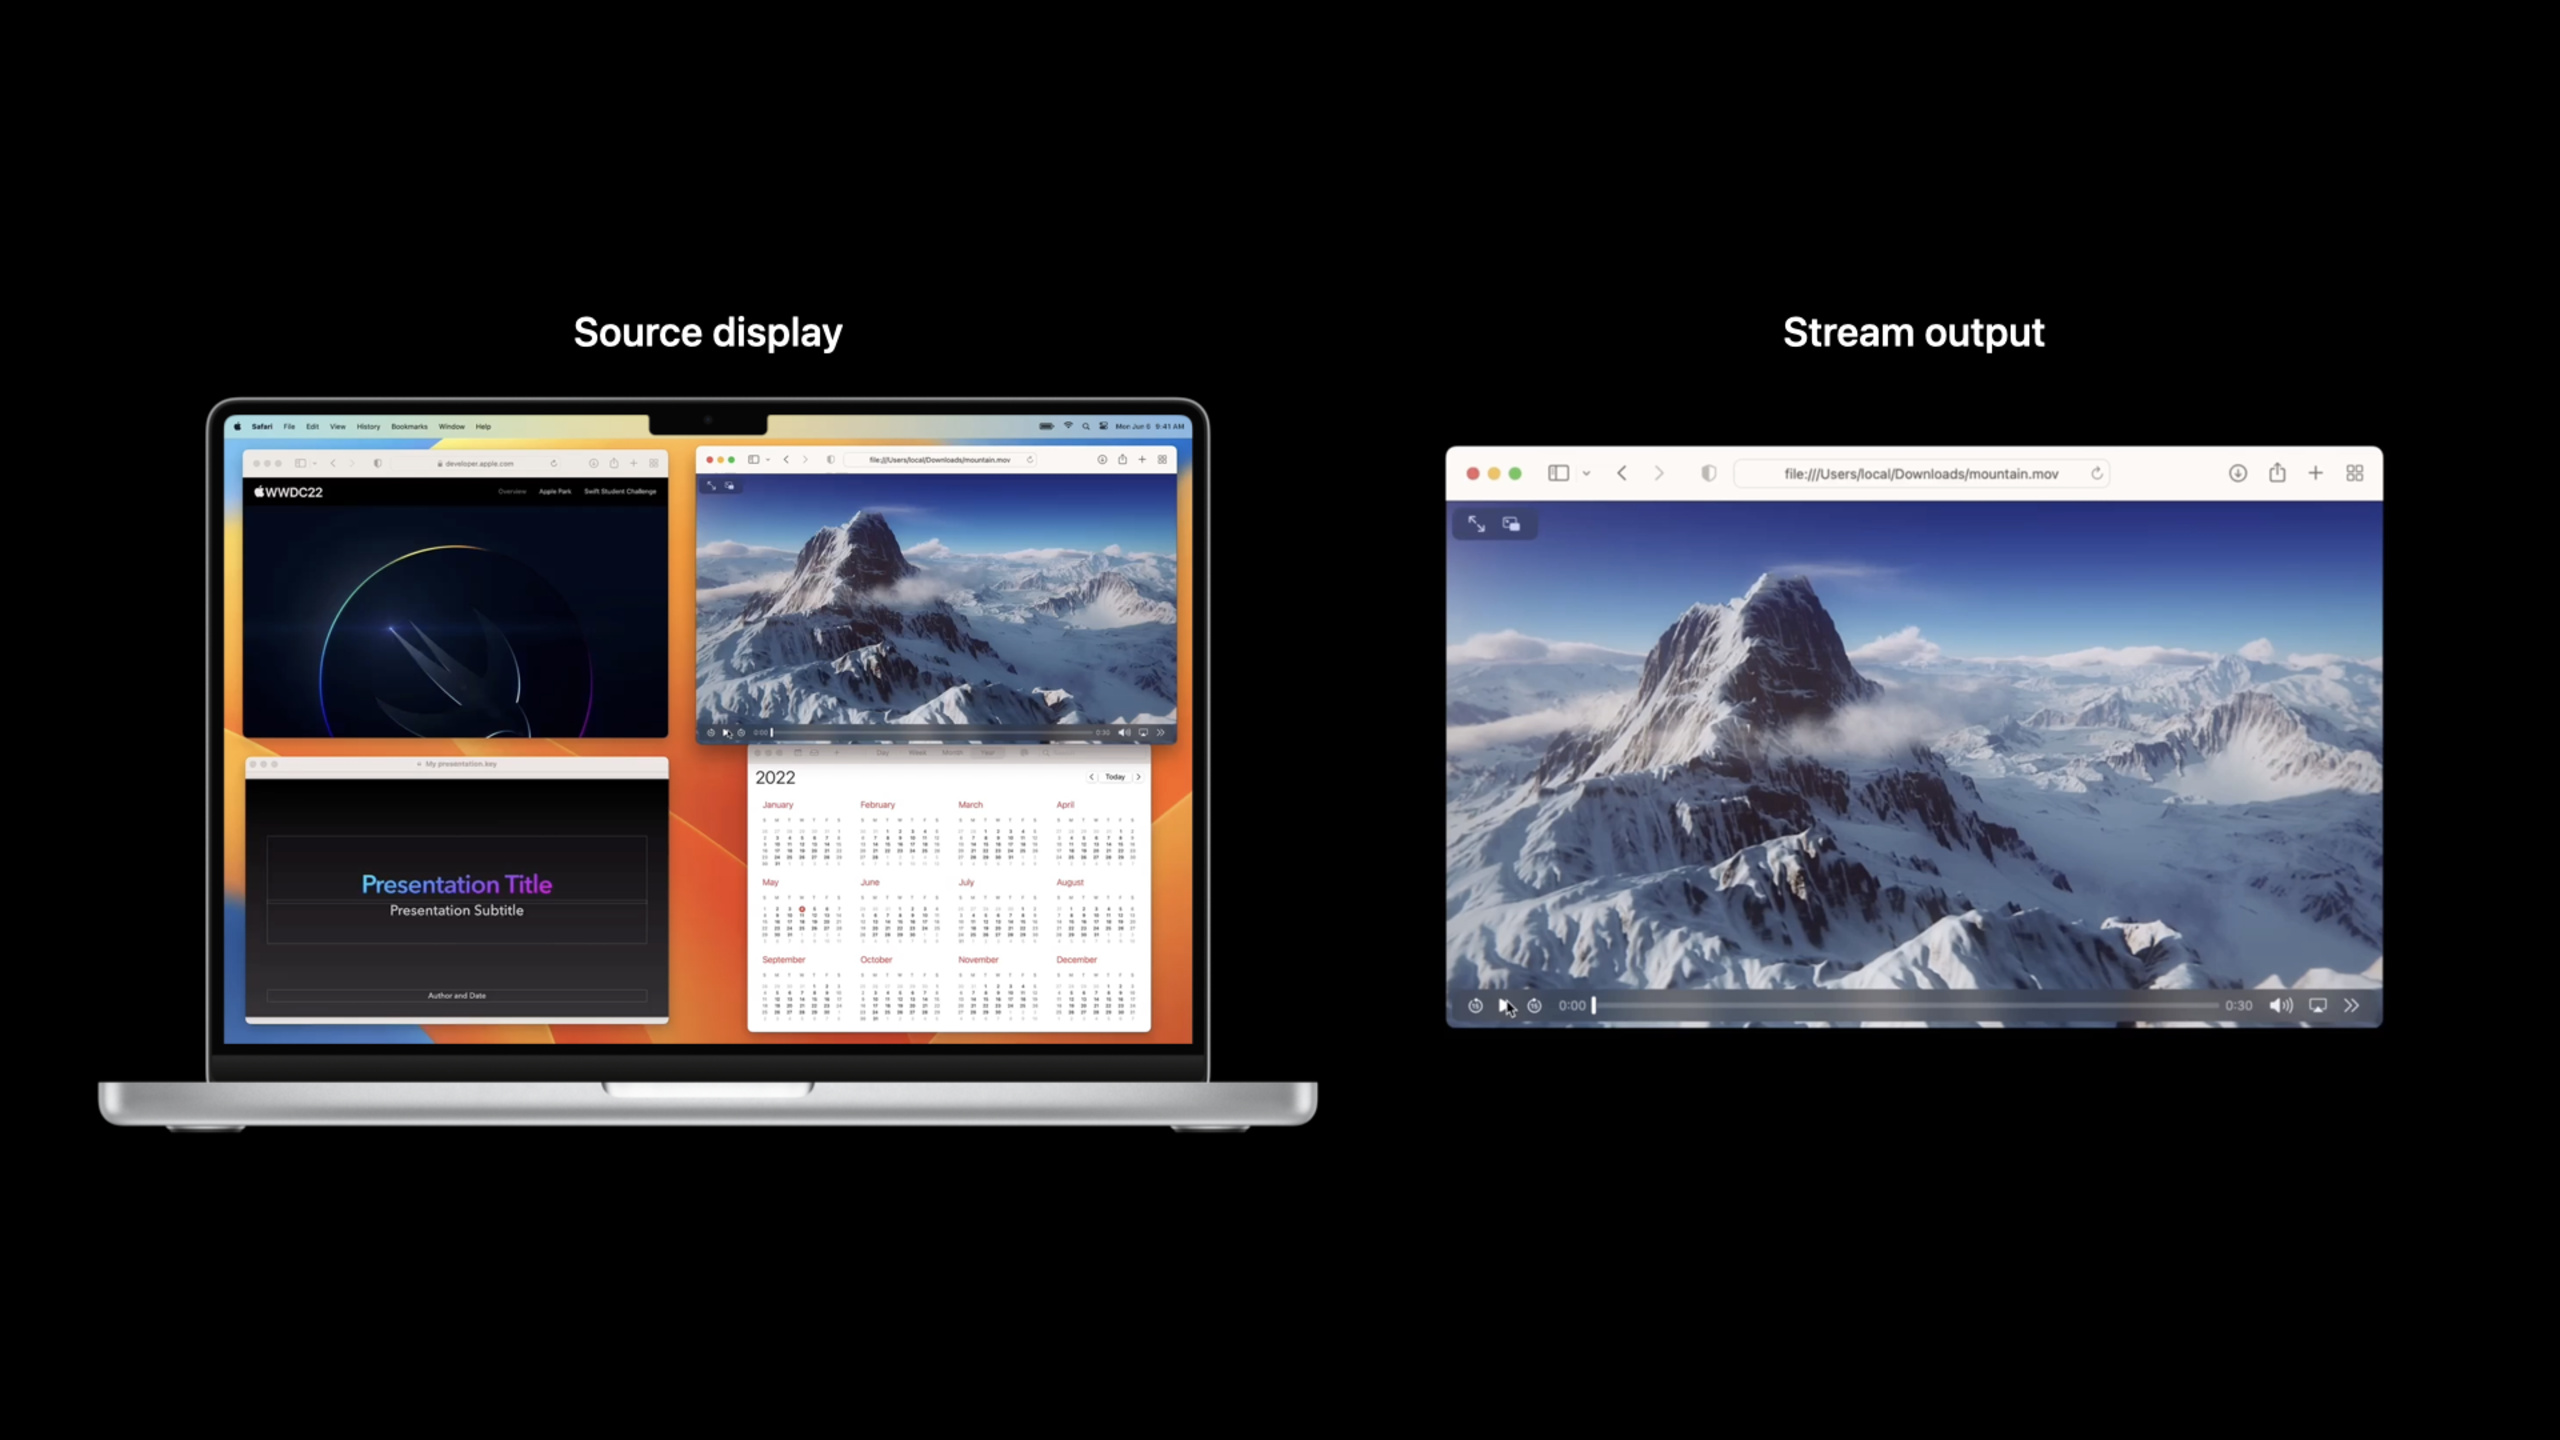
単一ウィンドウの独立したキャプチャ
(04:36)SCContentFilterのdesktopIndependentWindow初期化モードでは、モニターに依存しない単一ウィンドウのキャプチャが作成されます。このようにして、出力フレームにはターゲット ウィンドウのコンテンツのみが含まれます。ウィンドウが他のウィンドウによってブロックされている場合でも、キャプチャされたフレームにはウィンドウ全体が表示されます。
// Get all available content to share via SCShareableContent
let shareableContent = try await SCShareableContent.excludingDesktopWindows(false,
       onScreenWindowsOnly: false)

// Get window you want to share from SCShareableContent
guard let window: [SCWindow] = shareableContent.windows.first(where:
                                    { $0.windowID == windowID }) else { return }

// Create SCContentFilter for Independent Window
let contentFilter = SCContentFilter(desktopIndependentWindow: window)

// Create SCStreamConfiguration object and enable audio capture
let streamConfig = SCStreamConfiguration()
streamConfig.capturesAudio = true

// Create stream with config and filter
stream = SCStream(filter: contentFilter, configuration: streamConfig, delegate: self)
stream.addStreamOutput(self, type: .screen, sampleHandlerQueue: serialQueue)
stream.startCapture()重要なポイント:
excludingDesktopWindows(false, onScreenWindowsOnly: false)デスクトップ ウィンドウやオフスクリーン ウィンドウを含むすべてのウィンドウを取得しますSCContentFilter(desktopIndependentWindow:)モニターに依存しないウィンドウフィルターを作成するcapturesAudio = trueオーディオ キャプチャを有効にする - オーディオはウィンドウ レベルではなくアプリ レベルであることに注意してください。addStreamOutputコールバックキューと出力タイプをバインドする
フレームメタデータ: Dirty Rects
(09:38) フレームごとCMSampleBufferメタデータ辞書が付属しています。dirtyRects現在のフレームが前のフレームと比較して変更された領域をマークします。スクリーン キャプチャにおけるほとんどのフレーム変更には小さな領域 (マウスの動き、入力カーソルの点滅、通知ポップアップ) のみが含まれるため、ダーティ レククトを使用して変更された領域のみをエンコードすると、帯域幅が大幅に削減される可能性があります。
// Get dirty rects from CMSampleBuffer dictionary metadata

func streamUpdateHandler(_ stream: SCStream, sampleBuffer: CMSampleBuffer) {
    guard let attachmentsArray = CMSampleBufferGetSampleAttachmentsArray(sampleBuffer,
                                                          createIfNecessary: false) as?
                                                         [[SCStreamFrameInfo, Any]],
        let attachments = attachmentsArray.first else { return }

        let dirtyRects = attachments[.dirtyRects]
    }
}

// Only encode and transmit the content within dirty rects重要なポイント:
CMSampleBufferGetSampleAttachmentsArrayフレームアタッチメント配列の取得SCStreamFrameInfoメタデータキーの列挙型です.dirtyRects戻るCGRectこのフレームの変更領域をマークする配列- エンコード時にダーティ四角形内のピクセル データのみが処理されます
フレームメタデータ: コンテンツ Rect とスケーリング
(13:34) 3 つの主要なメタデータ フィールドは連携して機能します。contentRect有効なコンテンツ領域をマークし、contentScaleは論理対物理のスケーリング比です。scaleFactorはピクセル密度です。 3 つを組み合わせると、キャプチャしたフレームを元のウィンドウのサイズとピクセル密度に復元できます。
/* Get and use contentRect, contentScale and scaleFactor (pixel density) to convert the captured window back to its native size and pixel density */

func streamUpdateHandler(_ stream: SCStream, sampleBuffer: CMSampleBuffer) {

    guard let attachmentsArray = CMSampleBufferGetSampleAttachmentsArray(sampleBuffer,
                                                          createIfNecessary: false) as?
                                                         [[SCStreamFrameInfo, Any]],
        let attachments = attachmentsArray.first else { return }

        let contentRect = attachments[.contentRect]
        let contentScale = attachments[.contentScale]
        let scaleFactor = attachments[.scaleFactor]

        /* Use contentRect to crop the frame, and then contentScale and
        scaleFactor to scale it */

    }
}重要なポイント:
contentRect実際にコンテンツが含まれるフレームの長方形の領域を識別しますcontentScaleウィンドウの論理座標からキャプチャ フレームの座標までのスケーリング率です。scaleFactorRetina のピクセル密度 (例: 2.0)- 復元式: 元のサイズ = contentRect.size / contentScale *scaleFactor
モニターキャプチャ: 指定されたウィンドウが含まれます
(15:37) ディスプレイ全体をキャプチャする場合、次のことができます。includingパラメーターは、特定のウィンドウを (他のコンテンツによって隠されている場合でも) 追加で含めることを指定します。画面共有に適している場合は、主要なウィンドウが常に表示されるようにします。
// Get all available content to share via SCShareableContent
let shareableContent = try await SCShareableContent.excludingDesktopWindows(false,
                                                            onScreenWindowsOnly: false)

// Create SCWindow list using SCShareableContent and the window IDs to capture
let includingWindows = shareableContent.windows.filter { windowIDs.contains($0.windowID)}

// Create SCContentFilter for Full Display Including Windows
let contentFilter = SCContentFilter(display: display, including: includingWindows)

// Create SCStreamConfiguration object and enable audio
let streamConfig = SCStreamConfiguration()
streamConfig.capturesAudio = true

// Create stream
stream = SCStream(filter: contentFilter, configuration: streamConfig, delegate: self)
stream.addStreamOutput(self, type: .screen, sampleHandlerQueue: serialQueue)
stream.startCapture()重要なポイント:
SCContentFilter(display:including:)指定されたウィンドウも含めて表示をキャプチャします- プレゼンテーション シナリオに適しています。全画面 PPT をキャプチャしますが、弾幕/注釈ウィンドウも表示されていることを確認してください。
- 遮られたウィンドウの内容がシステムによってフレームに合成されます
モニターキャプチャ: アプリを含み、ウィンドウを除外
(18:13) より詳細なモードでは、特定のウィンドウを除外し、指定したアプリのすべてのウィンドウを含めます。たとえば、ディスプレイ全体をキャプチャしますが、Xcode と Safari のみが含まれ、通知センター ウィンドウは除外されます。
// Get all available content to share via SCShareableContent
let shareableContent = try await SCShareableContent.excludingDesktopWindows(false, onScreenWindowsOnly: false)

/* Create list of SCRunningApplications using SCShareableContent and the application
IDs you'd like to capture */
let includingApplications = shareableContent.applications.filter {
    appBundleIDs.contains($0.bundleIdentifier)
}

// Create SCWindow list using SCShareableContent and the window IDs to except
let exceptingWindows = shareableContent.windows.filter { windowIDs.contains($0.windowID) }

// Create SCContentFilter for Full Display Including Apps, Excepting Windows
let contentFilter = SCContentFilter(display: display, including: includingApplications,
exceptingWindows: exceptingWindows)重要なポイント:
includingApplications含めるアプリのリストを指定するexceptingWindowsこれらのアプリの特定のウィンドウを除外する- 教育シナリオに適しています: 教育関連のアプリケーションのみを表示し、通知やプライベート ウィンドウを除外します。
モニターキャプチャ: アプリを除外する
(20:46) 前のモードの逆: ディスプレイ全体をキャプチャしますが、特定のアプリとそのウィンドウは除外します。これは最も一般的な画面共有シナリオです。デスクトップ全体を共有しますが、電子メールやメッセージなどのプライベート アプリは非表示になります。
// Get all available content to share via SCShareableContent
let shareableContent = try await SCShareableContent.excludingDesktopWindows(false,
                                         onScreenWindowsOnly: false)

/* Create list of SCRunningApplications using SCShareableContent and the app IDs
you'd like to exclude */
let excludingApplications = shareableContent.applications.filter {
    appBundleIDs.contains($0.bundleIdentifier)
}

// Create SCWindow list using SCShareableContent and the window IDs to except
let exceptingWindows = shareableContent.windows.filter { windowIDs.contains($0.windowID) }

// Create SCContentFilter for Full Display Excluding Windows
let contentFilter = SCContentFilter(display: display,
                        excludingApplications: excludingApplications,
exceptingWindows: exceptingWindows)重要なポイント:
excludingApplications除外するアプリを指定するexceptingWindowsこれらのアプリでの特定のウィンドウの追加の除外- 除外されたアプリのウィンドウがぼやけて表示されるか、キャプチャされたフレームの背景色が置き換えられます
ストリーミング構成: 4K 60FPS 高品質キャプチャ
(28:46) 高品質ストリーミングを構成するには、解像度、フレーム レート、ピクセル形式、およびキューの深さを同時に設定する必要があります。queueDepthバッファリングされるフレームの数を 3 ~ 8 の値で制御します。値が大きいほど遅延は大きくなりますが、失われるフレームは少なくなります。
let streamConfiguration = SCStreamConfiguration()

// 4K output size
streamConfiguration.width  = 3840
streamConfiguration.height = 2160

// 60 FPS
streamConfiguration.minimumFrameInterval = CMTime(value: 1, timescale: CMTimeScale(60))

// 420v output pixel format for encoding
streamConfiguration.pixelFormat = kCVPixelFormatType_420YpCbCr8BiPlanarVideoRange

// Source rect(optional)
streamConfiguration.sourceRect = CGRectMake(100, 200, 3940, 2360)

// Set background fill color to black
streamConfiguration.backgroundColor = CGColor.black

// Include cursor in capture
streamConfiguration.showsCursor = true

// Valid queue depth is between 3 to 8
streamConfiguration.queueDepth = 5

// Include audio in capture
streamConfiguration.capturesAudio = true重要なポイント:
width/height出力解像度を設定するminimumFrameIntervalCMTime を使用してフレーム間隔を制御します (60FPS = 1/60 秒)pixelFormat選ぶ420vこの形式は、色空間の変換を避けるためにビデオ エンコーダに直接接続されます。sourceRect作物源地域queueDepth = 5レイテンシーとスムーズさのバランスを取る
ストリーム構成: 実行時の動的なダウングレード
(30:08) ネットワーク帯域幅が低下した場合、またはユーザーが低パフォーマンスのシナリオに切り替えた場合は、updateConfigurationストリームを再構築せずに、解像度とフレーム レートをリアルタイムで下げます。
// Update output dimension down to 720p
streamConfiguration.width  = 1280
streamConfiguration.height = 720

// 15FPS
streamConfiguration.minimumFrameInterval = CMTime(value: 1, timescale: CMTimeScale(15))

// Update the configuration
try await stream.updateConfiguration(streamConfiguration)重要なポイント:
- 4K 60FPS から 720p 15FPS、1 ラインにダウングレード
updateConfiguration仕上げる - ストリーミングを停止して再構築する必要はありません
SCStreamまたは出力を再バインドします - ネットワーク品質に基づいて品質レベルを動的に調整するのに適しています
ウィンドウセレクター: ライブプレビュー付き
(31:57) システム画面共有セレクターと同様の UI を構築します。ウィンドウごとに独立した低解像度のプレビュー ストリーム (284x182、5FPS、BGRA 形式) を作成し、ユーザーがクリックして選択できるようにインターフェイス上にリアルタイムのサムネイルを表示します。
// Get all available content to share via SCShareableContent
let shareableContent = try await SCShareableContent.excludingDesktopWindows(false,
                                        onScreenWindowsOnly: true)

// Create a SCContentFilter for each shareable SCWindows
let contentFilters = shareableContent.windows.map {
    SCContentFilter(desktopIndependentWindow: $0)
}

// Stream configuration
let streamConfiguration = SCStreamConfiguration()

// 284x182 frame output
streamConfiguration.width  = 284
streamConfiguration.height = 182
// 5 FPS
streamConfiguration.minimumFrameInterval = CMTime(value: 1, timescale: CMTimeScale(5))
// BGRA pixel format for on screen display
streamConfiguration.pixelFormat = kCVPixelFormatType_32BGRA
// No audio
streamConfiguration.capturesAudio = false
// Does not include cursor in capture
streamConfiguration.showsCursor = false
// Valid queue depth is between 3 to 8

// Create a SCStream with each SCContentFilter
var streams: [SCStream] = []
for contentFilter in contentFilters {
    let stream = SCStream(filter: contentFilter, streamConfiguration: streamConfig,
                        delegate: self)
    try stream.addStreamOutput(self, type: .screen, sampleHandlerQueue: serialQueue)
    try await stream.startCapture()
    streams.append(stream)
}重要なポイント:
onScreenWindowsOnly: true画面上のウィンドウのみを取得します- 284x182 の小さいサイズ + 5FPS の低フレーム レートでストリームをプレビューしてリソースを節約
BGRA画面上に直接表示するのに適したピクセル形式showsCursor = falseプレビューにカーソルは必要ありません- ウィンドウごとに独立したストリームを作成し、ユーザーの選択後に他のプレビュー ストリームを停止します
重要ポイント
-
ダーティ四角形を使用したインクリメンタル エンコード:
streamUpdateHandlerから抽出されたdirtyRects、変更された領域のみをエンコードします。多数のフレーム変更が小さな領域 (マウス、カーソル、通知) に集中する画面共有では、インクリメンタル エンコーディングにより帯域幅の 70% 以上を節約できます。 -
5 層の ContentFilter 戦略を構築します: 単一ウィンドウの独立したキャプチャ → ウィンドウを含む表示 → アプリケーションを含む表示 → アプリケーションを除外する表示 → 例外ウィンドウを含むアプリケーションを除外する表示。ユーザーの意図 (デモンストレーション、教育、プライバシー保護) に基づいて対応するレベルを選択し、画一的な全画面キャプチャを回避します。
-
実行時の流量パラメータの動的調整: を使用します。
updateConfiguration4K 60FPS と 720p 15FPS を切り替えます。ネットワークが良好な場合は高品質、ネットワークが悪い場合はフローを停止することなく自動的にダウングレードします。これは、リアルタイム通信アプリケーションには不可欠です。 -
ウィンドウ セレクターのプレビュー ストリーム プールを構築: 284x182 / 5FPS / BGRA 形式で各ウィンドウの軽量プレビュー ストリームを作成します。ユーザーがターゲット ウィンドウを選択すると、他のプレビュー ストリームが停止され、公式キャプチャ ストリームに切り替わります。このデュアル ストリーム アーキテクチャ (プレビュー ストリーム + 公式ストリーム) が、システム画面共有セレクターの中核となるパターンです。
-
ウィンドウレベルのオーディオとアプリレベルのオーディオを区別します:
capturesAudio = trueキャプチャされるのは、単一ウィンドウの音声ではなく、アプリ全体の音声です。ユーザーが特定のウィンドウのサウンドのみが共有されていると誤解しないように、UI で「このアプリのすべてのサウンドが共有される」ことをユーザーに明確に通知します。
関連セッション
- SwiftUI の新機能 — ウィンドウ セレクターと設定インターフェイスの構築に使用できる SwiftUI の最新アップデート
- より応答性の高いメディア アプリを作成する — メディア アプリケーションにおける AVFoundation の応答性の高いデザイン
- AVFoundation で HLS バリアントを探索する — AVFoundation で HLS バリアント ストリームを処理する方法を学習します。
- Discover Metal 3 — Metal 3 の新機能、GPU メモリのバッファリングされた画面キャプチャと連携
コメント
GitHub Issues · utterances