
ハイライト
Apple は、DocC を Xcode 13 でのインタラクティブなチュートリアル作成に拡張しました。開発者は Markdown コマンドを使用してチュートリアル ディレクトリ、章、ステップ、コード、画像を整理し、フレームワーク ユーザーがドキュメント ウィンドウで実際のアプリを段階的に構築できるようにします。
主な内容
Swift フレームワークがリリースされ、API リファレンスが作成されました。ユーザーは依然として立ち往生することになります。
ジャンルの存在は知っていますが、最初のステップとしてそれについて何を書けばよいのかわかりません。彼らは 1 つのメソッドの説明を読むことはできますが、複数の API が 1 つの関数にどのように結合されているかを見ることはできません。結局、サンプル プロジェクトにアクセスしてコードを調べるか、問題について質問することしかできません。
DocC の対話型チュートリアルは、この問題を解決します。チュートリアルをドキュメントの一部として扱い、Xcode の開発者ドキュメント ウィンドウに直接配置します。チュートリアルは Markdown で書かれており、DocC ディレクティブを使用して構造を記述します。
このセッションでは、例として SlothCreator フレームワークを使用します。著者は最初に、ナマケモノの作成、ナマケモノの世話、他のフレームワークとの対話など、フレームワーク API をグループ化します。次に、これらのグループをチュートリアルの章に変えます。各章には複数のチュートリアルが含まれています。各チュートリアルはセクションとステップに分かれています。
ユーザーが読むのは、段階的に進めることができる学習パスです。最初に Xcode プロジェクトを作成し、次にフレームワークの依存関係を追加し、次に SwiftUI ビューを作成し、プレビュー スクリーンショットと比較して結果を確認します。
これにより、ドキュメントは「API の説明」から「API を使用するためのユーザーのトレーニング」に移行します。開発者が行う必要があることも非常に具体的です。ドキュメント カタログを準備し、チュートリアル ディレクトリ ファイルを作成し、チュートリアル ファイルを追加し、画像とコード ファイルを配置し、最後に [製品] > [ドキュメントのビルド] を使用してプレビューします。
##詳細
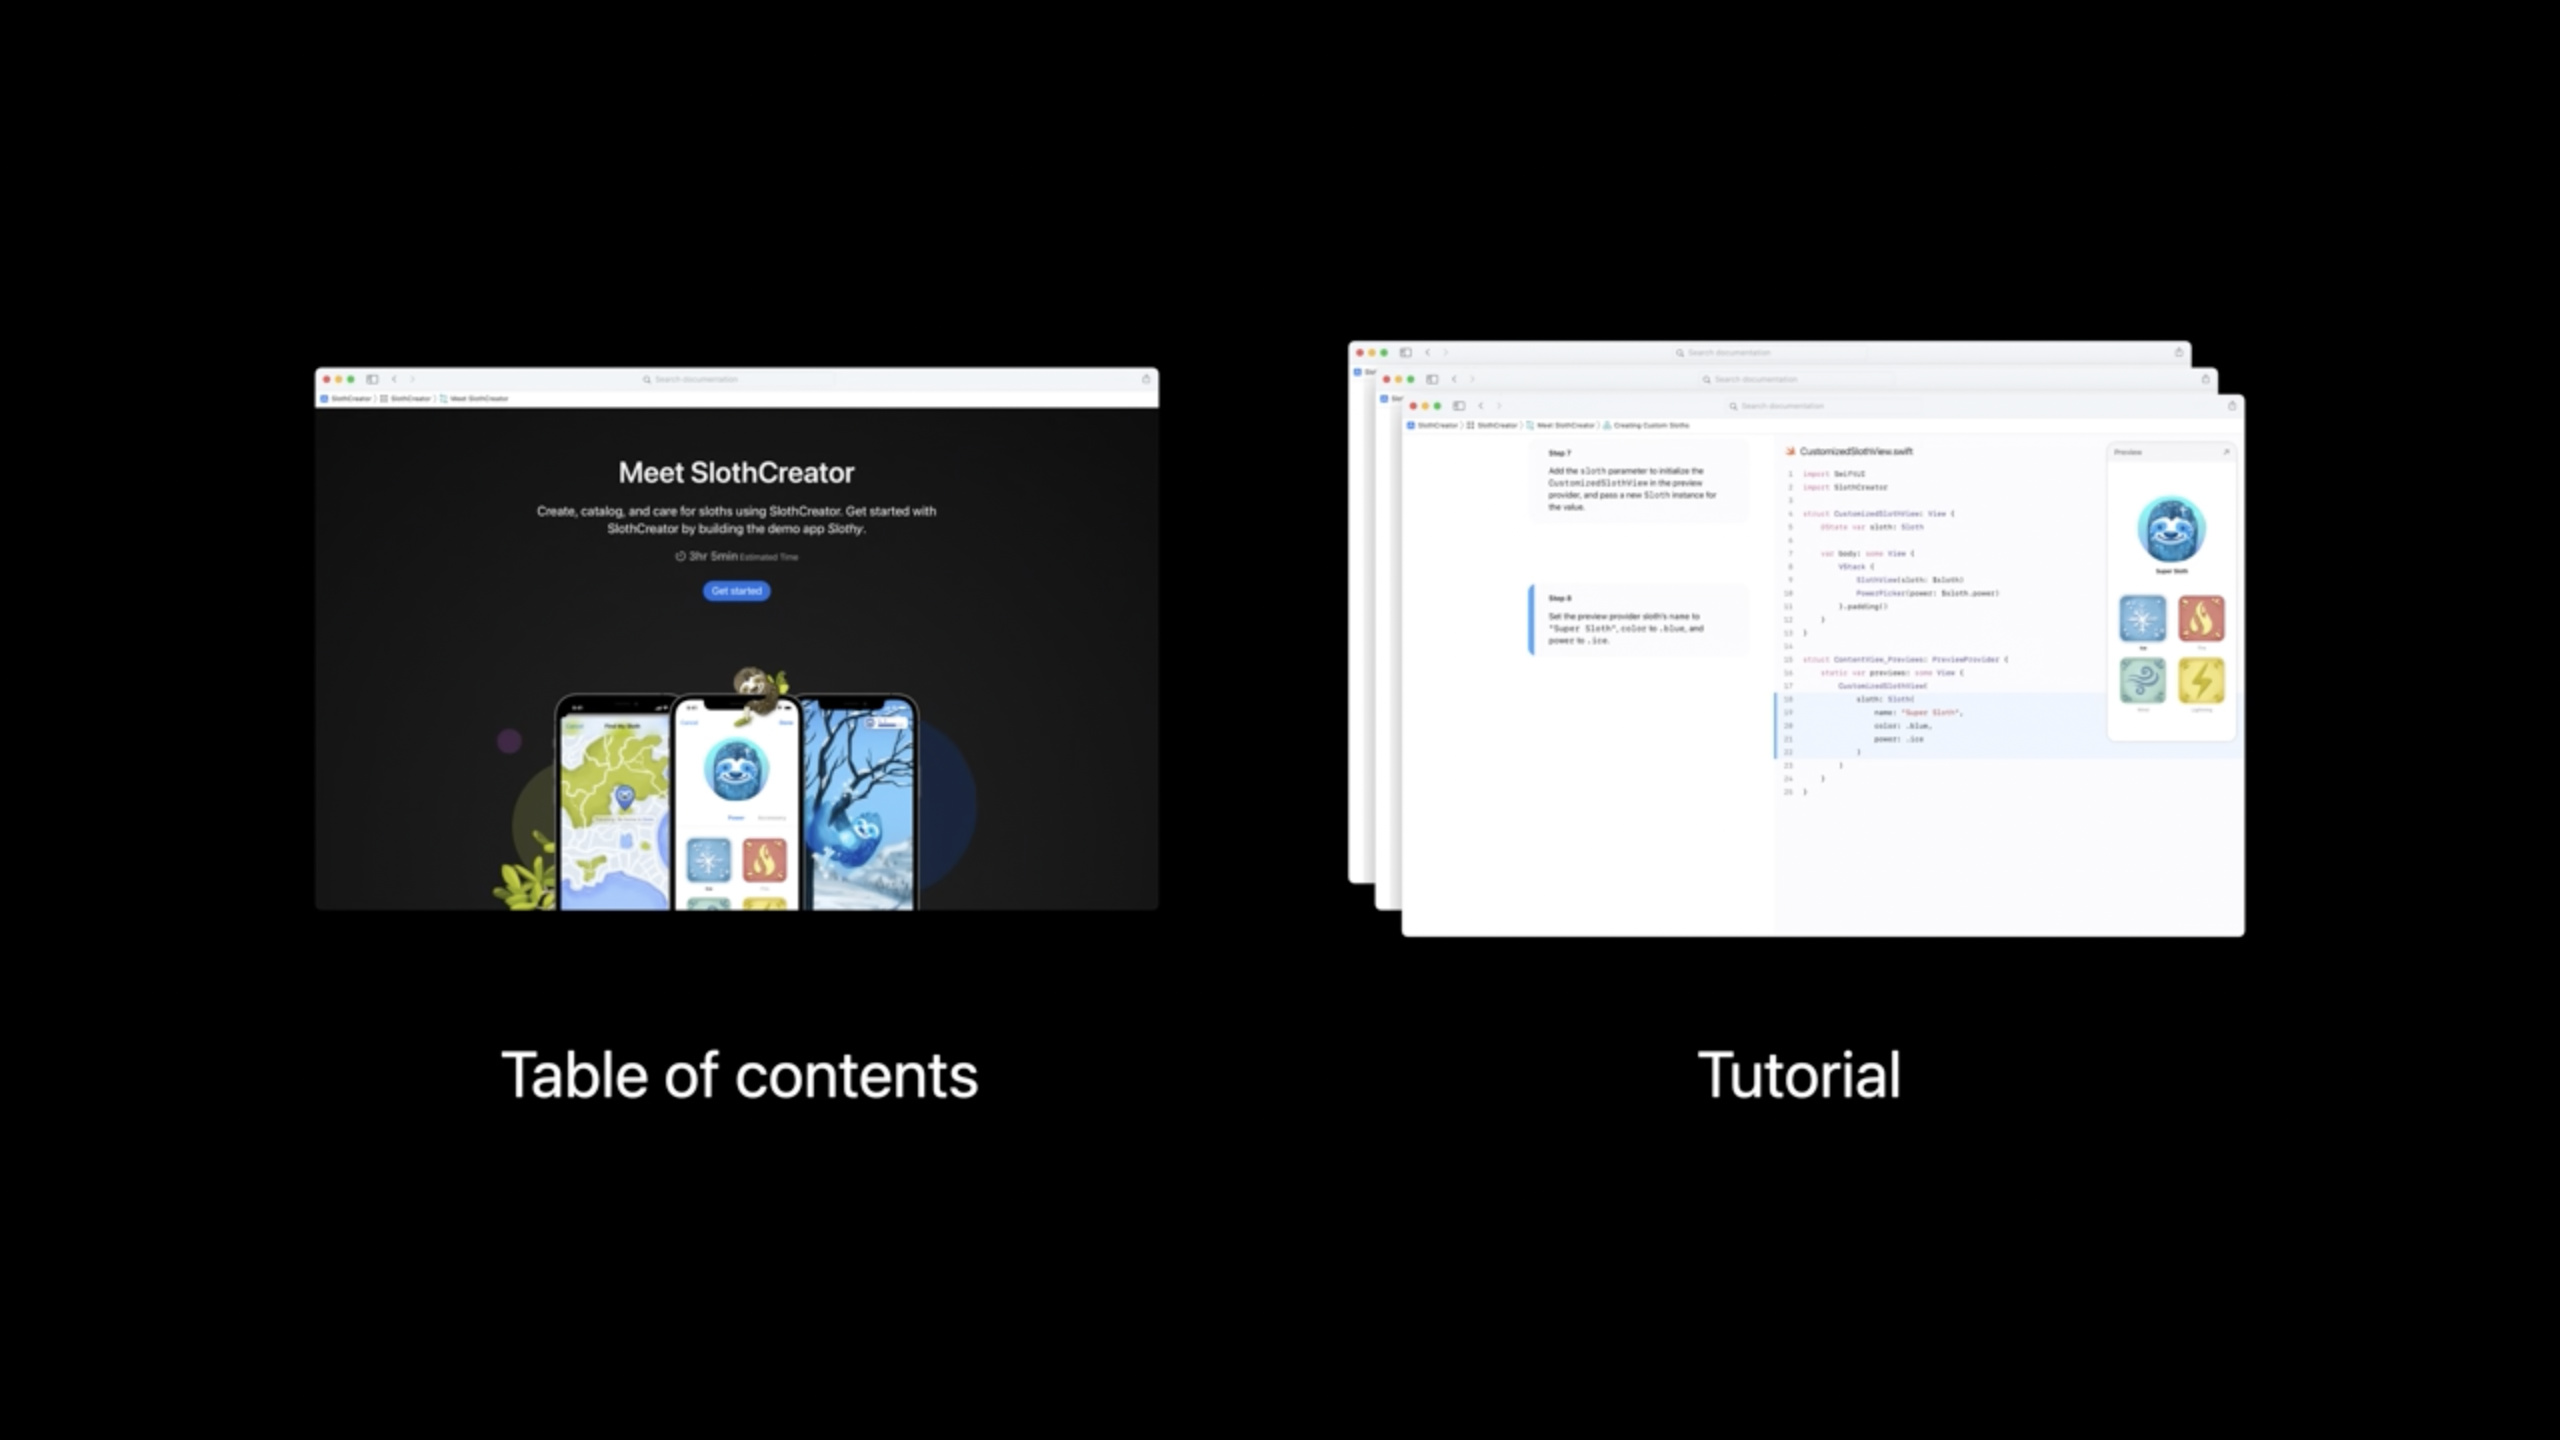
チュートリアル ディレクトリ: 使用します@Tutorials組織入口
(11:26)
DocC チュートリアル コレクションには目次ファイルが必要です。このファイルは、@Tutorialsrootコマンドとして。これには、概要、章、および特定のチュートリアルへのリンクが含まれています。
@Tutorials(name: "SlothCreator") {
    @Intro(title: "Meet SlothCreator") {
        Create, catalog, and care for sloths using SlothCreator. Get started with SlothCreator by building the demo app _Slothy_.

        @Image(source: slothcreator-intro.png, alt: "An illustration of 3 iPhones in portrait mode, displaying the UI of finding, creating, and taking care of a sloth in Slothy — the sample app that you build in this collection of tutorials.")
    }

    @Chapter(name: "SlothCreator Essentials") {
        @Image(source: chapter1-slothcreatorEssentials.png, alt: "A wireframe of an app interface that has an outline of a sloth and four buttons below the sloth. The buttons display the following symbols, from left to right: snowflake, fire, wind, and lightning.")

        Create custom sloths and edit their attributes and powers using SlothCreator.

        @TutorialReference(tutorial: "doc:Creating-Custom-Sloths")
    }
}
キーポイント:
@Tutorials(name: "SlothCreator")ドキュメント ナビゲーションに名前が表示されるチュートリアル コレクションを定義します。 -@Intro(title: "Meet SlothCreator")コレクションエントリのタイトルと紹介文を定義します。 -@Image(source:alt:)入り口に画像を追加し、アクセシビリティの説明を提供します。 -@Chapter(name:)チュートリアルを学習段階にグループ化します。 -@TutorialReference(tutorial:)個々のチュートリアル ファイルへのリンクは、DocC によってエントリと進行状況の情報を生成するために使用されます。
チュートリアル ファイル: タイトル、概要、写真から始める
(12:21)
Hannah は Xcode 13 で新しいチュートリアル ファイルを作成し、最初のチュートリアルに名前を付けましたCreating Custom Sloths。チュートリアル テンプレートにはすでにイントロ、セクション、ステップが含まれており、これに基づいてコンテンツを追加できます。
Creating Custom Slothsキーポイント:
- このタイトルはチュートリアル ページのメイン タイトルに対応します。
- Xcode のチュートリアル ファイル テンプレートは基本構造を生成し、作成者はタイトル、導入部分、および手順を置き換えるだけで済みます。
- タイトルは、ユーザーが完了したいタスクに対応している必要があります。この場合はカスタムのナマケモノを作成します。
(12:27)
チュートリアルの概要では、何を構築するかを読者に説明します。
This tutorial guides you through building _Slothy_ — an app for creating and caring for custom sloths. You'll start by building the sloth creation view.キーポイント:
- 最初の部分では、最終製品は次のとおりであると述べています。
_Slothy_アプリ。 - ダッシュの後に続くのは、アプリの実行内容です。カスタム ナマケモノの作成と管理です。
- 最後の文では、最初の段落の学習タスクであるナマケモノ作成ビューの構築について説明します。
-
_Slothy_DocC は、Markdown イタリック構文を使用して Markdown レンダリングを保持します。
(13:04)
チュートリアルでは、ドキュメント カタログ リソース フォルダーに配置された画像を参照できます。
creating-intro.pngキーポイント:
- ファイル名は
@Imageのsourceパラメータ。 - 画像リソースは、ドキュメント カタログの Resources フォルダーに配置されます。
- このセッションでは、読者が読んだり聞いたりすることでチュートリアルの内容を理解できるように、画像にアクセス可能な説明を追加することに重点を置いています。
セクションとステップ: 大きなタスクを実行可能なステップに分割する
(15:57)
最初のセクションでは、読者が Xcode プロジェクトを作成し、SlothCreator 依存関係を追加できるようにします。それぞれ@Stepたった 1 つのことを実行してスクリーンショットを撮るだけです。
@Step {
    Enter "Slothy" as the Product Name.

    @Image(source: creating-01-02.png, alt: "A screenshot of the project sheet, which shows the Product Name for the app being built as Slothy. The Interface is set to SwiftUI, and the Life Cycle is set to SwiftUI App.")
}

@Step {
    Select "SwiftUI" from the Interface pop-up menu and "SwiftUI App" from the Life Cycle pop-up menu, then click Next. Choose a location to save the Slothy project on your Mac.

    @Image(source: creating-01-03.png, alt: "A screenshot of the project sheet, which shows the Interface is set to SwiftUI and the Life Cycle is set to SwiftUI App.")
}

@Step {
    Add `SlothCreator` as a dependency to the project.

    @Image(source: creating-01-04.png, alt:"A screenshot shows the SlothCreator package in Xcode's navigator.")
}
キーポイント:
- それぞれ
@Stepコマンドテキストが含まれます。 - 最初のステップでは製品名を入力する必要がありますが、タスクの範囲は非常に狭いです。
- 2 番目のステップでは、SwiftUI インターフェイスと SwiftUI アプリのライフ サイクルを選択する必要があります。
- 3番目のステップでは次のことが必要です
SlothCreatorプロジェクトの依存関係を追加します。 - すべてのステップに従ってください
@Image、Xcode の状態で読者が見るべきものを示す図。 -altスクリーンショットのコンテンツを説明するテキスト。VoiceOver やその他の支援テクノロジーを提供します。
(16:09)
作成後、作成者は [製品] > [ドキュメントの作成] を使用するか、Ctrl+Shift+Command+D を押してドキュメントを作成します。 Xcode は開発者ドキュメント ウィンドウを開き、チュートリアルをプレビューします。
Product > Build Documentation
Control + Shift + Command + D
キーポイント:
Product > Build DocumentationXcode で DocC ドキュメントを構築します。 -Control + Shift + Command + D同じ操作のショートカットキーです。- ビルドが成功したら、開発者ドキュメント ウィンドウで目次、章、およびチュートリアルのページを確認できます。
- セッション内のサンプルには、章のリンク、チュートリアルの紹介、ステップから画像への切り替え、プレビューで確認できる推定完了時間が含まれています。
コードステップ: コードファイルとプレビュー画像をチュートリアルに挿入します。
(17:58)
2 番目のセクションでは、SwiftUI コードの記述を開始します。ドック@Codeディレクティブは、特定のステップに対応する Swift ファイルを表示できます。また、コードの前のステップと比較して、新しい部分を強調表示します。
@Section(title: "Add a customization view") {
    @ContentAndMedia(layout: horizontal) {
        Add the ability for users to customize sloths and select their powers.

        @Image(source: 01-creating-section2.png, alt: "An outline of a sloth surrounded by four power type icons. The power type icons are arranged in the following order, clockwise from the top: fire, wind, lightning, and ice.")
    }

    @Steps {
        @Step {
            Create a new SwiftUI View file named `CustomizedSlothView.swift`.

            @Code(name: "CustomizedSlothView.swift", file: 01-creating-code-02-01.swift) {
                @Image(source: preview-01-creating-code-02-01.png, alt: "A screenshot from the Xcode preview as it would appear on iPhone, with the text, Hello, World!, centered in the middle of the display.")
            }
        }

        @Step {
            Import the `SlothCreator` package.

            @Code(name: "<#display name#>", file: <#filename.swift#>)
        }
    }
}
キーポイント:
@Section(title:)チュートリアルのステージを定義します。 -@ContentAndMedia(layout: horizontal)キャプションと画像を水平方向に揃えてください。 -@Steps一連のステップをラップします。- 初め
@Step作成依頼CustomizedSlothView.swift。 @Code(name:file:)表示する Swift ファイルをポイントします。- ネストされている
@Code内で@ImageXcode プレビュー結果を表示します。 - 2番目
@Stepテンプレートのプレースホルダーが使用され、その後実際のファイル名に置き換えられます。
(19:05)
作成者は、2 番目のコード ステップの表示名を実際のファイル名に置き換えました。
CustomizedSlothView.swiftキーポイント:
- この値は次の目的で使用されます。
@Codeのnameパラメータ。 - コードステップの先頭に表示され、どのファイルが編集されているかを読者に伝えます。
- 名前は実際の Swift ファイルと一致しており、読者は Xcode ナビゲーターで直接見つけることができます。
(19:08)
コードの内容は別の Swift ファイルから取得されます。
01-creating-code-02-02.swiftキーポイント:
- この値は次の目的で使用されます。
@Codeのfileパラメータ。 - DocC は Swift ファイルを読み取り、チュートリアルの右側に表示します。
- このセッションでは、DocC が現在のコード ファイルと前のコード ファイルを比較し、新しいコードを強調表示することについて説明します。
(19:25)
引き続き後続の手順を使用します@Code各ステップの Swift ファイルを表示し、プレビューを使用して読者が結果を確認できるようにします。
@Step {
    Create a ``Sloth`` state variable called `sloth`.

    @Code(name: "CustomizedSlothView.swift", file: 01-creating-code-02-03.swift) {
         @Image(source: preview-01-creating-code-02-01.png, alt: "A screenshot from the Xcode preview as it would appear on iPhone, with the text, Hello, World!, centered in the middle of the display.")
    }
}

@Step {
    Delete the template `Text` view, then add a new `VStack` with trailing padding.

    This adds space around and between any views inside.

    @Code(name: "CustomizedSlothView.swift", file: 01-creating-code-02-04.swift) {
         @Image(source: preview-01-creating-code-02-04.png, alt: "A screenshot of a blank preview canvas.")
    }
}

@Step {
    Add a `SlothView`. Specify the `sloth` state variable for the view's `sloth` binding.

    @Code(name: "CustomizedSlothView.swift", file: 01-creating-code-02-05.swift) {
         @Image(source: preview-01-creating-code-02-04.png, alt: "A screenshot of a blank preview canvas.")
    }
}

@Step {
    Add a `PowerPicker`. Specify the `sloth`'s `power` for the picker view's `power` binding.

    @Code(name: "CustomizedSlothView.swift", file: 01-creating-code-02-06.swift) {
         @Image(source: preview-01-creating-code-02-04.png, alt: "A screenshot of a blank preview canvas.")
    }
}

The following steps display your customized sloth view in the SwiftUI preview.

@Step {
    Add the `sloth` parameter to initialize the `CustomizedSlothView` in the preview provider, and pass a new `Sloth` instance for the value.

    @Code(name: "CustomizedSlothView.swift", file: 01-creating-code-02-07.swift) {
         @Image(source: preview-01-creating-code-02-07.png, alt: "A portrait of a generic sloth displayed in the center of the canvas.")
    }
}

@Step {
    Set the preview provider sloth's `name` to `"Super Sloth"`, `color` to `.blue`, and `power` to `.ice`.

    @Code(name: "CustomizedSlothView.swift", file: 01-creating-code-02-08.swift) {
         @Image(source: preview-01-creating-code-02-08.png, alt: "A portrait of an ice sloth on top, followed by four power icons below. The power icons, clockwise from top left, include: ice, fire, wind, and lightning. The ice icon is selected.")
    }
}
キーポイント:
- 作成の最初のステップ
Sloth状態変数、および二重バッククォートを使用するSlothDocC シンボルへのリンク。 - 2 番目のステップはテンプレートを削除することです
Text、末尾にパディングがあるものに切り替えますVStack。 - 3 番目のステップは追加です。
SlothView、と置きますsloth状態変数が渡されますslothバインディング。 - ステップ 4 追加
PowerPicker、バインドsloth.power。 - 最後の 2 つの手順では、プレビューで特定のナマケモノの状態を表示できるように、SwiftUI プレビュー プロバイダーを調整します。
-
name、color、power値の例は次のとおりです。"Super Sloth"、.blue、.ice。
複数章のトレーニング: 一連の実際のタスクをチュートリアルでカバーします
(20:10)
1 つのチュートリアルでは、1 つの部分的なタスクのみを教えることができます。 SlothCreator の完全なチュートリアル コレクションには、3 つの章に分かれた 8 つのチュートリアルが含まれています。各章は、著者が以前に整理した API グループに対応しています。
@Chapter(name: "Sloth Health & Happiness") {
    @Image(source: chapter2-healthAndHappiness.png, alt: "A popover window pointing at a button with a leaf symbol on it. To the right of the leaf button, there is a button with a smiley face and a button with a dumbbell.")

    Discover how to track sloth's activity levels, measure their overall happiness, and feed them their favorite foods.

    @TutorialReference(tutorial: "doc:Feeding-Sloths")
    @TutorialReference(tutorial: "doc:Tracking-Sloth-Activity")
    @TutorialReference(tutorial: "doc:Measuring-Sloth-Happiness")
}

@Chapter(name: "Finding Hidden Sloths") {
    @Image(source: chapter3-findingHiddenSloths.png, alt: "An illustration of a radar scanning over a map. The map displays a pin with a smiley sloth face in the upper left quadrant.")

    Find sloths as they move around their neighborhoods and make friends.

    @TutorialReference(tutorial: "doc:Locating-Sloths")
    @TutorialReference(tutorial: "doc:Finding-Sloth-Habitats")
}
キーポイント:
Sloth Health & Happiness各章では、アクティビティ、幸福度、食事について説明します。- この章では、次の 3 つのチュートリアルを参照します。
Feeding-Sloths、Tracking-Sloth-Activity、Measuring-Sloth-Happiness。 Finding Hidden Sloths各章では位置と生息地について説明します。- この章では、次の 2 つのチュートリアルを参照します。
Locating-Sloths、Finding-Sloth-Habitats。 - 各章には写真と短い説明が含まれているため、読者はコンテンツ ページで学習パスを理解できます。
重要なポイント
-
やるべきこと: 「10 分間の入門」チュートリアルを Swift パッケージに追加します。 実行する価値がある理由: セッションのチュートリアルは実際のアプリから始まり、ユーザーはフレームワーク API がどのように連携して動作するかをすぐに確認できます。 開始方法: ドキュメント カタログに Tutorials フォルダーを作成し、
@Tutorialsディレクトリ、再利用@TutorialReference最初のチュートリアルへのリンク。 -
やるべきこと: 主要な API グループごとに章を設計します。 実行する価値がある理由: まず、SlothCreator API を作成、ケア、インタラクションの 3 つのグループに分割し、次にそれらのグループをチュートリアルの章に変えます。 開始方法: フレームワークの最も重要なタイプとビューをリストし、タスクごとにグループ化し、グループごとに 1 つずつ書きます。
@Chapter。 -
やるべきこと: インストール、構成、最初のコードを独立したステップに分割します。 実行する価値がある理由: セッションの最初のセクションでは、プロジェクトの作成と依存関係の追加のみを処理するため、新規ユーザーのエントリ コストが削減されます。 開始方法: 複数を使用する
@Step製品名、インターフェイス、ライフサイクル、パッケージの依存関係、その他のアクションを各ステップの図とともに明確に書き留めます。@Image。 -
内容: コードステップの Swift ファイルと Xcode プレビューのスクリーンショットを提供します。 実行する価値がある理由: DocC はコード ファイルを表示し、前のステップと比較し、新しいコードを強調表示できます。プレビュー画像を使用すると、読者が内容を理解できているかどうかを確認できます。 開始方法: 次を使用して、各ステップの Swift ファイルを準備します。
@Code(name:file:)もう一度引用します@Codeネストされたプレビュー@Image。 -
やるべきこと: チュートリアル画像のアクセシビリティの説明を完了します。 実行する価値がある理由: ハンナは、このチュートリアルは読むことと聞くことの両方で体験する必要があると明確に述べました。 開始方法: それぞれを確認してください
@Image、のためにaltタスクを完了するのに役立つ情報を画像に書き留めてください。
関連セッション
- Xcode で DocC ドキュメントを見る — DocC が Xcode で Swift フレームワークとパッケージのドキュメントを生成する方法を学びます。
- Xcode で DocC ドキュメントを強化する — DocC を使用して記事、目次、および拡張コンテンツを整理する方法を学びます。
- DocC ドキュメントのホストと自動化 — DocC ドキュメントの構築、ホスト、公開を自動化プロセスに統合します。
- 結果ビルダーを使用して Swift で DSL を作成する — 宣言構文の背後にある Swift 結果ビルダーの考え方を理解します。
コメント
GitHub Issues · utterances