
ハイライト
RealityKit 2 は、カスタム メタル シェーダ、後処理エフェクト、ダイナミック メッシュ API を開き、AR アプリケーションの視覚表現を「現実的」から「様式化された」ものにアップグレードします。
主な内容
RealityKit 1 のレンダリング パイプラインは閉じられています。開発者はマテリアル パラメータを調整できますが、頂点の変換やフラグメント シェーディングに干渉することはできません。これにより、創造的な表現が制限されます。
RealityKit 2 は、ジオメトリ モディファイア (頂点アニメーション)、サーフェス シェーダー (カスタム サーフェス シェーディング)、およびポスト プロセス (全画面後処理) の 3 つのレンダリング拡張ポイントを開きます。新しいダイナミック メッシュ API も追加され、実行時にジオメトリを作成および変更できるようになりました。
セッションは水中デモを使用してこれらの機能をデモンストレーションし続けています: 流れに応じて揺れる海草 (ジオメトリ モディファイア)、タコの色の変化 (サーフェス シェーダー)、水中の深さの霧 (コンピューティング ポスト プロセス)、ダイバーを囲むスパイラルの特殊効果 (ダイナミック メッシュ)。
##詳細
ジオメトリ モディファイア: 頂点アニメーション
ジオメトリ モディファイアは、フレームごとにモデルの頂点位置を変更する GPU 上で実行される Metal プログラムです。環境アニメーション、変形、パーティクル システム、掲示板エフェクトに適しています。
#include <RealityKit/RealityKit.h>

[[visible]]
void seaweedGeometry(realitykit::geometry_parameters params)
{
    float spatialScale = 8.0;
    float amplitude = 0.05;

    float3 worldPos = params.geometry().world_position();
    float3 modelPos = params.geometry().model_position();

    float phaseOffset = 3.0 * dot(worldPos, float3(1.0, 0.5, 0.7));
    float time = 0.1 * params.uniforms().time() + phaseOffset;

    float3 maxOffset = float3(
        sin(spatialScale * 1.1 * (worldPos.x + time)),
        sin(spatialScale * 1.2 * (worldPos.y + time)),
        sin(spatialScale * 1.2 * (worldPos.z + time))
    );

    float3 offset = maxOffset * amplitude * max(0.0, modelPos.y);
    params.geometry().set_model_position_offset(offset);
}
キーポイント:
- 機能タグ
[[visible]]、引き継ぐrealitykit::geometry_parameters(04:52) params.uniforms().time()現在時刻を取得するparams.geometry().world_position()空間的に一貫したアニメーションを実現するために頂点の世界座標を取得するparams.geometry().model_position()アニメーションの強度 (底部固定など) を制御するために使用される、モデルのローカル座標を取得します。set_model_position_offset()頂点オフセットを設定する
func assignSeaweedShader(to seaweed: ModelEntity) {
    let library = MTLCreateSystemDefaultDevice()!.makeDefaultLibrary()!
    let geometryModifier = CustomMaterial.GeometryModifier(
        named: "seaweedGeometry",
        in: library
    )

    seaweed.model!.materials = seaweed.model!.materials.map { baseMaterial in
        try! CustomMaterial(from: baseMaterial, geometryModifier: geometryModifier)
    }
}
キーポイント:
- デフォルトの Metal ライブラリからシェーダをロード (05:43)
CustomMaterial(from:geometryModifier:)元の材料特性を継承し、幾何学修飾子のみを追加します- 各マテリアルは個別に変換する必要があります
サーフェス シェーダー: サーフェスの外観をカスタマイズする
サーフェイス シェーダーはフラグメント段階で実行され、表示される各ピクセルの外観を定義します。色、法線、粗さ、金属性などの表面プロパティを変更できます。
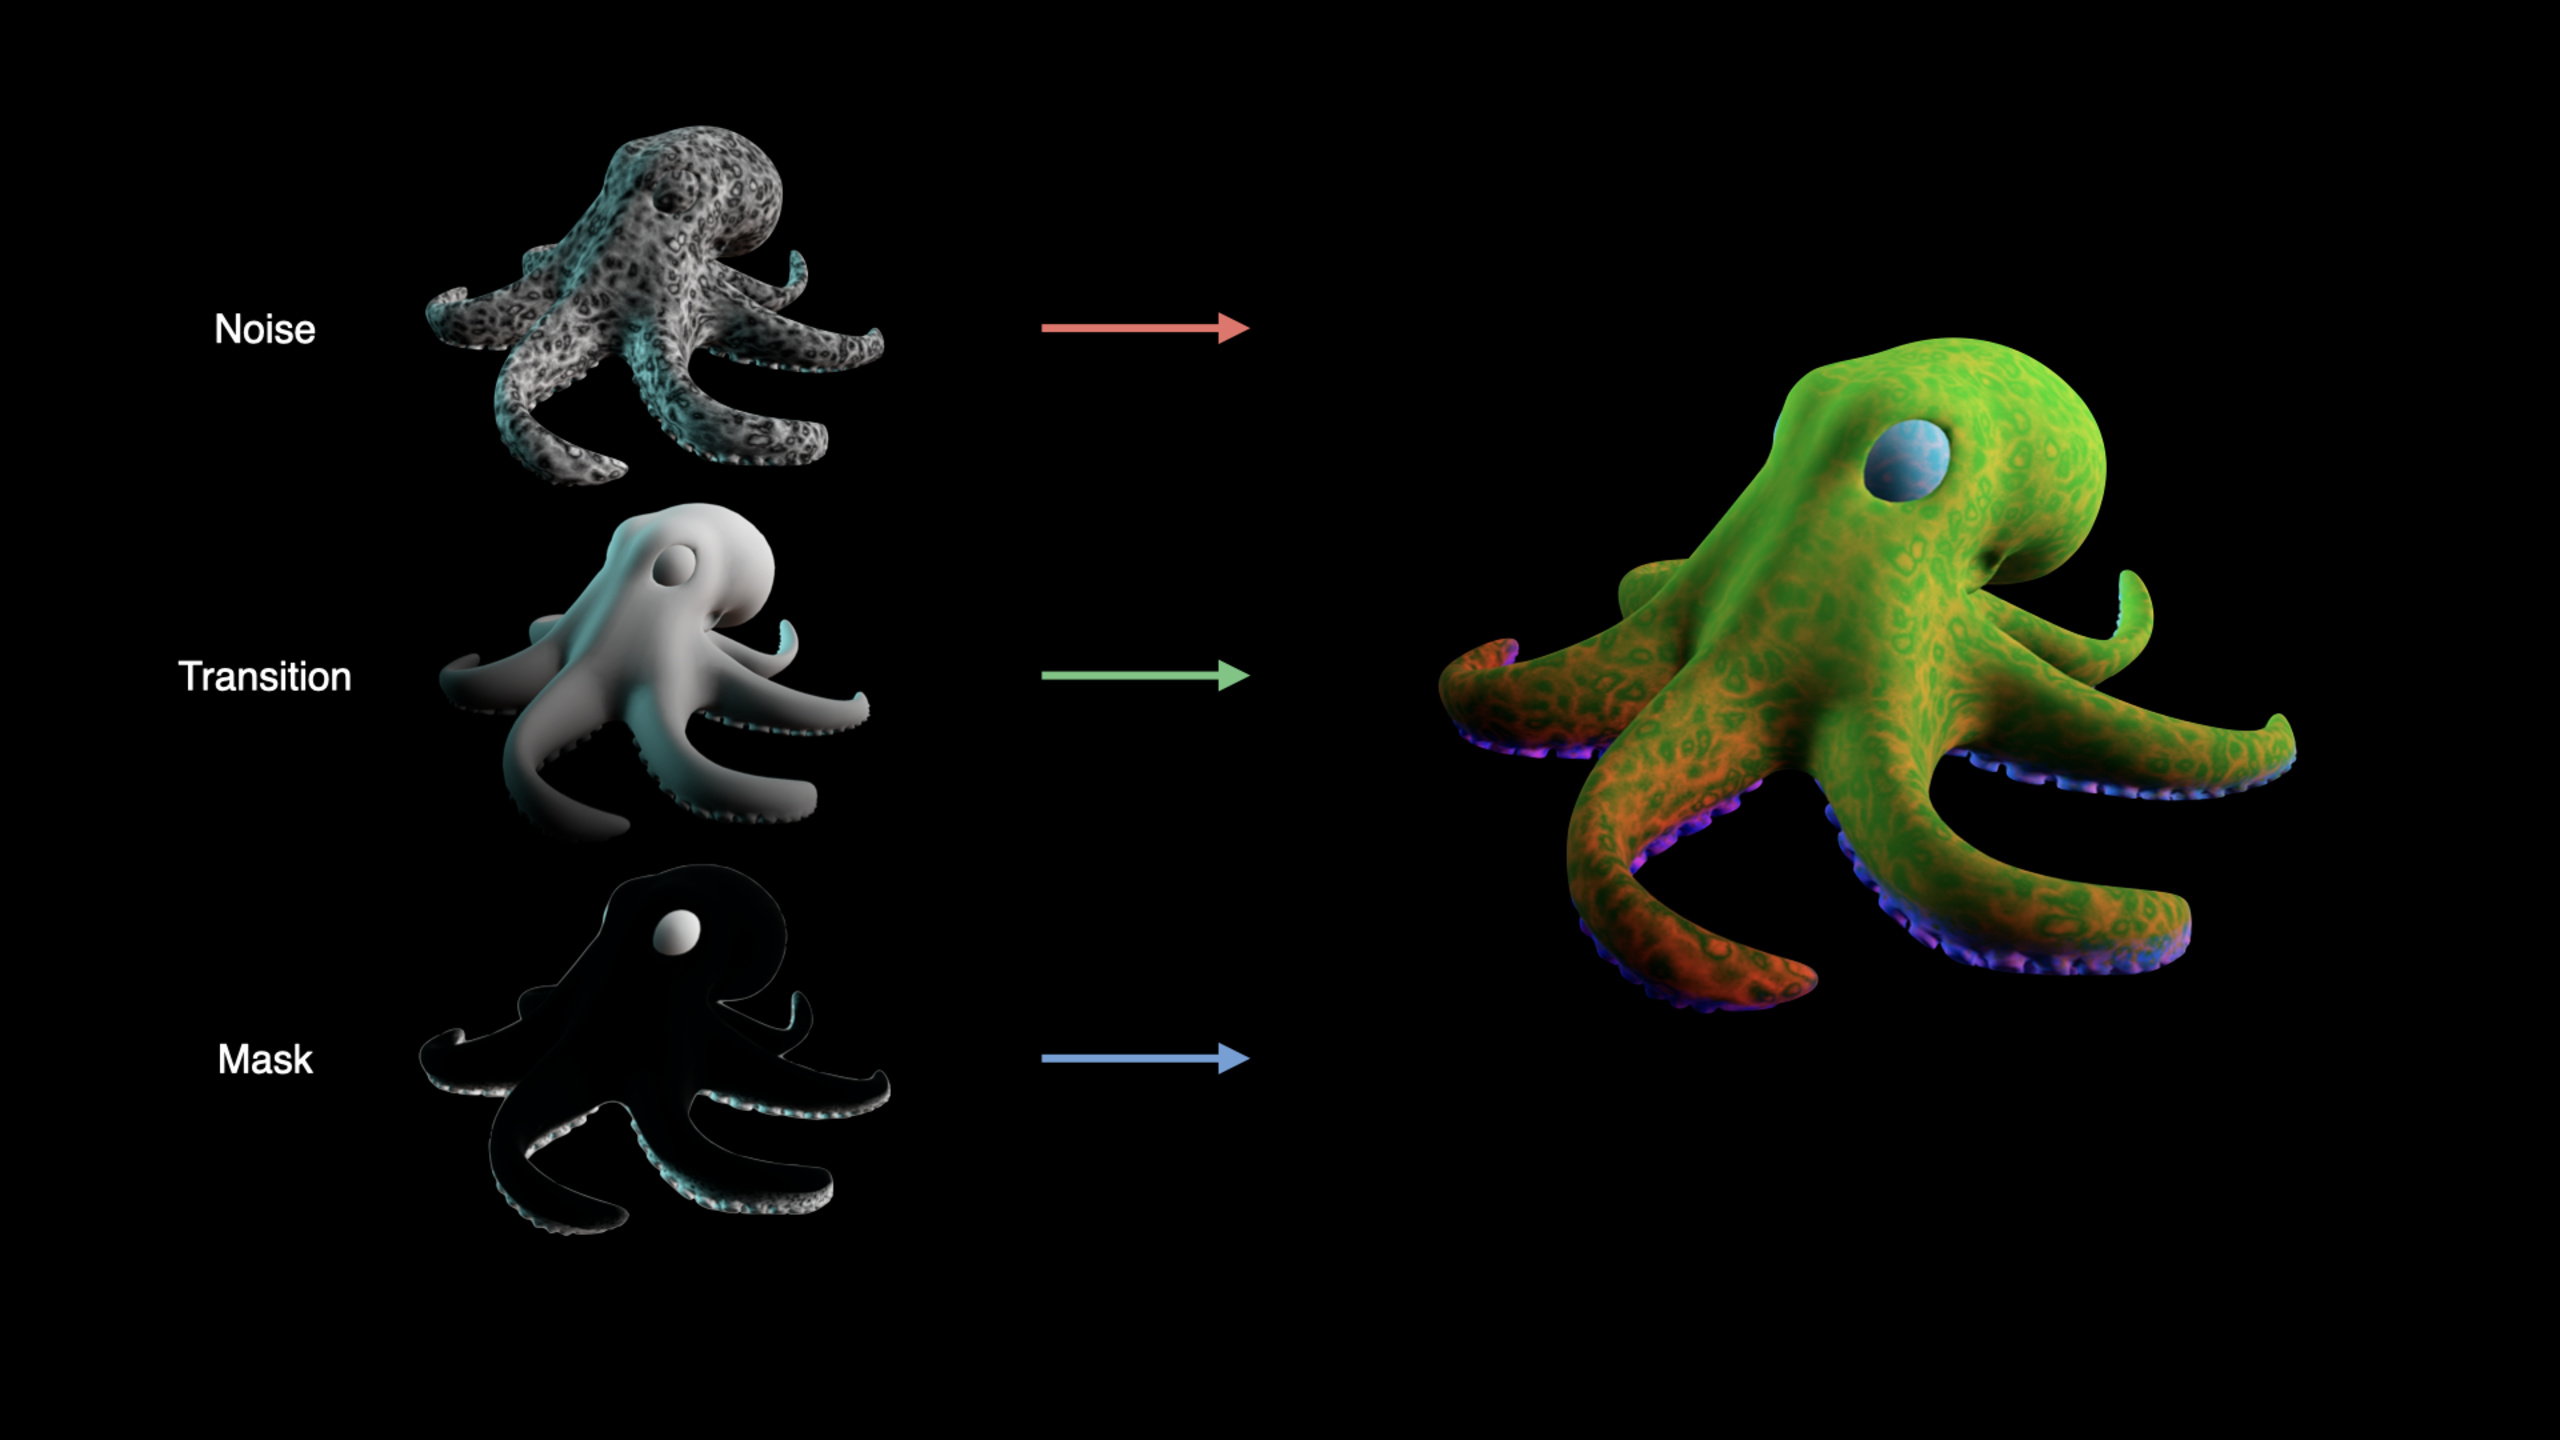
デモのタコは、紫と赤の 2 つの外観の間で切り替わります。トランジション効果は、3 チャンネルのマスク テクスチャを使用して制御されます。
[[visible]]
void octopusSurface(realitykit::surface_parameters params)
{
    constexpr sampler bilinear(filter::linear);
    auto tex = params.textures();
    auto surface = params.surface();
    auto material = params.material_constants();

    // USD 纹理的 Y 轴需要翻转
    float2 uv = params.geometry().uv0();
    uv.y = 1.0 - uv.y;

    // 采样 mask 纹理(噪声 + 渐变 + 遮罩)
    half3 mask = tex.custom().sample(bilinear, uv).rgb;

    half blend, colorBlend;
    transitionBlend(params.uniforms().time(), mask, blend, colorBlend);

    // 采样两种颜色纹理并混合
    half3 baseColor1 = tex.base_color().sample(bilinear, uv).rgb;
    half3 baseColor2 = tex.emissive_color().sample(bilinear, uv).rgb;
    half3 blendedColor = mix(baseColor1, baseColor2, colorBlend);
    blendedColor *= half3(material.base_color_tint());
    surface.set_base_color(blendedColor);

    // 法线贴图
    half3 texNormal = tex.normal().sample(bilinear, uv).rgb;
    half3 normal = realitykit::unpack_normal(texNormal);
    surface.set_normal(float3(normal));

    // 材质属性
    half roughness = tex.roughness().sample(bilinear, uv).r;
    half metallic = tex.metallic().sample(bilinear, uv).r;
    half ao = tex.ambient_occlusion().sample(bilinear, uv).r;

    roughness *= material.roughness_scale();
    roughness *= (1 + blend); // 红色状态更粗糙
    metallic *= material.metallic_scale();

    surface.set_roughness(roughness);
    surface.set_metallic(metallic);
    surface.set_ambient_occlusion(ao);
}
キーポイント:
- サーフェイスシェーダーが受け取る
realitykit::surface_parameters(09:21) params.textures()以下を含むマテリアル テクスチャにアクセスします。base_color()、normal()、roughness()、custom()待ってparams.material_constants()コードによって設定された材料パラメータにアクセスする- USD テクスチャの Y 座標を反転する必要があります (
uv.y = 1.0 - uv.y) realitykit::unpack_normal()法線マップをデコードする- 空のサーフェス シェーダーはモデルを灰色にします (09:30)。開発者は出力を完全に制御できます。
func assignOctopusShader(to octopus: ModelEntity) {
    let color2 = try! TextureResource.load(named: "Octopus/Octopus_bc2")
    let mask = try! TextureResource.load(named: "Octopus/Octopus_mask")
    let surfaceShader = CustomMaterial.SurfaceShader(named: "octopusSurface", in: library)

    octopus.model!.materials = octopus.model!.materials.map { baseMaterial in
        let material = try! CustomMaterial(from: baseMaterial, surfaceShader: surfaceShader)
        material.emissiveColor.texture = .init(color2)
        material.custom.texture = .init(mask)
        return material
    }
}
キーポイント:
CustomMaterial.SurfaceShaderサーフェス シェーダのロード (11:41)- 追加のテクスチャが割り当てられています
emissiveColorそしてcustomスロット - ジオメトリ モディファイアとサーフェス シェーダを組み合わせて使用できます
後処理: カスタマイズされた後処理
後処理は、各フレームがレンダリングされた後に実行されます。入力はカラー テクスチャと深度バッファであり、出力はターゲット カラー テクスチャです。
コアイメージの後処理
func initPostEffect(arView: ARView) {
    arView.renderCallbacks.prepareWithDevice = { [weak self] device in
        self?.prepareWithDevice(device)
    }
    arView.renderCallbacks.postProcess = { [weak self] context in
        self?.postProcess(context)
    }
}

func prepareWithDevice(_ device: MTLDevice) {
    self.ciContext = CIContext(mtlDevice: device)
}

func postProcess(_ context: ARView.PostProcessContext) {
    let sourceColor = CIImage(mtlTexture: context.sourceColorTexture)!
    let thermal = CIFilter.thermal()
    thermal.inputImage = sourceColor

    let destination = CIRenderDestination(
        mtlTexture: context.targetColorTexture,
        commandBuffer: context.commandBuffer
    )
    destination.isFlipped = false

    _ = try? self.ciContext?.startTask(
        toRender: thermal.outputImage!,
        to: destination
    )
}
キーポイント:
prepareWithDevice初期化中に 1 回呼び出され、テクスチャとパイプラインの作成に適しています (14:13)postProcessフレームごとに呼び出されますcontext.sourceColorTextureは入力色です。context.targetColorTexture出力ですcontext.commandBufferMetal コマンドのバッファリングを提供します- Core Image は何百もの既製のエフェクトを提供します
メタル パフォーマンス シェーダー: ブルーム エフェクト
func postProcess(_ context: ARView.PostProcessContext) {
    if self.bloomTexture == nil {
        self.bloomTexture = self.makeTexture(matching: context.sourceColorTexture)
    }

    // 1. 阈值过滤:亮度低于 20% 的像素置零
    let brightness = MPSImageThresholdToZero(
        device: context.device,
        thresholdValue: 0.2,
        linearGrayColorTransform: nil
    )
    brightness.encode(
        commandBuffer: context.commandBuffer,
        sourceTexture: context.sourceColorTexture,
        destinationTexture: bloomTexture!
    )

    // 2. 高斯模糊
    let gaussianBlur = MPSImageGaussianBlur(device: context.device, sigma: 9.0)
    gaussianBlur.encode(
        commandBuffer: context.commandBuffer,
        inPlaceTexture: &bloomTexture!
    )

    // 3. 叠加原图和 bloom
    let add = MPSImageAdd(device: context.device)
    add.encode(
        commandBuffer: context.commandBuffer,
        primaryTexture: context.sourceColorTexture,
        secondaryTexture: bloomTexture!,
        destinationTexture: context.targetColorTexture
    )
}
キーポイント:
- MPS は高度に最適化された画像処理オペレーターを提供します (16:15)
MPSImageThresholdToZeroハイライトされた領域を抽出するMPSImageGaussianBlurぼやけた拡散グローMPSImageAddオーバーレイ ブルームを元の画像に戻す
SpriteKit の後処理
func prepareWithDevice(_ device: MTLDevice) {
    self.skRenderer = SKRenderer(device: device)
    self.skRenderer.scene = SKScene(fileNamed: "GameScene")
    self.skRenderer.scene!.scaleMode = .aspectFill
    self.skRenderer.scene!.backgroundColor = .clear
}

func postProcess(context: ARView.PostProcessContext) {
    // 复制源纹理到目标
    let blitEncoder = context.commandBuffer.makeBlitCommandEncoder()
    blitEncoder?.copy(from: context.sourceColorTexture, to: context.targetColorTexture)
    blitEncoder?.endEncoding()

    // 更新 SpriteKit 场景
    self.skRenderer.update(atTime: context.time)

    // 在目标纹理上渲染 SpriteKit
    let desc = MTLRenderPassDescriptor()
    desc.colorAttachments[0].loadAction = .load
    desc.colorAttachments[0].storeAction = .store
    desc.colorAttachments[0].texture = context.targetColorTexture

    self.skRenderer.render(
        withViewport: CGRect(...),
        commandBuffer: context.commandBuffer,
        renderPassDescriptor: desc
    )
}
キーポイント:
- SpriteKit は 3D シーンに 2D エフェクトをオーバーレイするのに適しています (17:15)
- 背景を透明にして、3D コンテンツが透けて見えるようにします
loadAction = .load既存のコンテンツ (3D レンダリング結果) を保持する
カスタム コンピューティング シェーダー: デプス フォグ
水中デモの深度フォグは、ARKit の実際のシーンの深度と RealityKit の仮想コンテンツの深度を組み合わせる必要があります。
typedef struct {
    simd_float4x4 viewMatrixInverse;
    simd_float4x4 viewMatrix;
    simd_float2x2 arTransform;
    simd_float2 arOffset;
    float fogMaxDistance;
    float fogMaxIntensity;
    float fogExponent;
} DepthFogParams;

float linearizeDepth(float sampleDepth, float4x4 viewMatrix) {
    float d = max(1e-5f, sampleDepth);
    d = abs(-viewMatrix[3].z / d); // 反无限远 Z 投影
    return d;
}

[[kernel]]
void depthFog(uint2 gid [[thread_position_in_grid]],
              constant DepthFogParams& args [[buffer(0)]],
              texture2d<half, access::sample> inColor [[texture(0)]],
              texture2d<float, access::sample> inDepth [[texture(1)]],
              texture2d<half, access::write> outColor [[texture(2)]],
              depth2d<float, access::sample> arDepth [[texture(3)]])
{
    const half4 fogColor = half4(0.5, 0.5, 0.5, 1.0);

    float2 coords = float2(gid) / float2(inDepth.get_width(), inDepth.get_height());
    float2 arDepthCoords = args.arTransform * coords + args.arOffset;

    float realDepth = arDepth.sample(textureSampler, arDepthCoords);
    float virtualDepth = linearizeDepth(inDepth.sample(textureSampler, coords)[0], args.viewMatrix);

    float depth = min(virtualDepth, realDepth);
    float fogAmount = saturate(depth / args.fogMaxDistance);
    float fogBlend = pow(fogAmount, args.fogExponent) * args.fogMaxIntensity;

    half4 nearColor = inColor.read(gid);
    half4 color = mix(nearColor, fogColor, fogBlend);
    outColor.write(color, gid);
}
キーポイント:
- ARKit
sceneDepth実際のシーンの距離 (メートル)、低解像度 (18:23) を提供します。 - RealityKit 深度バッファは、Reverse Infinite-Z を使用します。0 は無限を意味し、1 は平面に近いことを意味します (19:40)
- 線形化の式:
abs(-viewMatrix[3].z / sampledDepth)(20:01) - 両方が正しく霧化されていることを確認するために、実際の深度と仮想深度の最小値を取得します。
- 使用
saturate霧の濃度曲線を制御するためのべき乗関数
動的グリッド
グリッドチェック
extension MeshResource.Contents {
    func forEachVertex(_ callback: (SIMD3<Float>) -> Void) {
        for instance in self.instances {
            guard let model = self.models[instance.model] else { continue }
            let instanceToModel = instance.transform
            for part in model.parts {
                for position in part.positions {
                    let vertex = instanceToModel * SIMD4<Float>(position, 1.0)
                    callback([vertex.x, vertex.y, vertex.z])
                }
            }
        }
    }
}
キーポイント:
MeshResource.Contentsインスタンスとモデルが含まれます (23:32)- モデルは元の頂点データを保存し、インスタンスはモデルを参照して変換をアタッチします。
- 部品は材料ごとにグループ化されたジオメトリです
- 頂点をトラバースするときにインスタンス変換を適用してワールド座標を取得します
グリッドの作成
extension MeshResource {
    static func generateSpiral(
        radiusAt: (Float)->Float,
        radiusAtIndex: (Float)->Float,
        thickness: Float,
        height: Float,
        revolutions: Int,
        segmentsPerRevolution: Int
    ) -> MeshResource {
        let totalSegments = revolutions * segmentsPerRevolution
        var positions: [SIMD3<Float>] = []
        var normals: [SIMD3<Float>] = []
        var indices: [UInt32] = []
        var uvs: [SIMD2<Float>] = []

        for i in 0..<totalSegments {
            let theta = Float(i) / Float(segmentsPerRevolution) * 2 * .pi
            let t = Float(i) / Float(totalSegments)
            let segmentY = t * height

            if i > 0 {
                let base = UInt32(positions.count - 2)
                indices.append(contentsOf: [
                    base, base + 3, base + 1, // 第一个三角形
                    base, base + 2, base + 3  // 第二个三角形
                ])
            }

            let radialDirection = SIMD3<Float>(cos(theta), 0, sin(theta))
            let radius = radiusAtIndex(t)
            var position = radialDirection * radius
            position.y = segmentY

            positions.append(position)
            positions.append(position + [0, thickness, 0])
            normals.append(-radialDirection)
            normals.append(-radialDirection)
            uvs.append(.init(0.0, t))
            uvs.append(.init(1.0, t))
        }

        var mesh = MeshDescriptor()
        mesh.positions = .init(positions)
        mesh.normals = .init(normals)
        mesh.primitives = .triangles(indices)
        mesh.textureCoordinates = .init(uvs)

        return try! MeshResource.generate(from: [mesh])
    }
}
キーポイント:
MeshDescriptor幾何学的データの記述: 位置、法線、プリミティブ、テクスチャ座標 (26:37)MeshResource.generate(from:)RealityKit のグリッド プロセッサを呼び出して自動的に最適化します- プロセッサは重複した頂点をマージし、四角形/ポリゴンを三角形化し、最も効率的な形式を選択します。
- 法線とテクスチャ座標はオプションで、プロセッサが法線を自動的に生成します
グリッドを更新する
if var contents = spiralEntity?.model?.mesh.contents {
    contents.models = .init(contents.models.map { model in
        var newModel = model
        newModel.parts = .init(model.parts.map { part in
            let start = min(self.allIndices.count, max(0, numIndices - stripeSize))
            let end = max(0, min(self.allIndices.count, numIndices))
            var newPart = part
            newPart.triangleIndices = .init(self.allIndices[start..<end])
            return newPart
        })
        return newModel
    })
    try? spiralEntity?.model?.mesh.replace(with: contents)
}
キーポイント:
- 頻繁に更新する場合は直接変更してください
MeshResource.Contents再生より効率的 (28:17) mesh.replace(with:)既存のグリッドを新しいコンテンツに置き換えます- 注: パス
MeshDescriptor作成されたメッシュは最適化され、トポロジが変更される可能性があります - 更新する前に、グリッド トポロジに対する最適化の影響を理解する必要があります。
重要ポイント
-
ジオメトリ モディファイアは環境アニメーションを実装します: 海草、木、旗、その他のオブジェクトの自然な揺れは骨格アニメーションを必要とせず、正弦波シェーダーで実現できます。ワールド座標を入力として使用すると、隣接するオブジェクトが一貫してアニメーション化されます。
-
Surface Shader により様式化されたレンダリングが可能: リアルから漫画まで、金属からクリスタルに至るまで、Surface Shader を使用すると、各ピクセルの最終的な外観を完全に制御できます。マスク テクスチャ + 時間パラメータにより、複雑なトランジション エフェクトを作成できます。
-
後処理による現実と仮想の統合: デプス フォグ エフェクトは、現実のシーン (ARKit 深度) と仮想オブジェクト (RealityKit 深度) の両方に作用し、2 つを視覚的に統合します。これが AR の没入の鍵となります。
-
特殊効果ジオメトリにはダイナミック メッシュが使用されます: スパイラル、粒子軌道、成長アニメーションなどの特殊効果ジオメトリには、プリセット モデル ファイルは必要ありません。使用
MeshDescriptorを使用して手続き的に生成replace効率的なアップデート。 -
複数のテクノロジーを組み合わせてユニークなエクスペリエンスを作成: ジオメトリ モディファイア + サーフェス シェーダー + ポスト プロセス + ダイナミック メッシュを組み合わせて、無限の可能性を生み出すことができます。水中デモは、4 つのテクノロジーが同時に使用されている例です。
関連セッション
- RealityKit 2 の詳細 — ECS、アニメーション、キャラクター コントローラーなど、RealityKit 2 のコア機能の更新
- オブジェクト キャプチャで 3D モデルを作成 — 写真から 3D モデルを作成して、カスタム シェーダーのマテリアルを提供します
- Render with Metal — カスタム シェーダを作成するための基礎を築くメタル レンダリング パイプライン
- ARKit 5 を探索する — ARKit 5 の深度およびシーン理解機能
コメント
GitHub Issues · utterances