
Highlight
UITextView and NSTextView now expose internal TextKit hooks, allowing developers to add custom behaviors such as line numbers and collapsible sections without giving up framework-provided editing features like selection, undo, and dictation.
Core Content
Text editing on Apple platforms has long felt like a choice between two paths: use UITextView or NSTextView, or build everything yourself.
Framework text views work out of the box. Text input, selection, accessibility, undo and redo, dictation, inline predictions: all of these come for free. The cost is limited customization. Want to change how line numbers are drawn? Want to add custom views next to text? That has been difficult.
The other option is to build a custom text view from scratch with TextKit. You set up NSTextLayoutManager, handle viewport layout yourself, and render every piece of content yourself. You get full control, but you lose all of the features the framework gave you. Building a production-grade text editor on your own is not a small project.
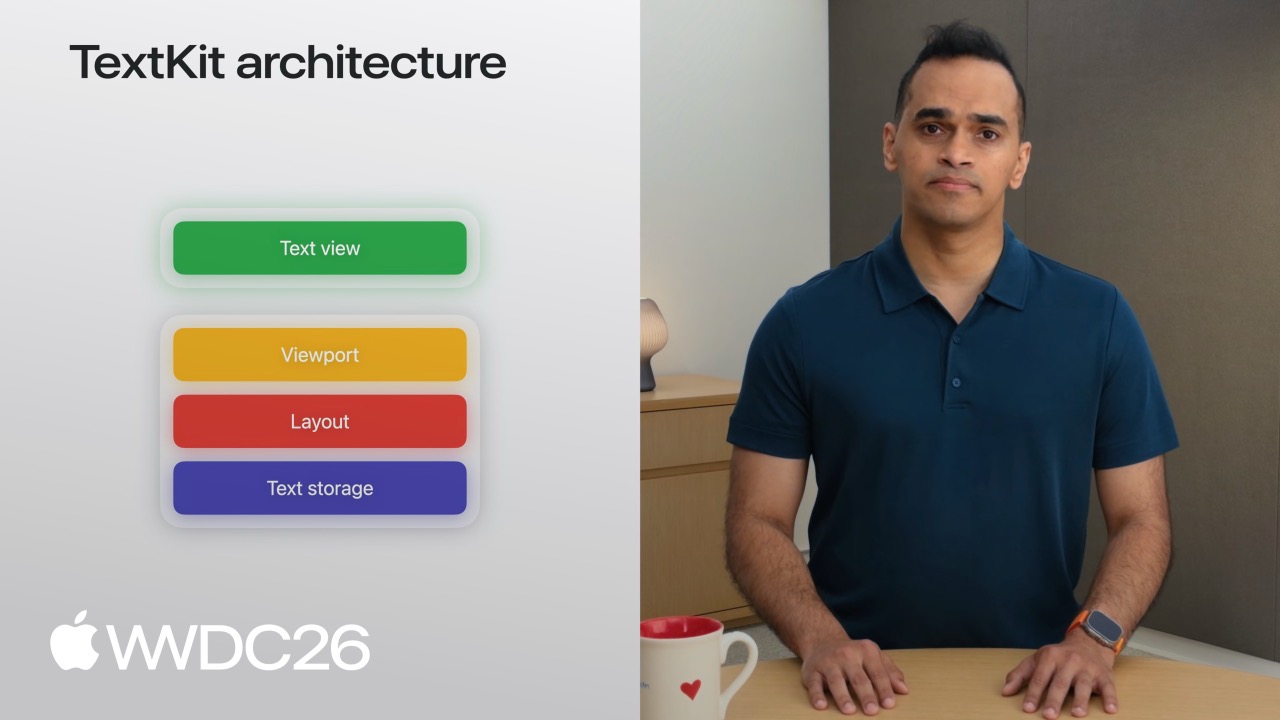
TextKit’s four-layer architecture explains this dilemma: the storage layer holds text data, the layout layer chunks and measures it, the viewport layer tracks visible content, and the view layer performs the actual rendering. The first three layers are shared across frameworks, but the view layer is your own.
The 2027 update breaks through this wall. UITextView and NSTextView now conform to NSTextViewportLayoutControllerDelegate, so you can subclass them and override viewport layout callbacks. This means you can inject your own drawing logic while retaining all framework behavior.
Details
TextKit architecture recap
TextKit’s rendering flow has four layers (00:17):
- Storage layer:
NSTextContentStoragedecomposes anNSAttributedStringintoNSTextParagraphobjects. - Layout layer:
NSTextLayoutManagermeasures glyphs and creates immutableNSTextLayoutFragmentvalues. - Viewport layer:
NSTextViewportLayoutControllertracks the visible region and renders only what the user can see. - View layer: The
UIView,NSView, orCALayerthat actually renders text.
The core idea is on-demand rendering: viewport layout only processes layout fragments that intersect the current scroll position.
New Rendering Surface API
Before 2027, TextKit had no unified way to refer to a target rendering view (09:47). Two new protocols solve this problem:
class MyView: UIView, NSTextViewportRenderingSurface {}Key points:
NSTextViewportRenderingSurface: represents a drawable visual element inside the viewport.NSTextViewportRenderingSurfaceKey: uniquely identifies a rendering surface;NSTextLayoutFragmentcan be used as the key.
Use NSMapTable as a cache:
var cache: NSMapTable<NSTextLayoutFragment, MyView>This lets you track the rendering view corresponding to each layout fragment during viewport layout.
Using UITextView in SwiftUI
SwiftUI’s TextEditor is suitable for simple scenarios, but sometimes you need the full capability of UITextView (12:39):
import SwiftUI

struct MyTextView: View {
    var body: some View { TextViewRepresentable() }
}

#if os(macOS)
struct TextViewRepresentable: NSViewRepresentable {
    func makeNSView(context: Context) -> NSTextView {
      NSTextView()
    }
    func updateNSView(_ nsView: NSTextView, context: Context) {}
}
#else
struct TextViewRepresentable: UIViewRepresentable {
    func makeUIView(context: Context) -> UITextView {
        UITextView()
    }
    func updateUIView(_ uiView: UITextView, context: Context) {}
}
#endif
Key points:
- Use
NSViewRepresentableon macOS, andUIViewRepresentableon iOS or Mac Catalyst. - Initialize the text view in the
makemethod. - Keep the view synchronized in the
updatemethod.
Adding line numbers
The first example in the talk builds a code editor for iPad and adds line numbers (13:33):
import UIKit

class TextView: UITextView {}

class ContainerView: UIView {
    let textView = TextView()
    let lineNumberView = UIView()

    textView.font = UIFont.monospacedSystemFont
}
The core is to override three viewport controller delegate methods in TextView (14:42):
class TextView: UITextView {
    // Setup phase: reset state and calculate the starting line number
    override func textViewportLayoutControllerWillLayout(_ textViewportLayoutController: NSTextViewportLayoutController) {
        super.textViewportLayoutControllerWillLayout(textViewportLayoutController)
        // ...
    }

    // Collect position information for each paragraph
    override func textViewportLayoutController(_ textViewportLayoutController: NSTextViewportLayoutController, configureRenderingSurfaceFor textLayoutFragment: NSTextLayoutFragment) {
        super.textViewportLayoutController(textViewportLayoutController, configureRenderingSurfaceFor: textLayoutFragment)
        // ...
    }

    // Pass accumulated information to ContainerView
    override func textViewportLayoutControllerDidLayout(_ textViewportLayoutController: NSTextViewportLayoutController) {
        super.textViewportLayoutControllerDidLayout(textViewportLayoutController)
        // ...
    }
}
Calculate the starting line number with enumerateTextElements (15:59):
func startingLineNumber(for viewportRange: NSTextRange?) -> Int {
    guard let viewportRange,
          let storage = textLayoutManager?.textContentManager as? NSTextContentStorage else { return 0 }
    let startLocation = storage.documentRange.location
    var count = 1
    storage.enumerateTextElements(from: startLocation) { element in
        guard let range = element.elementRange else { return true }
        if range.location.compare(viewportRange.location) != .orderedAscending { return false }
        count += 1
        return true
    }
    return count
}
Key points:
enumerateTextElementsiterates over text elements and returnsfalseto stop iteration.- Compare positions to determine whether the viewport start has been reached.
- In a real implementation, add caching to avoid recalculating this on every layout pass.
The DidLayout method needs to convert coordinates from the text container to the viewport (17:02):
class TextView: UITextView {
    private var lines: [CGRect] = []
    private var startingLineNumber = 0
    var onDidLayout: ((Int, [CGRect]) -> Void)?

    override func textViewportLayoutControllerDidLayout(_ textViewportLayoutController: NSTextViewportLayoutController) {
        super.textViewportLayoutControllerDidLayout(controller)
        let origin = controller.viewportBounds.origin
        onDidLayout?(startingLineNumber, lines.map { $0.offsetBy(dx: 0, dy: -origin.y) })
    }
}
Draw line numbers in ContainerView (17:16):
class ContainerView: UIView {
    let textView = TextView()
    let lineNumberView = UIView()

    func setup() {
        textView.onDidLayout = { startingLineNumber, lines in
            let attributes: [NSAttributedString.Key: Any] = [
                .font: UIFont.monospacedSystemFont(ofSize: 11, weight: .regular),
                .foregroundColor: UIColor.secondaryLabel
            ]
            for (i, frame) in lines.enumerated() {
                let number = "\(startingLineNumber + i)" as NSString
                number.draw(at: CGPoint(x: 8, y: frame.minY), withAttributes: attributes)
            }
        }
    }
}
Key points:
- The
onDidLayoutclosure passes layout information fromTextViewtoContainerView. - Use
NSString.draw(withAttributes:)to draw text directly. frame.minYaligns the line number with the corresponding line.
Implementing collapsible sections
The second example is a recipe app that collapses multi-paragraph recipes down to headings only (19:22):
class TextView: UITextView, NSTextContentStorageDelegate {
    var collapsedSections: Set<Int> = []

    override func textViewportLayoutControllerWillLayout(_ textViewportLayoutController: NSTextViewportLayoutController) {
        super.textViewportLayoutControllerWillLayout(textViewportLayoutController)
        // ...
    }

    override func textViewportLayoutController(_ textViewportLayoutController: NSTextViewportLayoutController, configureRenderingSurfaceFor textLayoutFragment: NSTextLayoutFragment) {
        super.textViewportLayoutController(textViewportLayoutController, configureRenderingSurfaceFor: textLayoutFragment)
        // ...
    }

    override func textViewportLayoutControllerDidLayout(_ textViewportLayoutController: NSTextViewportLayoutController) {
        super.textViewportLayoutControllerDidLayout(textViewportLayoutController)
        // ...
    }

    // Skip layout for collapsed paragraphs
    func textContentManager(shouldEnumerate textElement: NSTextElement, options: NSTextContentManager.EnumerationOptions) -> Bool {
        // ...
    }

    // Handle section collapse toggling
    func toggleSection(headerOffset: Int) {
        if collapsedSections.contains(headerOffset) {
            collapsedSections.remove(headerOffset)
        } else {
            collapsedSections.insert(headerOffset)
        }
        guard let textLayoutManager = textLayoutManager else { return }

        let textViewportLayoutController = textLayoutManager.textViewportLayoutController
        textViewportLayoutController.delegate?.textViewportLayoutControllerReceivedSetNeedsLayout?(textViewportLayoutController)
    }
}
Key points:
- The
shouldEnumeratemethod fromNSTextContentStorageDelegatecontrols whether layout runs for a given text element. collapsedSectionsstores the offsets of collapsed paragraphs in aSet.- After toggling collapse state, call
textViewportLayoutControllerReceivedSetNeedsLayoutto trigger relayout.
Reusing text attachment view providers
Text attachments such as inline images and stickers are rendered through NSTextAttachmentViewProvider. Because these objects are immutable, editing a paragraph recreates them and can lose animation state or other state.
The new 2027 registration API lets you specify a reuse strategy (22:06):
import UIKit

class ViewController: UIViewController {
    var textView: UITextView

    func setupTextView() {
        textView = UITextView()
        textView.register(
            [.onEditingInlineParagraphs],
            forTextAttachmentViewProviderType: AnimatedAttachmentViewProvider.self
        )
    }
}
Key points:
onEditingInlineParagraphs: preserve the view provider when editing a paragraph.onScrollingOutOfViewport: cache the provider when it scrolls out of the viewport and restore it when it scrolls back.- The two strategies can be combined.
Key Takeaways
-
Enhanced code editor: Starting from the line-number example, implement syntax highlighting, code folding, and error markers. Overriding
configureRenderingSurfaceForlets you recognize specific text ranges and apply different rendering styles. -
Rich text document editor: The collapsible section approach can be used for managing chapters in long documents. Combined with
NSTextContentStorageDelegate, it can synchronize an outline view with content, support chapter navigation, and load content progressively. -
Collaborative note-taking app: Use text attachment reuse strategies to build a real-time collaborative note app. Cursor indicators, user avatars, and inline comments can all be text attachments, and the reuse strategy prevents those elements from flickering during editing.
-
Custom text effects: Use the Rendering Surface API to add background animations, border highlights, or gesture responses to specific text ranges. This is useful for creative writing apps or interactive educational text.
-
Synchronized multi-view editing: Connect multiple
NSTextLayoutManagerinstances to the sameNSTextContentStorage. This enables real-time synchronization between a main editing area and a preview area, or a side-by-side reading mode.
Related Sessions
- What’s new in SwiftUI — New features in SwiftUI text controls
- Meet SwiftUI — SwiftUI view integration with UIKit and AppKit
- What’s new in AppKit — Modern NSTextView updates in AppKit
- SwiftUI + UIKit integration — ViewRepresentable best practices
- Advanced UI techniques — Custom view controller interactions
Comments
GitHub Issues · utterances