
Highlight
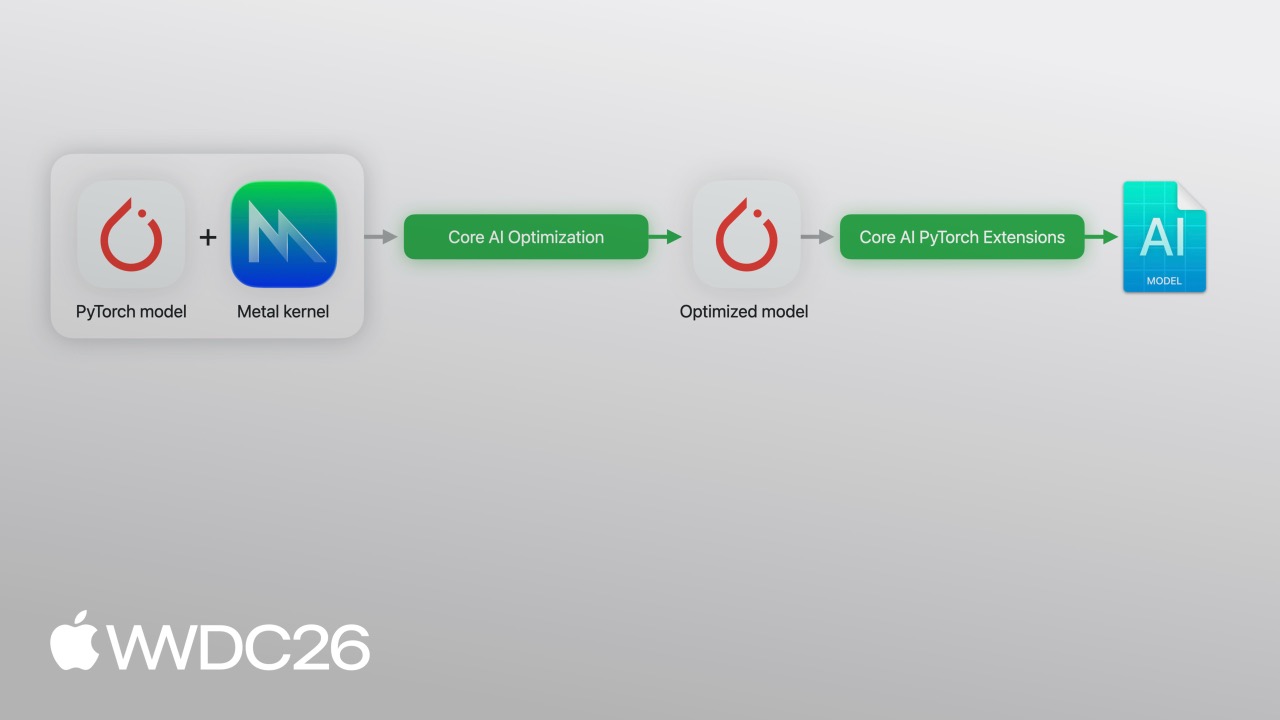
Core AI provides a complete Python toolchain for on-device AI deployment on Apple Silicon: PyTorch model export, configuration-driven compression, visual debugging, and packaging custom Metal kernels, all within one workflow.
Core Ideas
The old problems of on-device model deployment
When moving deep learning models onto iPhone or Mac, developers have long faced three problems: the model is too large to fit, accuracy drops after quantization and it is hard to find why, and custom operators are difficult to package and distribute with the model. With Core ML, after conversion and device testing, an accuracy drop often meant guessing which layer caused the problem or writing a lot of scripts to dump tensors layer by layer for comparison. Custom operators were even harder because you had to manage Metal library files and compilation pipelines separately. (00:14)
Core AI’s complete workflow
Apple has now connected the PyTorch-to-Apple-Silicon deployment path end to end. After installing pip install coreai-torch, an existing PyTorch model can go through a complete pipeline directly: capture the computation graph with torch.export, convert it to Core AI’s internal representation with TorchConverter, generate an .aimodel asset with optimize(), and load inference directly from Python. The whole process stays inside the familiar Python environment. (03:27)
How to debug quantization accuracy loss
Compression is essential for bringing large models onto devices. Take SAM3 (Segment Anything Model 3) as an example. This 850-million-parameter image segmentation model is over 3 GB in its original form. Using coreai-opt with the presets.w4 preset for full 4-bit quantization compresses it to 430 MB, but then an occluded flower is no longer detected. (06:02)
Where is the problem? Core AI Debugger is the answer. It runs on Mac, visualizes model structure, executes inference on a real device, and compares Core AI intermediate tensors against PyTorch reference results layer by layer. The Debugger automatically identifies synchronization points and scores each layer with PSNR (Peak Signal-to-Noise Ratio). Green means the tensors match, yellow means mild divergence, and red means severe divergence. Sorting reveals that almost every low-PSNR layer comes from the detector decoder, a module that accounts for only 4% of parameters but is extremely sensitive to quantization. Excluding it from the quantization configuration restores accuracy while keeping the model only a small fraction of its original size. (10:40)
Custom Metal kernels packaged with the model
Standard operator libraries will never cover every need. Core AI lets you hand-write Metal Shading Language (MSL) kernels, register them with TorchMetalKernel together with a PyTorch reference implementation, and embed them directly into the .aimodel asset during conversion. At deployment time, the app loads a single file and does not need to manage a separate Metal library. (21:12)
Model rewriting makes inference 76% faster
Splitting a model into multiple independent functions is another advanced technique. SAM3’s image encoder, text encoder, and detection head are split into three entry points. When the user changes the prompt from “flower” to “butterfly”, only the text encoder and detection head need to run again, while the image encoding result is reused directly. The second inference is 76% faster than running the full model again. (24:56)
Details
PyTorch model export and Core AI conversion
(03:27)
The first step is to use torch.export to capture the model’s complete computation graph, including weights, operations, and shape information.
import torch
import torch.nn as nn

class MLP(nn.Module):
    def __init__(self):
        super().__init__()
        self.fc1 = nn.Linear(256, 512)
        self.fc2 = nn.Linear(512, 10)

    def forward(self, x):
        return self.fc2(torch.relu(self.fc1(x)))

model = MLP().eval()
example_input = (torch.randn(1, 256),)
exported_program = torch.export.export(model, example_input)
Key points:
torch.export.export()captures a static computation graph with weights, operations, and shapes all frozen insideexported_programexample_inputis used to infer tensor shapes, and the model cannot contain dynamic control flow that depends on input data.eval()disables training-only layers such as dropout to ensure consistent inference behavior
The second step is to convert it to Core AI representation with TorchConverter, optimize it, and save it as .aimodel.
import coreai
import coreai_torch
from coreai.runtime import NDArray

converter = coreai_torch.TorchConverter()
converter.add_exported_program(
    exported_program,
    input_names=["features"], output_names=["logits"])
core_ai_program = converter.to_coreai()

core_ai_program.optimize()
asset = core_ai_program.save_asset("mlp.aimodel")

specialized_model = await AIModel.load("mlp.aimodel")
specialized_function = specialized_model.load_function("main")
result = await specialized_function({"features": NDArray(example[0].numpy())})
Key points:
TorchConverteris the bridge from PyTorch to Core AI, with an API design similar to Core ML Toolsoptimize()performs operator fusion and memory optimization for the target platformsave_asset()generates an.aimodelfile, Apple Silicon’s native execution format- Inference inputs are wrapped in
NDArrayaround numpy arrays and mapped by name through a dictionary
Configuration-driven model compression
(05:54)
coreai-opt supports int4, int8, FP4, and FP8 compression at multiple granularities. A configuration file decides which layers are compressed and which layers keep original precision.
import coreai_opt

# Use the preset for 4-bit per-channel symmetric quantization
config = coreai_opt.presets.w4
config.execution_mode = coreai_opt.ExecutionMode.EAGER

quantizer = coreai_opt.Quantizer(config)
quantizer.initialize(model, example_inputs)
compressed_model = quantizer.finalize()
Key points:
presets.w4is a one-line configuration shortcut for per-channel 4-bit symmetric quantizationExecutionMode.EAGERis suitable for weight quantization, whileGRAPHmode is suitable for activation quantizationinitialize()needs example inputs for calibration statistics- You can also pass large datasets for quantization-aware training (QAT) to reduce accuracy loss
Core AI Debugger for quantization problems
(10:40)
The Debugger’s core ability is comparing intermediate tensors between the PyTorch reference run and Core AI’s on-device run. First, save PyTorch intermediate results in Python:
# Save PyTorch intermediate tensors
intermediates = coreai_torch.save_intermediates(
    original_model,
    quantized_model,
    example_inputs
)
Then load this file in Debugger as the reference run and start a comparison session. Debugger automatically aligns nodes between the two computation graphs, creates synchronization points, and calculates PSNR. Green nodes indicate high tensor similarity, yellow means moderate divergence, and red means severe divergence. Sorting by PSNR quickly locates the problematic layer. (15:00)
Key points:
- The
save_intermediatesAPI captures the output tensor of every operation on the PyTorch side - Debugger automatically identifies synchronization points, so you do not need to align nodes manually
- PSNR is the default similarity metric, and you can switch to other metrics depending on the model type
- The left navigator groups nodes by PyTorch module, so navigating a large model follows the same structure as the code
Custom Metal kernels
(21:12)
Using the SiLU (Sigmoid Linear Unit) activation function as an example, provide both a PyTorch reference implementation and an MSL kernel:
import torch
from coreai_torch.dsl import TorchMetalKernel, MetalParameter

def silu_torch(x):
    return x * torch.sigmoid(x)

SILU_MSL = """
float val = float(x[gid]);
float sig = 1.0f / (1.0f + exp(-val));
y[gid] = TYPE(val * sig);
"""

silu_kernel = TorchMetalKernel(
    name="fused_silu",
    input_names=["x"],
    result_names=["y"],
    src=SILU_MSL,
    torch_defn=silu_torch,
    metal_params=[MetalParameter("gid", "uint", "thread_position_in_grid")],
    template_dtypes={"x": "TYPE"},
)
Use this kernel in a model:
class MyModel(torch.nn.Module):
    def __init__(self):
        super().__init__()
        self.linear = torch.nn.Linear(256, 256)

    def forward(self, x):
        h = self.linear(x)
        n = h.numel()
        return silu_kernel(
            h,
            threads_per_grid_size=(n, 1, 1),
            threads_per_thread_group=(min(n, 256), 1, 1),
            result_shapes=[h.shape],
        )

exported_program = torch.export.export(MyModel(), (torch.randn(1, 256),))

converter = coreai_torch.TorchConverter()
converter.register_custom_kernels([silu_kernel])
converter.add_exported_program(exported_program,
                               input_names=["x"], output_names=["y"])
deployable = converter.to_coreai()
Key points:
torch_defnis the reference implementation used bytorch.exportfor shape inference and Debugger comparisonsrcis the MSL code that actually runs on the GPU, and theTYPEmacro is replaced with the actual data type bytemplate_dtypesMetalParameterbinds variables in MSL to Metal built-in attributes such asthread_position_in_gridresult_shapesis passed on every call and supports dynamic-shaped inputs- The MSL code is packaged into the
.aimodeltogether with the model, so deployment needs no extra files
Rewriting a model into multiple independent functions
(24:56)
Split SAM3 into three entry points, image_encode, text_encode, and detect, each of which can be compressed and called independently:
# Export the three modules separately
image_exported = torch.export.export(image_encoder, image_input)
text_exported = torch.export.export(text_encoder, text_input)
detect_exported = torch.export.export(detector, detect_input)

converter = coreai_torch.TorchConverter()
converter.add_exported_program(image_exported,
                               input_names=["image"], output_names=["image_emb"],
                               entrypoint_name="image_encode")
converter.add_exported_program(text_exported,
                               input_names=["text"], output_names=["text_emb"],
                               entrypoint_name="text_encode")
converter.add_exported_program(detect_exported,
                               input_names=["image_emb", "text_emb"], output_names=["masks"],
                               entrypoint_name="detect")

deployable = converter.to_coreai()
asset = deployable.save_asset("sam3_split.aimodel")
Load it and call only what is needed:
model = await AIModel.load("sam3_split.aimodel")

# First run: the full flow
image_fn = model.load_function("image_encode")
text_fn = model.load_function("text_encode")
detect_fn = model.load_function("detect")

image_emb = await image_fn({"image": image_ndarray})
text_emb = await text_fn({"text": text_ndarray})
masks = await detect_fn({"image_emb": image_emb, "text_emb": text_emb})

# After changing the prompt: only run text_encode + detect
text_emb_new = await text_fn({"text": new_text_ndarray})
masks_new = await detect_fn({"image_emb": image_emb, "text_emb": text_emb_new})
Key points:
- Each
add_exported_programusesentrypoint_nameto define an independent entry point - One
.aimodelasset can contain multiple callable functions - The image encoding result
image_embcan be cached and reused, so changing the prompt skips the heaviest computation - Each entry point can use an independent compression strategy: keep the detector at original precision and compress the two encoders with 4-bit quantization
Key Takeaways
1. Add on-device image segmentation to an existing app
Use the SAM3 example from the coreai-models repository with a mixed-precision coreai-opt configuration to compress the model below 500 MB. After using Core AI Debugger to verify segmentation quality, integrate it directly into a photo editing app. The entry APIs are AIModel.load() and load_function(), the same as loading a regular model.
2. Build an interactive “change prompt, resegment instantly” experience
Follow the session’s three-function split pattern and separate image encoding from text encoding. The user draws a box or enters a prompt; the image is encoded once, and every later prompt change runs only text encoding plus the detection head. Implementation idea: cache the output tensor from image_encode and reuse it in subsequent text_encode + detect calls.
3. Package a custom activation function into the model asset
If your model uses a new activation function from a paper that Core AI’s standard operator library does not yet cover, write an MSL implementation with TorchMetalKernel. The PyTorch reference implementation handles shape inference and debug comparison; MSL handles actual execution. After conversion, deployment is a single .aimodel file.
4. Use AI Skills to help teams onboard to Core AI
The coreai-models repository includes a set of Agent Skills that can be installed in Cursor or Copilot. These skills contain Apple engineers’ best practices and can translate natural-language requests such as “I want to deploy SAM3 on iPhone” into concrete conversion, compression, and splitting scripts. New team members can produce runnable code without reading the full documentation first.
5. Build a quantization regression testing pipeline with Debugger
Integrate save_intermediates + Debugger comparison into CI. After every model update, automatically compare PyTorch reference outputs against quantized Core AI outputs and use PSNR thresholds to decide whether the change passes. This turns a previously manual visual check into an automated numerical gate.
Related Sessions
- 324 - Meet Core AI - The overall introduction to the Core AI framework and the foundation for this deeper technical session
- 326 - Integrate Core AI into your app - Concrete practices for integrating Core AI models into apps
- 328 - Deploy local AI with MLX Swift - Another local AI framework for Apple Silicon, useful for comparison when choosing an approach
- 330 - Optimize custom ML operations with Metal tensors - A deeper look at optimization techniques for custom Metal kernels
- 298 - Build robust model evaluations - Model evaluation methodology that pairs well with the Debugger’s comparison features
Comments
GitHub Issues · utterances