
Highlight
Apple opens up powerful combinations of
layerEffectandalignmentGuidein SwiftUI. Developers can implement pixel-level fluid distortion with Metal Shaders and position floating views with semantic alignment guides, all without leaving SwiftUI.
Core Ideas
Complex effects are not magic; they are composed pipelines
When building advanced UI effects, developers often assume Apple apps use some hidden technology. This session uses the design process for a podcast app to show a different answer: simple APIs can be chained like a pipeline.
The speaker starts from a plain transcript view and aims for an Apple Music live-lyrics style experience: flowing cover art in the background, lyrics scrolling in sync with playback time in the foreground, and a floating timestamp beside each line. He does not bring in UIKit or Core Animation. Instead, he takes existing data - cover art, playback time, and transcript text - and transforms it step by step through a series of SwiftUI APIs.
The core idea of this “creative pipeline” is that every SwiftUI modifier is a processing stage. Data flows in from one end, gets transformed, and moves to the next stage. Each individual stage is simple; the connected pipeline creates the complex effect.
Shaders let the GPU draw pixels for you
(04:18) The cover art first needs blur so it does not compete with foreground text:
Image("CoverArt")
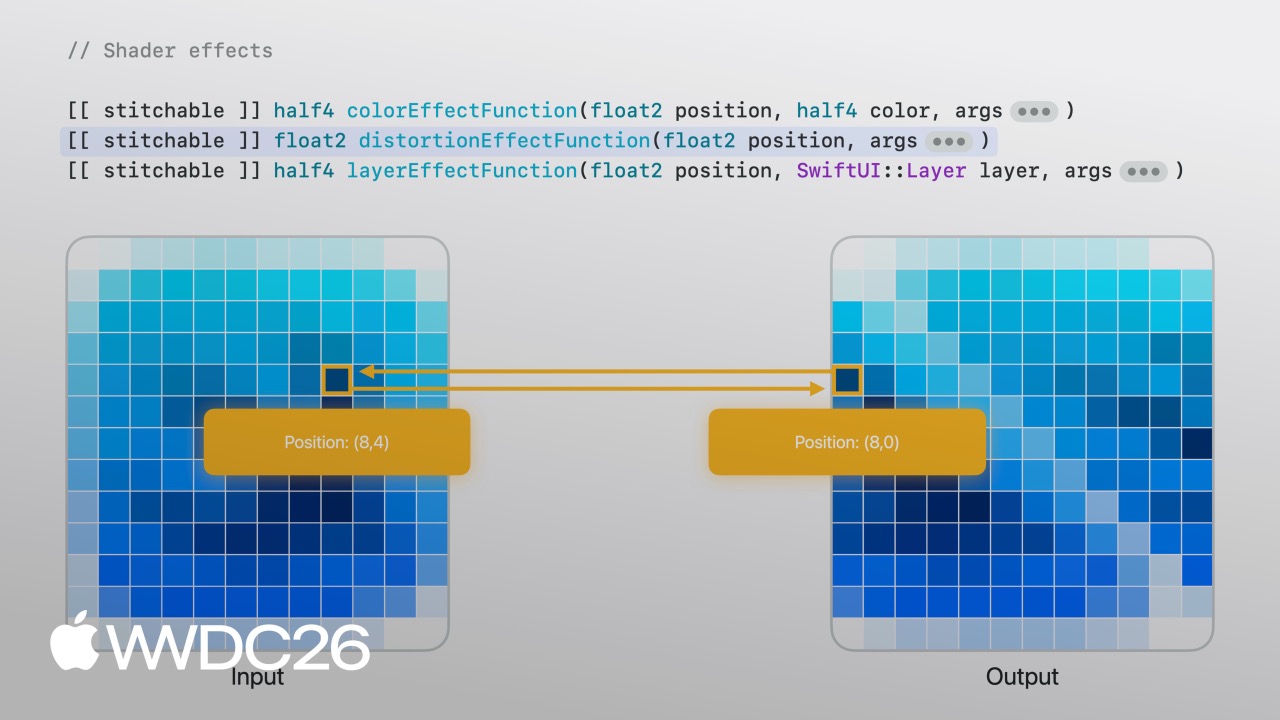
.blur(radius: 30)(04:42) After blurring, a program runs on the GPU to decide the color of each pixel. That program is a Shader. SwiftUI provides three kinds of Shader effects:
colorEffect: transforms color pixel by pixel, such as converting a color image to black and whitedistortionEffect: maps pixel positions to new positions for geometric distortionlayerEffect: provides the whole view layer, allowing samples from neighboring pixels or arbitrary regions
(07:09) For a fluid warp effect, layerEffect is the most flexible option. Add the .layerEffect modifier to a view and pass in a Metal Shader function:
GeometryReader { proxy in
    CoverArtView()
        .layerEffect(
            ShaderLibrary.backgroundWarp(),
            maxSampleOffset: .zero
        )
}
.ignoresSafeArea()
The corresponding Metal Shader function starts with the simplest possible behavior: return the input unchanged.
[[stitchable]] half4 backgroundWarp(
    float2 position, SwiftUI::Layer layer
) {
    return layer.sample(position);
}(07:39) layerEffect can sample from any position in the layer. Pass in a float2 offset and the Shader can sample from an offset position:
[[stitchable]] half4 backgroundWarp(
    float2 position, SwiftUI::Layer layer,
    float2 offset
) {
    return layer.sample(position + offset);
}
Pass the offset parameter from SwiftUI:
.layerEffect(
    ShaderLibrary.backgroundWarp(
       .float2(.init(x: proxy.size.width, y: 0))
    ),
    maxSampleOffset: .zero
)
But a uniform offset only creates a fixed pixel shift, without an organic feeling.
(08:37) The speaker introduces a NoiseTexture, a precomputed image of smooth random values. On the SwiftUI side, pass the view size and the noise texture:
.layerEffect(
    ShaderLibrary.backgroundWarp(
        .float2(proxy.size),
        .image(Image("NoiseTexture"))
    ),
    maxSampleOffset: .zero
)(08:55) On the Metal side, sample the noise texture with UV coordinates and map the red and green channel values into pixel offsets:
[[stitchable]] half4 backgroundWarp(
    float2 position, SwiftUI::Layer layer,
    float2 size, texture2d<half> noiseTex
) {
    constexpr sampler s(address::repeat, filter::linear);
    float2 uv = position / size;

    half4 n = noiseTex.sample(s, uv);
    float2 offset = (float2(n.r, n.g) - 0.5) * 200.0;

    return layer.sample(position + offset);
}
Key points:
position / sizeconverts absolute pixel coordinates into 0-1 UV coordinatessamplerusesaddress::repeatso the texture can tile- The noise texture’s red and green channels each provide a random value, forming a two-dimensional offset
- Scaling the offset to a 200-pixel range creates visible distortion
(10:22) The effect can go further. Domain Warping performs two noise samples: the first sample gets an initial offset, then the second sample reads again at the offset position:
half4 n = noiseTex.sample(s, uv);

float2 q = float2(n.r, n.g);
n = noiseTex.sample(s, uv + q);

float2 offset = (float2(n.r, n.g) - 0.5) * 200.0;

return layer.sample(position + offset);
The two samples combine to create a flowing organic blob effect, like liquid moving slowly.
TimelineView injects time into the Shader
(11:37) A Shader is stateless. It does not remember the previous frame; its output depends only on its current input parameters. To animate it, you must pass in a value that changes over time.
TimelineView(.animation) fires every frame and provides the current timestamp. Pass that timestamp into the Shader and add it to the noise sampling position:
@State private var startDate = Date.now

TimelineView(.animation) { timeline in
    let elapsed = timeline.date.timeIntervalSince(startDate)
    CoverArtView()
        .layerEffect(
            ShaderLibrary.backgroundWarp(
                .float2(proxy.size),
                .image(Image("NoiseTexture")),
                .float(elapsed)
            ),
            maxSampleOffset: .zero
        )
}
On the Metal side, add time to the UV coordinates and the noise pattern starts flowing. This is completely different from SwiftUI’s transaction-based animation system. The Shader is not driven by animations triggered from state changes; it is driven by a continuously changing external time parameter.
Time-synchronized transcript scrolling
(12:15) The transcript view starts from a basic LazyVStack:
ScrollView {
    LazyVStack(alignment: .leading, spacing: 12) {
        ForEach(sampleTranscript) { line in
            Text(line.text)
                .font(.title)
                .fontWeight(.bold)
        }
    }
}(12:33) After connecting playback state, the current line becomes bold and the other lines fade. Use ScrollViewReader to listen for changes to the current line and scroll it automatically to the center of the screen:
@State private var playback = PlaybackState()

ScrollViewReader { scrollProxy in
    ScrollView {
        LazyVStack(alignment: .leading, spacing: 12) {
            ForEach(sampleTranscript) { line in
                Text(line.text)
                    .transcriptLineStyle(isCurrent:
                        line.id == playback.currentLineIndex
                    )
            }
        }
    }
    .onChange(of: playback.currentLineIndex, { _, i in
        scrollProxy.scrollTo(i, anchor: .center)
    })
}
Semantic floating positioning with alignmentGuide
(13:53) Each lyric line needs to show a timestamp at the lower-left corner, visible only for the current line. Use overlay to place a child view on top of the text:
Text(line.text)
    .overlay {
        Text(line.formattedTimestamp)
    }
By default, overlay uses center alignment, so the timestamp covers the middle of the text. Change it to .bottomLeading:
Text(line.text)
    .overlay(alignment: .bottomLeading) {
        Text(line.formattedTimestamp)
    }
Now the timestamp’s bottom-leading edge aligns to the text’s bottom-leading edge, but the goal is for the timestamp’s top to attach to the text’s bottom.
(14:32) alignmentGuide can override the default alignment semantics. Tell the layout system: when it asks for the bottom alignment position, return the view’s top position:
Text(line.text)
    .overlay(alignment: .bottomLeading) {
        Text(line.formattedTimestamp)
            .alignmentGuide(.bottom) { $0[.top] }
    }
Key points:
$0[.top]returns the child view’s top boundary- The layout system treats this as the bottom alignment point, so it pins the child view’s top to the parent view’s bottom
- No concrete dimensions are needed. The layout is fully semantic and adapts automatically to Dynamic Type and multiline text
Details
Comparing the three Shader types
| Type | Input | Output | Use cases |
|---|---|---|---|
colorEffect | Pixel position + original color | New color | Black-and-white filters, color replacement |
distortionEffect | Pixel position | New sample position | Geometric distortion, skew effects |
layerEffect | Pixel position + whole layer | New color | Blur, fluid warp, effects that need neighborhood sampling |
layerEffect is the most flexible, but it requires rendering the view into an offscreen texture, so it has higher performance cost than the other two.
Complete Domain Warping Shader
[[stitchable]] half4 backgroundWarp(
    float2 position, SwiftUI::Layer layer,
    float2 size, texture2d<half> noiseTex
) {
    constexpr sampler s(address::repeat, filter::linear);
    float2 uv = position / size;

    half4 n = noiseTex.sample(s, uv);

    float2 q = float2(n.r, n.g);
    n = noiseTex.sample(s, uv + q);

    float2 offset = (float2(n.r, n.g) - 0.5) * 200.0;

    return layer.sample(position + offset);
}
Key points:
constexpr sampler s(address::repeat, filter::linear)creates a texture sampler, andrepeatmode lets the noise texture tile seamlesslyuv + qis the core of Domain Warping: the first sampling resultqis added to the UV coordinates, and the second sample happens in the warped coordinate space- The red and green channels
(n.r, n.g)each provide a random value from -0.5 to 0.5, which becomes a -100 to 100 pixel offset after multiplication by 200 layer.sample(position + offset)samples from the offset position and creates pixel displacement
Complete time-driven Shader animation
SwiftUI side:
@State private var startDate = Date.now

TimelineView(.animation) { timeline in
    let elapsed = timeline.date.timeIntervalSince(startDate)
    GeometryReader { proxy in
        CoverArtView()
            .layerEffect(
                ShaderLibrary.backgroundWarp(
                    .float2(proxy.size),
                    .image(Image("NoiseTexture")),
                    .float(elapsed)
                ),
                maxSampleOffset: .zero
            )
    }
    .ignoresSafeArea()
}
On the Metal side, add float time to the parameter list and add time to the UV coordinates when sampling:
[[stitchable]] half4 backgroundWarp(
    float2 position, SwiftUI::Layer layer,
    float2 size, texture2d<half> noiseTex,
    float time
) {
    constexpr sampler s(address::repeat, filter::linear);
    float2 uv = position / size + time * 0.1;
    // ... the rest of the logic stays the same
}
Key points:
TimelineView(.animation)calls back every frame and provides the latest timestamptimeIntervalSince(startDate)calculates elapsed seconds- In the Shader, adding time to the UV coordinates translates the noise pattern over time and creates a sense of flow
maxSampleOffsetshould be set according to the actual maximum offset. It cannot stay.zero, or SwiftUI will clip pixels that sample outside the view boundary
How alignmentGuide works
SwiftUI’s alignment system can be imagined as a pin passing through both the parent view’s and child view’s alignment points. By default, overlay uses center alignment, so the pin passes through the center of both views.
After switching to .bottomLeading, the pin passes through the bottom-leading edge of both views. But what we need is for the child view’s top to attach to the parent view’s bottom.
alignmentGuide(.bottom) { $0[.top] } performs a semantic substitution: when the layout system asks “where is your bottom?”, the child view answers “my top.” The pin then passes through the child view’s top and pulls it to the parent view’s bottom position.
Key Takeaways
1. Add a dynamic background to an existing app
- What to build: Replace a static cover image, avatar, or banner in your app with a time-driven Shader fluid effect
- Why it is worth doing:
TimelineView+layerEffectneeds only a few dozen lines of code and creates far more visual impact than a static image - How to start: Find a NoiseTexture image, write a
layerEffectShader, and inject a time parameter withTimelineView(.animation)
2. Build a lyrics or subtitle synchronized reader
- What to build: A text reader with time-synchronized highlighting and automatic scrolling for podcasts, audiobooks, or language learning
- Why it is worth doing:
ScrollViewReader+onChangemakes lyric-style synchronized scrolling simple, without manualcontentOffsetcalculations - How to start: Add a timestamp field to each line, track current time with
PlaybackState, and callscrollTo(_:anchor:)insideonChange
3. Use alignmentGuide for floating labels
- What to build: Floating hints, badges, or timestamps in lists, cards, or forms without breaking the layout flow
- Why it is worth doing:
alignmentGuideis more semantic thanoffsetand automatically adapts to different font sizes and screen sizes - How to start: Put the child view in
overlayorbackground, then override default alignment semantics withalignmentGuide
4. Feed sensor data into a Shader
- What to build: Replace the time parameter with gyroscope or accelerometer data so the Shader effect responds to device movement
- Why it is worth doing: The speaker mentioned that “the input can be gyroscope data instead of audio.” This pipeline model naturally supports arbitrary data sources
- How to start: Use
CoreMotionto get device attitude, pass roll and pitch values into the Shader as afloat2parameter, and control the distortion direction
5. Reuse Domain Warping for other visual effects
- What to build: Use the same two-sample noise technique for water ripples, heat haze, or liquid surface effects
- Why it is worth doing: Domain Warping is a general technique. Swap in a different noise texture or adjust the scale factor, and you get a completely different visual style
- How to start: Download Apple’s sample project, change the
offsetmultiplier and the time coefficient onuv, and observe how the effect changes
Related Sessions
- What’s new in SwiftUI - An overview of SwiftUI’s foundational layout tools and new modifiers
- Lazy stacks - Lazy-loading techniques for efficiently handling large data lists
- RealityKit - If you want to extend Shader effects into 3D space, RealityKit provides the corresponding material system
- Swift - New Swift language features. Understanding lower-level concepts such as
constexprhelps with Shader code - Xcode 27 - Improvements to Shader development and previewing in the new Xcode
Comments
GitHub Issues · utterances