
Highlight
iOS 26 introduces the Deferred Start API, allowing camera apps to defer initialization of non-preview outputs such as photo and video outputs until after the first preview frame is rendered. Combined with Responsive Capture, it can cut launch time in half without missing the moment when the user taps the shutter.
Core Content
What users feel when camera launch is slow
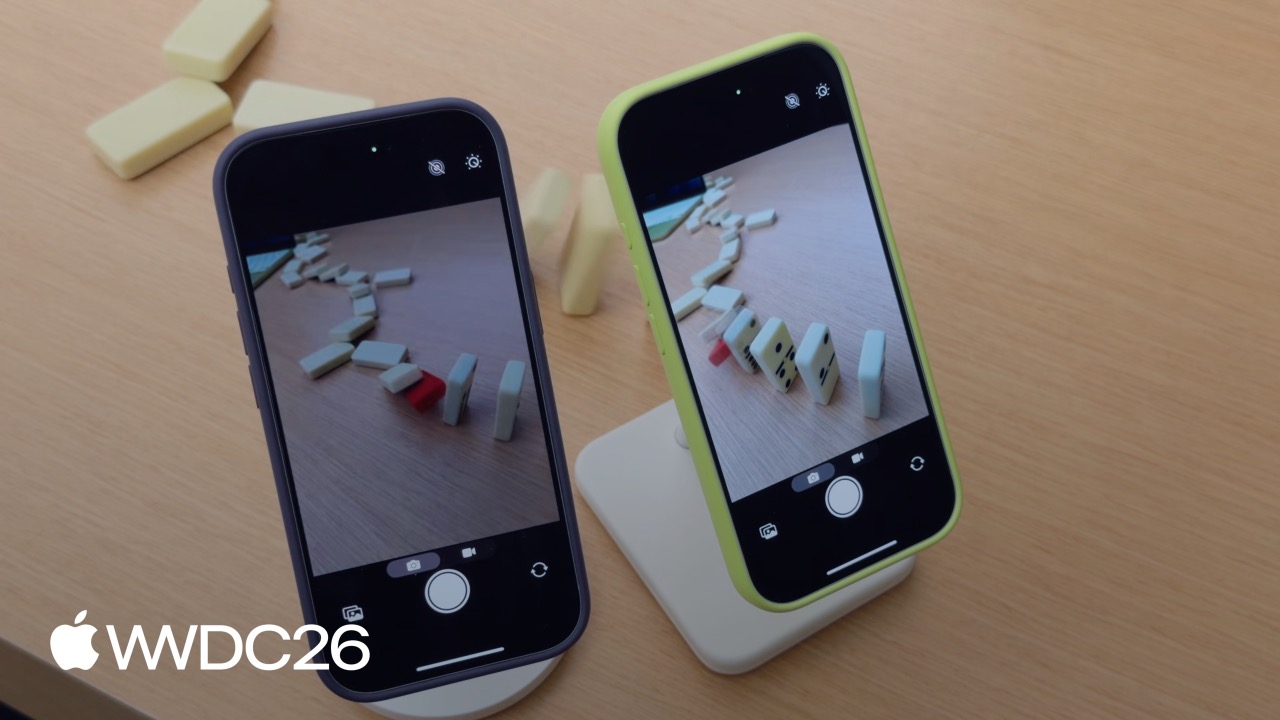
You open a camera app and the screen stays black. A few seconds later the preview finally appears, but the moment you wanted to capture is gone. The speaker uses a falling-domino example to make the problem concrete: when the red domino is about to fall, a slow camera launch means the preview appears only after the domino has already tipped over.
Behind that pain are four phases: app startup, session configuration and startup, output object initialization, and the start of preview frame delivery. The third phase, initializing AVCaptureOutput, is the most expensive.
Deferred Start: move heavy work after preview
Previously, all outputs were initialized together during startRunning(). Heavy objects such as AVCapturePhotoOutput and AVCaptureMovieFileOutput slow down the whole startup path even though they do not contribute to the preview itself.
The idea behind Deferred Start is simple: initialize only the preview output first and defer the rest. Each AVCaptureOutput and AVCaptureVideoPreviewLayer gets a new isDeferredStartEnabled property. Set it to true to defer initialization for that output.
At 02:05, the speaker shows a lab comparison: without Deferred Start, launch time is close to one second; with it enabled, launch time drops to about 0.5 seconds. The more complex the session configuration, the larger the benefit.
The preview is visible, but what if the shutter does not respond?
Deferred Start has a side effect: the preview appears quickly, but photo output may not have finished initializing, so the user can tap the shutter and get no response. That is fatal for quick-capture scenarios.
Apple’s solution is Responsive Capture. When enabled, AVCapturePhotoOutput adds internal buffering so capture can begin before the output is fully initialized. The speaker again uses dominoes to demonstrate the difference: the green phone with Responsive Capture catches the red domino falling, while the purple phone without it misses the moment.
(14:07)
Sustained performance: do not let the camera feel stuck
After preview frames start flowing, stable frame rate matters just as much. When a device heats up, the system reduces frequency. If the app does not adapt, the preview drops frames.
AVCaptureSession adds a hardwareCost property, with values from 0 to 1, representing how much hardware resource the current configuration uses. A value above 1 means the configuration exceeds the device’s capability and should be downgraded before startup. AVCaptureDevice’s systemPressureState lets you monitor system pressure at runtime, so you can reduce frame rate or GPU/ANE usage when pressure rises.
(20:16)
The I/O challenge of ProRes recording
High-bitrate video recording such as ProRes requires extremely high disk write speed. Traditional file-system I/O is nondeterministic: background indexing, memory fragmentation, and storage wear can all affect write speed and cause dropped frames.
iOS 27 introduces AVProVideoStorage, which provides deterministic write performance through preallocated storage. It is a system-level singleton shared by all apps. Before recording, check remainingCapacity and isBusy, then set usesProVideoStorage = true.
(22:17)
Details
Automatic Deferred Start
Apps that use AVCaptureVideoPreviewLayer to render preview enable automatic mode by default after recompiling with the iOS 26 SDK. The system automatically initializes the remaining outputs shortly after the preview appears.
import AVFoundation

class DeferredStartDelegate: NSObject, AVCaptureSessionDeferredStartDelegate {
    func sessionWillRunDeferredStart(_ session: AVCaptureSession) {
        // Called before deferred initialization starts; create background resources here
    }

    func sessionDidRunDeferredStart(_ session: AVCaptureSession) {
        // Called after deferred initialization finishes; all outputs are ready
    }
}

let captureSession = AVCaptureSession()
captureSession.beginConfiguration()
captureSession.automaticallyRunsDeferredStart = true

let videoPreviewLayer = AVCaptureVideoPreviewLayer(session: captureSession)
videoPreviewLayer.isDeferredStartEnabled = false

let photoOutput = AVCapturePhotoOutput()
photoOutput.isDeferredStartEnabled = true
captureSession.addOutput(photoOutput)

captureSession.setDeferredStartDelegate(
    deferredStartDelegate,
    deferredStartDelegateCallbackQueue: sessionQueue
)

captureSession.commitConfiguration()
captureSession.startRunning()
Key points:
automaticallyRunsDeferredStartdefaults totruewhen using the iOS 26 SDK.videoPreviewLayer.isDeferredStartEnabled = falseensures the preview is initialized first.photoOutput.isDeferredStartEnabled = truedefers photo output.setDeferredStartDelegateregisters callbacks so you can observe deferred-start progress.sessionQueueshould be a dedicated serial queue to avoid blocking the main thread.
(09:14)
Manual Deferred Start
Apps that use AVCaptureVideoDataOutput for custom preview rendering need manual mode. Capture the moment the first frame is presented with CAMetalLayer’s addPresentedHandler, then trigger deferred initialization.
import AVFoundation
import QuartzCore

let captureSession = AVCaptureSession()
captureSession.beginConfiguration()
captureSession.automaticallyRunsDeferredStart = false

let videoOutput = AVCaptureVideoDataOutput()
captureSession.addOutput(videoOutput)
videoOutput.isDeferredStartEnabled = false

let photoOutput = AVCapturePhotoOutput()
photoOutput.isDeferredStartEnabled = true
captureSession.addOutput(photoOutput)

captureSession.setDeferredStartDelegate(
    deferredStartDelegate,
    deferredStartDelegateCallbackQueue: sessionQueue
)

captureSession.commitConfiguration()
captureSession.startRunning()

// In the Metal render loop
private var firstFramePresented = false

guard let drawable = layer.nextDrawable() else { return }
if !firstFramePresented {
    drawable.addPresentedHandler { _ in
        captureSession.runDeferredStartWhenNeeded()
    }
    firstFramePresented = true
}
Key points:
automaticallyRunsDeferredStart = falsedisables automatic mode.videoOutput.isDeferredStartEnabled = falseensures the custom preview is ready first.addPresentedHandlerruns after the first frame is presented.runDeferredStartWhenNeeded()tells the system that deferred initialization can begin.- Manual mode fits apps that need precise control over the startup sequence.
(11:30)
Enable Responsive Capture
Responsive Capture adds a buffering layer to AVCapturePhotoOutput, allowing capture processing to begin before the output is fully initialized.
import AVFoundation

func configurePhotoOutput(for session: AVCaptureSession, device: AVCaptureDevice) {
    let photoOutput = AVCapturePhotoOutput()

    guard session.canAddOutput(photoOutput) else { return }
    session.addOutput(photoOutput)

    photoOutput.maxPhotoQualityPrioritization = .quality
    photoOutput.isResponsiveCaptureEnabled = photoOutput.isResponsiveCaptureSupported
}
Key points:
- Check
isResponsiveCaptureSupportedbefore enabling it. isResponsiveCaptureEnabled = trueenables responsive capture.- It works best when paired with Deferred Start.
- It trades a small amount of processing latency for faster shutter response.
(14:07)
Monitor system pressure
import AVFoundation

let captureSession = AVCaptureSession()
let device = activeVideoInput?.device
captureSession.beginConfiguration()
// ... Configure the session ...
captureSession.commitConfiguration()

guard captureSession.hardwareCost <= 1.0 else {
    print("hardwareCost \(captureSession.hardwareCost) - cannot start session. Reconfiguring.")
    setupLowCostConfiguration()
}

captureSession.startRunning()

let systemPressureObserver = device?.observe(
    \.systemPressureState,
    options: [.initial, .new],
    changeHandler: { device, change in
        // Adjust frame rate or reduce GPU/ANE usage based on pressure state
    }
)
Key points:
- Check
hardwareCostaftercommitConfiguration(). If it exceeds 1.0, downgrade the configuration. - Observe
systemPressureStatethrough KVO and respond to system pressure in real time. - When pressure rises, reduce frame rate, use a binned format, or reduce UI workload.
(20:16)
Use AVProVideoStorage
import AVFoundation

func configureProVideoStorage() {
    guard AVProVideoStorage.isSupported else { return }
    let storage = AVProVideoStorage.shared
    guard storage.remainingCapacity != 0 else {
        storage.openSettings()
        return
    }
}

// Recording configuration
guard AVProVideoStorage.isSupported else { return }
guard let pvs = AVProVideoStorage.shared else { return }

let movieOutput = AVCaptureMovieFileOutput()

guard movieOutput.isProVideoStorageSupported else { return }
guard !pvs.isBusy else { return }

let movieFileURL = FileManager.default.temporaryDirectory
    .appendingPathComponent(UUID().uuidString)
    .appendingPathExtension("mov")

movieOutput.usesProVideoStorage = true
movieOutput.startRecording(to: movieFileURL, recordingDelegate: delegate)
Key points:
AVProVideoStorage.isSupportedchecks device support.remainingCapacitychecks remaining preallocated space. If it is 0, guide the user to Settings.isBusychecks whether storage is currently occupied by another task.isProVideoStorageSupportedconfirms the output supports this feature.- After
usesProVideoStorage = true, recording first writes into preallocated space, then moves the file to the target location after recording ends. AVAssetWriteralso supports theusesProVideoStorageproperty.
(22:17)
Key Ideas
-
Build a social camera app that opens instantly: Use Deferred Start to show preview within 0.5 seconds, and combine it with Responsive Capture so users can shoot the moment they open the app. Implementation idea: in automatic mode, initialize only the preview layer first, defer photo output, and make the shutter button fully available after the
sessionDidRunDeferredStartcallback. -
Add thermal downshifting protection to a live-streaming app: Observe
systemPressureStateand automatically reduce capture resolution or frame rate when the device overheats, avoiding choppy live video or system termination. Implementation idea: switchactiveFormatbased on pressure level inchangeHandler, and useframeRateOverridefor precise frame-rate control. -
Implement professional ProRes recording on iPhone: Use
AVProVideoStorageto eliminate I/O jitter during high-bitrate recording and give video creators stable professional recording. Implementation idea: checkremainingCapacityandisBusybefore recording, setusesProVideoStorage = true, and move the file out of the temporary directory after recording ends. -
Build a real-time filter preview with VideoDataOutput: Use a custom Metal rendering pipeline and apply filters to each frame in
AVCaptureVideoDataOutput’scaptureOutput(_:didOutput:from:)before presenting it. Implementation idea: use manual Deferred Start, callrunDeferredStartWhenNeeded()after the first frame is displayed, and defer photo output at the same time. -
Stage UI loading during camera startup: In phase one, show only preview and the shutter button. In phase two, fade in noncritical UI such as album thumbnails and mode selectors after
sessionDidRunDeferredStart. Implementation idea: split UI creation into two methods and trigger the second phase from the Deferred Start delegate callback.
Related Sessions
- Implement high-resolution photo capture - A deeper look at combining Responsive Capture with high-quality photo capture.
- Create a more responsive camera experience - Center Stage and camera responsiveness optimization.
- Metal performance optimization - GPU performance tuning when you render a custom camera preview.
- Xcode 27 - Use Instruments to measure camera launch performance.
- Instruments - Find performance bottlenecks in camera apps.
Comments
GitHub Issues · utterances