
Highlight
RealityKit adds soft shadows, projective textures, physical space lighting, navigation meshes, cloth simulation, LOD switching, 3D Gaussian Splat rendering, and custom reverb meshes, moving 3D games and immersive apps on visionOS from “it runs” toward “it feels real.”
Core Ideas
Lighting and shadows: blending virtual worlds into real environments
In earlier visionOS indoor scenes, corners often stayed dark. Developers had to solve indirect lighting themselves, and shadows from dynamic lights had hard, knife-like edges.
Apple addresses this from three directions this year.
Lightmaps make indirect lighting in static scenes simple. Bake indirect lighting, ambient occlusion, and beauty maps in Reality Composer Pro 3, apply them directly to the scene, and the corners immediately become brighter. (02:24)
But Lightmaps only solve static scenes. What about dynamic lights? RealityKit adds Soft Shadows. Light sources in the real world have area, so shadow edges include a penumbra. By setting lightSize and quality, a spotlight shadow can move from a hard edge to a natural gradient. (04:02)
The most impressive addition is Physical Space Lighting. Previously, virtual lights could only illuminate virtual objects. Now virtual spotlights and point lights can directly light up your real room. Combined with Projective Textures, you can build a virtual planetarium projector that casts stars and nebulae directly onto bedroom walls and furniture. (05:16)
Navigation meshes: NPCs finally know where to go
Pathfinding is one of the most frustrating parts of building a 3D game. visionOS developers previously had to hand-roll A* algorithms while also handling obstacles, terrain costs, ladders, and jump points.
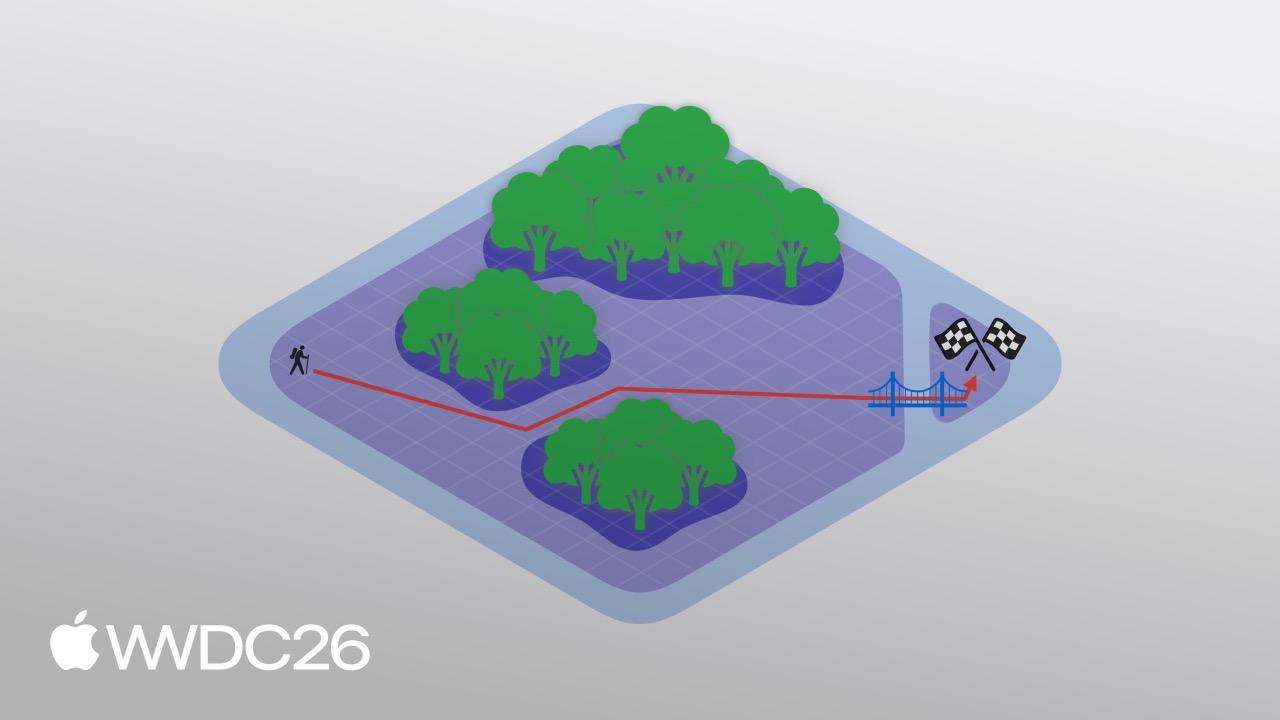
RealityKit now supports Navigation Meshes natively. In Reality Composer Pro 3, you draw the walkable areas, give forests a high traversal cost, add off-mesh connections to bridges, and then compute paths asynchronously in code with NavigationController.computePath. (07:44)
Asynchrony is the key. visionOS is extremely sensitive to frame rate, so pathfinding runs on a background thread while the main thread focuses on rendering. (09:46)
Cloth simulation: curtains, capes, and sheets can move
RealityKit adds a complete cloth simulation system. Treat mesh vertices as particles and edges as springs, and you can simulate folds and flowing fabric in real time. (11:01)
The more practical feature is anchoring. You can mark some cloth vertices as kinematic so they follow an entity transform but are not affected by cloth simulation. That lets curtains hang from a door frame and capes stay attached to a character’s shoulders. (12:51)
Performance optimization: LOD and thermal state management
Soft shadows, cloth simulation, and Gaussian splats all cost performance. RealityKit provides two tools to deal with that.
LOD, or level of detail, automatically switches faraway objects to lower-poly models. RealityKit supports two switching strategies: camera distance and screen area. Screen area is more suitable for visionOS because objects near the edge of the field of view may be physically close but occupy few pixels. (14:42)
Thermal state observation lets apps proactively degrade quality. When the device reaches .serious or .critical, you can raise LOD switching thresholds and lower shadow quality to avoid stutters caused by system-enforced downclocking. (16:26)
3D Gaussian Splat: bringing the real world into virtual space
3D Gaussian Splat is a technique for representing scenes with 3D Gaussian distributions. It is lighter than traditional photogrammetry and can preserve richer details. RealityKit now supports rendering Gaussian Splats natively. Provide buffers for position, scale, rotation, opacity, and spherical harmonics, and you can show high-fidelity real-world scan data in visionOS. (17:13)
Spatial audio: custom reverb makes sound more real
Spatial audio immersion depends on accurate reflection and reverberation. RealityKit adds Custom Reverb Meshes. You can define room geometry with ReverbMeshResource and specify absorption and scattering coefficients for each surface. When a virtual band plays in a museum, sound reflects realistically between walls before it reaches the user’s ears. (19:08)
Details
Soft shadow configuration
(04:02)
guard var shadow = hearthSpotlight.components[SpotLightComponent.Shadow.self] else {
    // handle error
}
shadow.lightSize = 0.7 // meters
shadow.quality = .medium // or .high
// shadow.quality = .low // will result in hard shadows
hearthSpotlight.components.set(shadow)
Key points:
lightSizeis the light source diameter in meters. Larger values make shadow edges softer.qualitycontrols the sample count. Only.mediumand.highproduce soft shadows;.lowfalls back to hard shadows..highlooks better but costs more performance..mediumis usually the best trade-off for mid-range and distant objects.
Projective textures and physical space lighting
(06:13)
let spotLightEntity = Entity()
spotLightEntity.components.set(SpotLightComponent(
    color: .white,
    intensity: intensity,
    innerAngleInDegrees: innerAngle,
    outerAngleInDegrees: outerAngle,
    attenuationRadius: attenuationRadius,
))

let projectiveTexture: TextureResource = generateStarsAndNebulaeTexture()
spotLightEntity.components.set(SpotLightComponent.ProjectiveTexture(
    texture: projectiveTexture
))(07:13)
spotLightEntity.components.set(SpotLightComponent.SurroundingsLight())Key points:
SpotLightComponent.ProjectiveTextureprojects a texture like a slide. It is useful for simulating window light, underwater caustics, and star projections.SurroundingsLightlets virtual lights illuminate the real environment. It currently supports only SpotLight and PointLight.- Set the color to white to avoid adding an extra tint on top of the projective texture.
Navigation mesh path queries
(09:46)
extension Entity {
    public func navigate(/* ... */) async {
        let navigator = try! NavigationController(entity: self)
        guard let result = await navigator.computePath(from: fromPosition, to: toPosition)
        else {
            return
        }
        if result.isEmpty {
            return
        }
        for node in result {
            switch node.category {
                case .meshPoint:
                    finalPath.append(node.position)
                case .offMeshConnection:
                    // handle ladders
            }
        }
    }
}
Key points:
NavigationControllermust be initialized with an entity that has aNavigationComponent.computePathis asynchronous and does not block the main thread.- Returned path nodes have two categories:
.meshPointis a normal path point on the mesh, and.offMeshConnectionis a special connection such as a ladder or jump point. nilmeans no valid path was found. An empty array means the destination has already been reached.
Pinning cloth anchors
(12:51)
for (pin, pinComponent) in pins {
    let position = pin.position(relativeTo: event.entity)
    let selectionSphere = ClothSphereShape(radius: pinComponent.radius)

    let vertices = clothMesh.vertices(in: .sphere(selectionSphere),
                                center: position)
    clothBody.motionTypes.set(vertexIndices: vertices, value: .kinematic)
}
Key points:
ClothSphereShapedefines a spherical region for selecting vertices to pin.clothMesh.vertices(in:center:)returns all vertex indices inside the spherical region..kinematicmeans these vertices only follow the entity transform and are not affected by cloth simulation.- This is useful for effects such as curtain hooks and cape shoulder straps.
LOD switching by camera distance
(14:42)
let lod0 = [ModelEntity(mesh: lodMesh0)]
let lod1 = [ModelEntity(mesh: lodMesh1)]
let lod2 = [ModelEntity(mesh: lodMesh2)]

let entity = Entity()

LevelOfDetailComponent.addByCameraDistance(to: entity, levels: [
    (entities: lod0, maxDistance: 1.0 /* meters */), // highest detail
    (entities: lod1, maxDistance: 5.0),              // medium detail
    (entities: lod2, maxDistance: .infinity),        // lowest detail
])
Key points:
lod0is the highest-detail model and is used within 1 meter.- The system switches to
lod1beyond 1 meter andlod2beyond 5 meters. - Set the final LOD’s
maxDistanceto.infinityso distant objects always have a model to render.
LOD switching by screen area
(15:58)
let lod0 = [ModelEntity(mesh: lodMesh0)]
let lod1 = [ModelEntity(mesh: lodMesh1)]
let lod2 = [ModelEntity(mesh: lodMesh2)]

let entity = Entity()

LevelOfDetailComponent.addByScreenArea(to: entity, levels: [
    (entities: lod0, minArea: 0.2 /* fraction of screen area */),  // highest detail
    (entities: lod1, minArea: 0.1),                                // medium detail
    (entities: lod2, minArea: 0.01),                               // lowest detail
])
Key points:
minAreais the fraction of the total screen area occupied by the object.- Use the highest detail when the object occupies more than 20% of the screen, medium detail from 10% to 20%, and low detail from 1% to 10%.
- Screen-area switching is more accurate than distance switching, especially for objects near the edge of the field of view.
Thermal state observation
(16:26)
NotificationCenter.default.addObserver(of: ProcessInfo.self,
                                       for: .thermalStateDidChange) { _ in
    switch ProcessInfo.processInfo.thermalState {
        case .nominal, .fair:
            // Stay the course
        case .serious, .critical:
            // Improve performance by:
            // More aggressive LOD switching
            // Lower shadow quality
    }
}
Key points:
- Observe
.thermalStateDidChangeand proactively degrade quality when the device heats up. .nominaland.fairmean temperature is normal, so you can keep the current quality..seriousand.criticalrequire higher LOD thresholds, lower shadow quality, or less precise cloth simulation.
3D Gaussian Splat rendering
(18:44)
let resource = try GaussianSplatResource.BufferResource(
    count: splatCount,
    position: positionBuffer,
    scale: scaleBuffer,
    rotation: rotationBuffer,
    opacity: opacityBuffer,
    sphericalHarmonics: (sphericalHarmonicsBuffer, degree)
)

let splatResource = GaussianSplatResource(resource)
let splatComponent = GaussianSplatComponent(splatResource)
splatEntity.components.set(splatComponent)
Key points:
BufferResourceaccepts five buffers: position, scale, rotation, opacity, and spherical harmonics.degreecontrols how much color changes with viewing angle.0means solid color; higher values allow richer color variation.- RealityKit does not bind you to a specific file format. Developers need to parse
.plyor other formats themselves and fill the buffers. - Rendering optimization is handled internally by RealityKit. Developers do not need to manually sort or blend.
Custom reverb meshes
(20:49)
let mesh: ReverbMeshResource = .shoebox(size: [5, 4, 6])
let reverb: Reverb = .simulated(mesh: mesh, materials: [.dryWall])
entity.components.set(ReverbComponent(reverb: reverb))(21:33)
let thickCarpet: Audio.Material = .carpet.scalingAbsorption { freq in 0.1 }

let bookshelfAbsorption = Audio.Absorption(
    [0.10, 0.15, 0.28, 0.20, 0.15, 0.10, 0.10, 0.07, 0.07, 0.05])

let bookshelfScattering = Audio.Scattering([500: 0.5, 1000: 0.6, 4000: 0.7])

let bookshelf = Audio.Material(
    absorption: bookshelfAbsorption,
    scattering: bookshelfScattering
)
Key points:
.shoebox(size:)is the simplest entry point. It creates an inward-facing box.- Built-in material presets include
.dryWall,.carpet, and more. - Custom materials define absorption coefficients across 10 frequency bands, from 31.5Hz to 16kHz, and scattering coefficients at 500Hz, 1kHz, and 4kHz.
- This only supports Immersive Space. Shared Space automatically uses the reverb that the system builds from the real room.
Key Takeaways
1. Build an interior design app that blends virtual and real lighting
Place virtual furniture in the user’s real room, then use SurroundingsLight so a virtual desk lamp illuminates real walls and floors. As the user rotates the lamp, light and shadow change on the real wall in real time. Entry API: SpotLightComponent.SurroundingsLight().
2. Build an escape-room game on visionOS
Use NavigationMeshResource in Reality Composer Pro 3 to draw walkable areas in the room. Assign high traversal costs to narrow passages so the player character automatically avoids obstacles. NPCs use NavigationController.computePath to track the player asynchronously. Combine that with projective textures to project puzzle clues onto walls.
3. Build an immersive museum guide
Use 3D Gaussian Splat to scan real museum exhibits, letting users walk around high-fidelity scans in visionOS. Place a virtual guide plaque next to each exhibit, and use custom reverb meshes so narration reflects realistically through the gallery. Entry APIs: GaussianSplatComponent and ReverbMeshResource.
4. Build a magic RPG with physical feedback
Simulate character capes with ClothBodyComponent so they flow in the wind during combat. Use SpotLightComponent.ProjectiveTexture to project rune patterns onto floors and walls during spellcasting. Thermal state observation keeps long play sessions smooth.
5. Build a virtual planetarium
Project stars onto the user’s real bedroom ceiling, and use SurroundingsLight so a virtual projector illuminates the real environment. As the user turns their head, the star pattern changes with viewpoint. Combine innerAngleInDegrees and outerAngleInDegrees on SpotLightComponent to adjust the projection range.
Related Sessions
- Iterate your spatial scenes faster with Reality Composer Pro 3 — New scene editing tools in Reality Composer Pro 3, plus particle and character behavior graph interfaces
- Supercharge your spatial workflows with Reality Composer Pro 3 — Build navigation meshes and baked lighting in Reality Composer Pro 3
- Explore immersive environments in visionOS — Design patterns and best practices for Immersive Space, used together with physical space lighting
- Render 3D models with RealityKit — The basics of 3D model rendering, complementary to Gaussian Splat
- Build spatial experiences with Object Tracking — Combine object tracking with RealityKit scenes so virtual content anchors to real objects
Comments
GitHub Issues · utterances