
Highlight
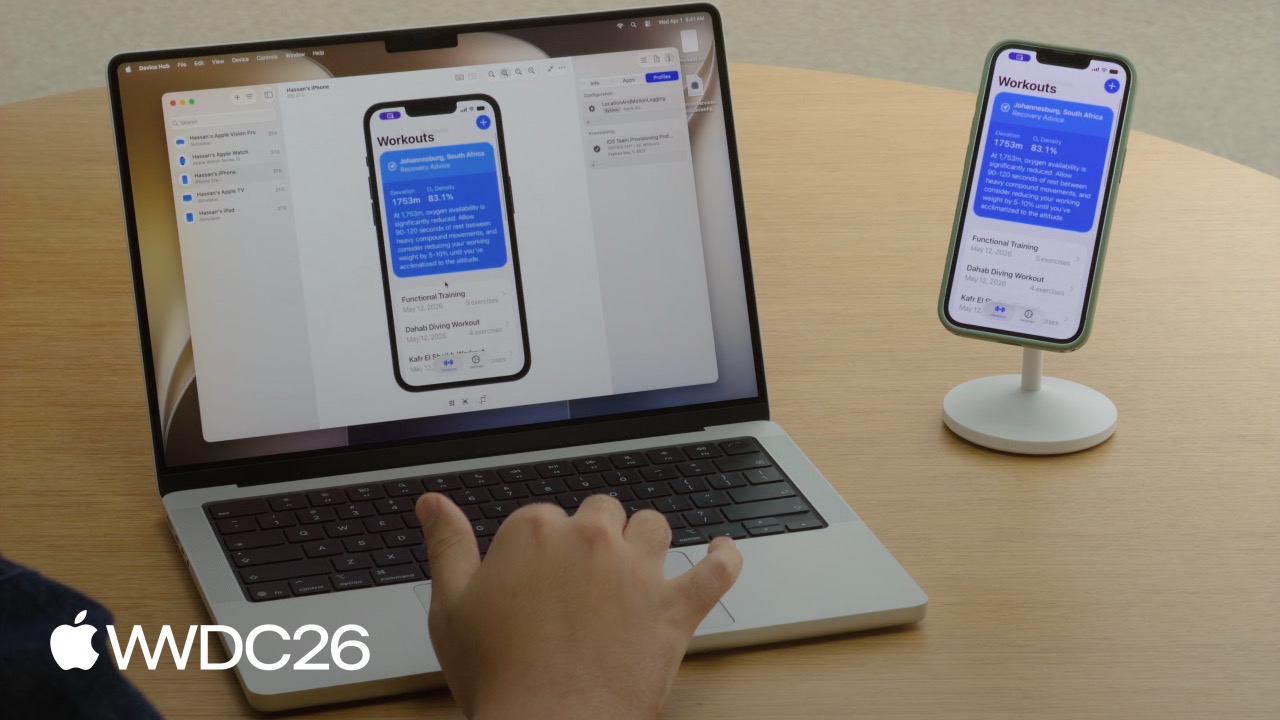
Apple introduces Device Hub, a standalone app separate from Xcode that unifies physical device and simulator management. Together with the
devicectlcommand-line tool, it makes device control, diagnostic collection, and CI script integration possible without stitching together multiple tools.
Core Ideas
The old problem: device management was scattered across tools
Every iOS developer has had this experience. To test a physical device, you opened Xcode’s Devices and Simulators window. To debug a simulator, you opened Simulator.app. To write CI scripts, you used xcrun simctl plus separate third-party tools for physical devices. Once there were multiple devices, you were constantly switching windows. Changing configuration was even worse: Dark Mode, font size, location simulation, each step required digging through device settings.
What Device Hub does
Apple combines Simulator.app functionality and physical device management into a standalone app: Device Hub. It is installed with Xcode 27 and can be used directly without opening Xcode.
Device Hub has three main areas:
- Sidebar: Lists all devices and simulators, with filtering, sorting, grouping, and context-menu actions such as restarting a device or pairing an iPhone and Apple Watch with one click.
- Canvas: Shows the device screen in real time. You can click, drag, scroll, and interact directly, and you can route Mac keyboard input to the device.
- Inspector: Provides five panels covering appearance settings, location simulation, audio options, diagnostics, app management, and profiles.
Physical devices and simulators behave the same way across these three areas. You do not need to remember two different workflows.
A practical workflow
The session demonstrates a complete bug reproduction flow.
Hassan finds a UI bug on Apple Watch: text is truncated in landscape. He uses Device Hub to do the following:
- Pair the Apple Watch wirelessly to the Mac.
- Install a CoreLocation logging profile.
- Capture a screenshot of the bug.
- Trigger sysdiagnose to collect system diagnostics.
- Download the app’s data container and send it to a teammate.
Matt receives the materials, opens the matching iPhone 17e simulator in Device Hub, replaces the data container, rotates the simulator to landscape, sets the location to Johannesburg at high altitude, and increases the font size to the maximum. The bug reproduces. All three conditions were required: landscape + specific location + maximum font size.
Previously, this required switching among Xcode, Simulator.app, command-line tools, and Finder. Now the whole flow happens in Device Hub.
Details
Compact mode and Full mode
(01:45) When you build and run to a simulator from Xcode, Device Hub automatically launches in Compact mode. The window shows only the device screen and a few bottom controls, such as Home, screenshot, and rotate. These buttons are context-aware: Apple TV shows play/pause and navigation keys, Apple Vision Pro shows environment switching and camera movement, and Apple Watch shows the side button and Digital Crown.
(02:32) Click the expand button at the top to enter Full mode and unlock all features: zoom, 1:1 physical size, Resize mode, keyboard capture, the sidebar device list, and Inspector panels.
Canvas interaction
(03:20) Canvas supports direct interaction: clicks, drags, scrolling, and natural trackpad gestures. Physical devices and simulators use the same interaction model.
The toolbar above Canvas provides several useful features:
- Zoom: Scale the screen display up or down.
- 1:1 physical size: Show the screen at real device size, useful for checking how UI feels at actual size.
- Resize mode: Freely resize the app, useful for debugging UIKit adaptive layouts.
- Capture keyboard: Route Mac keyboard input directly to the device to test shortcuts and hardware keyboard support.
Organizing devices in the sidebar
(04:55) The sidebar shows the full list of devices and simulators. A filter menu at the top controls which devices are visible, and the list supports several sorting and grouping modes. Right-click a device for quick actions such as restart or pairing iPhone and Apple Watch simulators.
(05:22) You can open views for multiple devices at once. Select several devices in the sidebar and double-click; each opens in its own Compact window. This is convenient when comparing UI adaptation across screen sizes side by side.
Five Inspector panels
(06:14) The Inspector on the right has three tabs and five panels:
Settings tab
- Appearance: Dark Mode, font size, and more. Changes take effect immediately without digging through device settings.
- Conditions: Simulate location changes and other conditions.
- Audio: Volume controls and input/output settings.
Diagnostics tab
- Shows all diagnostics on the device, including crashes, spins, and other diagnostic information. When an app has performance issues or crashes, start here.
Info/Apps/Profiles tab
- Info: Basic information such as storage, model, and serial number.
- Apps: Install, uninstall, and manage apps, including downloading and replacing data containers.
- Profiles: Manage configuration profiles and provisioning profiles.
Data container management
(11:46) Device Hub supports direct operations on an app’s data container. You can:
- View saved state in Finder
- Restore to a known baseline state
- Capture snapshots for later use
- Download a data container and send it to another developer
- Replace the current app’s data with a received data container
This is especially useful when reproducing bugs. Import a user’s or teammate’s device data directly into the simulator, and the reproduction environment is ready.
The devicectl command-line tool
(15:52) The underlying technology for Device Hub corresponds to a command-line tool: devicectl. It is designed for scripts and automation, including CI/CD pipelines.
Examples of common commands:
# List all devices
xcrun devicectl list devices

# Install an app on a device
xcrun devicectl device install app --device <device-id> ./MyApp.app

# Switch between Dark and Light mode
xcrun devicectl device info settings --device <device-id>

# Get detailed device information
xcrun devicectl device info --device <device-id>
The --json-output option outputs structured JSON, making it easier to parse in scripts and integrate into CI workflows.
Key points:
list devices: Gets identifiers and basic information for all connected devices.device install app: A unified install command with the same syntax for physical devices and simulators.--json-output: Outputs structured data, replacing regular-expression parsing of plain text output.- CLI and GUI behavior is consistent because both are built on the same underlying Device Hub technology.
Practical Ideas
1. Recreate a bug environment with one workflow
- What to do: After receiving a bug report, use Device Hub to quickly reproduce the user’s device environment.
- Why it matters: A data container plus location and appearance settings can recreate the environment in minutes, reducing “works on my machine” disputes.
- How to start: Download the data container in the Apps panel, adjust location and font size in the Settings panel, and use screenshots to confirm reproduction.
2. Test adaptive UI across multiple devices
- What to do: Open Compact windows for iPhone SE, iPhone Pro Max, and iPad at the same time and compare layouts side by side.
- Why it matters: Device Hub’s 1:1 physical size view shows how the UI actually feels on real hardware sizes.
- How to start: Select multiple simulators in the sidebar, double-click to open separate windows, and combine this with Resize mode to test different sizes.
3. Standardize device management in CI pipelines
- What to do: Replace mixed scripts using
simctland third-party physical-device tools withdevicectl. - Why it matters: One command family manages both physical devices and simulators, and JSON output is easy to parse.
- How to start: Gradually replace
xcrun simctlcommands in CI withxcrun devicectl, and first validate the output format with--json-output.
4. Automate diagnostic collection
- What to do: Automatically trigger sysdiagnose and log collection when tests fail.
- Why it matters: Device Hub’s diagnostics panel and
devicectllog commands standardize diagnostic collection. - How to start: Add sysdiagnose trigger logic to UI test scripts and package diagnostics automatically on failure.
5. Debug cross-device features
- What to do: When developing Apple Watch + iPhone features, use Device Hub to pair the two devices.
- Why it matters: Right-click pairing for simulators and wireless pairing for physical devices put the communication link under one management surface in Device Hub.
- How to start: Right-click in the sidebar, choose “Pair Nearby Device,” and follow the prompts.
Related Sessions
- Modernize your UIKit app - Device Hub’s Resize mode is an ideal companion for debugging adaptive UIKit layouts
- Getting the Most Out of Simulator (WWDC 2019) - Learn about Simulator’s historical capabilities and compare them with Device Hub improvements
- Xcode 27 - Device Hub ships with Xcode 27, so this session covers the broader Xcode update
- SwiftUI - SwiftUI adaptive layouts across devices also benefit from Device Hub’s multi-size testing capabilities
Comments
GitHub Issues · utterances