
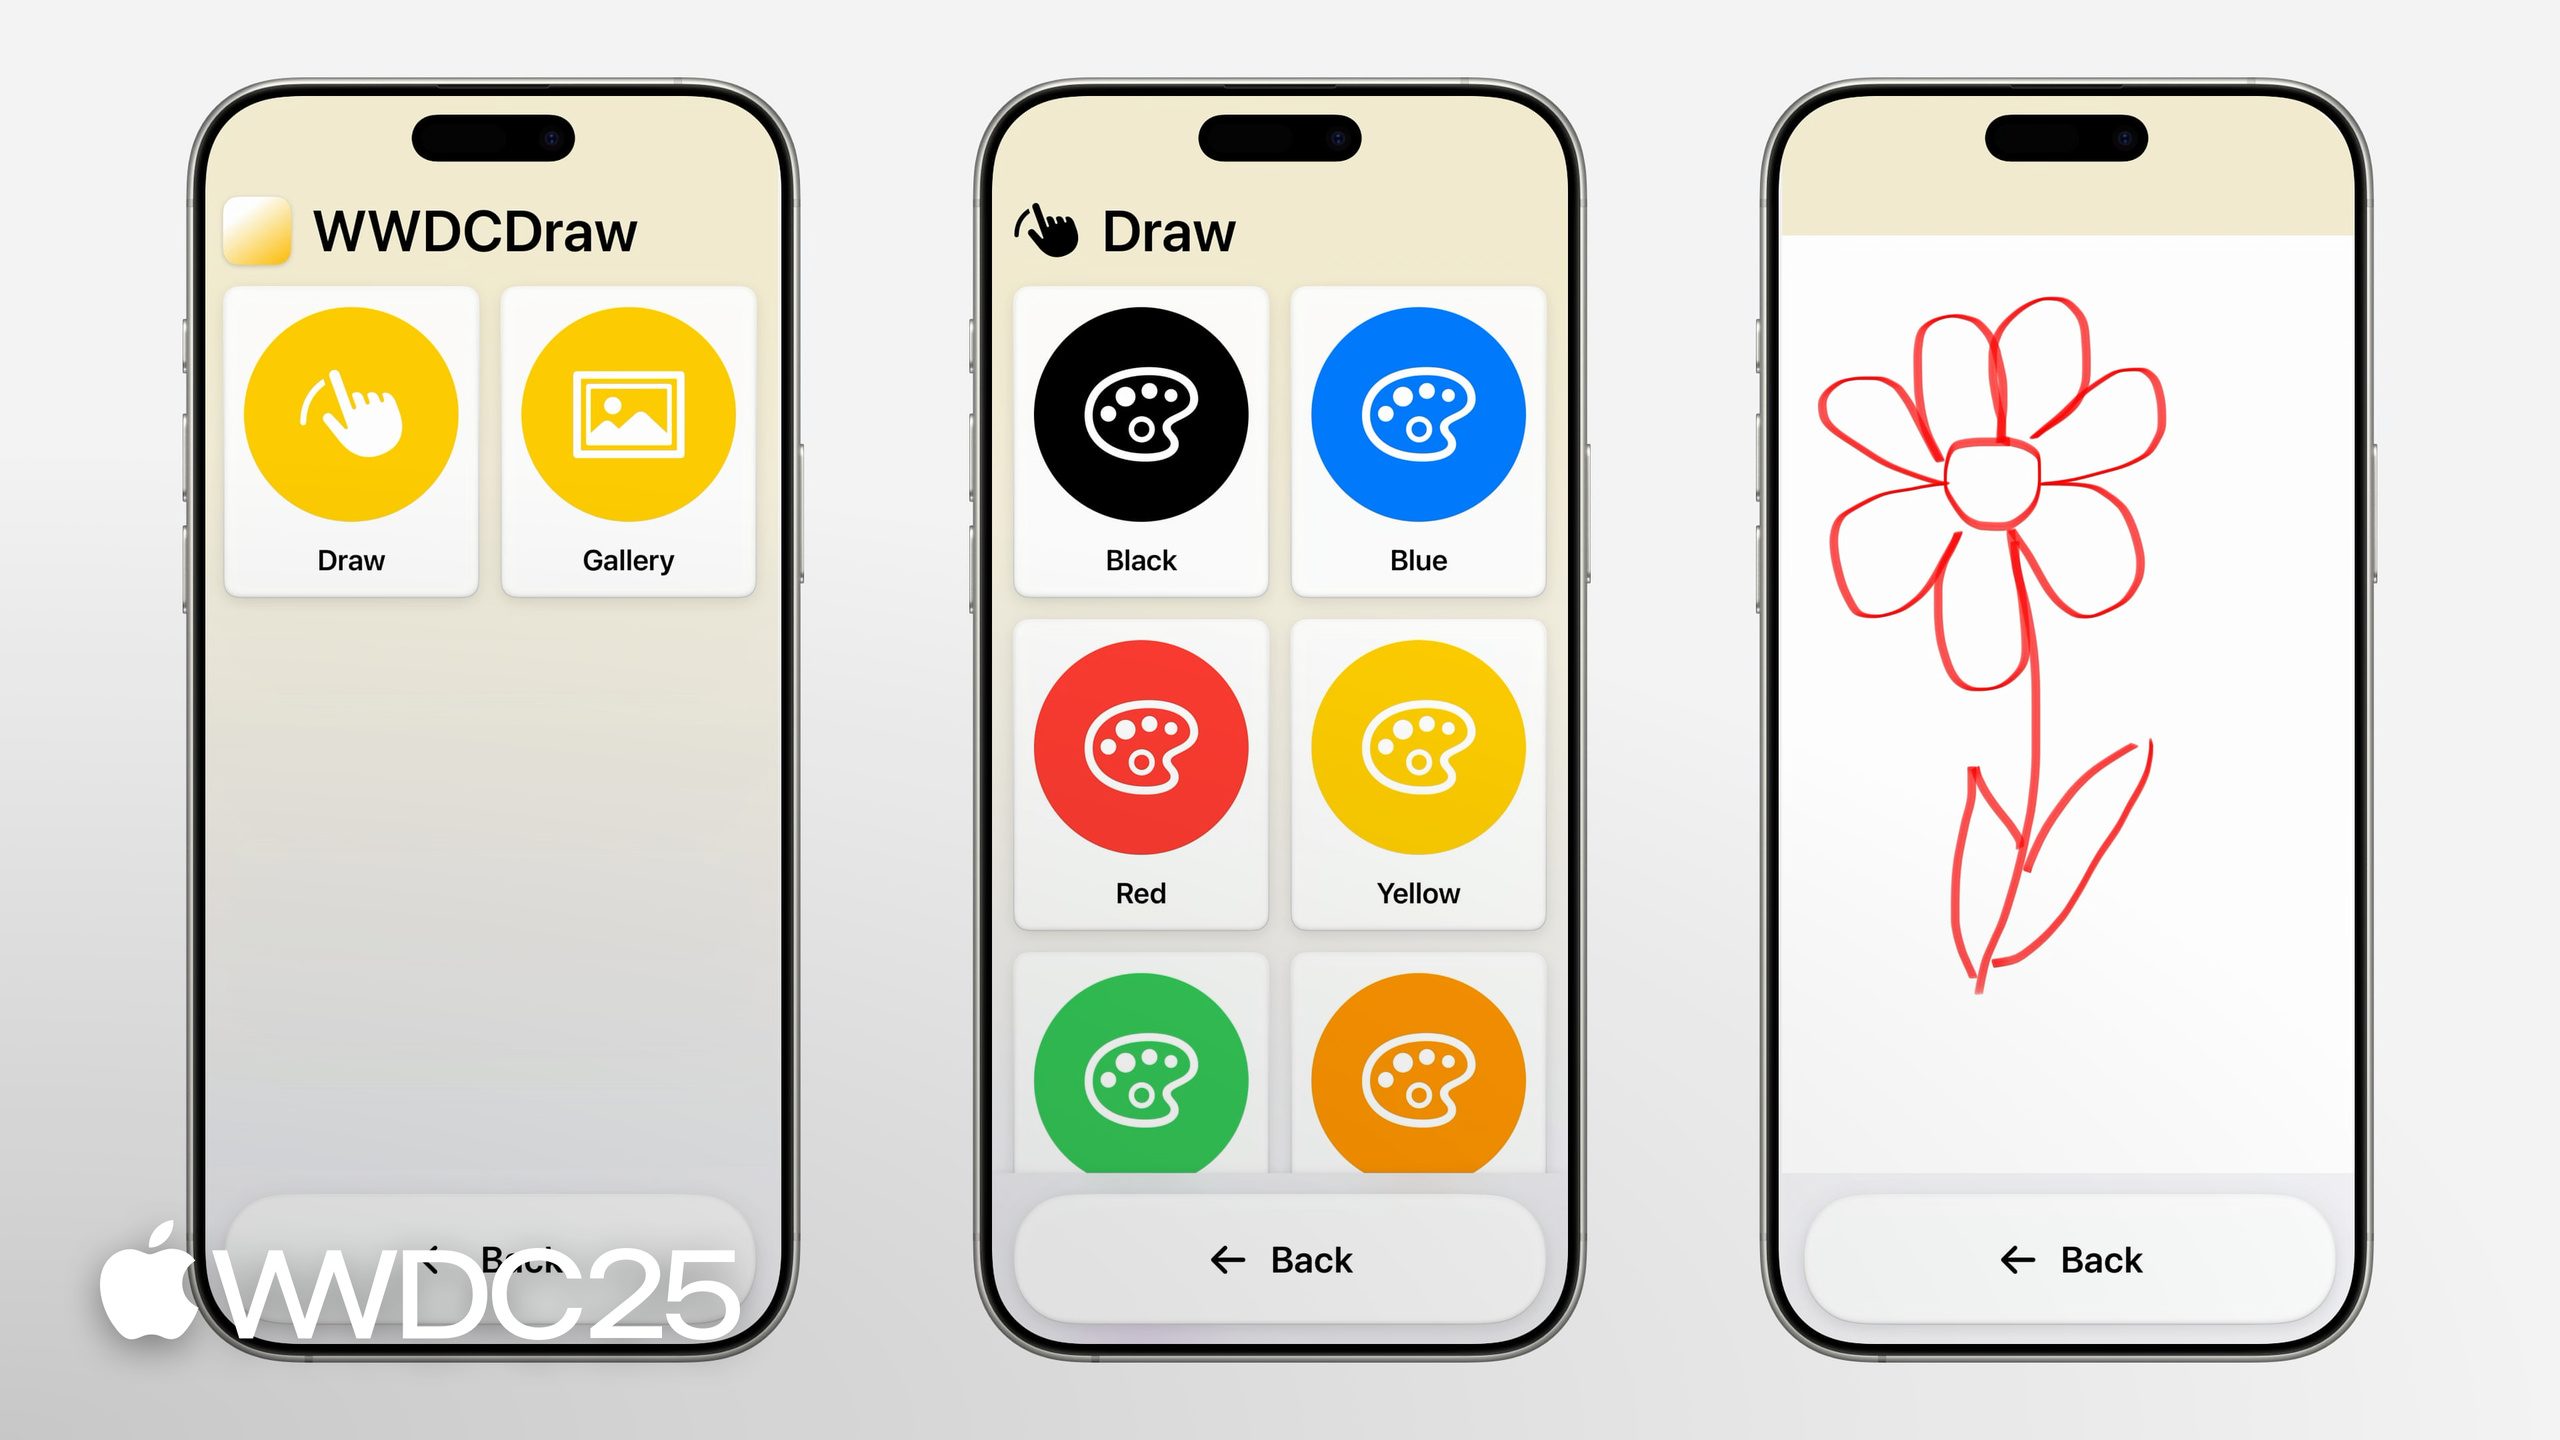
Highlight
Assistive Access is the streamlined system experience Apple introduced in iOS/iPadOS 17 for users with cognitive disabilities. It uses large controls, simplified flows, and visual information layouts. Before iOS 26, apps that hadn’t been adapted ran inside a shrunken frame to leave room for the global back button at the bottom. iOS 26 adds the
AssistiveAccessSwiftUI scene, which lets you ship a fully custom interface for this mode.
Core content
A user with a cognitive disability opens your drawing app. The screen is packed with brushes, erasers, undo, gallery, favorites, color palette, and an opacity slider. Every extra option adds cognitive load. After Assistive Access shipped in iOS 17, apps that hadn’t been adapted were also squeezed into a smaller frame to make room for the global back button — visually tighter, and a worse experience.
iOS/iPadOS 26 adds the AssistiveAccess SwiftUI scene, which lets you ship a separate interface for this mode. When the scene is active, native Button, List, NavigationLink, and navigationTitle automatically render in Assistive Access’s large, prominent style and lay out as a grid or rows based on the user’s choice in system settings. The bottom back button handles popping the navigation stack with no extra code (09:00). If your app is already designed for users with cognitive disabilities (such as an AAC communication app), set UISupportsFullScreenInAssistiveAccess to true and your existing UI runs full screen as is. Other apps should adopt the new scene path and trim down to the core features.
Details
The first step to adopt the Assistive Access scene: set UISupportsAssistiveAccess to true in Info.plist. The app then shows up in the Optimized Apps list in system settings and launches full screen instead of inside the shrunken frame (04:54). Then add an AssistiveAccess scene to your App:
// Create a scene for Assistive Access

import SwiftUI
import SwiftData

@main
struct WWDCDrawApp: App {
  var body: some Scene {
    WindowGroup {
      ContentView()
        .modelContainer(for: [DrawingModel.self])
    }
    AssistiveAccess {
      AssistiveAccessContentView()
          .modelContainer(for: [DrawingModel.self])
    }
  }
}
Key points:
WindowGroupis the entry point for normal mode;AssistiveAccess { ... }is a new sibling scene that is only created and attached when Assistive Access is active (05:55).- Both scenes attach
modelContainerso SwiftData models are available in both modes. AssistiveAccessContentViewis the root view you design for this mode, holding only the 1–2 most essential features.
You don’t need a device to preview this scene. Pass the .assistiveAccess trait to #Preview (06:25):
// Display an Assistive Access preview

import SwiftUI

struct AssistiveAccessContentView: View {
  @Environment(\.modelContext) var context
  var body: some View {
    VStack {
      Image(systemName: "globe")
        .imageScale(.large)
        .foregroundStyle(.tint)
      Text("Hello, world!")
    }
    .padding()
  }
}

#Preview(traits: .assistiveAccess)
    AssistiveAccessContentView()
}
Key points:
traits: .assistiveAccesstells Xcode Preview to render the view in the style used when the scene is active, so you don’t have to keep entering Assistive Access mode to debug.
UIKit-lifecycle apps can host this SwiftUI scene too. Declare it on the scene delegate’s static rootScene property (06:35):
// Declare a SwiftUI scene with UIKit

import UIKit
import SwiftUI

class AssistiveAccessSceneDelegate: UIHostingSceneDelegate {

  static var rootScene: some Scene {
    AssistiveAccess {
      AssistiveAccessContentView()
    }
  }

    /* ... */
}
Key points:
UIHostingSceneDelegateis the new scene bridging protocol in iOS 26. It lets a UIKit app host a SwiftUI scene.rootScenemust be a static property that returnssome Scene.
Then attach the delegate in AppDelegate based on the scene role (06:55):
// Activate a SwiftUI scene with UIKit

import UIKit

@main
class AppDelegate: UIApplicationDelegate {
  func application(_ application: UIApplication, configurationForConnecting connectingSceneSession: UISceneSession, options: UIScene.ConnectionOptions) -> UISceneConfiguration {
    let role = connectingSceneSession.role
    let sceneConfiguration = UISceneConfiguration(name: nil, sessionRole: role)
    if role == .windowAssistiveAccessApplication {
      sceneConfiguration.delegateClass = AssistiveAccessSceneDelegate.self
    }
    return sceneConfiguration
  }
}
Key points:
- When the system launches the app in Assistive Access,
roleis.windowAssistiveAccessApplication. - Only swap
delegateClassfor that role; normal mode keeps its original delegate, and the two don’t interfere.
On the visual side, users with cognitive disabilities understand icons better than text alone, so navigation titles should carry an icon too. assistiveAccessNavigationIcon(systemImage:) shows the icon in the navigation bar when the scene is active (14:36):
// Display an icon alongside a navigation title

import SwiftUI

struct ColorSelectionView: View {
  var body: some View {
    Group {
      List {
        ForEach(ColorMode.allCases) { color in
          NavigationLink(destination: DrawingView(color: color)) {
            ColorThumbnail(color: color)
          }
        }
      }
      .navigationTitle("Draw")
      .assistiveAccessNavigationIcon(systemImage: "hand.draw.fill")
    }
  }
}
Key points:
- The
assistiveAccessNavigationIconmodifier only takes effect inside the Assistive Access scene; normal mode is untouched. - It also accepts a custom
Imageinstead of an SF Symbol name. - Pair every page that has a
navigationTitlewith an icon.
For design principles, the session gives five concrete pieces of advice (starting at 09:39): trim down to 1–2 core features; reduce on-screen options; avoid hidden gestures and nested UI; don’t use timed interactions (views that auto-dismiss or auto-switch); and build step-by-step selection flows that split decisions apart. The speaker uses the drawing app as an example: the “pick a color” choice moves out of the canvas and becomes its own step before entering the canvas. Decisions are separated, and cognitive load drops (13:01). At the same time, hard-to-recover actions like “undo stroke” and “delete drawing” are removed, and any destructive action that has to stay requires a confirmation step (11:33).
Takeaways
-
Add an
AssistiveAccessscene to an existing app. Why it’s worth it — compared to running the whole app full screen, the scene path lets native controls pick up the large Assistive Access style and grid/row layout for free, giving you a consistent look at almost no cost. How to start — addUISupportsAssistiveAccessto Info.plist, declare anAssistiveAccess { ... }scene next to the main one inApp, and write a root view inside it that has only 1–2 core features. -
Use
#Preview(traits: .assistiveAccess)to speed up debugging. Why it’s worth it — preview the scene’s active style directly in Xcode without flipping system settings every time. How to start — add a#Preview(traits: .assistiveAccess) { MyView() }to each Assistive Access view, just like a regular SwiftUI preview. -
Rewrite “many options side by side” as “step by step”. Why it’s worth it — fewer on-screen options make each decision easier; a step-by-step flow has each step carry one decision, and cognitive load drops linearly. How to start — count the independent decisions on the current page (color, brush, canvas size…), split them into separate pages up front, ask one question per page, and finish all the choices before entering the main feature.
-
Pair every
navigationTitlewith an icon. Why it’s worth it — a dual text-and-image channel is easier for users with cognitive disabilities to understand, and it doesn’t change the look in normal mode. How to start — add.assistiveAccessNavigationIcon(systemImage: "...")after each view that has anavigationTitle, and pick an SF Symbol that closely matches the feature. -
Audit the destructive actions in your app. Why it’s worth it — accidental deletions and edits hit harder for users with cognitive disabilities. How to start — list every irreversible action in the app (delete, clear, submit order); in the Assistive Access scene, consider removing the non-essential ones outright; for the ones you keep, add a confirmation prompt.
Related sessions
- Evaluate your app for Accessibility Nutrition Labels — show the accessibility features your app supports on its App Store product page.
- Make your Mac app more accessible to everyone — practical guide to integrating accessibility into Mac apps.
- Principles of inclusive app design — design principles for more inclusive apps, starting from understanding disability.
Comments
GitHub Issues · utterances