
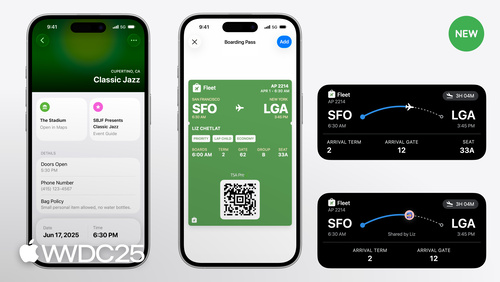
Highlight
Wallet introduces
upcomingPassInformationin 2025, letting one pass hold every show in a tour or every game in a season. Each event has its ownidentifier,isActivestate, venue semantics, and detail page.
Core Content
The old problem with ticketing apps: a 20-game season means 20 tickets piled up in Wallet. The month view fills up with the same team logo, and finding a specific game comes down to remembering the date. Last year’s Poster Event Ticket changed the visuals, but the underlying data model stayed the same — each game was still a separate pass. This year’s upcomingPassInformation finally changes the data structure: one pass carries an array of events, and each event has its own ID, date, venue, performer, seat, and event guide. The user opens the pass and sees an itinerary list; tapping into one shows the single-event detail. Migration cost for developers comes down to two things: a stable identifier for adding and removing events, and an isActive field that marks the event you can currently enter.
The boarding pass changes are more aggressive. Apple has wired flight tracking directly into the system-level Apple Flight Service. When a pass is added, Wallet looks up the flight using three semantic fields — airlineCode, flightNumber, and originalDepartureDate — and from then on gate changes, delays, and terminal swaps are pushed by the system. The developer’s backend no longer has to poll and fan out APNs. Boarding time no longer needs to be tracked separately either: at the moment the pass is added, Wallet records the gap between departure and boarding times, and when the official system updates departure, boarding shifts by the same delta. With the new Live Activity, the user can watch the flight from the Lock Screen and Dynamic Island all the way to landing, and can share that Live Activity through Messages with whoever is picking them up.
One change that’s easy to miss: automatic pass addition. PKPassLibrary adds a one-shot authorization called backgroundAddPasses. Once granted, calling addPasses(_:) drops the pass into Wallet directly, with a single notification to inform the user. For monthly passes, transit cards, and frequent-flyer apps, this saves at least two taps along the “open the app, find the order, tap Add to Wallet” path.
Detailed Content
The pass.json structure for multi-event tickets (02:04). Upcoming events go in the upcomingPassInformation array at the top level of pass.json. Each element is a complete event object:
{
  "upcomingPassInformation": [
    {
      "type": "event",
      "identifier": "tour-2025-tokyo",
      "displayName": "Tokyo Night",
      "date": "2025-09-12T19:00:00+09:00",
      "isActive": true,
      "semantics": {
        "venueName": "Tokyo Dome",
        "venuePlaceID": "...",
        "venueLocation": { "latitude": 35.7056, "longitude": 139.7519 },
        "seats": [{ "seatSection": "A", "seatRow": "12", "seatNumber": "8" }]
      },
      "URLs": {
        "purchaseParkingURL": "https://example.com/parking/tokyo"
      },
      "images": {
        "headerImage": {
          "1x": "https://example.com/[email protected]",
          "2x": "https://example.com/[email protected]",
          "3x": "https://example.com/[email protected]"
        }
      }
    }
  ]
}
Key points:
identifiermust be globally unique within the pass and stable, since you’ll use it later to add, remove, or update this event through pass updates.- Set
isActiveto true when the event begins and false after it ends. This controls whether the event is highlighted as “upcoming” in the Wallet list. venueName,venuePlaceID, andvenueLocationinsidesemanticsdrive the venue card and map button at the top of the detail page. The structure is identical to a single Poster Event Ticket — but values are not inherited automatically from the outer pass’s same-named fields. You have to repeat them inside each event.images.headerImagemust provide 1x, 2x, and 3x resolutions, because the upcoming event detail page renders on both iOS and watchOS.- To reuse the outer pass’s venue map for this event, set
venueMap.reuseExistingto true. Otherwise Wallet won’t show a venue map.
The semantic layer of the upgraded boarding pass (09:00). Wallet uses three semantic fields to identify the flight, and the gap between boarding and departure to maintain boarding time on its own. The pass.json only needs to provide the raw fields — the rest is handled by Apple Flight Service:
{
  "semantics": {
    "airlineCode": "CA",
    "flightNumber": "983",
    "originalDepartureDate": "2025-09-12T08:30:00+08:00",
    "currentDepartureDate": "2025-09-12T08:30:00+08:00",
    "originalBoardingDate": "2025-09-12T07:50:00+08:00",
    "currentBoardingDate": "2025-09-12T07:50:00+08:00",
    "passengerServiceSSRs": ["SVAN", "WCOB"],
    "airlineLoungePlaceID": "..."
  },
  "purchaseLoungeAccessURL": "https://example.com/lounge"
}
Key points:
airlineCode + flightNumber + originalDepartureDateis a three-field set. Drop any one of them and Wallet can’t find the flight in Apple Flight Service, and the whole automatic tracking falls back to a static display.originalDepartureDateis always the time printed on the ticket. Do not change it because of a delay; for delays, only updatecurrentDepartureDate(09:45).originalBoardingDateandoriginalDepartureDateare used at the moment the pass is added to compute “boarding lead time”. After that, whenever Apple updates departure, boarding shifts by the same delta. UsecurrentBoardingDateto override it yourself.passengerServiceSSRsaccepts IATA-standard SSR codes (e.g.SVANfor service dog,WCOBfor onboard wheelchair). Wallet renders the text, so the display is consistent across airlines.- When
airlineLoungePlaceIDappears together withpurchaseLoungeAccessURL, Wallet renders a map preview below the button (14:56). Provide just the URL without the placeID and the button looks orphaned.
The automatic pass-adding API (17:35). The flow is similar to requesting push permission, but the prompt only fires once:
import PassKit
import SwiftUI

struct AddPassToWalletButton: View {
    let pass: PKPass

    var body: some View {
        Button("Add to Wallet") {
            Task {
                try? await PKPassLibrary().requestAuthorization(for: .backgroundAddPasses)
            }
        }
        .task {
            let status = PKPassLibrary().authorizationStatus(for: .backgroundAddPasses)
            if status == .authorized {
                try? await PKPassLibrary().addPasses([pass])
            }
        }
    }
}
Key points:
requestAuthorization(for: .backgroundAddPasses)is async and one-shot. Once the user has tapped allow or deny, calling it again does nothing — the system won’t prompt a second time (18:12). So pick a moment when the user is likely to say yes, such as right after a ticket purchase.authorizationStatus(for:)doesn’t trigger any UI. Read it directly inside.taskoronAppear.addPasses(_:)takes an array, so you can add several passes at once — a good fit for cases like “buy a yearly pass, deliver 12 monthly cards in one go”.- Once authorized, the user can switch the capability off in system settings at any time, and the app can’t block that. Check the authorization status every time.
- After a successful background add, Wallet posts a system notification. Don’t pile your own in-app toast on top — that just nags the user twice.
Core Takeaways
-
What to do: Migrate the existing “one event, one pass” model to
upcomingPassInformation. Why it’s worth doing: 20 season tickets for the same team scattered around the user’s wallet collapse into 1 pass. The detail page can carry opening acts, venue maps, parking vouchers, and everything else related — pushing up retention and reach for that single pass. How to start: First add 2-3 events to a test pass and check how Wallet renders them. Confirm thatidentifier-based add and remove behavior in pass updates matches what you expect. Then update your backend templates in bulk. -
What to do: Fill in the semantic layer for boarding passes and turn on Apple Flight Service tracking. Why it’s worth doing: You can retire your own “flight change push” pipeline (polling, APNs, sync) and get Live Activity and the share-with-family feature for free. It’s a subtraction in engineering and an addition in user experience. How to start: First, fill in just
airlineCode,flightNumber,originalDepartureDate, andcurrentDepartureDate. Next, add SSR codes and service URLs. After launch, compare against real flights to check how accurate Apple Flight Service is. For domestic routes, run both pipelines side by side for a while before retiring your own push. -
What to do: Request
backgroundAddPassesauthorization the moment a ticket purchase succeeds. Why it’s worth doing: It pushes the success rate of “add to Wallet” past the drop-off of a two-step flow. The biggest wins are in cases where users already expect the pass to land in Wallet — monthly passes, transit cards, hotel chain membership cards. How to start: Add an explicit “automatically add to Wallet” toggle on the purchase confirmation page so the user actively triggers the authorization request. Don’t call it silently at app launch — that wastes your one and only prompt. -
What to do: Standardize boarding tags with
passengerServiceSSRs. Why it’s worth doing: Service dogs, wheelchairs, special meals — running these through IATA-standard codes gives consistent display across airlines in Wallet. Ground staff ask fewer questions, and you don’t have to maintain your own localized strings. How to start: Map the special-request fields in your backend order system to the IATA SSR code table, and write them into thesemantics.passengerServiceSSRsarray in pass.json.
Related Sessions
- Discover Apple-Hosted Background Assets — Apple-hosted background asset downloads, useful for shipping large content without straining your servers
- Dive deeper into Writing Tools — Deep integration with system-level writing tools, giving app text input proofreading and rewriting
- Dive into App Store server APIs for In-App Purchase — Latest updates to App Store server APIs and notifications
- Enhance child safety with PermissionKit — Using PermissionKit to strengthen communication safety on kids’ devices
Comments
GitHub Issues · utterances