
Highlight
visionOS 2 adds automatic baseplates, corner resize handles, toolbars, and custom ornaments to volumes, plus enhanced immersion control and spatial tracking for immersive spaces.
Core Content
visionOS has three scene types: Window, Volume, and Immersive Space. This session focuses on Volume and Immersive Space, especially visionOS 2 enhancements.
Volumes improved noticeably in visionOS 2. When you look at a volume, a baseplate automatically appears at the bottom, helping users perceive its boundaries. If content already fills the volume or you draw your own bottom surface, hide the baseplate with .volumeBaseplateVisibility(.hidden).
Another important change: volumes now have corner resize handles. By default, min/max sizes inherit from the content view’s frame. Fixed frame sizes prevent resizing—set min/max values instead and drag handles to scale smoothly. You can also drive volume size changes dynamically via state variables in code.
Toolbars can float in ornaments at the bottom of a volume. In visionOS 2, toolbars automatically move to the nearest side based on where the user stands; window controls do too. Beyond toolbars, visionOS 2 lets volumes add custom ornaments anywhere around the volume, auto-scaling with distance for readability.
As users move around a volume, robots and content should respond. Each side of a volume is a viewpoint; the system moves window controls and ornaments to the side nearest the user. Listen for viewpoint changes with onVolumeViewpointChange so content follows. Restrict to specific sides with supportedVolumeViewpoints if needed.
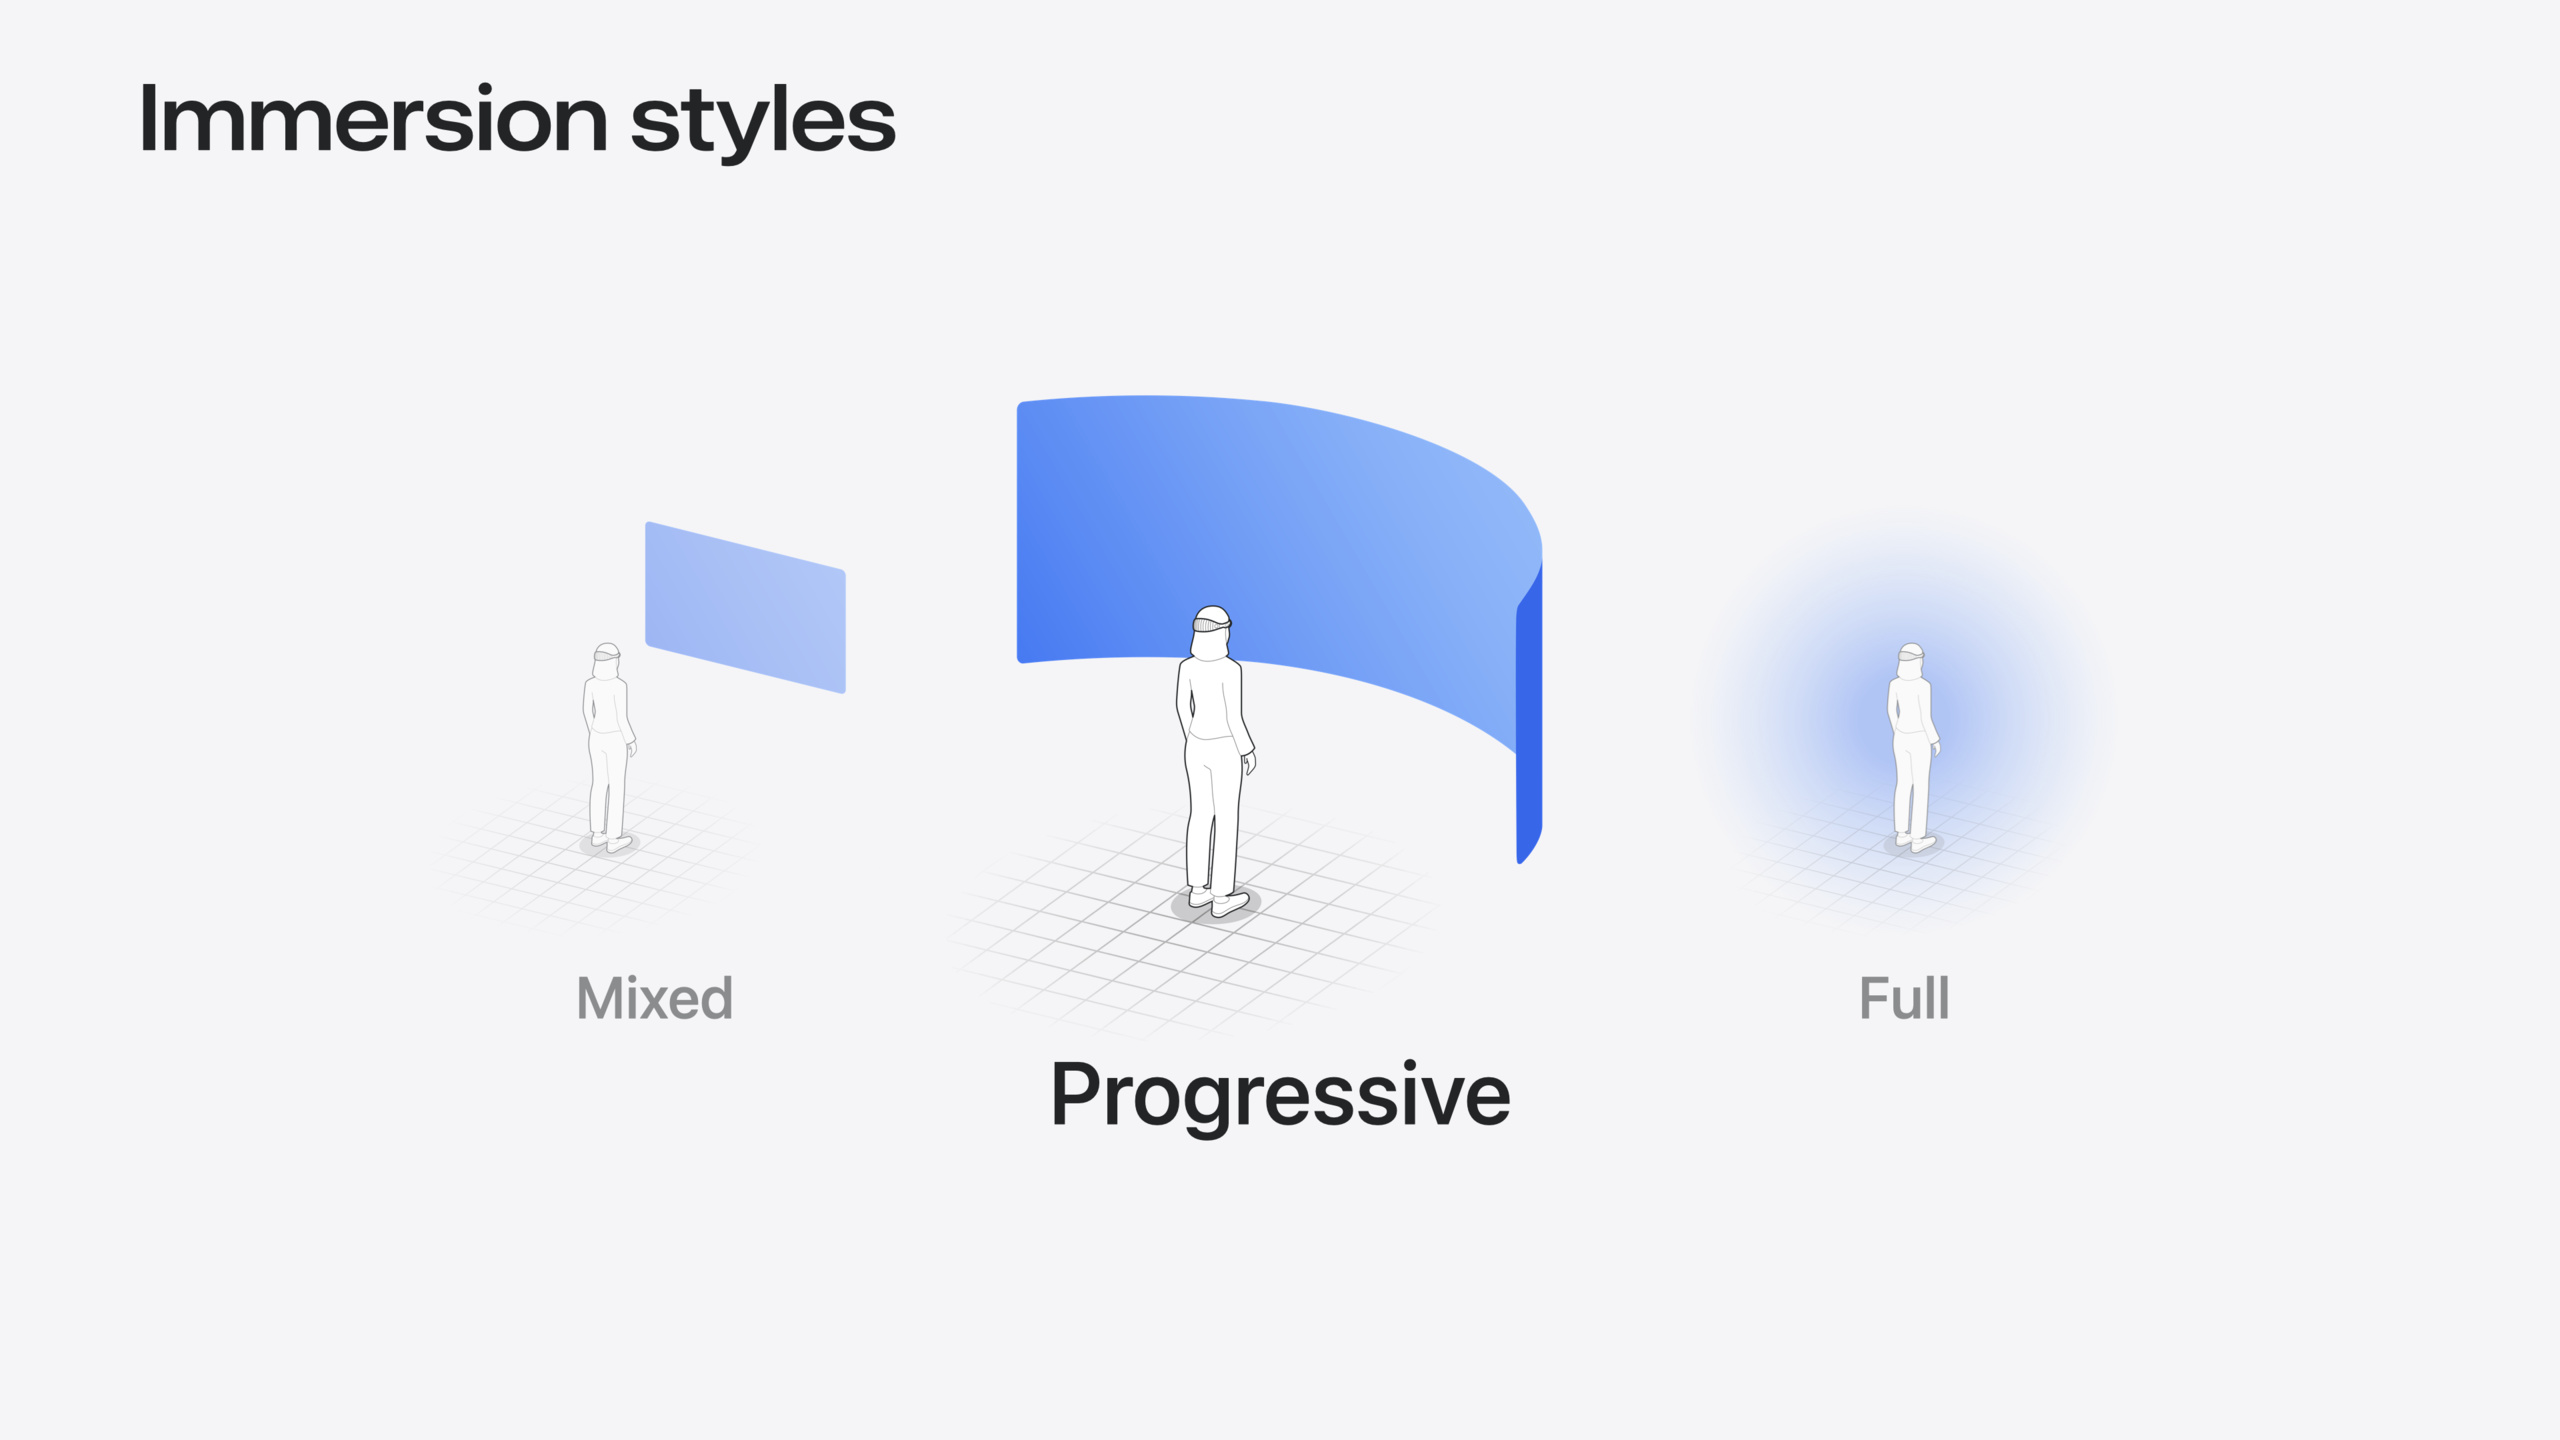
The Immersive Space section adds more control. visionOS 2 supports custom immersion ranges—specify initial, min, and max values for progressive immersion. When users adjust immersion with the Digital Crown, react with onImmersionChange.
The new SpatialTrackingSession API tracks plane anchors. After creating a floor anchor, use SpatialTapGesture to detect taps in the immersive space and place plants where the user taps. Finally, SurroundingsEffect can dynamically tint passthrough—e.g., when a robot collides with a plant, tint the environment with the pot’s color.
Detailed Content
Volume baseplate
visionOS 2 enables baseplates for volumes by default. They fade in when the user looks at the volume, helping perceive boundaries.
// Baseplate

WindowGroup(id: "RobotExploration") {
    ExplorationView()
        .volumeBaseplateVisibility(.visible) // Default!
}
.windowStyle(.volumetric)volumeBaseplateVisibility(.visible)is default—baseplate fades in on gaze- If content fills the volume or you custom-draw the bottom, set
.hiddento avoid visual conflict - Baseplate helps users find corner resize handles
Volume resizing
Volumes now have corner resize handles—set frame min/max correctly.
// Enabling resizability

WindowGroup(id: "RobotExploration") {
    let initialSize = Size3D(width: 900, height: 500, depth: 900)

    ExplorationView()
        .frame(minWidth: initialSize.width, maxWidth: initialSize.width * 2,
               minHeight: initialSize.height, maxHeight: initialSize.height * 2)
        .frame(minDepth: initialSize.depth, maxDepth: initialSize.depth * 2)
}
.windowStyle(.volumetric)
.windowResizability(.contentSize) // Default!- Set
minWidth/maxWidth,minHeight/maxHeight,minDepth/maxDepthto allow resizing - Fixed frame values disable resizing
windowResizability(.contentSize)is default—volume size inherits from content
Programmatic volume resize
Drive volume size dynamically via state variables (06:10).
// Programmatic resize

struct ExplorationView: View {
    @State private var levelScale: Double = 1.0

    var body: some View {
        RealityView { content in
            // Level code here
        } update: { content in
            appState.explorationLevel?.setScale(
                [levelScale, levelScale, levelScale], relativeTo: nil)
        }
        .frame(width: levelSize.value.width * levelScale,
               height: levelSize.value.height * levelScale)
        .frame(depth: levelSize.value.depth * levelScale)
        .overlay { Button("Change Size") { levelScale = levelScale == 1.0 ? 2.0 : 1.0 } }
    }
}- State variable
levelScalecontrols scale - Frame values change with scale; volume auto-resizes
- RealityKit entities must scale in sync
Toolbar ornament
Toolbars float at the bottom of a volume (07:39).
// Toolbar ornament

ExplorationView()
.toolbar {
		ToolbarItem {
      	Button("Next Size") {
          	levelScale = levelScale == 1.0 ? 2.0 : 1.0
        }
    }
  	ToolbarItemGroup {
      	Button("Replay") {
          	resetExploration()
        }
      	Button("Exit Game") {
          	exitExploration()
          	openWindow(id: "RobotCreation")
        }
    }
}ToolbarItemandToolbarItemGrouporganize buttons- Toolbar auto-moves to the nearest side as the user moves
- Toolbar auto-scales with distance for readability
Custom ornaments
Beyond toolbars, add custom ornaments around volumes (10:41).
// Ornaments

WindowGroup(id: "RobotExploration") {
    ExplorationView()
    .ornament(attachmentAnchor: .scene(.topBack)) {
        ProgressView()
    }
}
.windowStyle(.volumetric)
attachmentAnchor: .scene(.topBack)places ornament at top-back of volume- Ornaments follow viewpoint changes
- Ornaments auto-scale with distance
Listening for viewpoint changes
Make content respond as users move around the volume (12:08).
// Volume viewpoint

struct ExplorationView: View {
    var body: some View {
        RealityView { content in
            // Some RealityKit code
        }
        .onVolumeViewpointChange { oldValue, newValue in
            appState.robot?.currentViewpoint = newValue.squareAzimuth
        }
    }
}onVolumeViewpointChangefires when the active viewpoint changesnewValue.squareAzimuthreturns one of four normalized values: front, left, right, back- Use this to make characters face the user
Restricting supported viewpoints
If content only works from certain sides, limit supported viewpoints (13:43).
// Supported viewpoints
struct ExplorationView: View {
  	let supportedViewpoints: Viewpoint3D.SquareAzimuth.Set = [.front, .left, .right]

  	var body: some View {
      	RealityView { content in
        		// Some RealityKit code
        }
      	.supportedVolumeViewpoints(supportedViewpoints)
      	.onVolumeViewpointChange { _, newValue in
        		appState.robot?.currentViewpoint = newValue.squareAzimuth
        }
    }
}supportedVolumeViewpointsaccepts a set of supported sides- Unsupported sides won’t trigger ornament/window control moves
- All four sides supported by default
Viewpoint update strategy
Use updateStrategy to control updates for unsupported viewpoints (14:30).
// Viewpoint update strategy

struct ExplorationView: View {
    let supportedViewpoints: Viewpoint3D.SquareAzimuth.Set = [.front, .left, .right]

    var body: some View {
        RealityView { content in
            // Some RealityKit code
        }
        .supportedVolumeViewpoints(supportedViewpoints)
        .onVolumeViewpointChange(updateStrategy: .all) { _, newValue in
            appState.robot?.currentViewpoint = newValue.squareAzimuth
            if !supportedViewpoints.contains(newValue) {
                appState.robot?.animationState.transition(to: .annoyed)
            }
        }
    }
}
updateStrategy: .allensures all viewpoint changes trigger the callback- Detect when user is on an unsupported side and trigger hint animation
- Default only fires when switching between supported viewpoints
Custom immersion range
visionOS 2 supports custom initial values and ranges for progressive immersion (23:54).
// Customizing immersion
struct BotanistApp: App {
    // Custom immersion amounts
    @State private var immersionStyle: ImmersionStyle = .progressive(0.2...1.0, initialAmount: 0.8)

    var body: some Scene {
        // Immersive Space
        ImmersiveSpace(id: "ImmersiveSpace") {
            ImmersiveSpaceExplorationView()
        }
        .immersionStyle(selection: $immersionStyle, in: .mixed, .progressive, .full)
    }
}
.progressive(range, initialAmount:)creates custom progressive immersion0.2...1.0is min to max immersion rangeinitialAmount: 0.8sets initial immersion to 80%
Reacting to immersion changes
Listen for Digital Crown immersion adjustments (25:17).
// Reacting to immersion
struct ImmersiveView: View {
    @State var immersionAmount: Double?

    var body: some View {
        ImmersiveSpaceExplorationView()
            .onImmersionChange { context in
                immersionAmount = context.amount
            }
            .onChange(of: immersionAmount) { oldValue, newValue in
                handleImmersionAmountChanged(newValue: newValue, oldValue: oldValue)
            }
    }
}onImmersionChangeprovides the new immersion valueonChangedetects immersion changes and triggers responses- Compare old and new values to tell if immersion increased or decreased
Handling immersion changes
Make the robot react to immersion changes (25:39).
// Reacting to immersion
func handleImmersionAmountChanged(newValue: Double?, oldValue: Double?) {
    guard let newValue, let oldValue else {
        return
    }

    if newValue > oldValue {
        // Move the robot outward to react to increasing immersion
        moveRobotOutward()
    } else if newValue < oldValue {
        // Move the robot inward to react to decreasing immersion
        moveRobotInward()
    }
}- On increasing immersion, robot moves outward
- On decreasing immersion, robot moves inward
- This response enhances user perception of immersion changes
Spatial tracking session
Use SpatialTrackingSession to track plane anchors (26:57).
// Create and run spatial tracking session
struct ImmersiveExplorationView {
    @State var spatialTrackingSession: SpatialTrackingSession
        = SpatialTrackingSession()

    var body: some View {
        RealityView { content in
            // ...
        }
        .task {
            await runSpatialTrackingSession()
        }
    }
}SpatialTrackingSessionmanages spatial tracking.taskstarts the session when the immersive space opens- User authorization required for plane anchor access
Configure and run tracking
Set plane tracking configuration and run the session (27:11).
// Create and run the spatial tracking session
func runSpatialTrackingSession() async {
    // Configure the session for plane anchor tracking
    let configuration =
        SpatialTrackingSession.Configuration(tracking: [.plane])

    // Run the session to request plane anchor transforms
    let _ = await spatialTrackingSession.run(configuration)
}
Configuration(tracking: [.plane])configures plane trackingrun(configuration)requests authorization and starts tracking- Return value indicates authorization success
Create floor anchor
Create a horizontal floor anchor entity (27:32).
// Create a floor anchor to track
struct ImmersiveExplorationView {
    @State var spatialTrackingSession: SpatialTrackingSession
        = SpatialTrackingSession()

    let floorAnchor = AnchorEntity(
        .plane(.horizontal, classification: .floor, minimumBounds: .init(x: 0.01, y: 0.01))
    )

    var body: some View {
        RealityView { content in
            content.add(floorAnchor)
        }
        .task {
            await runSpatialTrackingSession()
        }
    }
}
.plane(.horizontal, classification: .floor, ...)creates a floor anchorminimumBoundssets minimum detection size- Add anchor to RealityView to enable tracking
Detect spatial taps
Use SpatialTapGesture to detect taps in the immersive space (27:54).
// Detect taps on entities in immersive space
RealityView { content in
    // ...
}
.gesture(
    SpatialTapGesture(
        coordinateSpace: .immersiveSpace
    )
    .targetedToAnyEntity()
    .onEnded { value in
        handleTapOnFloor(value: value)
    }
)
SpatialTapGesture(coordinateSpace: .immersiveSpace)detects 3D taps.targetedToAnyEntity()applies gesture to any entityonEndedhandles tap events
Handle tap to place plant
Convert tap location to floor anchor coordinates and place plant (28:09).
// Handle tap event
func handleTapOnFloor(value: EntityTargetValue<SpatialTapGesture.Value>) {
    let location =
        value.convert(value.location3D, from: .immersiveSpace, to: floorAnchor)

    plantEntity.position = location
    floorAnchor.addChild(plantEntity)
}
convert(location3D, from: .immersiveSpace, to: floorAnchor)transforms coordinate spaces- Set converted position as plant position
- Add plant as child of floor anchor
Passthrough tinting
Use SurroundingsEffect to tint passthrough color (30:48).
// Apply effect to tint passthrough
struct ImmersiveExplorationView: View {
    var body: some View {
        RealityView { content in
            // ...
        }
        .preferredSurroundingsEffect(surroundingsEffect)
    }

    // The resolved surroundings effect based on tint color
    var surroundingsEffect: SurroundingsEffect? {
        if let color = appModel.tintColor {
            return SurroundingsEffect.colorMultiply(color)
        } else {
            return nil
        }
    }
}SurroundingsEffect.colorMultiply(color)creates a color multiply effectpreferredSurroundingsEffectapplies the surroundings effect- When robot collides with plant, tint environment with corresponding color
Core Takeaways
-
Enable volume resizing: If volume content isn’t fixed size, use
frame(minWidth:maxWidth:minDepth:maxDepth:)instead of fixed frames so users can resize via corner handles. For dynamic adjustment, drive frame changes with state variables—the volume adapts automatically. -
Reduce main view clutter with ornaments: Move auxiliary UI (progress, status) from the main view to custom ornaments. Ornaments follow the user to the nearest side and auto-scale with distance. Keep only core 3D content in the main view.
-
Make content respond to user viewpoint: Use
onVolumeViewpointChangeto track user movement around the volume and turn characters toward them. If only certain sides are supported, usesupportedVolumeViewpointsandupdateStrategy: .allto hint when users reach unsupported sides. -
Customize immersion experience: visionOS 2 lets you specify initial values and ranges for progressive immersion. For stronger immersion, set a higher initial value (e.g., 80%). Use
onImmersionChangeto react when users adjust immersion. -
Enable interaction with spatial tracking: Use SpatialTrackingSession to track plane anchors, paired with SpatialTapGesture for 3D taps—enabling “tap floor to place object” interactions in the real environment.
Related Sessions
- Create custom environments for your immersive apps in visionOS — Learn to create visually rich, performant custom app environments
- Create enhanced spatial computing experiences with ARKit — Learn to create captivating immersive experiences with ARKit
- Design interactive experiences for visionOS — Learn to design compelling interactive narrative experiences for Apple Vision Pro
- Meet RealityKit 4 — Latest RealityKit 4 capabilities and how they power spatial computing apps
Comments
GitHub Issues · utterances