
Highlight
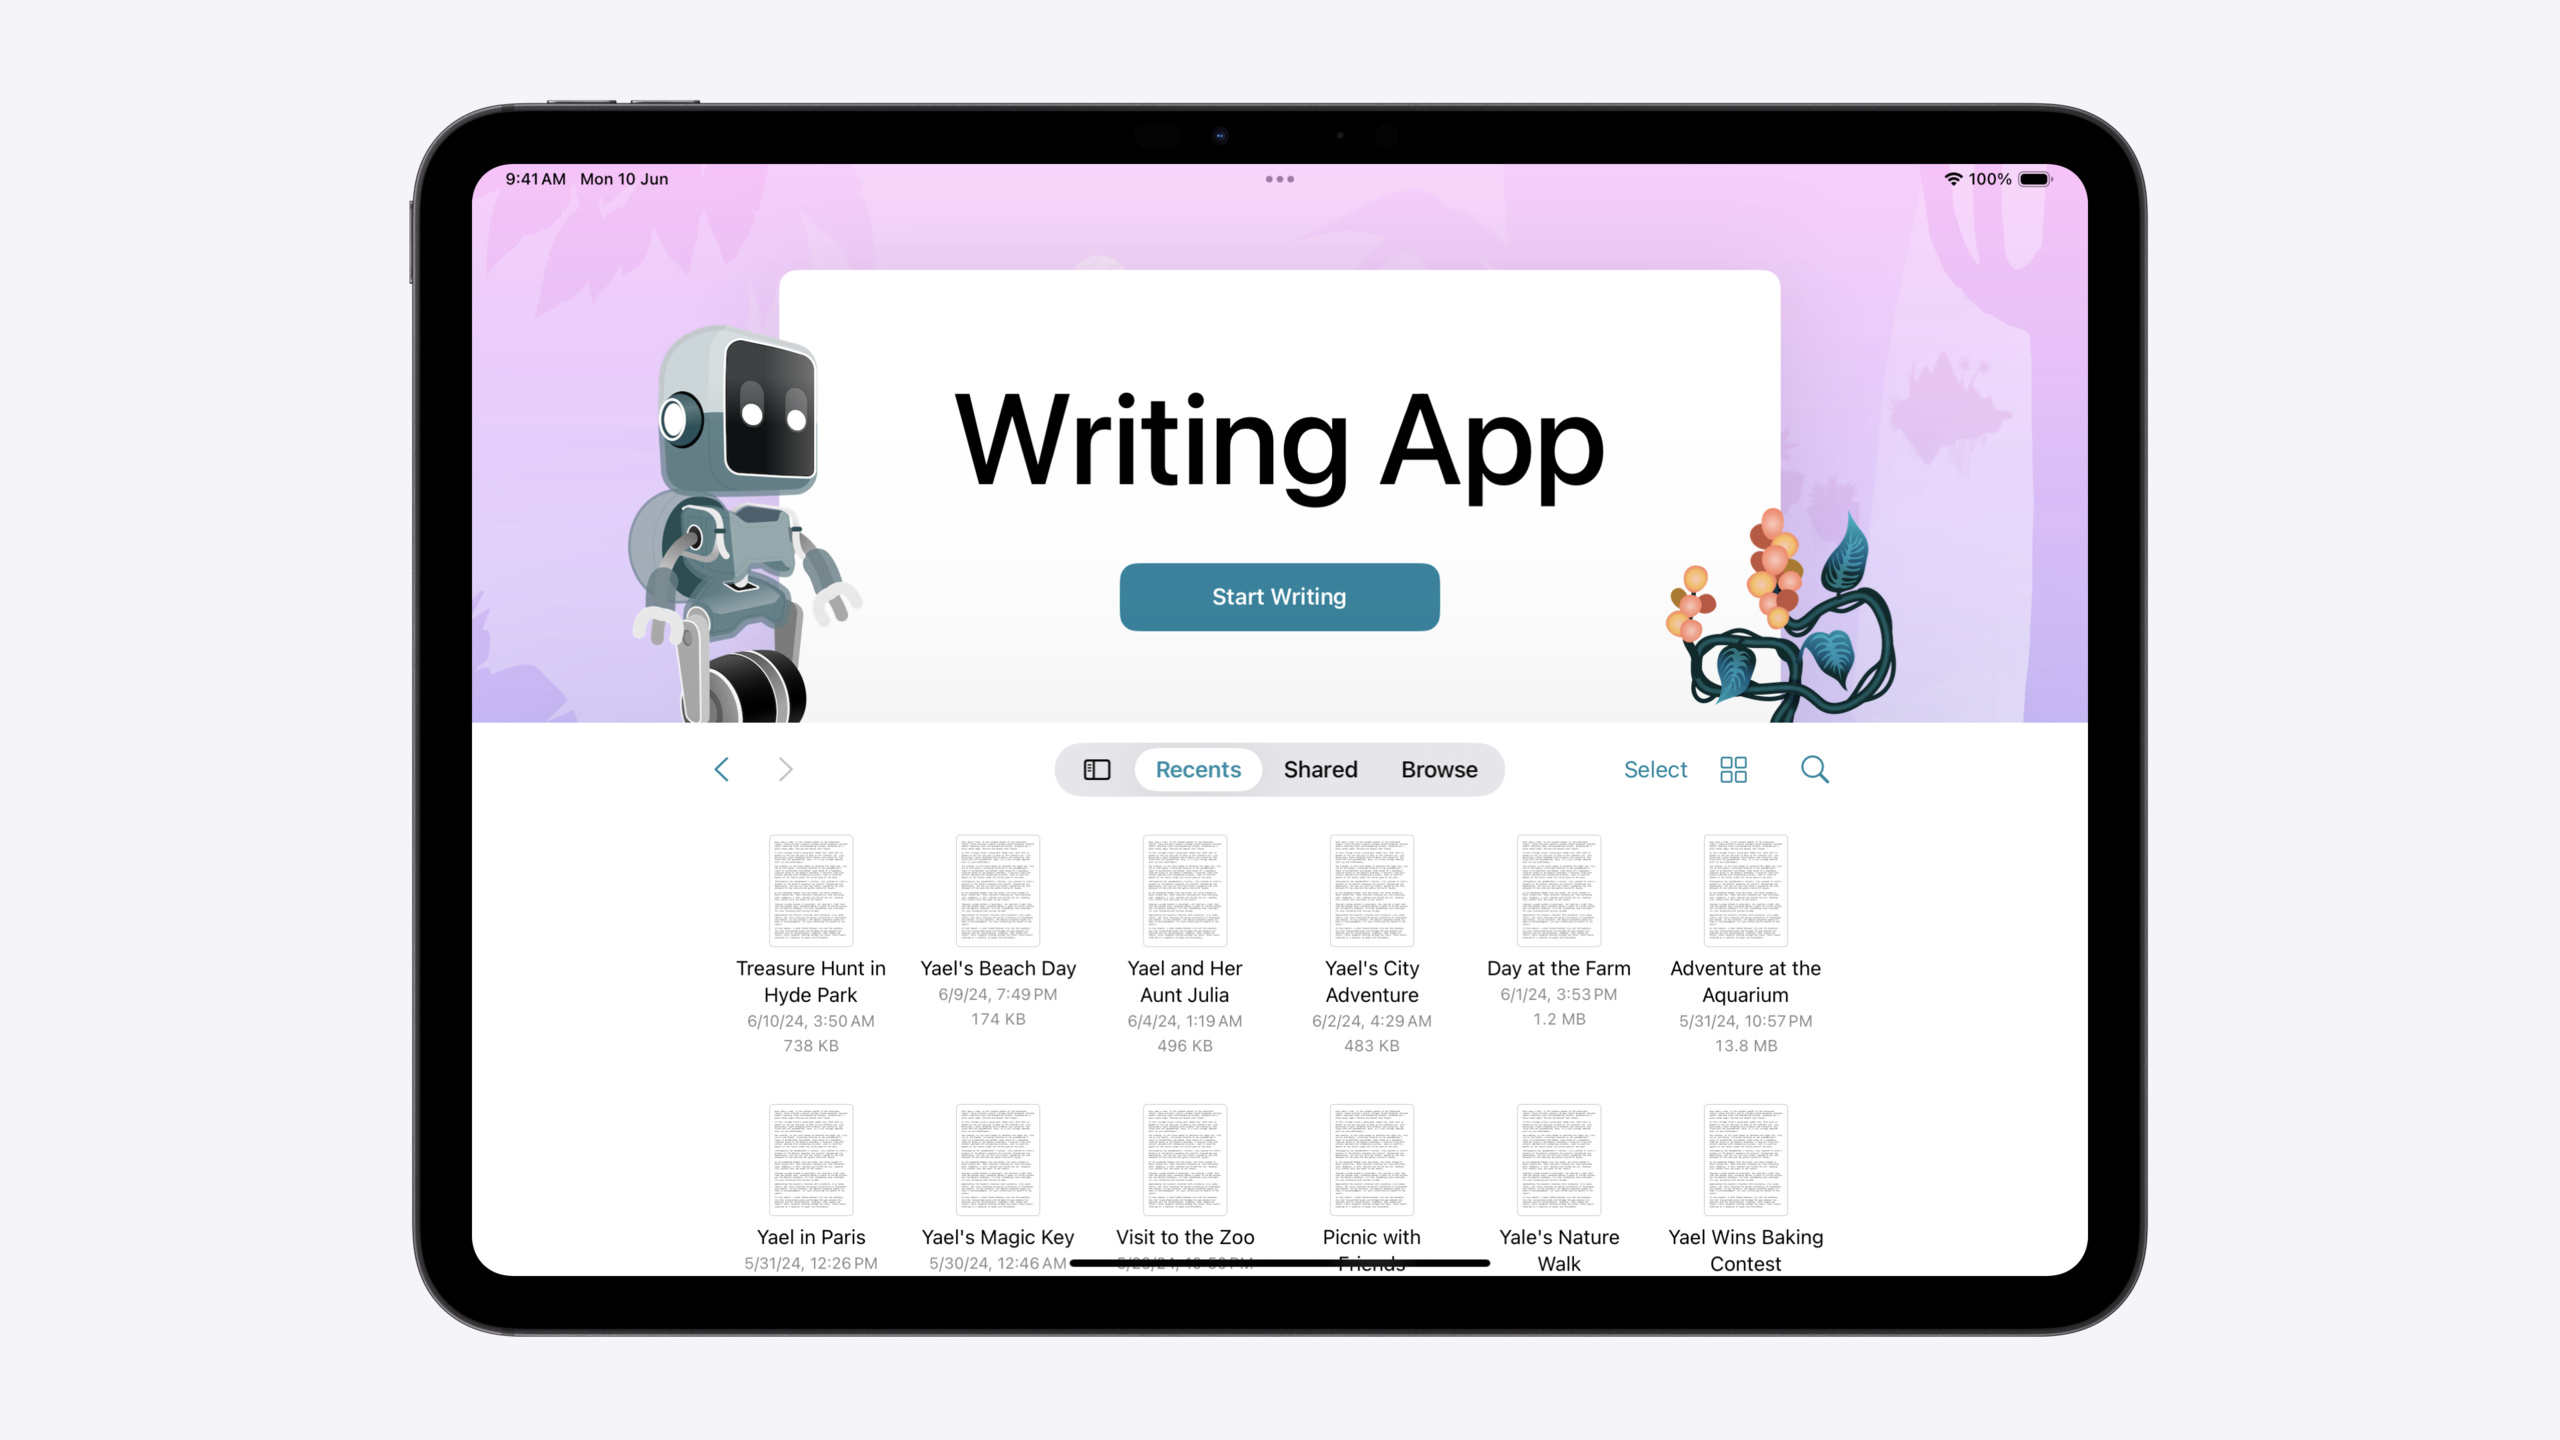
iOS 18 gives document-based apps a new launch screen.
DocumentGroupLaunchScenelets developers customize the background, decorative views, and template creation buttons—and recompiling with the iOS 18 SDK alone gets the new design with zero code changes.
Core Content
Document-based apps have long had an awkward moment at launch: users see only the system document browser—a cold file list with no brand identity. Your app might be a writing tool, canvas, or code editor, but at first open it looks like every other document app.
iOS 18 answers that. Recompile with the iOS 18 SDK and SwiftUI’s DocumentGroup and UIKit’s UIDocumentViewController automatically show the new launch screen—centered app name, prominent create button, built-in document browser, all provided by the system with no new code.
That’s the starting point. Apple also opened the DocumentGroupLaunchScene API so you can replace the background image, add decorative views, customize button labels, and even create documents from templates. Swift Playgrounds already uses this API to put the Byte character on the launch screen, so your app can express its personality from the first open.
Detailed Content
SwiftUI: Zero-Code Upgrade + Gradual Customization
A minimal SwiftUI document app structure (02:38):
@main
struct WritingApp: App {
    var body: some Scene {
        DocumentGroup(newDocument: { StoryDocument() }) { file in
            StoryView(document: $file.document)
        }
    }
}
Key points:
DocumentGroupdeclares both the document type and editing view- After compiling with the iOS 18 SDK, the app automatically shows the new launch screen with no code changes
To customize the launch screen, add DocumentGroupLaunchScene to the app body (04:38):
DocumentGroup(
    newDocument: { StoryDocument() }
) { file in
    StoryView(document: $file.document)
}

DocumentGroupLaunchScene {
    NewDocumentButton("Start Writing")
} background: {
    Image(.pinkJungle)
        .resizable()
        .aspectRatio(contentMode: .fill)
}
Key points:
DocumentGroupLaunchSceneis declared alongsideDocumentGroupNewDocumentButton("Start Writing")replaces the default “Create Document” button label- The
backgroundclosure accepts any SwiftUI view; here an image fills the screen
Decorative Views: Positioning with Geometry
When adding decorative elements, use the overlayAccessoryView closure for layout info (05:53):
DocumentGroupLaunchScene {
    NewDocumentButton("Start Writing")
} background: {
    Image(.pinkJungle)
        .resizable()
        .aspectRatio(contentMode: .fill)
} overlayAccessoryView: { geometry in
    ZStack {
        Image(.robot)
            .position(
                x: geometry.titleViewFrame.minX,
                y: geometry.titleViewFrame.minY
            )
        Image(.plant)
            .position(
                x: geometry.titleViewFrame.maxX,
                y: geometry.titleViewFrame.maxY
            )
    }
}
Key points:
geometry.titleViewFramegives the title view’s exact frame withminX/minY/maxX/maxY- Decorative views can sit in front of or behind the title view for depth
- Position with
position()oroffset()—the system doesn’t auto-layout these
Creating Documents from Templates
Support template creation with a second NewDocumentButton (07:56):
@State private var creationContinuation: CheckedContinuation<StoryDocument?, any Error>?
@State private var isTemplatePickerPresented = false

DocumentGroupLaunchScene {
    NewDocumentButton("Start Writing")
    NewDocumentButton("Choose a Template", for: StoryDocument.self) {
        try await withCheckedThrowingContinuation { continuation in
            self.creationContinuation = continuation
            self.isTemplatePickerPresented = true
        }
    }
    .sheet(isPresented: $isTemplatePickerPresented) {
        TemplatePicker(continuation: $creationContinuation)
    }
}
When the user picks a template, return the document via continuation (08:07):
struct TemplatePicker: View {
    @Binding var creationContinuation: CheckedContinuation<StoryDocument?, any Error>?

    var body: some View {
        Button("Three Act Structure") {
            creationContinuation?.resume(returning: StoryDocument.threeActStructure())
            creationContinuation = nil
        }
    }
}
Key points:
- The async closure on
NewDocumentButtonmust return a document instance; SwiftUI saves it automatically - Use
CheckedContinuationto suspend until the user finishes template selection - Set continuation to nil after use to avoid double resume
UIKit: Customization with launchOptions
UIKit apps customize via launchOptions on UIDocumentViewController (06:11):
class DocumentViewController: UIDocumentViewController {
    override func viewDidLoad() {
        super.viewDidLoad()

        // Update the background
        launchOptions.background.image = UIImage(resource: .pinkJungle)

        // Add foreground accessories
        launchOptions.foregroundAccessoryView = ForegroundAccessoryView()
    }
}
UIKit template creation uses UIDocument.CreationIntent (08:29):
extension UIDocument.CreationIntent {
    static let template = UIDocument.CreationIntent("template")
}

launchOptions.secondaryAction = LaunchOptions.createDocumentAction(with: .template)
launchOptions.browserViewController.delegate = self

// In delegate method:
func documentBrowser(
    _ browser: UIDocumentBrowserViewController,
    didRequestDocumentCreationWithHandler importHandler: @escaping (URL?, ImportMode) -> Void
) {
    switch browser.activeDocumentCreationIntent {
    case .template:
        presentTemplatePicker(with: importHandler)
    default:
        let newDocumentURL = // ...
        importHandler(newDocumentURL, .copy)
    }
}
Key points:
- UIKit apps get the new screen only when
UIDocumentViewControlleris the window’s rootViewController - Legacy patterns with
UIDocumentBrowserViewControlleras root need adjustment activeDocumentCreationIntentroutes different creation intents to different template picker logic
Core Takeaways
-
What to do: Add a branded launch screen to your document-based app. Why it’s worth it: Users feel your product’s tone from the first open instead of a generic system UI. How to start: Recompile an existing SwiftUI
DocumentGroupproject with the iOS 18 SDK for the new screen at zero code, then add background and decorations gradually. -
What to do: Offer 3–5 curated document templates. Why it’s worth it: Lowers the barrier for new users; templates include structure and style so they don’t start from a blank page. How to start: Add
NewDocumentButton("Choose a Template", for:)inDocumentGroupLaunchScenewithCheckedContinuationfor the template picker flow. -
What to do: Use decorative views to tell your app’s story. Why it’s worth it: Decorations turn the launch screen from functional UI into a brand touchpoint—Swift Playgrounds’ Byte character is a success story. How to start: Position brand characters or icons in
overlayAccessoryViewwithgeometry.titleViewFrame; one or two elements are enough—avoid clutter. -
What to do: Migrate UIKit document apps to the correct rootViewController. Why it’s worth it: Only with
UIDocumentViewControlleras root do you get the new launch screen; legacyUIDocumentBrowserViewController-as-root patterns are no longer needed. How to start: Remove theUIDocumentBrowserViewControllerlayer, setUIDocumentViewControlleras root, and configurelaunchOptionsinviewDidLoad.
Related Sessions
- Build better document-based apps with UIKit — Foundational UIKit document app architecture and full UIDocumentViewController usage
- Demystify SwiftUI containers — SwiftUI container view mechanics and how DocumentGroup works under the hood
- What’s new in SwiftUI — Annual SwiftUI updates including context for DocumentGroupLaunchScene
- Extend your app’s controls across the system — System-wide control extensions, complementary to launch screen button customization
Comments
GitHub Issues · utterances