
Highlight
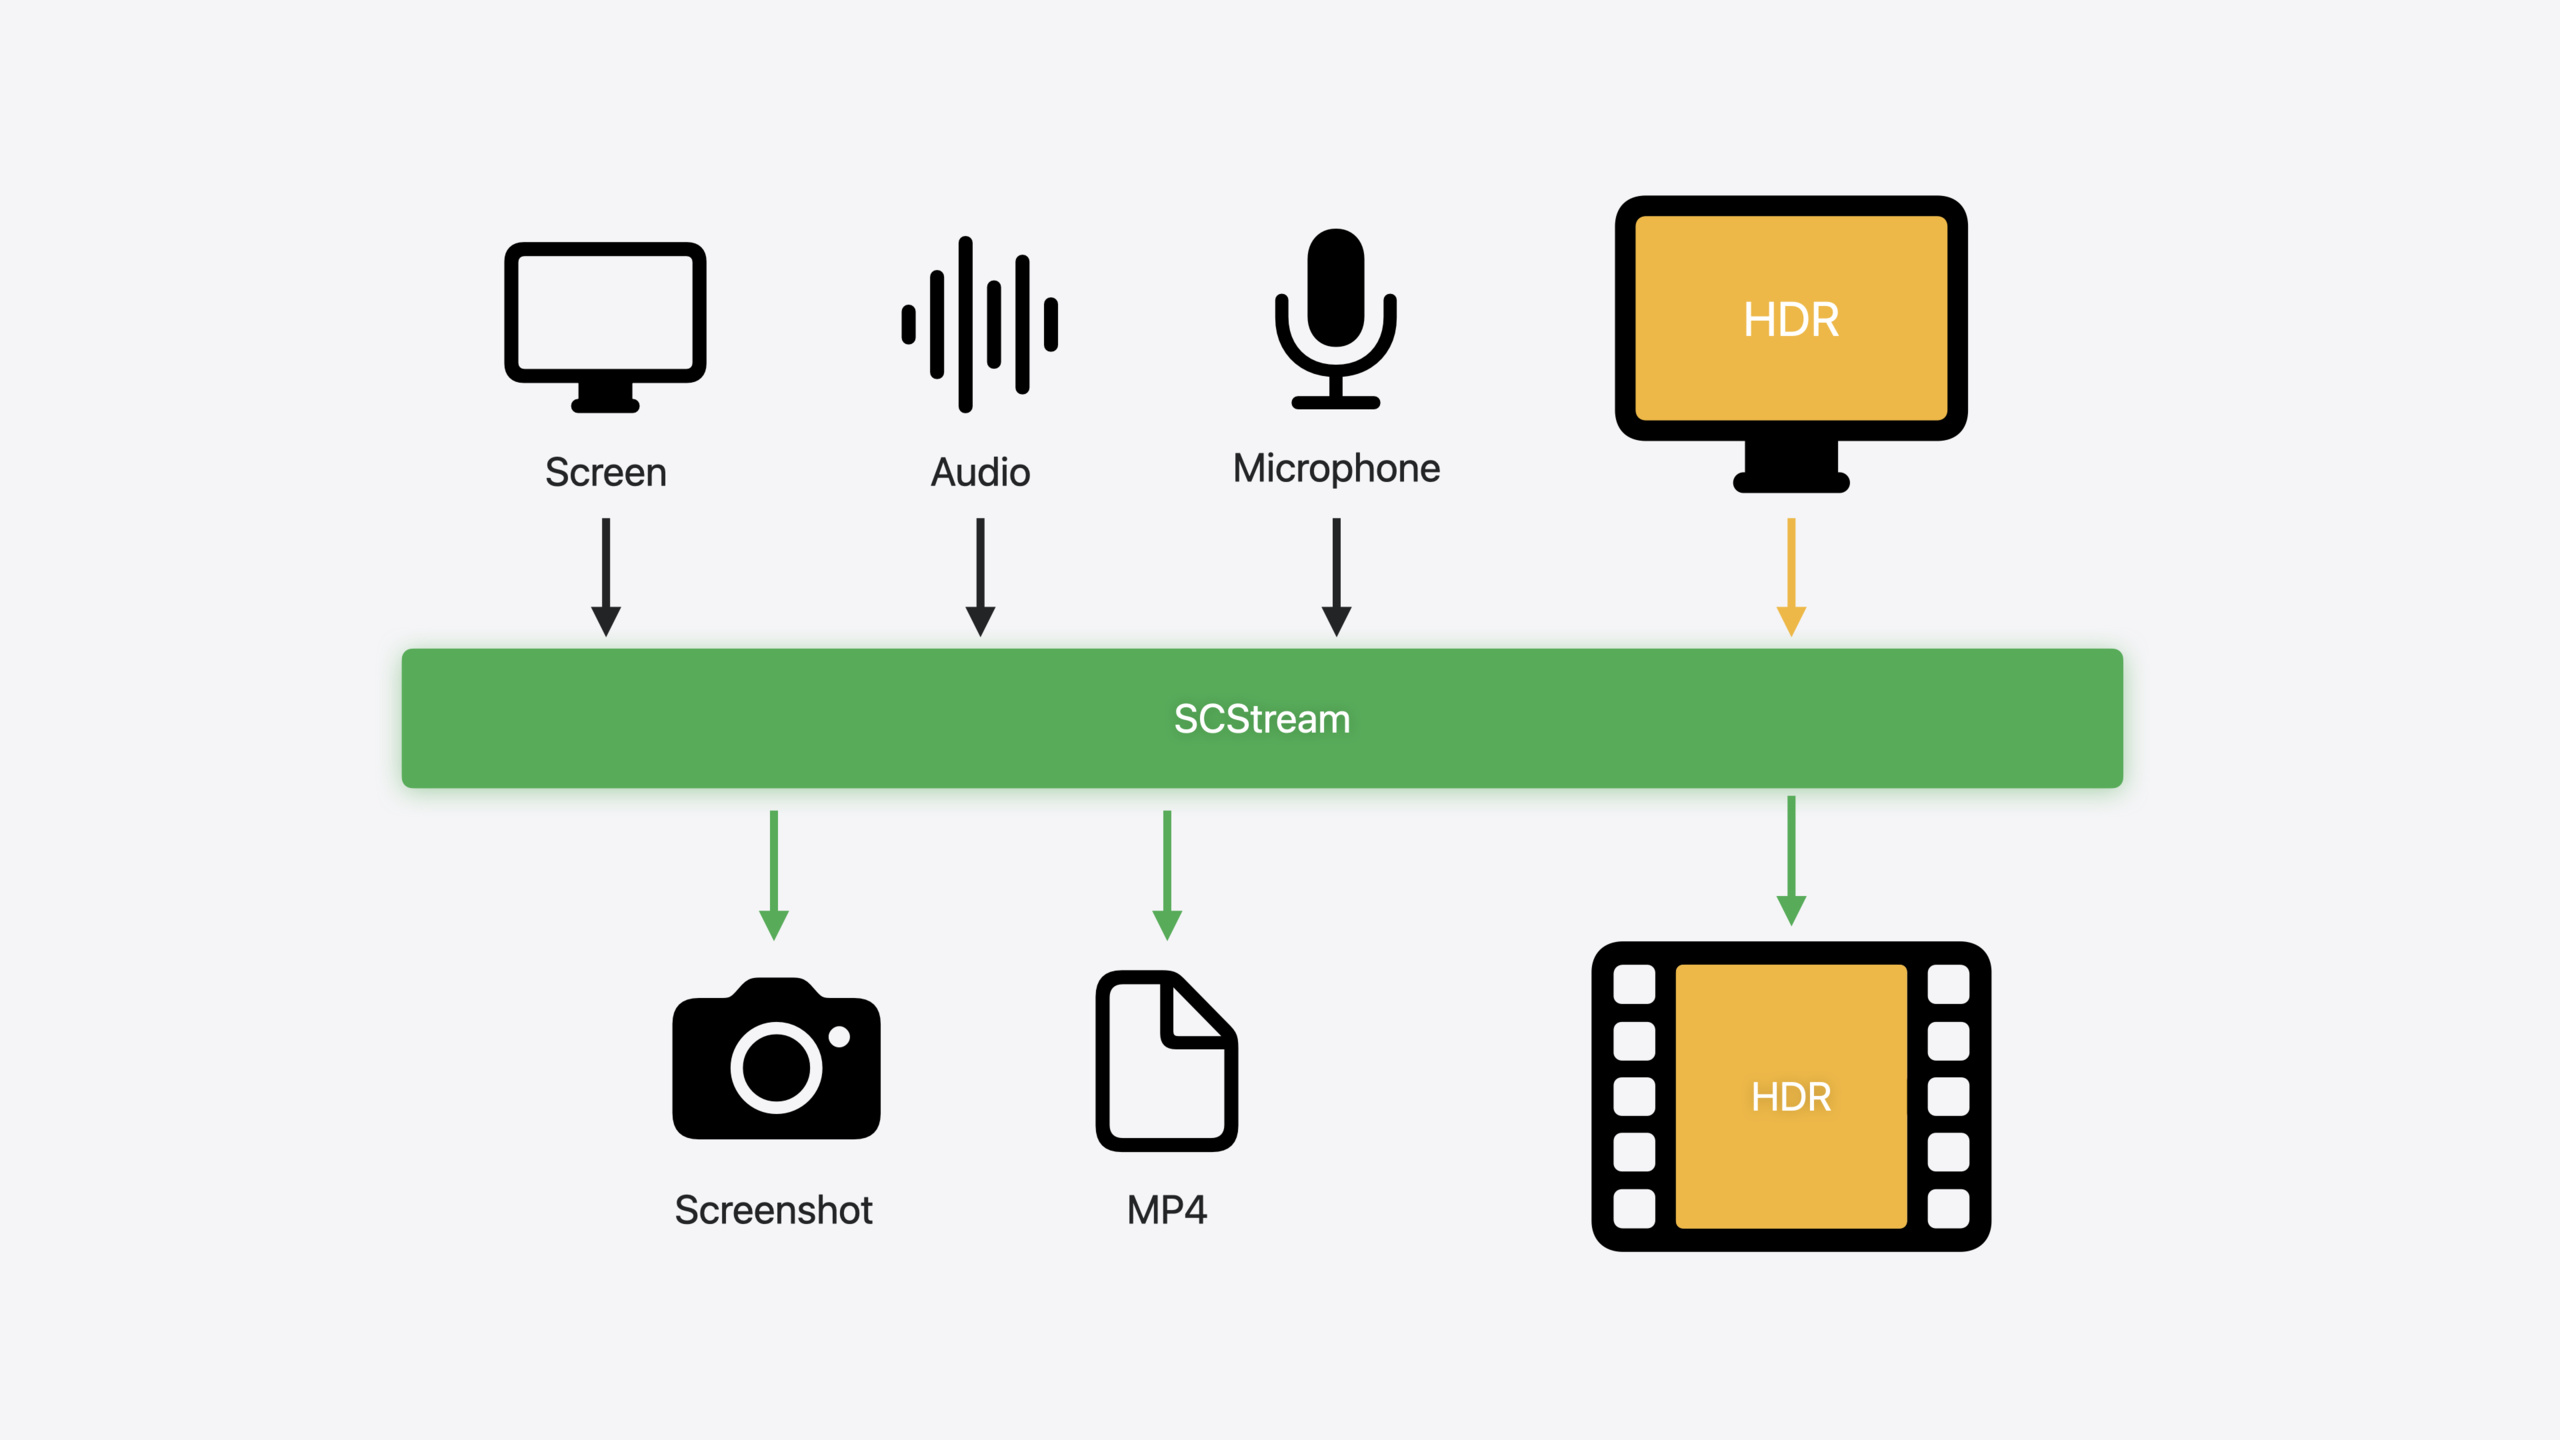
ScreenCaptureKit is the core macOS framework for screen sharing, screenshots, and remote desktop. This year’s updates cover three scenarios: HDR content capture, microphone capture, and recording output.
Core Content
A common pain in screen sharing or remote desktop: HDR on the user’s screen (4K HDR video, games) looks flat and gray when shared. SCStream outputs SDR by default—you must configure colorSpace, pixelFormat, and colorMatrix yourself; one mistake skews color.
This year ScreenCaptureKit adds two HDR presets: captureHDRStreamLocalDisplay for capture-and-render on the same machine, and captureHDRStreamCanonicalDisplay for sharing to other HDR devices. Presets fill colorSpace (Display P3 PQ / HLG), pixelFormat (10-bit YCbCr), and colorMatrix—one line for correct HDR.
The second pain is voiceover. SCStream used to give screen and system audio only; narration needed a separate AVAudioEngine mic path and manual timestamp alignment. Now SCStream natively supports .microphone output—screen, system audio, and mic from one stream with aligned timestamps.
The third pain is recording. After CMSampleBuffer you wrote AVAssetWriter logic—format, codec, error recovery, lots of code and bugs. New SCRecordingOutput wraps it: set URL, file type, codec, add to the stream, and recording starts; the file is ready when done.
Detailed Content
Two HDR capture presets
HDR vs SDR differs in brightness range and gamut. HDR gives 10-bit+ depth and PQ/HLG transfer functions, preserving shadow and highlight detail. SCStreamConfiguration adds captureDynamicRange; set .hdrLocalDisplay or .hdrCanonicalDisplay to enable HDR.
Local Display assumes capture and render on the same machine—color mapping uses the local display path. Canonical Display assumes content goes to other devices—standard HDR transport.
Full code for Canonical Display HDR capture (5:22):
// Get content that is currently available for capture.
let availableContent = try await SCShareableContent.current

// Create instance of SCContentFilter to record entire display.
guard let display = availableContent.displays.first else { return }
let filter = SCContentFilter(display: display, excludingWindows: [])

// Create a configuration using preset for HDR stream canonical display.
let config = SCStreamConfiguration(preset: .captureHDRStreamCanonicalDisplay)

// Create a stream with the filter and stream configuration.
let stream = SCStream(filter: filter, configuration: config, delegate: self)

// Add a stream output to capture screen content.
try stream.addStreamOutput(self, type: .screen, sampleHandlerQueue: nil)

// Start the capture session.
try await stream.startCapture()
Key points:
SCShareableContent.currentlists displays and windows available for captureSCContentFiltersets capture scope; excluding all windows captures the full display.captureHDRStreamCanonicalDisplaypreset fills colorSpace, pixelFormat, colorMatrix- Override individual properties on top of the preset if needed
Screenshot HDR presets too. SCScreenshotManager adds captureHDRScreenshotLocalDisplay and captureHDRScreenshotCanonicalDisplay (6:40):
// Create an SCStreamConfiguration with preset for HDR.
let config = SCStreamConfiguration(preset: .captureHDRScreenshotLocalDisplay)

// Call the screenshot API to get CMSampleBuffer representation.
let screenshotBuffer = try await SCScreenshotManager.captureSampleBuffer(contentFilter: filter, configuration: config)

// Call the screenshot API to get CGImage representation.
let screenshotImage = try await SCScreenshotManager.captureImage(contentFilter: filter, configuration: config)
Key points:
captureSampleBufferreturns CMSampleBuffer for video pipelinescaptureImagereturns CGImage for display or save- Same configuration; output format differs
Microphone capture
SCStreamConfiguration adds captureMicrophone (toggle) and microphoneCaptureDeviceID (device ID). Mic data goes through new .microphone output type (8:05):
// Create instance of SCStreamConfiguration.
let config = SCStreamConfiguration()

// Enable microphone capture and set id of microphone to capture.
config.captureMicrophone = true
config.microphoneCaptureDeviceID = AVCaptureDevice.default(for: .audio)?.uniqueID

// Create an SCStream instance.
let stream = SCStream(filter: filter, configuration: config, delegate: self)

// Add stream outputs for capturing screen and microphone.
try stream.addStreamOutput(self, type: .screen, sampleHandlerQueue: nil)
try stream.addStreamOutput(self, type: .microphone, sampleHandlerQueue: nil)

// Start the capture session.
try await stream.startCapture()

// Implement SCStreamOutput function to receive samples.
func stream(_ stream: SCStream, didOutputSampleBuffer sampleBuffer: CMSampleBuffer, of type: SCStreamOutputType) {
    switch type {
    case .screen:
        handleLatestScreenSample(sampleBuffer)
    case .audio:
        handleLatestAudioSample(sampleBuffer)
    case .microphone:
        handleLatestMicrophoneSample(sampleBuffer)
    }
}
Key points:
captureMicrophone = trueenables mic capturemicrophoneCaptureDeviceIDfrom AVCaptureDevice can pick a specific mic.microphoneis a new SCStreamOutputType alongside.screenand.audio- System aligns timestamps across all three media types
Recording to file
SCRecordingOutput replaces manual AVAssetWriter (9:38):
// Create a recording output configuration.
let recordingConfiguration = SCRecordingOutputConfiguration()

// Configure the outputURL (optionally set file type and video codec).
recordingConfiguration.outputURL = url
recordingConfiguration.outputFileType = .mov
recordingConfiguration.videoCodecType = .hevc

// Create the recording output with the configuration.
let recordingOutput = SCRecordingOutput(configuration: recordingConfiguration, delegate: self)

// Add an SCRecordingOutput to the stream.
try stream.addRecordingOutput(recordingOutput)

// Start capturing (which will also start recording).
try await stream.startCapture()

// Stop recording.
try await stream.stopCapture()

// OR
// Stop recording, but keep stream running.
try stream.removeRecordingOutput(recordingOutput)
Key points:
outputURLsets save path;outputFileTypeandvideoCodecTypeoptional.hevcpairs best with HDRaddRecordingOutputthenstartCapturestarts recording toostopCapturestops stream and recording;removeRecordingOutputstops recording only
Recording state via SCRecordingOutputDelegate (10:27):
func recordingOutputDidStartRecording(_ recordingOutput: SCRecordingOutput) {
    // Recording started asynchronously after addRecordOutput.
}

func recordingOutput(_ recordingOutput: SCRecordingOutput, didFailWithError error: Error) {
    // Recording failed with error.
}

func recordingOutputDidFinishRecording(_ recordingOutput: SCRecordingOutput) {
    // Recording finished after calling either removeRecordOutput or stopCapture.
}
Key points:
recordingOutputDidStartRecordingafter async recording startdidFailWithErrorfor mid-recording failuresrecordingOutputDidFinishRecordingwhen the file is fully written and ready
Core Takeaways
-
Add HDR to screen sharing: If you do video calls or remote desktop, HDR video and games look bad when shared. Switch to
captureHDRStreamCanonicalDisplay—minimal change, replaceSCStreamConfiguration()withSCStreamConfiguration(preset: .captureHDRStreamCanonicalDisplay). -
Add voiceover to recording tools: Tutorials and demos need screen plus voice. Previously AVAudioEngine mic plus merge. Now
captureMicrophone = true, add.microphoneoutput—three media types from one stream. -
Replace hand-rolled AVAssetWriter with SCRecordingOutput: Manual CMSampleBuffer writing is large and fragile (wrong codec, bad headers, misaligned timestamps). SCRecordingOutput is three lines of config and works with HDR and mic. Create SCRecordingOutputConfiguration, set URL and codec,
stream.addRecordingOutputinstead of AVAssetWriter.
Related Sessions
- Use HDR for dynamic image experiences in your app — HDR image read/write and display; pairs with HDR capture here
- Discover media performance metrics in AVFoundation — New media performance APIs for analyzing recording playback quality
- Keep colors consistent across captures — Constant Color API for capture consistency; complements HDR gamut management
- Build compelling spatial photo and video experiences — Spatial photo/video capture and playback; similar HDR and multi-stream handling
Comments
GitHub Issues · utterances