
Highlight
VisionOS App development follows the familiar Xcode + SwiftUI workflow, bridging 3D content through three scene types: Window, Volume, Immersive Space and RealityView. Developers can build an interactive and immersive experience from scratch in a few hours.
Core Content
When doing VR/AR development, the most painful thing in the past was the tool chain. Although Unity or Unreal are powerful, they have a steep learning curve and are completely different systems from iOS development.
visionOS does it differently: It integrates spatial computing capabilities directly into tools that developers are already familiar with. Xcode is still Xcode, SwiftUI is still SwiftUI, just with a few new scene types and a RealityView.
Three scene types
When creating a visionOS project, the Xcode template provides three initial scenario choices: (01:56)
Window: Mainly used for 2D content, with adjustable plane size and fixed depth. Display alongside other apps in Shared Space. Suitable for migration of traditional apps.
Volume: used for 3D content. The size of the three dimensions is controlled by the App and cannot be adjusted by the user. Also runs in Shared Space, but can display dioramas, data visualizations, etc.
Immersive Space: A borderless immersive scene. When activated, the app enters the Full Space from the Shared Space, and other apps are hidden. Can request ARKit features such as hand tracking.
Immersive Space has three immersion styles: (03:50)
- Mixed: Virtual content is superimposed on the see-through environment, and users can still see the real world
- Progressive: Opens a viewport of about 180 degrees, and the user can adjust the viewport size with the Digital Crown
- Full: perspective is completely hidden and the user is surrounded by the virtual environment
Apple recommends that apps always start in Window and provide clear buttons for users to actively enter immersive mode. Don’t force a switch without the user’s knowledge. (05:04)
RealityView: The bridge between SwiftUI and 3D
RealityView is the core component connecting SwiftUI and RealityKit on visionOS. It receives two closures: (07:28)
- make: Asynchronously initialize RealityKit content, which can be loaded
.usdaScene files can also be created programmatically - update: called when SwiftUI state changes, used to update 3D content
The update closure is only triggered when the SwiftUI state changes, not the rendering loop called every frame. This design is very important to prevent developers from mistakenly using it as a game loop.
From Volume to Immersive Space
The session walks through a complete development flow: create a Volume project from the template, load a 3D sphere model in ContentView with RealityView, add a Toggle button, and use tap gestures to control scaling. (06:24)
Then create a new scene in Reality Composer Pro, import the USDZ cloud model, and adjust the position and size. Go back to Xcode, add ImmersiveSpace scene declaration in App.swift, and add button in ContentViewopenImmersiveSpaceOpen up the immersion space. (20:31)
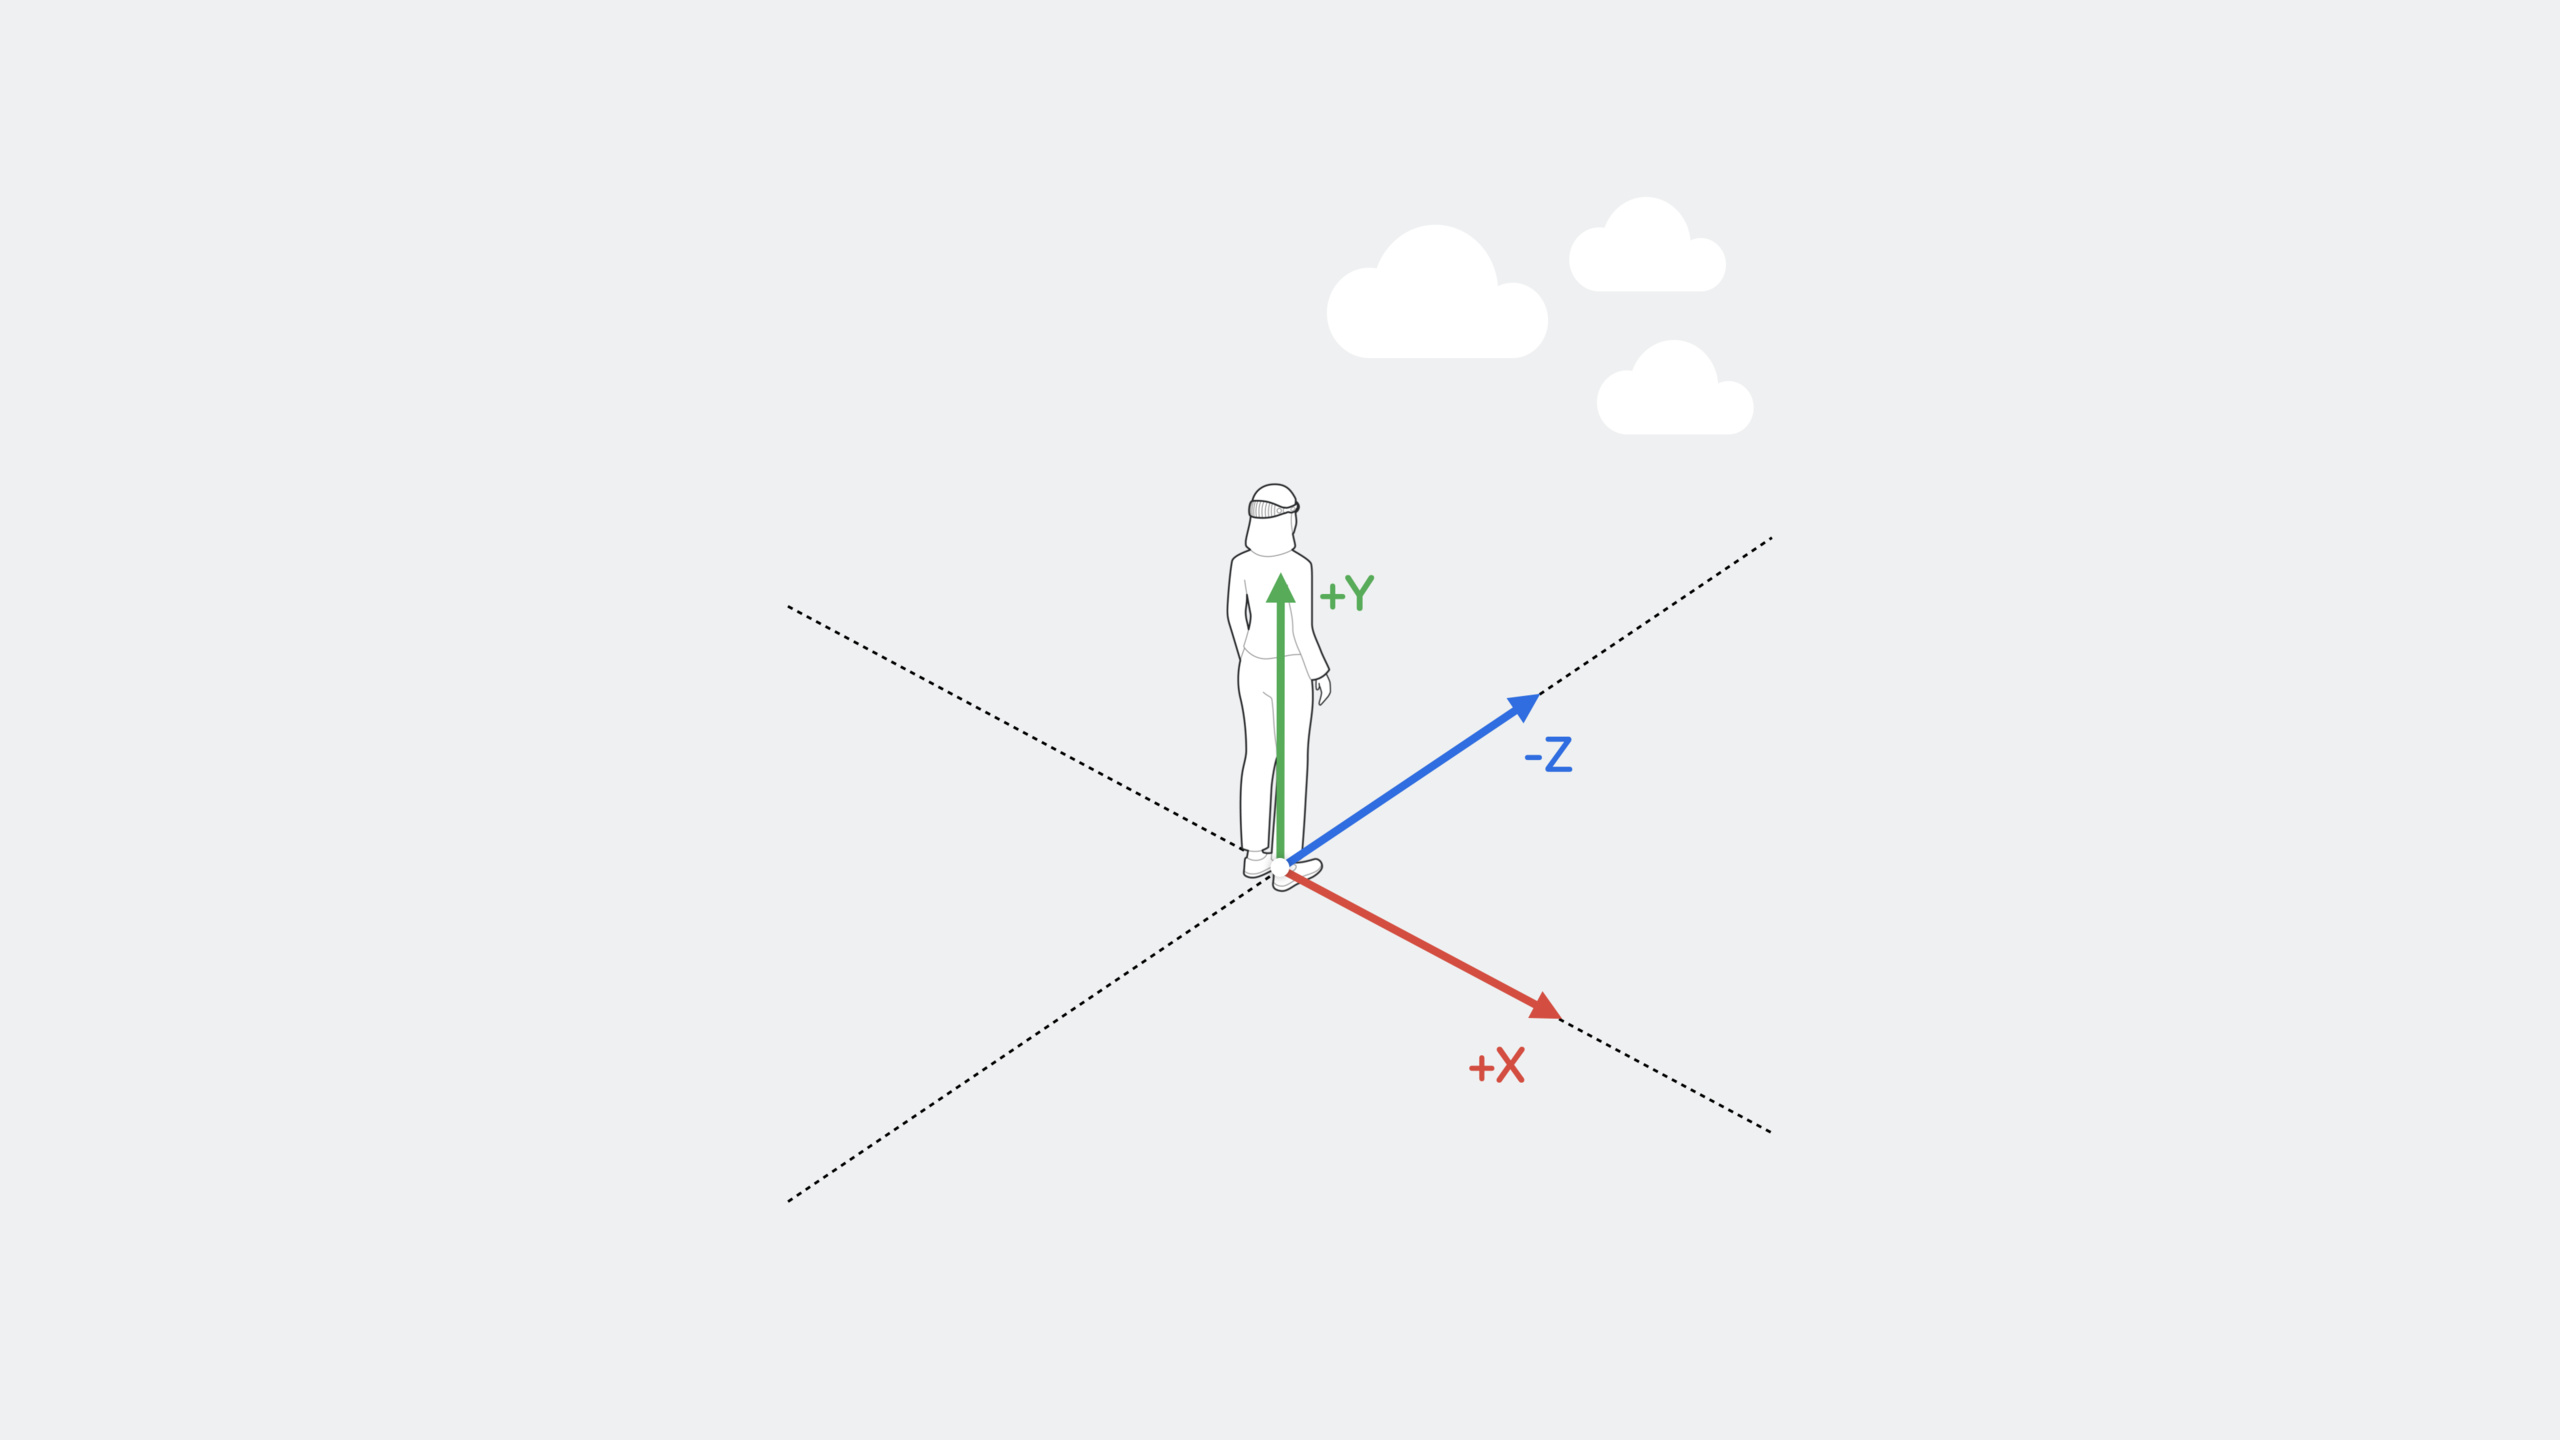
The coordinate system of Immersive Space takes the position of the user’s feet as the origin, with the X-axis pointing to the right, the Y-axis pointing upward, and the negative Z-axis pointing forward. After the content is placed, the position is fixed, and users explore the space by moving their bodies. (16:04)
Entity interaction
To make a 3D object respond to clicks, two conditions are required: (25:48)
- The entity must have
CollisionComponent, define the collision volume - The entity must have
InputTargetComponent, marked as an interactive target
These two components can be added in Reality Composer Pro or in code. Then attach to RealityView.targetedToAnyEntity()Gesture modifiers can accurately identify which entity the user clicked.
Session demonstrates the effect of clicking on a cloud to make it flutter. Useentity.move(to:relativeTo:duration:timingFunction:)Achieve smooth animation. (28:56)
Detailed Content
Xcode project template configuration
When creating a visionOS project, select Volume for Initial Scene and None for Immersive Space. After the project is generated, it will contain:
MyFirstImmersiveApp.swift:App entrance, declare WindowGroup -ContentView.swift: Main view, including RealityView and UI controls -RealityKitContentSwift Package: Storing 3D content
// MyFirstImmersiveApp.swift
@main
struct MyFirstImmersiveApp: App {
    var body: some Scene {
        WindowGroup {
            ContentView()
        }.windowStyle(.volumetric)

        ImmersiveSpace(id: "ImmersiveSpace") {
            ImmersiveView()
        }
    }
}
Key points:
.windowStyle(.volumetric)Turn WindowGroup into Volume to support 3D content -ImmersiveSpaceA unique ID is required and will be opened later via the ID.- The first scene is displayed by default when the app starts
Complete usage of RealityView
RealityView { content in
    // make closure: asynchronously load initial content
    if let scene = try? await Entity(named: "Scene", in: realityKitContentBundle) {
        content.add(scene)
    }
} update: { content in
    // update closure: respond to SwiftUI state changes
    if let scene = content.entities.first {
        let uniformScale: Float = enlarge ? 1.4 : 1.0
        scene.transform.scale = [uniformScale, uniformScale, uniformScale]
    }
}
.gesture(TapGesture().targetedToAnyEntity().onEnded { _ in
    enlarge.toggle()
})
Key points:
Entity(named:in:)Loading the scene from RealityKit Content Package returnsEntitytype -content.add(scene)Add loaded entities to the contents of RealityView -content.entitiesAll entities added can be accessed -transform.scaleacceptSIMD3<Float>, using array literals[x, y, z]Simple settings- Gesture chain call: create first
TapGesture(), then use.targetedToAnyEntity()Specify the target and finally use.onEndedhandle events
Glass Background Effect
UI controls on visionOS require glass background effects to ensure readability and interactivity:
VStack {
    Toggle("Enlarge RealityView Content", isOn: $enlarge)
        .toggleStyle(.button)
}
.padding()
.glassBackgroundEffect()
Key points:
.glassBackgroundEffect()Adds the platform’s signature frosted glass background to views- This effect automatically adjusts transparency and blur based on the 3D content behind it
- All interactive controls should be wrapped in this effect
Open Immersive Space
struct ContentView: View {
    @Environment(\.openImmersiveSpace) var openImmersiveSpace

    var body: some View {
        Button("Open") {
            Task {
                await openImmersiveSpace(id: "ImmersiveSpace")
            }
        }
    }
}
Key points:
openImmersiveSpaceis the environment value, which needs to be obtained from@Environmentget- It is asynchronous, use
awaitWait for the space to be opened - The ID passed in must match
Appdeclared inImmersiveSpaceID match - must be in
TaskCalled in SwiftUI because the body of SwiftUI is not an asynchronous context
Entity click animation
.gesture(TapGesture().targetedToAnyEntity().onEnded { value in
    var transform = value.entity.transform
    transform.translation += SIMD3(0.1, 0, -0.1)
    value.entity.move(
        to: transform,
        relativeTo: nil,
        duration: 3,
        timingFunction: .easeInOut
    )
})
Key points:
value.entityIt is the specific entity that was clicked, not the entire RealityView -transform.translationyesSIMD3<Float>Displacement vector of type -move(to:relativeTo:duration:timingFunction:)Is RealityKit’s built-in animation method -relativeTo: nilRepresents movement in the world coordinate system -.easeInOutGive animation a natural acceleration and deceleration effect
Xcode Preview configuration
When previewing an ImmersiveView, the default preview bounds clip off content that exceeds the bounds. Need to add.previewLayout(.sizeThatFits):
#Preview {
    ImmersiveView()
        .previewLayout(.sizeThatFits)
}
Key points:
#PreviewMacros replace the oldPreviewProviderprotocol -.sizeThatFitsMake the preview resize to the content without cropping 3D content outside the boundaries- The same navigation controls (look, pan, orbit, move) can be used to view the scene in the Simulator
Core Takeaways
1. 3D Product Demonstrator
What to do: Make an e-commerce app that allows users to view product models 360 degrees in Volume and click on parts to display details.
Why it’s worth doing: RealityView + targetedToAnyEntity makes 3D interaction as easy as 2D, without the need for complex ray detection code.
How to start: Use Reality Composer Pro to import the product USDZ model, add CollisionComponent and InputTargetComponent to each interactive component, and use in SwiftUI.targetedToAnyEntity()Bind the click gesture to pop up the details panel.
2. Immersive Data Visualization
What it does: Turn complex data sets (such as urban population density, stock trends) into 3D immersive charts, and let users explore the data.
Why it’s worth it: Immersive Space lets users use body movement to explore data more intuitively than 2D screens.
How to get started: Use RealityKit to programmatically create a histogram or scatter plot entity, put it into ImmersiveSpace, and useopenImmersiveSpaceTrigger entry from a button in the Window.
3. Virtual space tour What to do: Make a museum or real estate tour app, browse the list from Window, and click to enter Immersive Space for an immersive tour. Why it’s worth doing: The combination of three scene types allows the app to smoothly transition from information browsing to immersive experience. How to start: Use SwiftUI List in Window to display exhibits. After selecting, open the ImmersiveSpace with the corresponding ID. Each space loads a different Reality Composer Pro scene.
4. Gesture-driven 3D creation tools
What to do: Make a simple 3D scene editor where users can move, rotate, and scale by clicking on entities.
Why it’s worth it: The combination of Entity targeting and the RealityKit animation API makes building interactive 3D editors feasible.
How to get started: Add gesture recognition to an entity, in.onEndedMedium modificationtransform,usemove(to:)ororientationImplement smooth animated transitions.
Related Sessions
- Meet SwiftUI for spatial computing — SwiftUI’s new features on the spatial computing platform, understand the usage of Window and Volume
- Go beyond the window with SwiftUI — In-depth understanding of the three immersion styles and usage scenarios of Immersive Space
- Build spatial experiences with RealityKit — Detailed explanation of RealityKit API, including core concepts such as Entity, Component, and Anchor
- Meet Reality Composer Pro — Get started with the Reality Composer Pro tool and learn how to prepare and preview 3D content
Comments
GitHub Issues · utterances