
Highlight
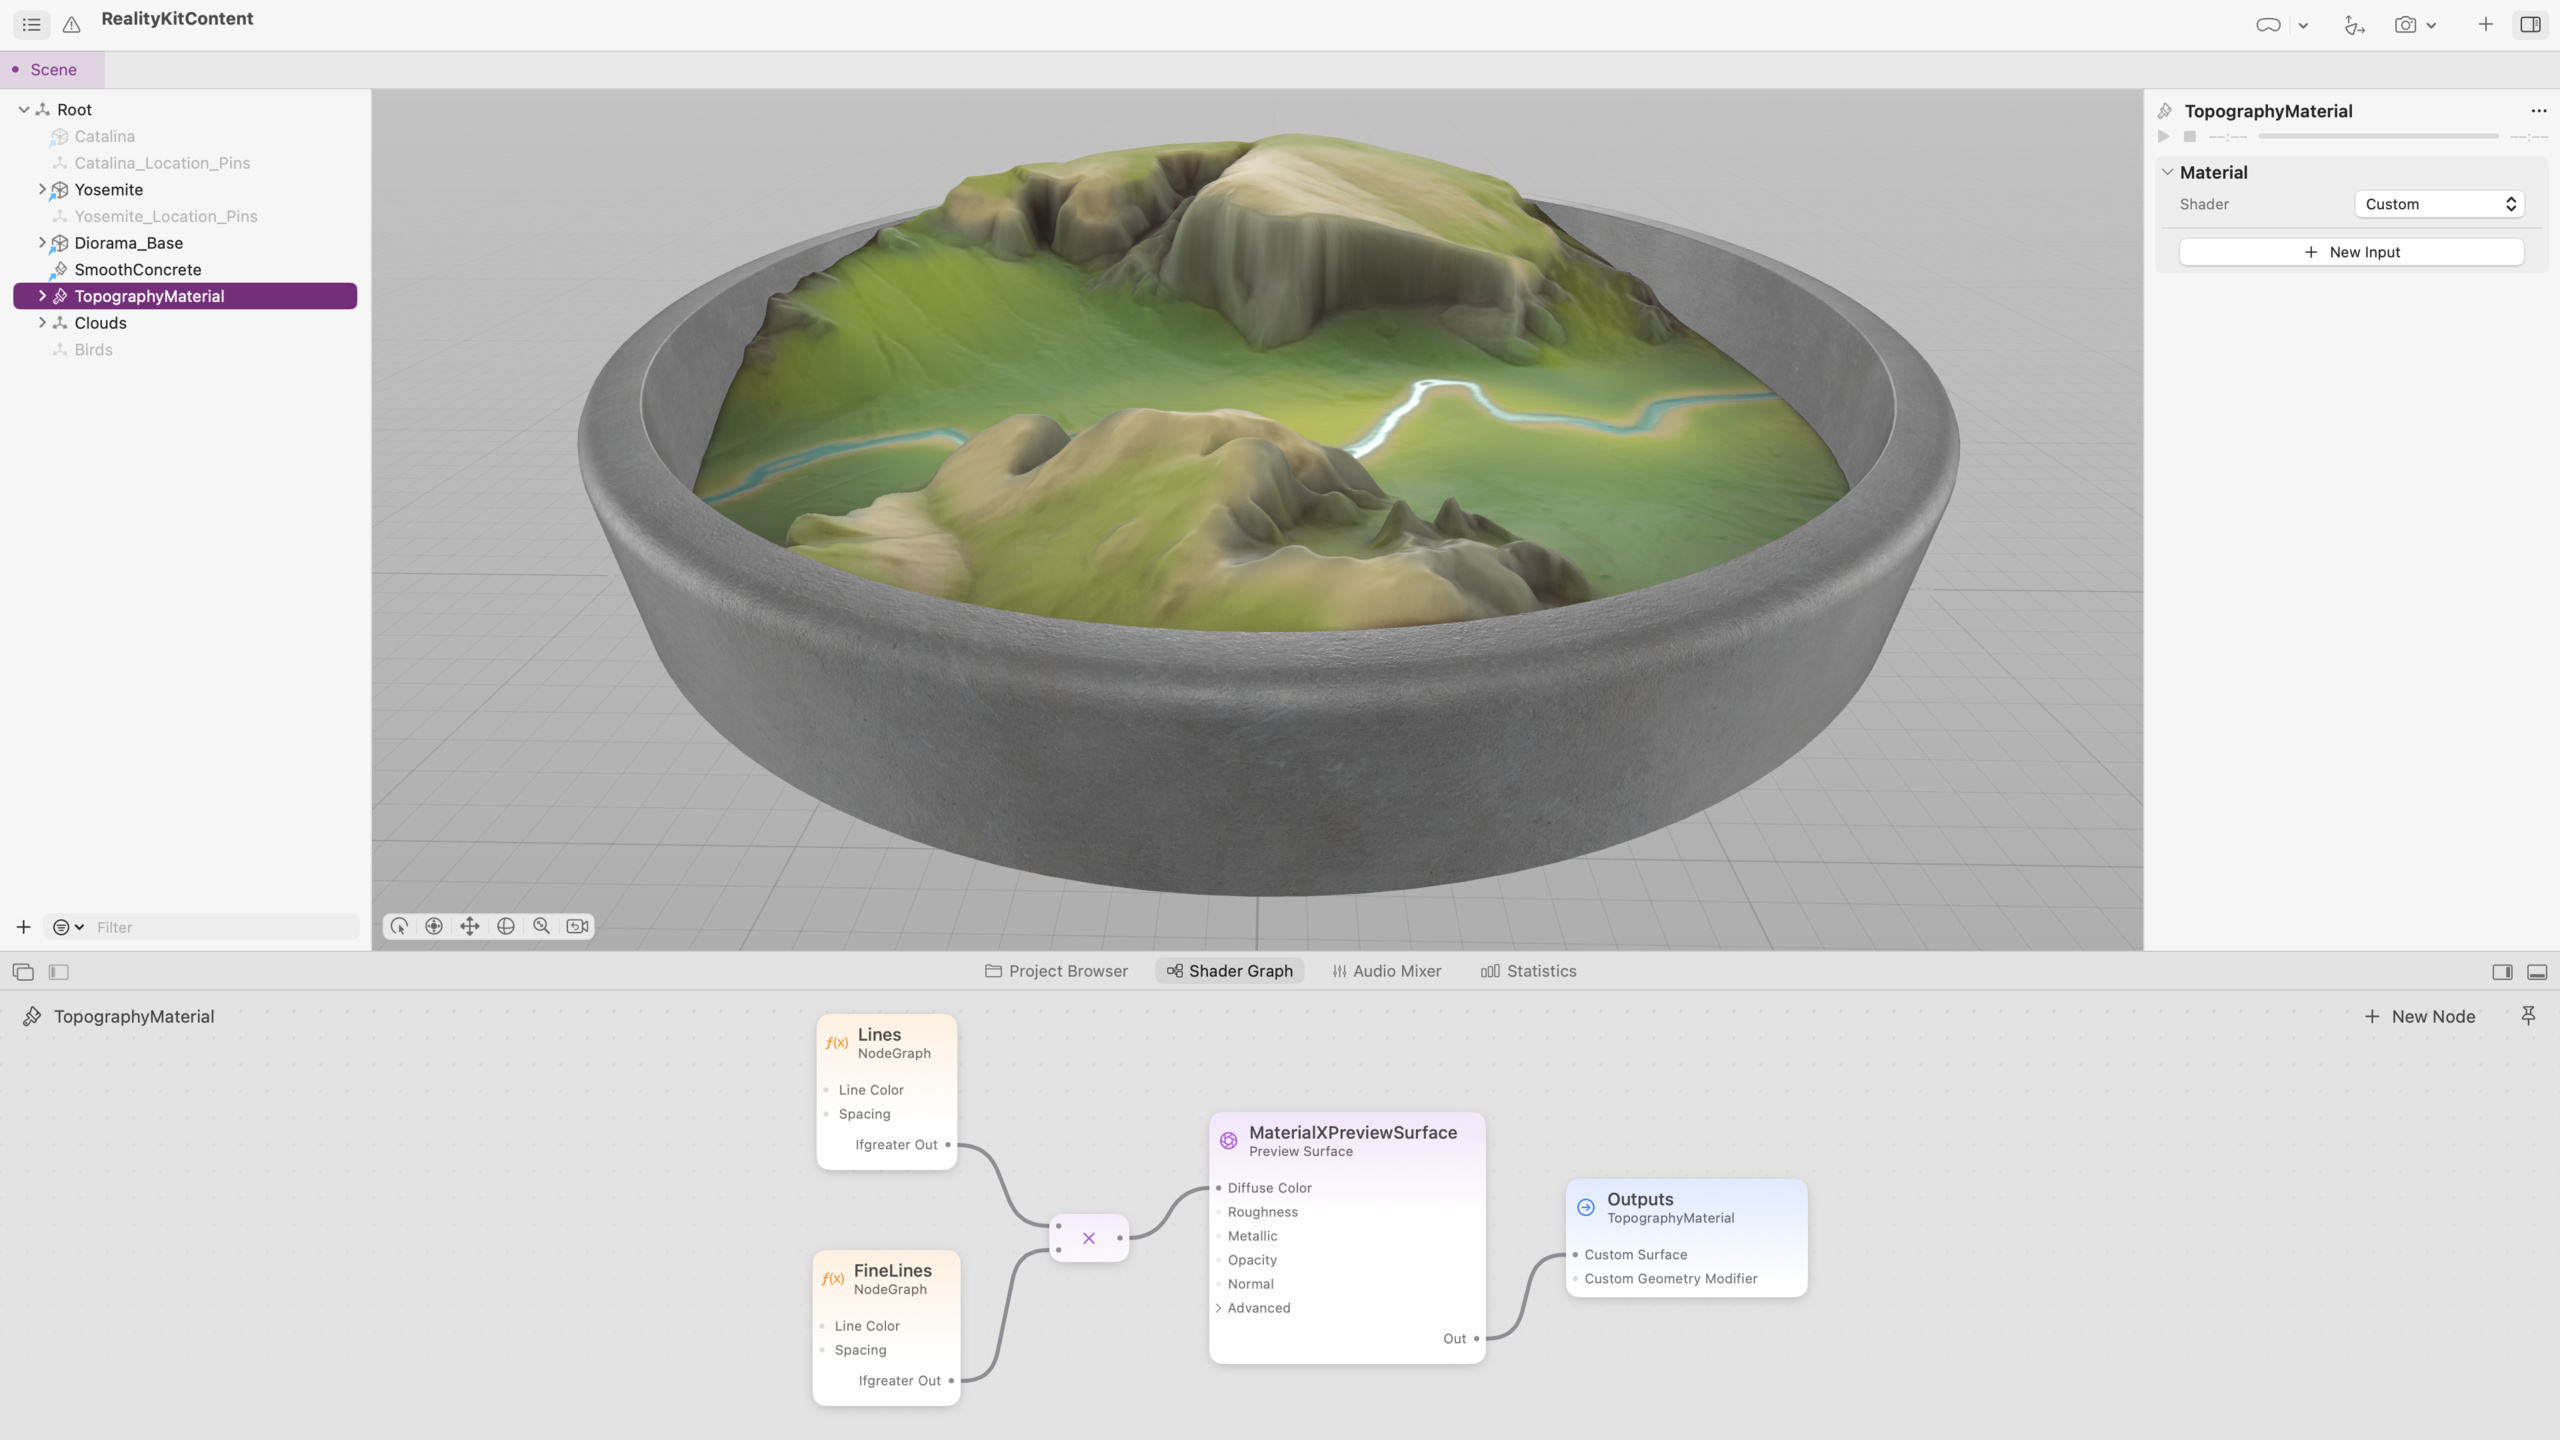
The Shader Graph editor of Reality Composer Pro allows developers to create the MaterialX standard ShaderGraphMaterial through the visual node graph without writing Metal code to achieve complex material effects such as terrain contours and dynamic geometric deformation.
Core Content
When doing 3D development, materials have always been a pain point. In the past, to write custom materials on iOS, you had to hand-write shader code using Metal. This has a high threshold for programmers and is almost impossible for artists to participate.
visionOS introduces a new material system. It is based on the MaterialX open standard created by Industrial Light and Magic (ILM) in 2012, and turns material creation into a visual operation through ShaderGraphMaterial.
The Shader Graph editor is built directly into Reality Composer Pro. Artists can drag nodes, connect lines, adjust parameters, and see the effects in the 3D viewport in real time. Programmers can export materials to Xcode and dynamically control them through Swift code.
This division of labor solves a long-standing collaboration problem: artists are responsible for visual effects, programmers are responsible for interaction logic, and the two sides do not have to wait for each other.
Material Basics
Materials in visionOS are based on Physical Rendering (PBR). (01:29)
PBR materials use real-world physical properties to define their appearance, such as metalness and roughness. A simple blue sphere with reflectivity set to 40% will give you a basic glossy feel. Apply color and roughness maps to create realistic concrete effects. Increase the metallicity to simulate the texture of iron.
ShaderGraphMaterial supports two shader types:
- Physically Based: Basic PBR shader, suitable for simple scenes, configure each attribute with constant values or textures
- Custom: Fully customizable control, supports animation, geometric deformation, special surface effects
(02:51)
Contour material actual combat
The talk uses a Yosemite Valley terrain model to demonstrate how to build a contour material from scratch. (04:02)
The idea is simple: draw a line at a specific elevation based on the height of the terrain. The specific method is to use the position node to obtain the 3D coordinates of the rendering position, use the separate node to extract the Y-axis (height), then use the modulo node to segment the height at fixed intervals, and finally use the ifgreater node to determine whether the current height falls within the contour width and decide whether to display terrain color or line color.
The connection method of the node graph is very intuitive:
Position → Separate 3(Y) → Modulo(÷0.1) → IfGreater(>0.002)
                                              ↓
Surface Diffuse Color(06:33)
Node graph reuse
When materials become complex, the node graph becomes confusing. Reality Composer Pro provides the Compose Node Graph function, which can package a group of nodes into a reusable node. (10:28)
Packaged nodes can create Instances. The instance will synchronize the modifications of the original node in real time. When you add Spacing and Color inputs to the original node, all instances automatically get these inputs as well.
This feature brings modular thinking to material design. Commonly used effects (such as contours, noise, gradients) can be packaged into node libraries and reused in different projects.
Geometry deformer
Geometry Modifier is an advanced capability of Custom shader. It does not just change the pixel color like the surface shader, but directly moves the vertex position of the model. (13:18)
The speech demonstrated a shocking effect: starting from a flat disk, using height map data to raise the vertices, and generating the terrain of Yosemite Valley in real time. Then use the mix node to mix the two sets of height maps, normal maps, and color maps to achieve a smooth transition between the two terrains.
The key step is to use the Promote command to promote the blending parameters to custom inputs for the material. In this way, Swift code can control the transition progress in real time and create animation effects. (18:43)
Detailed Content
The core node of ShaderGraphMaterial
Nodes in the Shader Graph editor are categorized by function. The most commonly used categories when making materials:
Input Node
-Position: Returns the 3D coordinates of the current rendering point in model space or world space
-Normal: Surface normal vector
-Texture Coordinates:UV coordinates
Math Node
-Separate 3: Split vec3 into three float components
-Combine 3: Combine three floats into vec3
-Modulo: Modulo operation
-Remap: Map values from one range to another
-Mix:Linearly interpolates between two values
logical node
-IfGreater: Compare two inputs and output different values based on the results.
Image Node
-Image: Read texture maps, support color map, height map, normal map, etc.
(06:57)
Control material parameters from Swift
In Reality Composer Pro, select a constant value in the shader, right-click and select Promote to turn it into a programmable input for the material. These inputs are passed in Swift viaShaderGraphMaterialinterface access.
import RealityKit

// Assume material is a ShaderGraphMaterial exported from Reality Composer Pro
if var material = model.materials.first as? ShaderGraphMaterial {
    // Set the custom input named "progress"
    try material.setParameter(name: "progress", value: .float(0.5))
    model.materials = [material]
}
Key points:
ShaderGraphMaterialIt is the only way to customize materials on visionOS, replacing theCustomMaterialsetParameter(name:value:)Used to modify the material input, the parameter name must be consistent with the input name defined in Reality Composer Pro- For value types
.float()、.color()、.texture()etc. enumeration wrapper - After modifying the material, it needs to be reassigned to the model.
materialsarray will take effect
Implementation details of geometric deformers
The geometry deformer has one more node graph than the surface shaderGeometry Modifiersurface nodes. Its core input isModel Position Offset, represents the displacement vector of the vertex in the model space. (15:23)
Terrain generated node chain:
Height Map(Image) → Combine 3(X:0, Y:height, Z:0) → GeometryModifier.ModelPositionOffset
Color Map(Image) → Surface.BaseColor
Normal Map(Image) → Remap(0..1 to -1..1) → Surface.Normal(16:15)
Key points:
- Height maps usually store floating point height values in EXR format, which is more precise than the 8bit of ordinary images.
- Normals must be updated after moving vertices, otherwise lighting calculations will be wrong
- The value range in the normal map is 0..1, which needs to be remap to -1..1 before it can be used by the shader.
- Algorithmic lines are expected to be more accurate than calculating normals from a height map in real time, especially when terrain details are rich
Complete node structure of terrain transition animation
The transition between two terrains requires three sets of mix nodes to mix height, color and normal:
Yosemite Height → Mix → Combine 3 → GeometryModifier
Catalina Height →    ↑
                     progress (0..1)

Yosemite Color → Mix → Surface.BaseColor
Catalina Color →    ↑
                    progress

Yosemite Normal → Mix → Remap → Surface.Normal
Catalina Normal →    ↑
progress(18:01)
BundleprogressAfter being promoted to material input, use it in SwiftTimerorAnimationBy continuously changing its value, you can achieve smooth terrain deformation animation.
Core Takeaways
1. Real-time terrain visualization tool What to do: Make a visionOS App that can load arbitrary height maps and render 3D terrain in real time. Why it’s worth doing: Shader Graph eliminates the need for hand-written Metal shaders for terrain rendering, and can produce professional results in a few hours. How to get started: Use Reality Composer Pro to create a Disk model, connect an Image node to read the height map, and use Geometry Modifier to raise the vertices. See the material structure in the Diorama sample code.
2. Interactive material display
What to do: Make a 3D material library where users can adjust parameters such as metallicity, roughness, color, etc., and see changes in PBR effects in real time.
Why it’s worth it: PBR parameters are abstract to many developers, and an interactive tool can speed up learning.
How to get started: Create multiple Physically Based materials in Reality Composer Pro and Promote key parameters as inputs. Binding to Slider in SwiftUIShaderGraphMaterial.setParameter()。
3. Dynamic data-driven 3D charts What it does: Map real-time data (e.g. stock trends, weather data) onto 3D geometric shapes. Why it’s worth doing: Geometry Modifier can change the shape of the model in real time according to data values, which is more impactful than ordinary 2D charts. How to get started: Use a planar mesh as the base geometry, pass the data values into an Image node as a heightmap, and update the data texture every frame via Swift code.
4. Modular material asset library
What it does: Encapsulate commonly used shader effects (water waves, flames, metal oxidation) into reusable Node Graphs, and publish them as internal or open source material packs within the team.
Why it’s worth doing: Compose Node Graph + Instance gives materials true modularity, so teams can share and iterate material assets.
How to start: Design the effect in Reality Composer Pro, select the relevant node Compose Node Graph, and export.usdaThe file can be referenced by other projects.
Related Sessions
- Meet Reality Composer Pro — An introductory introduction to Reality Composer Pro. It is recommended to read this issue first before learning about materials.
- Work with Reality Composer Pro content in Xcode — Learn how to integrate materials and models in Reality Composer Pro into Xcode projects
- Build spatial experiences with RealityKit — The foundation of RealityKit spatial experience development, understanding the Entity-Component architecture
- Create 3D models for spatial computing — 3D model creation guide to understand the cooperation relationship between materials and models
Comments
GitHub Issues · utterances