
Highlight
SwiftUI changes the default animation from easeInOut to physics-based spring in iOS 17, and introduces duration + bounce two intuitive parameters to replace the traditional mass/stiffness/damping, and also provides
SpringModel types allow developers to reuse Apple’s spring calculation logic in custom animations.
Core Content
Why spring animation is better
Jacob started from the SwiftUI team and used the knob animation of the switch button as an example. One of the core values of animation is to provide continuity: as an object goes from A to B, both position and speed should change continuously, otherwise it will feel abrupt.
The Ease In/Out animation works well for static starts, but has a fatal flaw when used with gestures: it cannot represent the initial speed. When the user drags and then lets go, the easeInOut animation stops abruptly and then starts again. Linear animations have speed jumps at the start and end points, which are also not suitable.
Spring animation has two core advantages:
- Both speed and position are continuous: The spring can accept any initial speed, and the animation will naturally transition from the speed at the end of the gesture.
- More natural movement: Based on the spring model of the real physical world, it slowly decelerates to a stop, in line with human intuition of object movement.
Physical model of spring
(08:35) Spring animation is defined by three physical properties:
- mass (mass): the mass of the object
- stiffness: the stiffness of the spring
- damping (damping): friction of the system
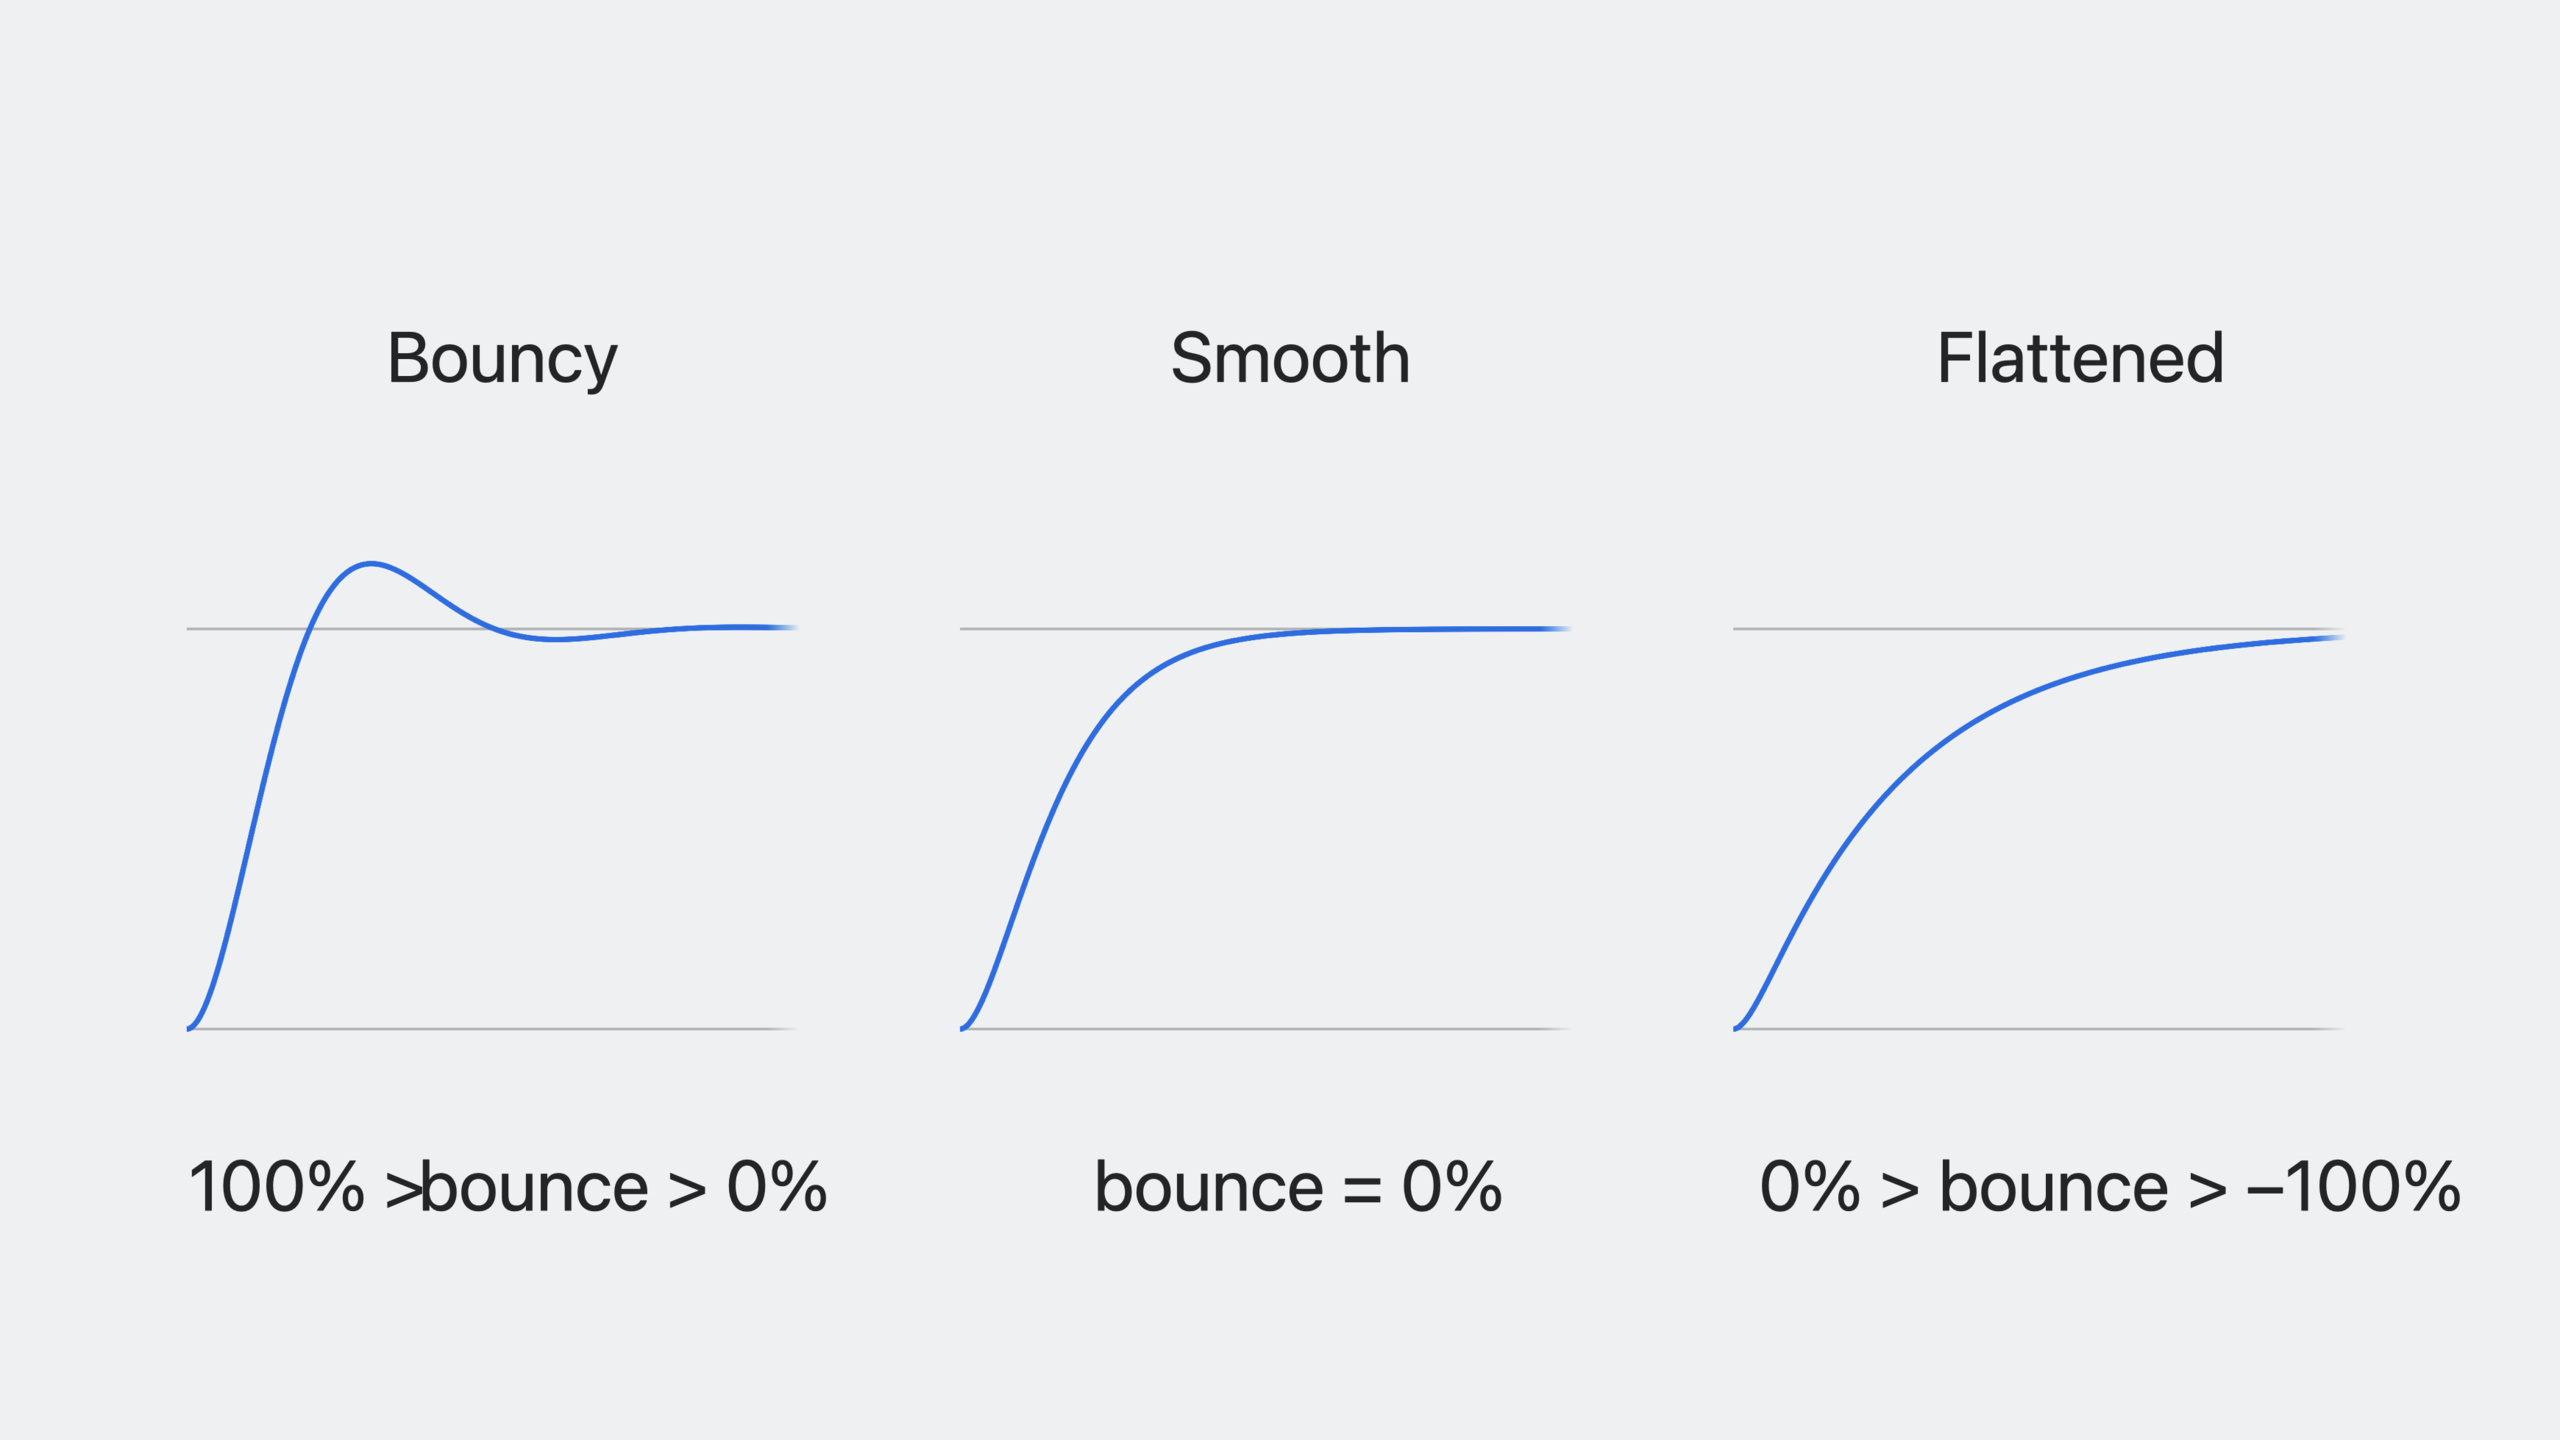
But these parameters are not intuitive enough for developers. SwiftUI introduces more friendly parameters:
- duration: The perceived duration of the animation
- bounce: Bounce level, from -1.0 to 1.0
Three spring types:
- bouncy (bounce > 0): excessive damping, will overshoot the target position
- smooth (bounce = 0): critical damping, slowly asymptotic to the target
- flattened (bounce < 0): underdamped, flatter approach to target
Multi-attribute collaboration
(08:05) The App startup animation on iOS is a classic example of spring animation. Different attributes use different spring parameters and different start and end times to create a natural and smooth effect. Different attributes don’t need to start and end at the same time. This “unevenness” makes the animation feel more realistic.
Detailed Content
Using Spring Presets
(18:00) SwiftUI provides three built-in spring presets:
withAnimation(.snappy) {
    // Changes
}
Key points:
.snappy: A small amount of bounce, suitable for most interactions -.smooth: No bounce, suitable for subtle changes -.bouncy: More bounce, suitable for lively interaction
Custom preset parameters:
withAnimation(.snappy(duration: 0.4)) {
    // Custom duration
}

withAnimation(.snappy(extraBounce: 0.1)) {
    // Add bounce on top of the preset
}
Customize Spring
(18:37) Fully custom spring:
withAnimation(.spring(duration: 0.6, bounce: 0.2)) {
    // Changes
}

// UIKit
UIView.animate(duration: 0.6, bounce: 0.2) {
    // Changes
}

// Core Animation
let animation = CASpringAnimation(perceptualDuration: 0.6, bounce: 0.2)
Key points:
durationandbounceParameters unified across SwiftUI, UIKit and Core Animation -bounceRange is -1.0 to 1.0- 0 means smooth, positive value means bouncy, negative value means flattened
Spring model type
(18:57)SpringTypes can be used independently:
let mySpring = Spring(duration: 0.5, bounce: 0.2)
let (mass, stiffness, damping) = (mySpring.mass, mySpring.stiffness, mySpring.damping)
Created with traditional parameters:
let otherSpring = Spring(mass: 1, stiffness: 100, damping: 10)
withAnimation(.spring(otherSpring)) {
    // Changes
}
Key points:
- Can switch between duration/bounce and mass/stiffness/damping
- Parameter conversion formula:
-
stiffness = (2π ÷ duration)²damping = 1 - 4π × bounce ÷ duration(bounce ≥ 0)damping = 4π ÷ (duration + 4π × bounce)(bounce < 0)
Evaluate Spring
(19:35) can query the status of the spring at any point in time:
let mySpring = Spring(duration: 0.4, bounce: 0.2)
let value = mySpring.value(target: 1, time: time)
let velocity = mySpring.velocity(target: 1, time: time)
Key points:
valueReturns the position of the spring at a specified time -velocityReturns the velocity of the spring at a specified time- Ideal for custom animations, simulations or data visualizations
Using Spring in custom animations
(20:15) inCustomAnimationReuse spring logic:
func animate<V: VectorArithmetic>(
    value: V, time: Double, context: inout AnimationContext<V>
) -> V? {
    spring.value(
        target: value, initialVelocity: context.initialVelocity,
        time: effectiveTime(time: time, context: context))
}
Key points:
- call
spring.valueGet interpolation results - incoming
initialVelocityPreserve gesture speed -effectiveTimeProcessing time mapping
Select Bounce value
(21:07) The feeling of different bounce values:
// No bounce - most general purpose
withAnimation(.spring(duration: 0.5)) {
    isActive.toggle()
}

// Small bounce - more energetic
withAnimation(.spring(duration: 0.5, bounce: 0.15)) {
    isActive.toggle()
}

// Large bounce - more playful
withAnimation(.spring(duration: 0.5, bounce: 0.3)) {
    isActive.toggle()
}
Key points:
- Use bounce 0 (smooth) when in doubt, this is the most versatile option
- Add bounce when you want a lively feel
- The animation at the end of the gesture is suitable to use bounce, because it is more physical
- A bounce above 0.4 may be too exaggerated, so use with caution
- Keep the animation style consistent within the app
Settling Duration
(16:45) The spring animation theoretically never stops completely, it just moves smaller and smaller. SwiftUI uses “settling duration” to decide when to remove an animation - when the motion is too small to be noticeable.
But be warned: settling duration is unpredictable. If you need to make UI changes when the animation is “almost finished”, use SwiftUI’s new completion handler, which is based on perceptual duration rather than settling duration.
Core Takeaways
-
Global replacement easeInOut
- What to do: Add all the
withAnimationand.animation()The default call to spring is changed to explicit - Why it’s worth doing: iOS 17 already has smooth spring by default, but explicitly specifying it makes the intention clearer and allows fine-tuning of parameters.
- How to start: Search all items in the project
.easeInOutand nakedwithAnimation, replaced by.spring(duration:bounce:)
- What to do: Add all the
-
Gesture-driven elastic interaction
- What to do: Add spring ending animation for dragging, sliding and other gestures
- Why it’s worth doing: The spring automatically inherits the gesture speed, and the animation after letting go is natural and smooth, without the need to manually calculate the speed.
- How to start: at
onEndedChinese usewithAnimation(.spring)Set final state and SwiftUI automatically handles velocity delivery
-
Interruptible animation system
- What it does: Make animations interruptible by new animations and smooth transitions
- Why it is worth doing: When the spring animation is interrupted, the current speed will be retained as the initial speed of the new animation, and the user experience will be coherent.
- How to start: Make sure to use spring animations and call them directly when new states arrive
withAnimation(.spring)update status
-
Brand motion design system
- What to do: Define a unified set of animation parameter specifications for the team
- Why it’s worth doing: The two parameters of duration + bounce are enough to express the brand’s tone (serious vs. lively), and are easy for the whole team to understand.
- How to start: Definition
extension Animation { static let brand = .spring(duration: 0.4, bounce: 0.1) }, all Apps can be used uniformly
-
Spring-driven data visualization
- What to do: Use Spring model calculations to drive custom charts or game physics
- Why it’s worth doing: You can reuse Apple’s optimized spring mathematics without having to implement physical simulation yourself.
- How to start: Create
SpringExample, inTimelineViewOr called in the game loopspring.value(target:time:)Get current value
Related Sessions
- Explore SwiftUI animation — The complete principle of SwiftUI animation system
- Wind your way through advanced animations in SwiftUI — Keyframes and multi-stage animations
- SwiftUI essentials — SwiftUI basic concepts
- Beyond scroll views — ScrollView animations and transitions
Comments
GitHub Issues · utterances