
Highlight
SwiftUI introduces two new APIs in iOS 17:
phaseAnimatorFor defining multi-stage loop/event-driven animations,keyframeAnimatorUsed to create multi-track keyframe animations, both support customizing animation curves at each stage, allowing the implementation of complex animations to change from “handwritten state machine” to “declarative configuration”.
Core Content
Limitations of traditional animation
Tim, from the SwiftUI team, points outwithAnimationOnly transitions “from old state to new state” can be handled. Many animation requirements are more complex: loading indicators need to loop continuously, and buttons need to play a pulse effect and then resume after clicking. These animations have multiple steps, and the steps are not simple state switches.
Phase Animator: Multi-stage animation
(03:13)phaseAnimatorThe modifier accepts a set of phases, and SwiftUI automatically cycles between them.
The simplest example is a two-phase loop - highlight and normal:
OverdueReminderView()
    .phaseAnimator([false, true]) { content, value in
        content
            .foregroundStyle(value ? .red : .primary)
    } animation: { _ in
        .easeInOut(duration: 1.0)
    }
Key points:
- Provide stage array, SwiftUI automatically loops
- Any attribute of the view can be modified at each stage
-
animationThe closure receives the target stage and can specify different animations for different stages. - Spring is used by default and can be used
animationClosure coverage
(06:20) Define more complex stages with custom enums:
ReactionView()
    .phaseAnimator(
        Phase.allCases,
        trigger: reactionCount
    ) { content, phase in
        content
            .scaleEffect(phase.scale)
            .offset(y: phase.verticalOffset)
    } animation: { phase in
        switch phase {
        case .initial: .smooth
        case .move: .easeInOut(duration: 0.3)
        case .scale: .spring(duration: 0.3, bounce: 0.7)
        }
    }

enum Phase: CaseIterable {
    case initial
    case move
    case scale

    var verticalOffset: Double {
        switch self {
        case .initial: 0
        case .move, .scale: -64
        }
    }

    var scale: Double {
        switch self {
        case .initial: 1.0
        case .move: 1.1
        case .scale: 1.8
        }
    }
}
Key points:
- Custom enums follow
CaseIterable, each case defines the attribute value of this stage -triggerParameters make the animation play once when the event is triggered (rather than looping) - Each stage can have its own animation curve
Keyframe Animator: keyframe animation
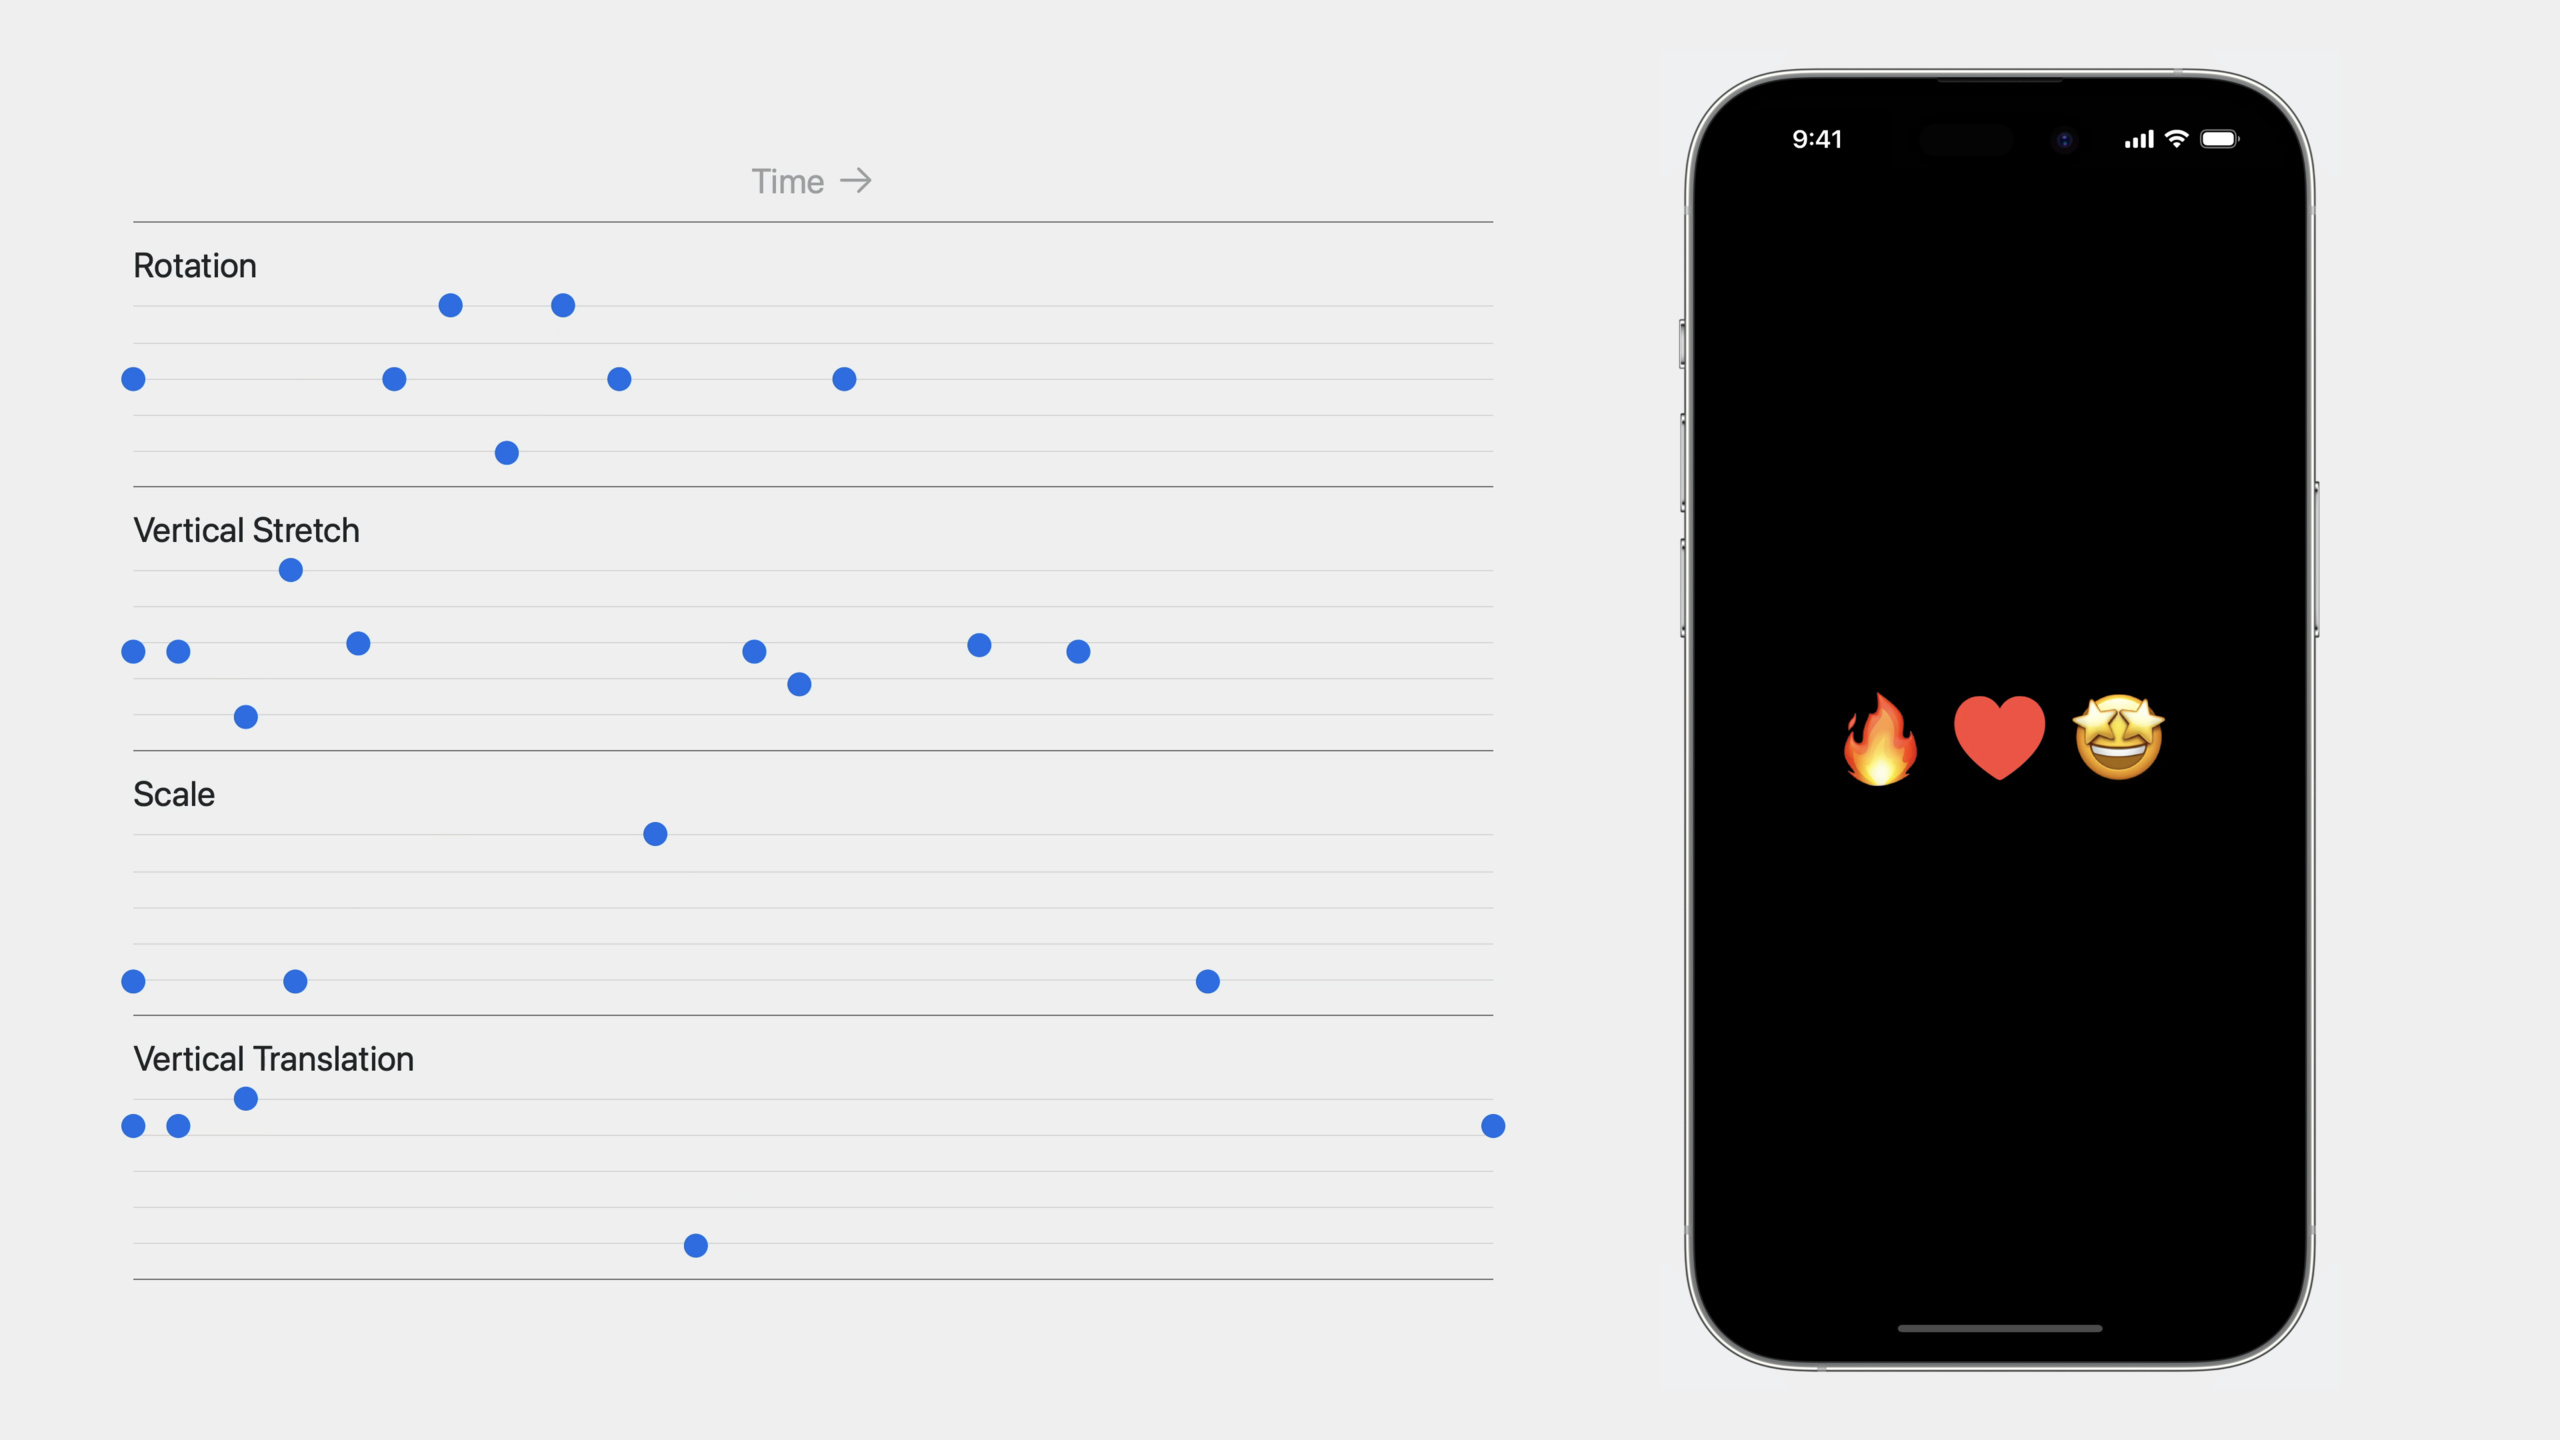
(09:48)keyframeAnimatorAllows defining separate tracks for each animation property, each with its own set of keyframes.
struct AnimationValues {
    var scale = 1.0
    var verticalStretch = 1.0
    var verticalTranslation = 0.0
    var angle = Angle.zero
}

ReactionView()
    .keyframeAnimator(initialValue: AnimationValues()) { content, value in
        content
            .foregroundStyle(.red)
            .rotationEffect(value.angle)
            .scaleEffect(value.scale)
            .scaleEffect(y: value.verticalStretch)
            .offset(y: value.verticalTranslation)
    } keyframes: { _ in
        KeyframeTrack(\.angle) {
            CubicKeyframe(.zero, duration: 0.58)
            CubicKeyframe(.degrees(16), duration: 0.125)
            CubicKeyframe(.degrees(-16), duration: 0.125)
            CubicKeyframe(.degrees(16), duration: 0.125)
            CubicKeyframe(.zero, duration: 0.125)
        }

        KeyframeTrack(\.verticalStretch) {
            CubicKeyframe(1.0, duration: 0.1)
            CubicKeyframe(0.6, duration: 0.15)
            CubicKeyframe(1.5, duration: 0.1)
            CubicKeyframe(1.05, duration: 0.15)
            CubicKeyframe(1.0, duration: 0.88)
            CubicKeyframe(0.8, duration: 0.1)
            CubicKeyframe(1.04, duration: 0.4)
            CubicKeyframe(1.0, duration: 0.22)
        }

        KeyframeTrack(\.scale) {
            LinearKeyframe(1.0, duration: 0.36)
            SpringKeyframe(1.5, duration: 0.8, spring: .bouncy)
            SpringKeyframe(1.0, spring: .bouncy)
        }

        KeyframeTrack(\.verticalTranslation) {
            LinearKeyframe(0.0, duration: 0.1)
            SpringKeyframe(20.0, duration: 0.15, spring: .bouncy)
            SpringKeyframe(-60.0, duration: 1.0, spring: .bouncy)
            SpringKeyframe(0.0, spring: .bouncy)
        }
    }
Key points:
initialValueDefine the initial value when the animation starts- each
KeyframeTrackAn animation track corresponding to an attribute - Keyframe type:
LinearKeyframe(linear interpolation),CubicKeyframe(cubic curve),SpringKeyframe(spring animation) - Different tracks can have different durations and number of keyframes
- Tracks can be interlaced to produce rich combination effects
Map keyframe animation
(15:22) Keyframe animation can also be usedMapcamera:
Map(initialPosition: .rect(route.rect)) {
    MapPolyline(coordinates: route.coordinates)
        .stroke(.orange, lineWidth: 4.0)
    Marker("Start", coordinate: route.start)
        .tint(.green)
    Marker("End", coordinate: route.end)
        .tint(.red)
}
.mapCameraKeyframeAnimation(trigger: playTrigger) { initialCamera in
    KeyframeTrack(\.centerCoordinate) {
        let points = route.points
        for point in points {
            CubicKeyframe(point.coordinate, duration: 16.0 / Double(points.count))
        }
        CubicKeyframe(initialCamera.centerCoordinate, duration: 4.0)
    }
    KeyframeTrack(\.heading) {
        CubicKeyframe(heading(from: route.start.coordinate, to: route.end.coordinate), duration: 6.0)
        CubicKeyframe(heading(from: route.end.coordinate, to: route.end.coordinate), duration: 8.0)
        CubicKeyframe(initialCamera.heading, duration: 6.0)
    }
    KeyframeTrack(\.distance) {
        CubicKeyframe(24000, duration: 4)
        CubicKeyframe(18000, duration: 12)
        CubicKeyframe(initialCamera.distance, duration: 4)
    }
}
Key points:
mapCameraKeyframeAnimationIs a Map-specific keyframe animation modifier- Can control the center coordinates, heading and distance of the camera
- The camera flies smoothly along the route and finally returns to the initial position
KeyframeTimeline
(16:26)KeyframeTimelineCan be used independently without relying on views:
let myKeyframes = KeyframeTimeline(initialValue: CGPoint.zero) {
    KeyframeTrack(\.x) { ... }
    KeyframeTrack(\.y) { ... }
}

let duration: TimeInterval = myKeyframes.duration
let value = myKeyframes.value(time: 1.2)
Key points:
- You can query the total duration of the animation
- You can query the value at any point in time
- Suitable for custom animation logic or integration with other systems
Detailed Content
How Phase Animator works
(03:57) Phase Animator workflow:
- The first phase is activated when the view first appears
- SwiftUI immediately starts the animation transition to the next stage
- After the animation is completed, it automatically advances to the next stage.
- After reaching the last stage, loop back to the first stage
if providedtriggerParameter, the animation plays all stages once when the trigger value changes, and then stops.
Detailed explanation of keyframe types
Each of the three keyframe types has its applicable scenarios:
- LinearKeyframe: changes at a constant speed, suitable for attributes that require constant speed
- CubicKeyframe: smooth curve, suitable for most visual properties
- SpringKeyframe: Physical spring effect, suitable for properties that require elasticity
SpringKeyframeYou can just specify the target value and spring parameters and let SwiftUI automatically calculate the duration.
Core Takeaways
-
Loop reminder animation
- What to do: Add breathing light effects to to-do items and notification reminders
- Why it’s worth doing:
phaseAnimatorMake looping animations a few lines of code, no timers or state machines required - How to start: Define an array of two stages (normal/highlight), with
.phaseAnimatorModify the reminder view, inanimationspecified in the closure.easeInOut(duration: 1.5)
-
Like/Collect animation
- What it does: Play a multi-stage heart-shaped zoom animation when a user likes it
- Why it’s worth doing:
triggerPatterns make event-driven animation simple, allowing you to combine scaling, rotation, and color changes - How to start: Definition
initial->scaleUp->settlethree stages, usingtrigger: likeCountTrigger, each stage specifies different spring parameters
-
Map Route Roaming
- What to do: Display a running/cycling route on the map, with the camera flying along the route
- Why it’s worth doing:
mapCameraKeyframeAnimationTurn complex camera controls into declarative configuration - How to start: Prepare the coordinate point array of the route, as
centerCoordinateTrack creation keyframes, one for each pointCubicKeyframe
-
Loading Status Indicator
- What to do: Customize loading animation, than system
ProgressViewMore brand characteristics - Why it’s worth doing:
KeyframeTimelineCan be used independently or in conjunction withCanvasDraw animations of arbitrary shapes - How to start: Create
KeyframeTimelineTo define changes in shape properties over time, useTimelineViewDriver redraw
- What to do: Customize loading animation, than system
-
Complex transition animation
- What it does: Play a multi-property combination animation when the view appears/disappears
- Why it’s worth doing: Keyframe animation allows multiple attributes (position, scaling, rotation, transparency) to be controlled independently and coordinated
- How to start: Define a structure containing all animation properties, create a
KeyframeTrack, applied in view modifiers.keyframeAnimator
Related Sessions
- Explore SwiftUI animation — Basic principles of SwiftUI animation
- Animate with springs — In-depth explanation of spring animation
- SwiftUI essentials — SwiftUI basic concepts
- Beyond scroll views — Scroll transition animation in ScrollView
Comments
GitHub Issues · utterances