
Highlight
iOS 17/macOS Sonoma introduces Cinematic API (prefix CN), which allows third-party applications to play and edit movie-effect mode videos shot on iPhone 13/14, supporting real-time adjustment of aperture, non-destructive modification of focus decision-making, and saving/loading editing status.
Core Content
Two-layer file structure of movie effect mode
Cine-effect mode videos captured on iPhone contain two files. One is a rendered ordinary QuickTime movie with a depth of field effect that can be shared and played directly. The other is a special cinematic effects asset that contains all the raw data and information needed for editing.
The cinematic effects asset has three tracks. The video track is the original shot, supporting up to 4K@30fps. The parallax track records the pixel offset of the dual cameras. Near objects have a large offset and distant objects have a small offset. This data drives depth of field rendering. The metadata track contains rendering properties (focus parallax and aperture f-number) and movie scripts (automatically detected faces, heads, torsos, and recording of focus decisions).
Hierarchical mechanism of focus decision-making
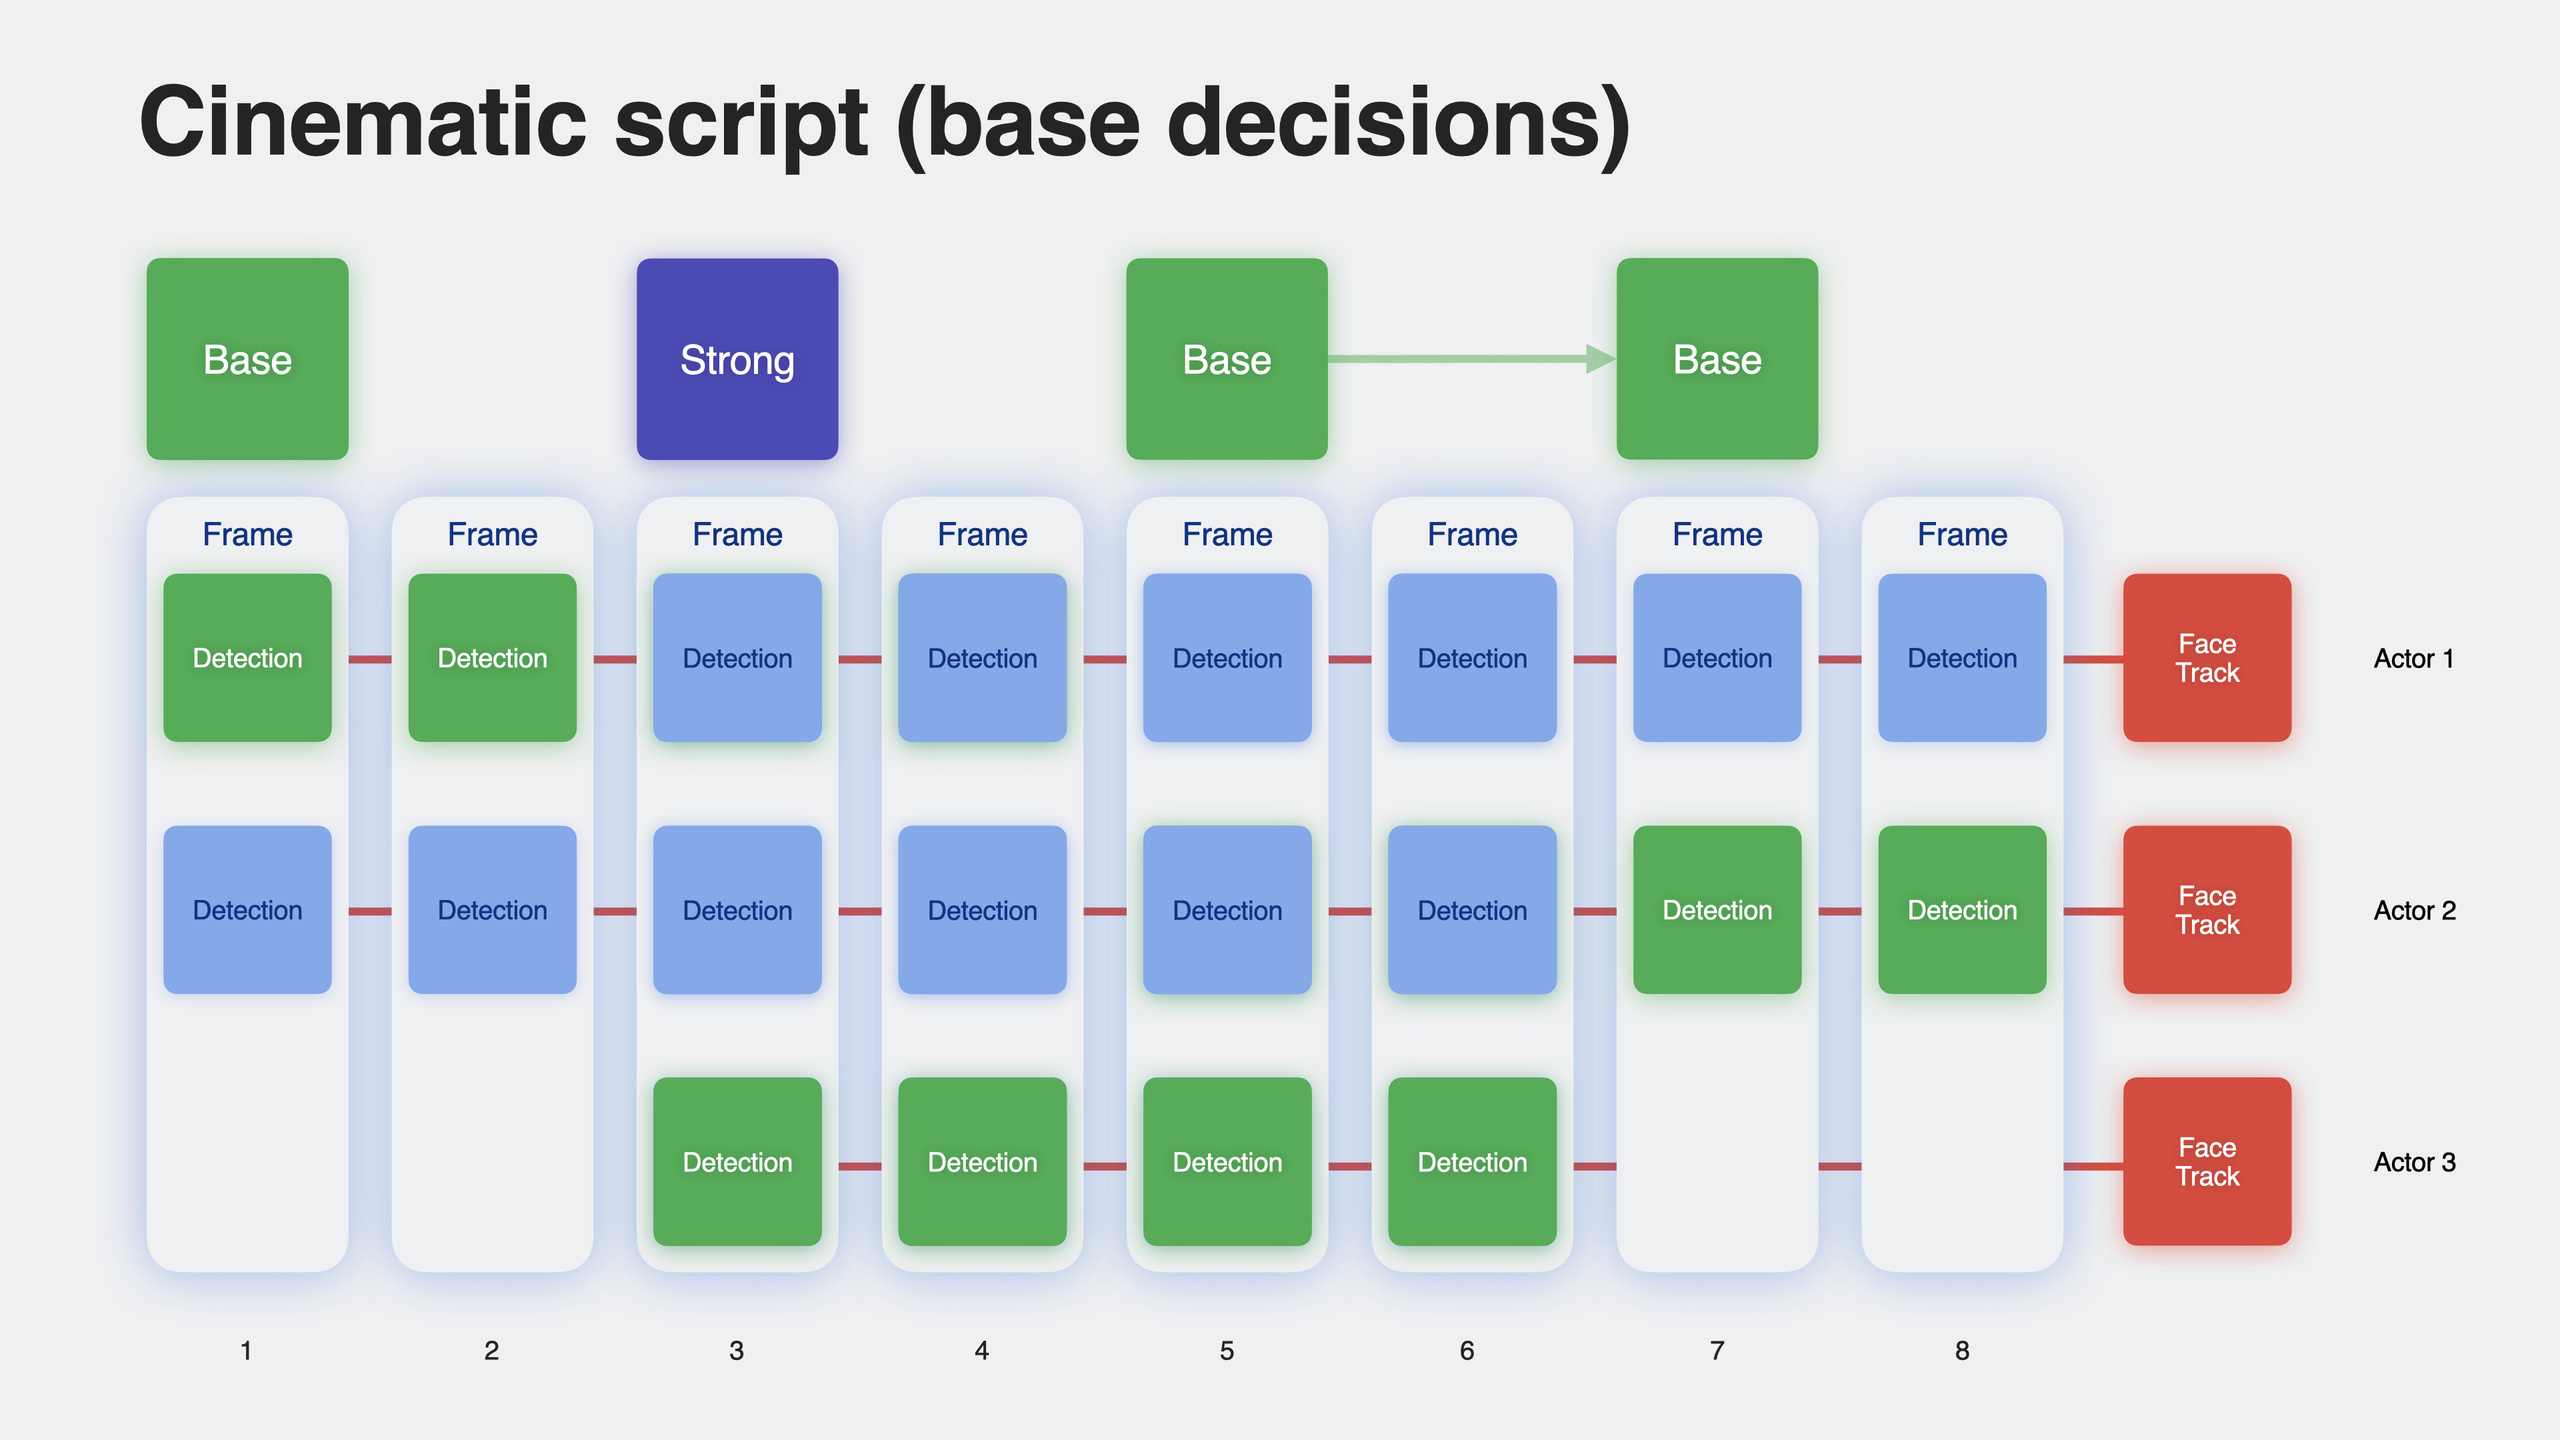
The Cinematic engine automatically detects objects in the scene and determines focus when shooting. These automated decisions are called base decisions. During post-editing, users can insert two types of user decisions: a weak decision will only last until the next base or user decision; a strong decision will overwrite all subsequent base decisions until the detected object leaves the screen or the user manually switches focus again.
This hierarchical design allows users to modify only part of the focus in a clip, while maintaining automatic decision-making on the rest, allowing for fine narrative control.
Real-time rendering data stream
When playing or editing, the Cinematic engine reads the rendering properties of the current frame and combines the disparity map to calculate the shallow depth of field effect. When the focus switches, the engine will start rack focus in advance, predicting key frames like a professional focus puller, producing a smooth transition effect.
Detailed Content
Get movie effect assets
(08:16)
Get the movie effects asset from the Photos library:
// Use the Photos picker to filter for Cinematic videos
let picker = PHPickerViewController(configuration: config)

// Request the original version after getting the asset identifier
let options = PHVideoRequestOptions()
options.version = .original
options.isNetworkAccessAllowed = true // The asset may be in iCloud

PHImageManager.default().requestAVAsset(
    forVideo: phAsset,
    options: options
) { avAsset, _, _ in
    // avAsset contains all tracks for the Cinematic asset
}
Key points:
version = .originalmust be set, otherwise you can only get the ordinary video after renderingisNetworkAccessAllowed = truehandles assets on iCloud- Select “All Photos Data” during AirDrop transfer to retain the complete movie effect data
Set up rendering session
(10:08)
// 1. Get rendering properties from the asset
let assetInfo = try await CNScript.loadFromAsset(asset)
let renderingAttributes = assetInfo.renderingAttributes

// 2. Create the rendering session
let session = try CNRenderingSession(
    attributes: renderingAttributes,
    commandQueue: metalCommandQueue
)

// 3. Set rendering quality
session.quality = .export // or .preview
Key points:
CNRenderingSessionrequires Metal command queue, rendering is performed on GPU.previewis suitable for real-time playback,.exportis suitable for final outputCNScript.loadFromAssetAsynchronously loads script data of assets
Build a custom video synthesizer
(10:53)
// Add asset tracks to the composition
let composition = AVMutableComposition()
let cinematicComposition = try await composition.loadCinematicCompositionInfo(
    from: assetInfo
)

// Get the cinematic script
let script = assetInfo.script

// Create rendering instructions
let instruction = CinematicVideoCompositionInstruction(
    renderingSession: session,
    composition: cinematicComposition,
    script: script,
    aperture: fNumber // Aperture value from the UI
)

// Build the video composition
let videoComposition = AVMutableVideoComposition(
    propertiesOf: composition,
    instruction: instruction
)
videoComposition.customVideoCompositorClass = CinematicCompositor.self

// Play
let playerItem = AVPlayerItem(asset: composition)
playerItem.videoComposition = videoComposition
let player = AVPlayer(playerItem: playerItem)
Key points:
loadCinematicCompositionInfoComplete multi-track addition in one stepCinematicVideoCompositionInstructionencapsulates rendering parameters- Custom compositor calls Cinematic renderer in
startRequest
Customize the rendering process in the compositor
(12:10)
class CinematicCompositor: NSObject, AVVideoCompositing {
    func startRequest(_ request: AVAsynchronousVideoCompositionRequest) {
        // Get the source buffer
        let videoBuffer = request.sourceFrame(
            byTrackID: cinematicComposition.videoTrackID
        )
        let disparityBuffer = request.sourceFrame(
            byTrackID: cinematicComposition.disparityTrackID
        )
        let metadataBuffer = request.sourceFrame(
            byTrackID: cinematicComposition.metadataTrackID
        )

        // Create the output buffer
        let outputBuffer = ...

        // Get frame rendering properties from metadata
        var frameAttributes = session.frameAttributes(
            from: metadataBuffer
        )

        // Apply user adjustment: change aperture
        if let aperture = instruction.aperture {
            frameAttributes.aperture = aperture
        }

        // Apply user adjustment: change focus (from the updated script)
        let scriptFrame = script.frame(at: request.compositionTime)
        frameAttributes.focusDisparity = scriptFrame.focusDisparity

        // Encode the rendering work
        let commandBuffer = commandQueue.makeCommandBuffer()!
        session.encodeRender(
            frameAttributes: frameAttributes,
            frame: videoBuffer,
            disparity: disparityBuffer,
            output: outputBuffer,
            commandBuffer: commandBuffer
        )

        commandBuffer.addCompletedHandler { _ in
            request.finish(withComposedVideoFrame: outputBuffer)
        }
        commandBuffer.commit()
    }
}
Key points:
- Extract
CNRenderingFrameAttributesfrommetadataBuffer, which is the core input for rendering - Aperture and focus parallax can be modified before rendering, enabling real-time adjustments
- Focus disparity is obtained from the updated
CNScriptframe, including smooth transition calculations - Rendering is done entirely on the GPU, scheduled via the Metal command buffer
Draw detection box
(18:09)
// Get the script frame at the current time
let scriptFrame = script.frame(at: compositionTime)

// Iterate through all detected objects and draw rectangles
for detection in scriptFrame.detections {
    let rect = detection.rect
    // Draw detection boxes in white
    drawRect(rect, color: .white)
}

// Highlight the focus detection in yellow
if let focusDetection = scriptFrame.focusDetection {
    let rect = focusDetection.rect
    drawRect(rect, color: .yellow)
}
Key points:
scriptFrame.detectionscontains all face, head, and torso detections in the current framefocusDetectionis the detection object where the current focus is- Detection frames can be filtered as needed, such as only showing faces
Modify focus decision
(19:40)
// When the user taps the image, determine whether the tap is inside a detected object
for detection in scriptFrame.detections {
    if detection.rect.contains(tapPoint) {
        // Decide decision strength based on the tap type
        let strength: CNDecisionStrength = isDoubleTap ? .strong : .weak

        let decision = CNDecision(
            time: compositionTime,
            detectionID: detection.detectionID,
            strength: strength
        )

        // Add to the script
        script.addUserDecision(decision)
        break
    }
}
Key points:
CNDecisionStrength.weaklasts only until the next automatic or user decisionCNDecisionStrength.strongoverrides all subsequent automatic decisions until the detected object disappears- After adding a decision,
focusDisparityof subsequent frames will automatically follow the new focus - The engine will start rack focus early, resulting in a smooth transition
Saving and loading edits
(22:19)
// Save edits
let scriptChanges = script.changes
let data = scriptChanges.dataRepresentation()
try data.write(to: editFileURL)

// Load edits
let loadedData = try Data(contentsOf: editFileURL)
let loadedChanges = try CNScript.Changes(dataRepresentation: loadedData)
let newScript = try CNScript(asset: asset, changes: loadedChanges)
Key points:
- Edits are stored in independent data files, and the original assets are not modified.
dataRepresentation()generates compact binary format- The original script and modifications can be passed in at the same time when loading, and they will be automatically merged.
- You can discard changes at any time and return to the original state
Core Takeaways
-
Movie Effect Video Editor
- What to build: Make a simplified version of iMovie, specifically editing the focus and aperture of movie effect videos
- Why it’s worth doing: Cinematic API provides complete non-destructive editing capabilities, and the interaction of single/two-finger click to switch focus is intuitive and natural.
- How to start: Use
PHPickerViewControllerto filter movie effect videos, buildCNRenderingSession+ customizedAVVideoCompositing, and realize the interaction of clicking to switch focus
-
Automatic narrative generation tool
- What to build: Automatically generate multiple focus narrative versions (suspense version, comedy version, warmth version) based on the video content
- Why it’s worth doing: The detection data in the Cinematic script exposes all faces and objects in the scene, and the focus switching timing can be automatically arranged based on the rules engine
- How to start: Analyze the detection timeline of
CNScript, and use algorithms to generate different decision sequences based on the face orientation, distance, and timing of entering/leaving the screen.
-
Depth of field video social platform
- What to build: After users upload movie-effect videos, viewers can click on the screen to switch focus and discover hidden details during playback
- Why it’s worth doing: strong/weak decision mechanism allows the audience to temporarily switch focus without destroying the author’s narrative, increasing interactivity
- How to start: The backend stores the original movie effect assets and user’s editing changes, the frontend uses
CNRenderingSessionfor real-time rendering, and weak decisions are inserted when clicked
-
Intelligent generation of video cover
- What to build: Automatically extract the frame with clear focus and the most beautiful depth of field from the movie-effect video as the cover
- Why it’s worth doing: You can preview the bokeh effect of each frame by adjusting the aperture to the maximum value (f/1.4) and choose the picture with the strongest visual impact.
- How to start: Traverse the video keyframes, use
CNRenderingSessionto render with different aperture values, calculate the contrast/color richness of the bokeh area, and select the best one by scoring
Related Sessions
- Edit and Play Back HDR Video with AVFoundation — HDR video editing and custom synthesizer explained
- Capturing Depth in iPhone Photography — In-depth explanation of depth/parallax principle
- What’s new in AVFoundation — AVFoundation annual new feature summary
Comments
GitHub Issues · utterances