
Highlight
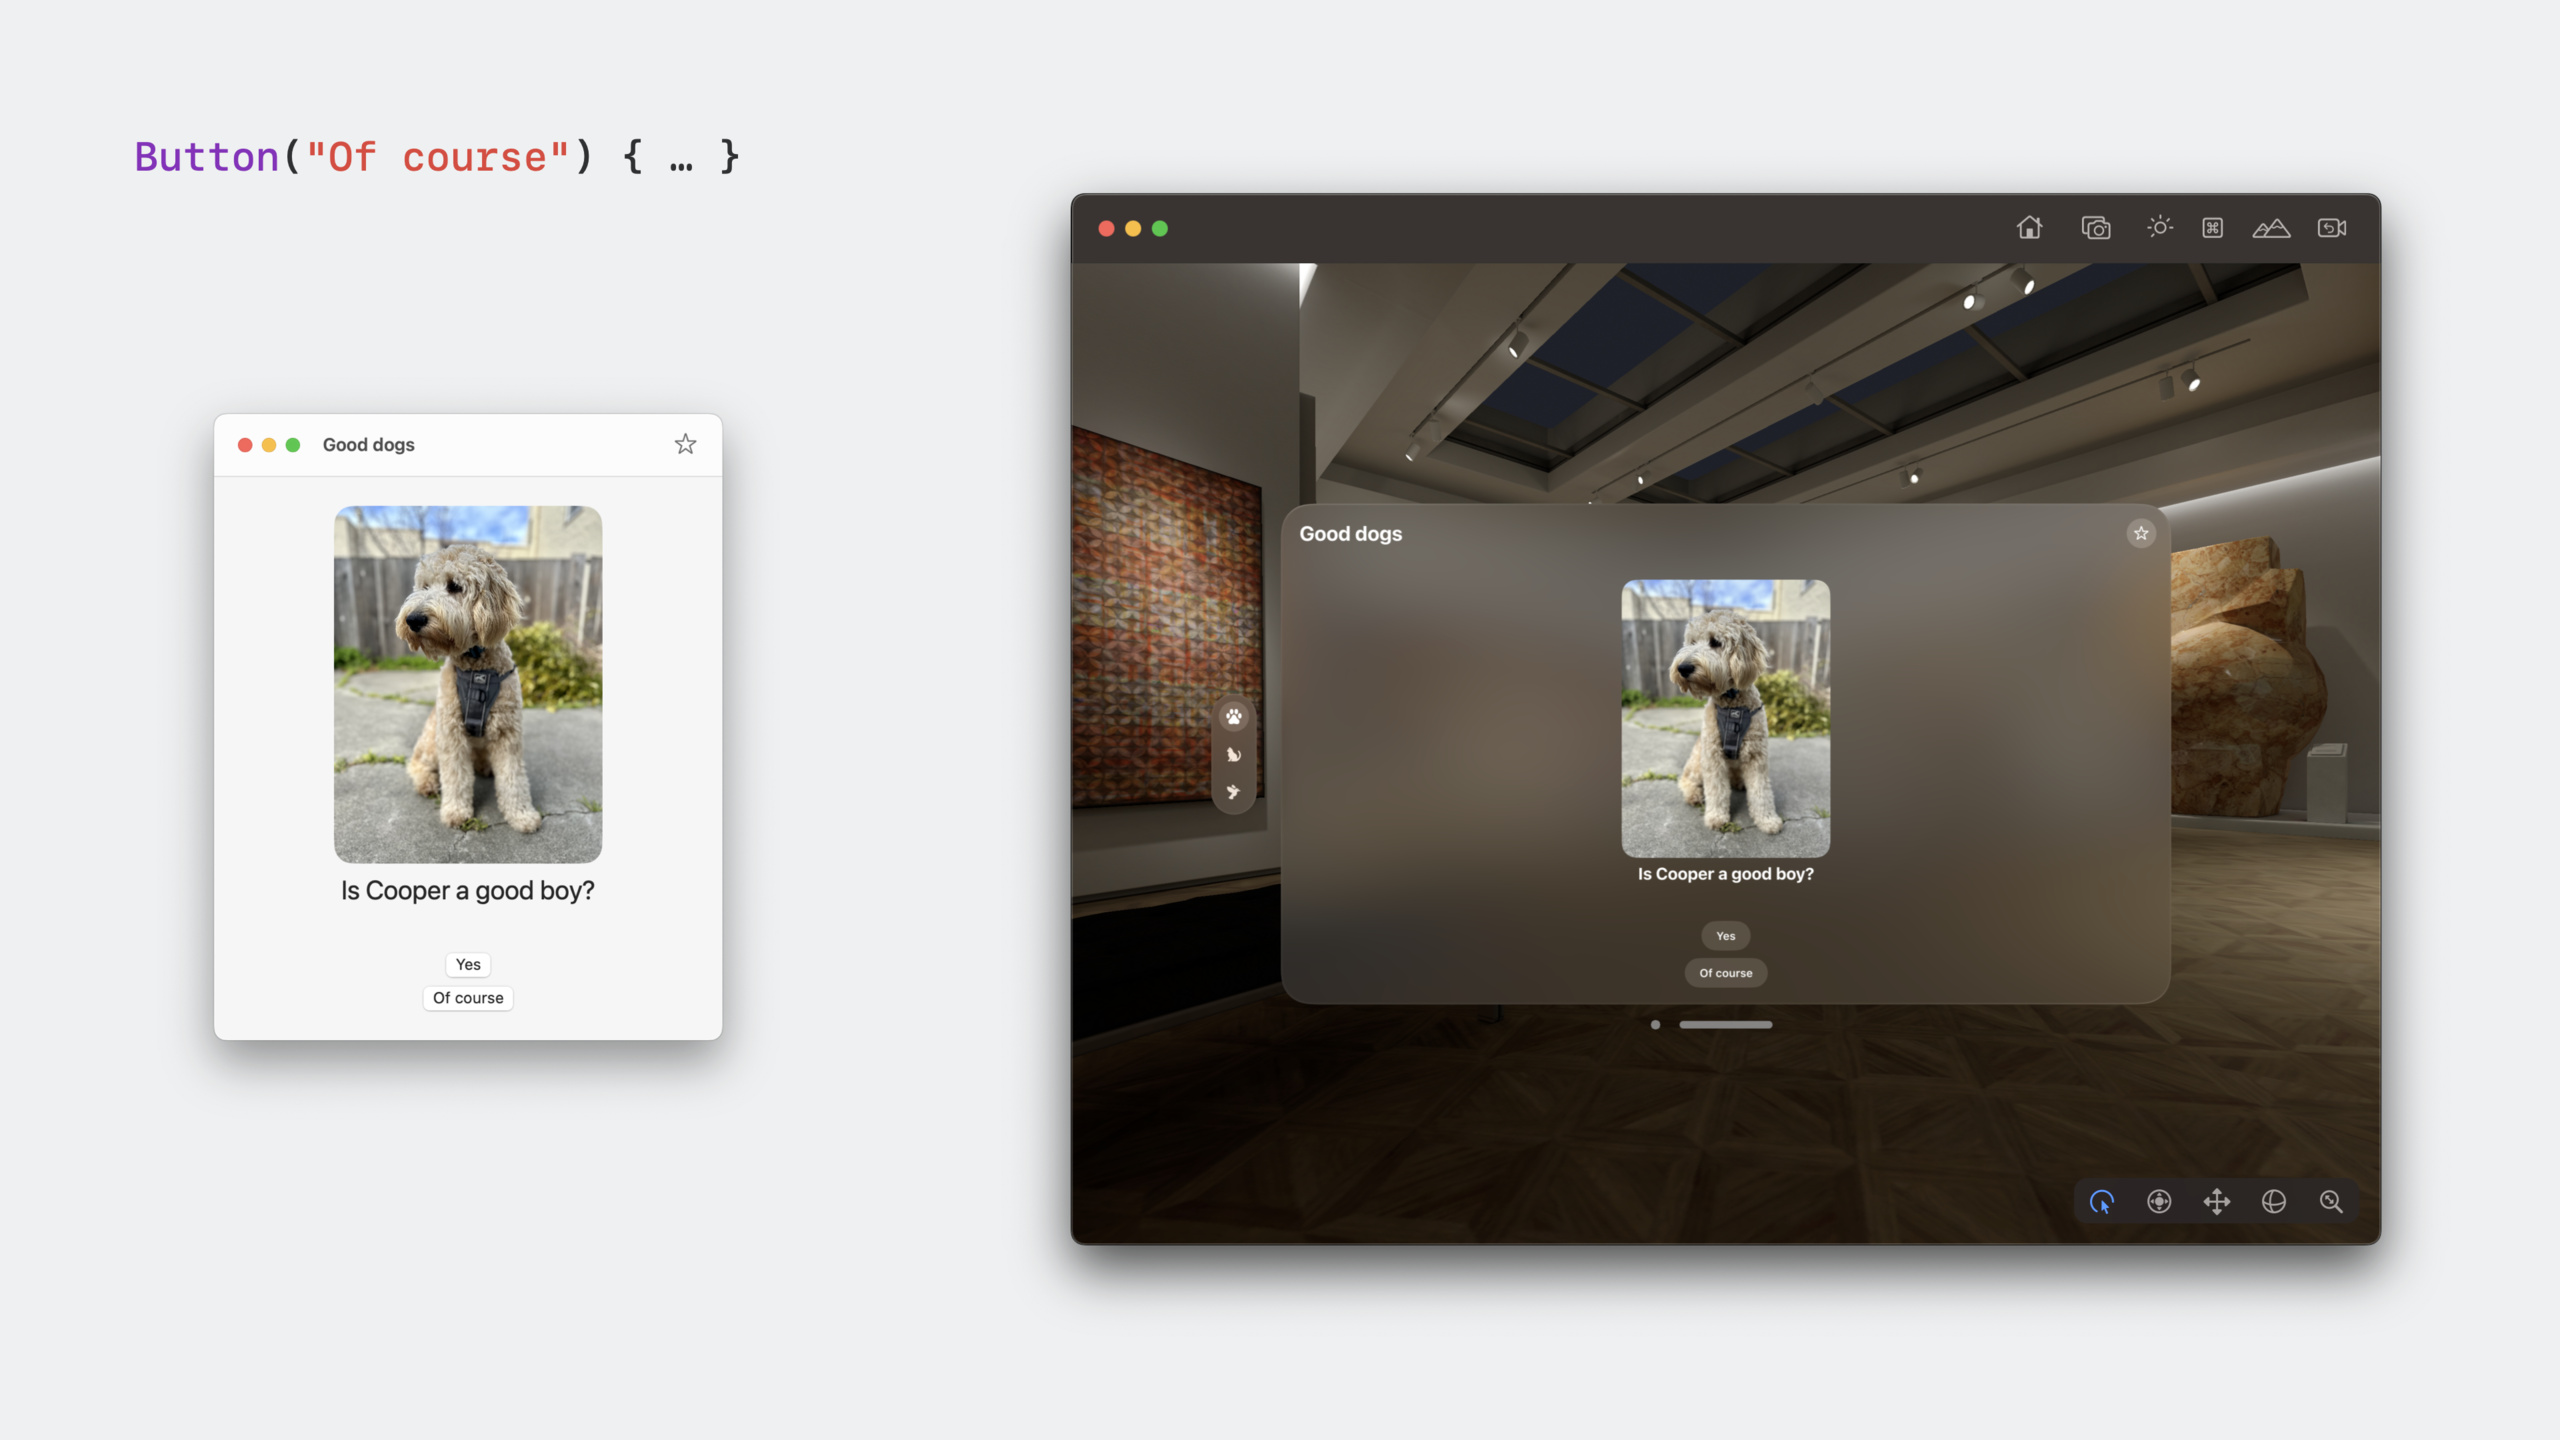
SwiftUI is the best way to build visionOS applications, providing three scene types (Window, Volume, ImmersiveSpace), new 3D capabilities (Model3D, RealityView, 3D gestures) and smart defaults that automatically adapt to the platform, from Button’s hover effects to TabView’s side navigation without additional configuration.
Core Content
Apple built the entire system interface of visionOS from scratch using SwiftUI. Home View, Control Center, Safari, Freeform’s 3D drawing board, Keynote’s immersive rehearsal—all implemented with SwiftUI.
(00:38) This means your SwiftUI knowledge can be directly transferred to this new platform. Basic controls such as Button, Toggle, and TabView retain familiar APIs, but gain platform-specific appearance and interaction.
Three scene types
(03:49) visionOS application consists of three scenarios:
- Window: Traditional 2D window, with a glass background that allows the environment to shine through. Suitable for content-based applications such as Safari and Freeform.
- Volume: New 3D window style to display 3D objects in limited space. Can be displayed side by side with other applications. Suitable for 3D model preview, board games.
- ImmersiveSpace (Full Space): Fully immersive 3D environment. It can hide the surrounding environment and bring users into a whole new world. Suitable for gaming and immersive experience.
These three scenarios can be mixed. Open Volume from Window to display the 3D preview, and then enter Full Space from Volume for complete immersion.
Intelligent default values for platform adaptation
(02:02) Button uses bordered style and vibrant material background by default, supports gaze-triggered hover effects, scales when pressed and provides audio feedback. Buttons in the navigation bar automatically display tooltips when the user looks at them.
The TabView hangs from the left edge of the window and expands to display the label text when looking at it. This takes full advantage of the platform’s “gaze is interaction” feature.
3D capabilities
(14:10) Model3D is as simple as Image, loading and displaying 3D models asynchronously. RealityView provides complete RealityKit capabilities and supports custom materials, physics, and animation. 3D gestures like SpatialTapGesture and RotateGesture3D make interactions more natural.
Detailed Content
Application Portal (App Protocol)
(03:37) visionOS applications use the same App protocol as other platforms:
@main
struct WorldApp: App {
    var body: some Scene {
        WindowGroup("Hello, world") {
            ContentView()
        }
    }
}
Key points:
WindowGroupautomatically supports multiple windows, the same as macOS/iPadOS- The application can define multiple scenes at the same time
Window with TabView
(07:03) Use TabView to organize app content:
@main
struct WorldApp: App {
    var body: some Scene {
        WindowGroup("Hello, world") {
            TabView {
                Modules()
                    .tag(Tabs.menu)
                    .tabItem {
                        Label("Experience", systemImage: "globe.americas")
                    }
                FunFactsTab()
                    .tag(Tabs.library)
                    .tabItem {
                        Label("Library", systemImage: "book")
                    }
            }
        }
    }
}
Key points:
- TabView automatically displays on the left edge of the window
- Expand to display the complete label text when looking at it
- Use
.tagto identify the currently selected tag
Materials and glass background
(08:42) Use system materials to create visual hierarchy:
VStack(alignment: .leading, spacing: 12) {
    Text("Stats")
        .font(.title)

    StatsGrid(stats: stats)
        .padding()
        .background(.regularMaterial, in: .rect(cornerRadius: 12))
}
Key points:
- The window uses a glass background by default, and there is no distinction between light and dark modes.
.regularMaterialAdd vibrant dark background to glass- Materials automatically adapt to the environment to keep content readable
- Use
.secondaryforeground style to express visual hierarchy
Custom button style
(09:23) Create a custom button with hover effect:
struct FunFactButtonStyle: ButtonStyle {
    func makeBody(configuration: Configuration) -> some View {
        configuration.label
            .padding()
            .background(.regularMaterial, in: .rect(cornerRadius: 12))
            .hoverEffect()
            .scaleEffect(configuration.isPressed ? 0.95 : 1)
    }
}

// Usage
Button(action: {
    // perform button action
}) {
    VStack(alignment: .leading, spacing: 12) {
        Text(fact.title)
            .font(.title2)
            .lineLimit(2)
        Text(fact.details)
            .font(.body)
            .lineLimit(4)
        Text("Learn more")
            .font(.caption)
            .foregroundStyle(.secondary)
    }
    .frame(width: 180, alignment: .leading)
}
.buttonStyle(.funFact)
Key points:
- Custom
ButtonStyleneeds to be added manually.hoverEffect() - Built-in controls automatically get hover effects
.hoverEffect()Automatically select effects appropriate to the current context- The effect will match the shape of the button background
Volume (3D Window)
(14:17) Create a Volume displaying 3D content:
@main
struct WorldApp: App {
    var body: some Scene {
        WindowGroup {
            Globe()
        }
        .windowStyle(.volumetric)
        .defaultSize(width: 600, height: 600, depth: 600)
    }
}
Use Model3D to display a 3D model:
import SwiftUI
import RealityKit

struct Globe: View {
    @State var rotation = Angle.zero

    var body: some View {
        ZStack(alignment: .bottom) {
            Model3D(named: "Earth")
                .rotation3DEffect(rotation, axis: .y)
                .onTapGesture {
                    withAnimation(.bouncy) {
                        rotation.degrees += Double.random(in: 360...720)
                    }
                }
                .padding3D(.front, 200)

            GlobeControls()
                .glassBackgroundEffect(in: .capsule)
        }
    }
}
Key points:
.windowStyle(.volumetric)Change window to Volume.defaultSize(width:height:depth:)Set 3D dimensionsModel3Dloads 3D models asynchronously and automatically displays placeholdersrotation3DEffectRotate in 3D space.padding3D(.front, 200)adds spacing in the Z-axis direction.glassBackgroundEffectAdd glass background to controls
RealityView and 3D Gestures
(17:30) Use RealityView to access full RealityKit capabilities:
struct Earth: View {
    @State private var pinLocation: GlobeLocation?
    @State private var rotation = Angle.zero
    @State private var animatingRotation = false

    var body: some View {
        RealityView { content in
            if let earth = try? await ModelEntity(named: "Earth") {
                earth.addImageBasedLighting()
                content.add(earth)
            }
        } update: { content, attachments in
            if let pin = attachments.entity(for: "pin") {
                content.add(pin)
                placePin(pin, at: pinLocation)
            }
        } attachments: {
            if let pinLocation {
                GlobePin(pinLocation: pinLocation)
                    .tag("pin")
            }
        }
        .gesture(
            SpatialTapGesture()
                .targetedToAnyEntity()
                .onEnded { value in
                    withAnimation(.bouncy) {
                        rotation.degrees += Double.random(in: 360...720)
                        animatingRotation = true
                    } completion: {
                        animatingRotation = false
                    }
                    pinLocation = lookUpLocation(at: value)
                }
        )
    }
}
Key points:
RealityView’s closure supports async/awaitupdateclosure is called when the state changes and is used to update RealityKit contentattachmentsclosure attaches SwiftUI views to RealityKit entitiesSpatialTapGestureprovides full 3D click position.targetedToAnyEntity()Get the clicked entity and relative positionaddImageBasedLighting()Add image-based lighting
ImmersiveSpace (immersive space)
(21:11) Create a fully immersive experience:
@main
struct WorldApp: App {
    var body: some Scene {
        // Window scene
        WindowGroup {
            ContentView()
        }

        // Immersive space
        ImmersiveSpace(id: "solar-system") {
            SolarSystem()
        }
        .immersionStyle(selection: .constant(.full), in: .full)
    }
}

struct ContentView: View {
    @Environment(\.openImmersiveSpace) private var openImmersiveSpace
    @Environment(\.dismissImmersiveSpace) private var dismissImmersiveSpace

    var body: some View {
        Button("View Outer Space") {
            Task {
                await openImmersiveSpace(id: "solar-system")
            }
        }
    }
}

struct SolarSystem: View {
    var body: some View {
        Earth()
        Sun()
        Starfield()
    }
}

struct Starfield: View {
    var body: some View {
        RealityView { content in
            let starfield = await loadStarfield()
            content.add(starfield)
        }
    }
}
Key points:
ImmersiveSpacerequires uniqueidopenImmersiveSpaceenvironment value is used to open spacedismissImmersiveSpaceis used to close the space.immersionStyle(selection:in:)Set immersion style.fullCompletely hides surroundings.mixedLet virtual content and reality coexist.progressiveUsers can adjust the immersion level through the digital crown
Immersion style switching
(22:50) Support multiple immersion styles and dynamically switch:
@main
struct WorldApp: App {
    @State private var selectedStyle: ImmersionStyle = .full

    var body: some Scene {
        WindowGroup {
            ContentView(selectedStyle: $selectedStyle)
        }

        ImmersiveSpace(id: "solar-system") {
            SolarSystem()
        }
        .immersionStyle(selection: $selectedStyle, in: .full, .mixed, .progressive)
    }
}
Key points:
immersionStyle’sselectionbinding allows runtime switchinginparameter lists supported styles- Users can adjust immersion via the Digital Crown in
.progressivestyle
Core Takeaways
1. Add 3D product preview to e-commerce applications
What to build: Add a Volume to the product details page so that users can view the 3D model of the product from all angles.
Why it’s worth doing: 3D preview allows users to have a clearer understanding of the appearance of the product before purchasing, reducing return rates. Volume can be displayed side by side with other applications without interrupting the user’s shopping process.
How to start: Use Model3D to load the USDZ model of the product, use .windowStyle(.volumetric) to create a Volume, and add rotation3DEffect and onTapGesture to allow users to rotate and interact.
2. Build immersive educational applications
What to build: Create an astronomy or biology education application, display knowledge points in the Window, and enter the Full Space immersive experience through buttons, allowing students to explore the solar system or cell structure immersively.
Why it’s worth doing: Spatial computing makes abstract concepts intuitive. Students can “walk into” the solar system and observe the movement of the planets from any angle, an experience that 2D screens cannot provide.
How to start: Use WindowGroup to build the course navigation interface, use ImmersiveSpace to create an immersive scene, and enter through openImmersiveSpace. Use RealityView to load complex 3D models, and add SpatialTapGesture to implement interactive annotation.
3. Add 3D model viewer to design tools
What to build: Integrate Volume in graphic design or architectural design applications, allowing users to preview imported 3D models while continuing to edit the design in a 2D window.
Why it’s worth doing: Designers need to view 2D drawings and 3D models simultaneously. Volume can be displayed side by side with other application windows, supporting true multitasking workflows.
How to start: Use RealityView to load the model, and use attachments to overlay SwiftUI controls (such as dimensions and material selection panels) on the 3D scene. Use glassBackgroundEffect to blend controls into the platform’s visual style.
4. Interactive interface to realize gaze awareness
What to build: Utilize the platform’s “gaze-interaction” feature to allow interface elements to automatically expand more information or display operation prompts based on the user’s gaze position.
Why it’s worth doing: This is a unique interaction method of the spatial computing platform. TabView gaze expansion is a good example, and the same pattern can be applied to any interface with high information density.
How to start: Using SwiftUI built-in controls (which automatically support gaze interaction), add .hoverEffect() to your custom control. Combined with the ornament modifier, place auxiliary information at the edge of the window and expand the details when looking at it.
Related Sessions
- Create a more responsive camera experience — iOS 17 camera responsiveness new API: delayed processing, zero shutter lag, responsive shooting
- Support external cameras in your iPadOS app — Use external cameras like the Apple Studio Display in iPadOS apps
- What’s new in the Photos picker — New improvements to the system photo picker, supporting embedded and continuous selections
- What’s new in Background Assets — Download resources in the background to reduce user waiting
Comments
GitHub Issues · utterances