
Highlight
iOS 17 introduces three new APIs for
AVCapturePhotoOutput: deferred photo processing, zero shutter lag, and responsive capture—letting camera apps maintain Deep Fusion’s highest image quality while achieving faster burst speeds and shorter shutter delay.
Core Content
Nothing kills the moment like waiting for processing to finish before you can take the next shot. Deep Fusion’s detail improvements are undeniable—feather textures and beard details come through sharp and clear. But processing is synchronous; it must complete before the next capture can begin.
(01:43)Before iOS 17, developers had to choose between image quality and speed. Choosing quality priority gave the best results but lengthened shot-to-shot time. Choosing balanced or speed sacrificed quality for speed.
Apple’s solution this year: defer processing until after the camera session ends.
Deferred Photo Processing
(01:43)Deferred Photo Processing works by returning a lightweight proxy photo at capture time so users can keep shooting; the real Deep Fusion processing happens in the background and runs after the user exits the camera app.
This proxy photo is saved to the photo library as a placeholder. When the user later views or shares it, the system either completes processing on demand or finishes it automatically in the background when the device is idle.
Zero Shutter Lag
(16:03)Another common pain point is shutter lag. What you see in the viewfinder when you press the shutter isn’t what you get—the photo captures a later moment. At 30fps each frame displays for only 33 milliseconds, but that’s enough to miss the perfect moment.
Zero Shutter Lag uses a ring buffer to store past frame data. When you press the shutter, the camera “travels back in time,” extracting the frame from the moment you pressed the button to compose the photo.
Responsive Capture
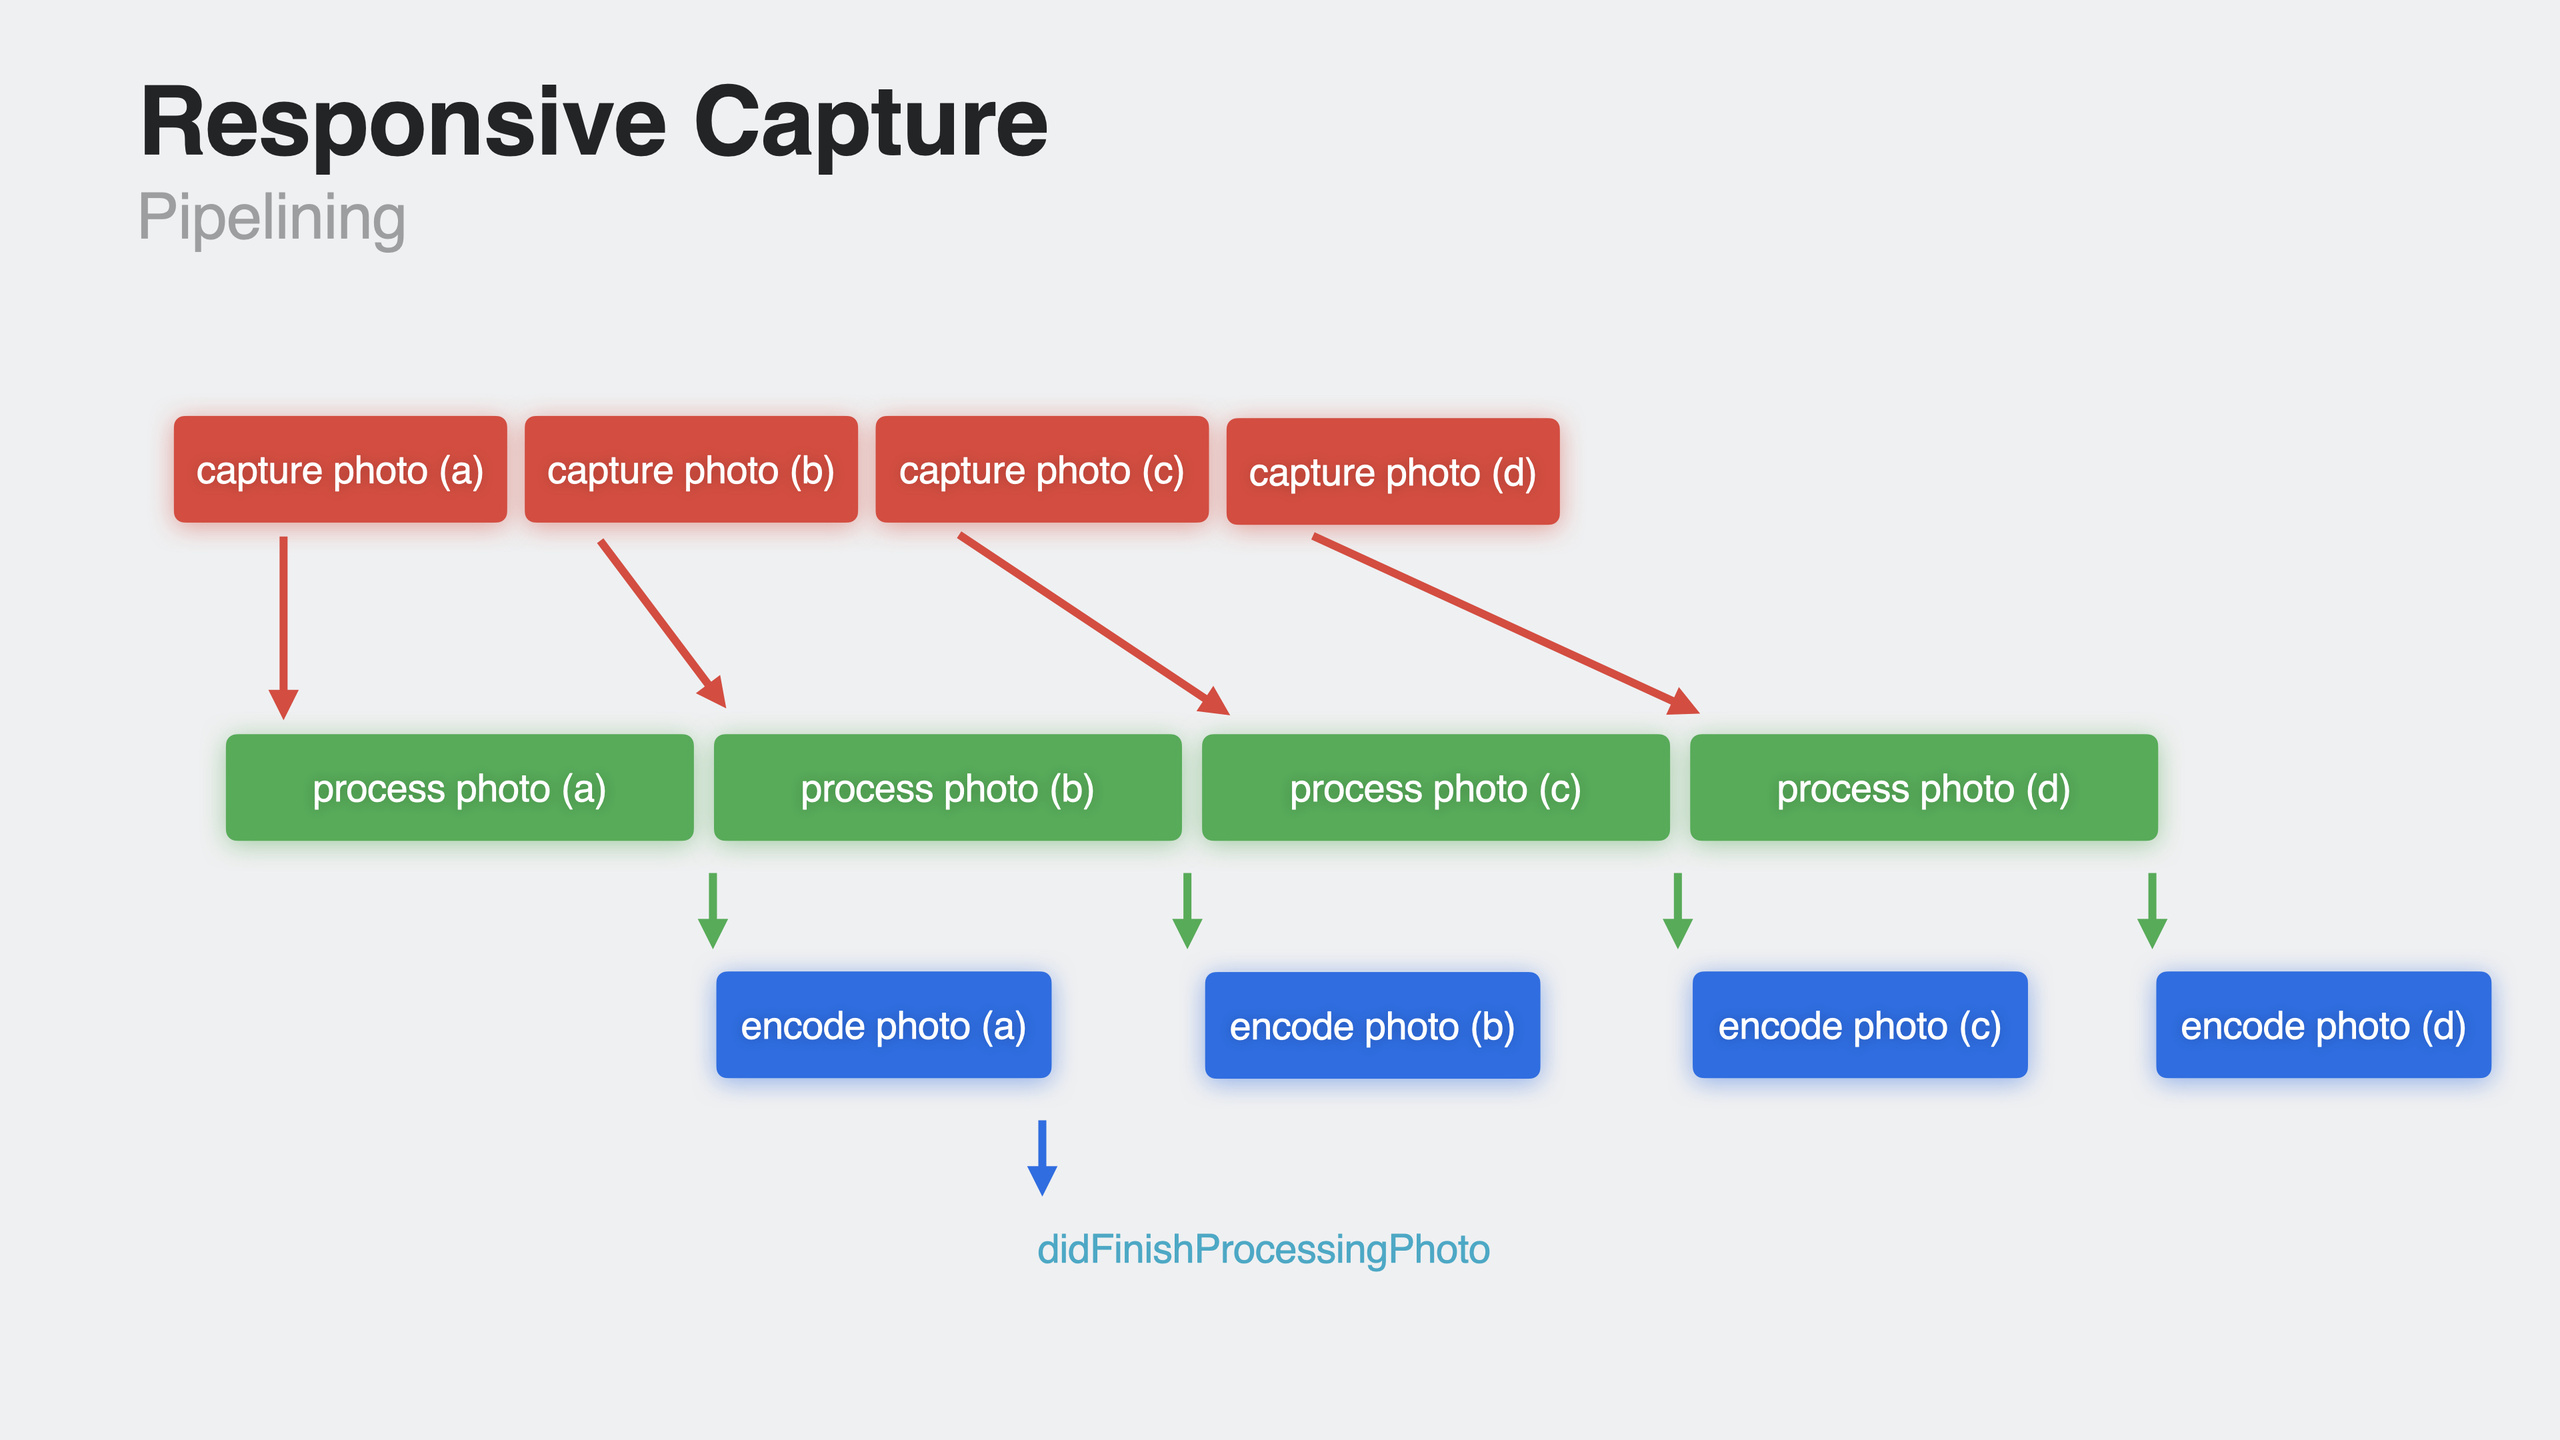
(19:44)Responsive Capture lets the capture and processing phases overlap. While the first photo is still processing, the second capture request can already begin. This dramatically improves burst speed.
Combined with Fast Capture Prioritization, when the system detects rapid consecutive shots, it automatically lowers quality from maximum to balanced to maintain stable shot-to-shot timing.
Video Effects and Reaction Gestures
(27:07)macOS Sonoma moves video effects out of Control Center into a dedicated menu. Portrait and Studio Light effects now have adjustable intensity. New Reactions support gesture triggers—thumbs up, thumbs down, heart, peace sign, and more—rendering balloons, fireworks, lasers, and other animations on video.
Detailed Content
Enabling Deferred Photo Processing
(05:46)When configuring AVCapturePhotoOutput, check and enable deferred processing:
// Check whether deferred photo processing is supported
if photoOutput.isAutoDeferredPhotoDeliverySupported {
    photoOutput.isAutoDeferredPhotoDeliveryEnabled = true
}
Key points:
isAutoDeferredPhotoDeliverySupportedchecks whether the current device supports it- With
isAutoDeferredPhotoDeliveryEnabledon, the camera automatically decides which photos suit deferred processing - No per-photo setup needed—the system handles it automatically
Saving Proxy Photos to the Photo Library
(07:42)After capture, use the new proxy callback to save the photo:
func photoOutput(_ output: AVCapturePhotoOutput,
                 didFinishCapturingDeferredPhotoProxy deferredPhotoProxy: AVCaptureDeferredPhotoProxy?,
                 error: Error?) {
    guard error == nil, let proxy = deferredPhotoProxy else { return }

    PHPhotoLibrary.shared().performChanges {
        let request = PHAssetCreationRequest.forAsset()
        request.addResource(with: .photoProxy,
                           data: proxy.fileDataRepresentation()!,
                           options: nil)
    } completionHandler: { success, error in
        // Handle the completion callback
    }
}
Key points:
- Use the
didFinishCapturingDeferredPhotoProxycallback to receive the proxy photo PHAssetResourceType.photoProxytells PhotoKit this photo needs deferred processing- Save proxy data to the photo library promptly to avoid data loss if the app is suspended
Requesting Photos Still Processing
(09:43)When users view a photo still being processed, enable secondary degraded images:
let options = PHImageRequestOptions()
options.allowSecondaryDegradedImage = true

PHImageManager.default().requestImage(for: asset,
                                       targetSize: targetSize,
                                       contentMode: .aspectFit,
                                       options: options) { image, info in
    if let info = info {
        if info[PHImageResultIsDegradedKey] as? Bool == true {
            // Show the intermediate-quality image
        } else {
            // Show the final image
        }
    }
}
Key points:
allowSecondaryDegradedImageprovides a medium-quality image between the low-quality placeholder and the final image- Both degraded images are marked with
PHImageResultIsDegradedKey - The final image won’t have this flag
Zero Shutter Lag
(18:24)Zero Shutter Lag is enabled by default on iOS 17—apps linked against the iOS 17 SDK get it automatically. To disable:
// Check support
if photoOutput.isZeroShutterLagSupported {
    photoOutput.isZeroShutterLagEnabled = false // Default is true
}
Key points:
- Only supported on presets/formats where
isHighestPhotoQualitySupportedis true - Flash, manual exposure, bracketed exposure, and multi-camera synchronized capture don’t support zero shutter lag
- Minimize delay between the tap event and calling
capturePhoto
Responsive Capture and Readiness Coordinator
(21:31)Enable responsive capture:
// Zero shutter lag must be enabled first
if photoOutput.isResponsiveCaptureSupported {
    photoOutput.isResponsiveCaptureEnabled = true
}

// Fast capture priority
if photoOutput.isFastCapturePrioritizationSupported {
    photoOutput.isFastCapturePrioritizationEnabled = true
}
Use the readiness coordinator to manage shutter button state:
let readinessCoordinator = AVCapturePhotoOutputReadinessCoordinator(photoOutput: photoOutput)
readinessCoordinator.delegate = self

// Notify the coordinator before capture
readinessCoordinator.startTrackingCaptureRequest(using: photoSettings)
photoOutput.capturePhoto(with: photoSettings, delegate: self)

// Implement delegate methods
func readinessCoordinator(_ coordinator: AVCapturePhotoOutputReadinessCoordinator,
                         captureReadinessDidChange captureReadiness: AVCapturePhotoOutput.CaptureReadiness) {
    switch captureReadiness {
    case .ready:
        shutterButton.isEnabled = true
    case .notReadyMomentarily:
        shutterButton.isEnabled = false
    case .notReadyWaitingForCapture:
        shutterButton.isEnabled = false // Flash is charging
    case .notReadyWaitingForProcessing:
        shutterButton.isEnabled = false // Processing
    default:
        break
    }
}
Key points:
AVCapturePhotoOutputReadinessCoordinatormonitors capture readiness state changes.notReadyWaitingForCapturemeans still waiting for frames from the sensor (e.g., flash scenarios).notReadyWaitingForProcessingmeans processing is in progress- You can use the readiness coordinator even without responsive capture
Video Reaction Effects
(29:59)On iOS, apps must declare reaction effects support in Info.plist:
<key>NSCameraReactionEffectsEnabled</key>
<true/>
Or declare the VoIP background mode:
<key>UIBackgroundModes</key>
<array>
    <string>voip</string>
</array>
Trigger reaction effects:
// Check whether the device supports reaction effects
if device.activeFormat.reactionEffectsSupported {
    // Trigger the effect
    device.performEffect(for: .thumbsUp)
}

// Get the system icon
let imageName = AVCaptureReactionType.thumbsUp.systemImageName
let image = UIImage(systemName: imageName)

// Observe effect-in-progress status
// reactionEffectsInProgress returns an array of AVCaptureReactionEffectStatus
Key points:
AVCaptureReactionTypeincludes thumbsUp, thumbsDown, balloons, heart, fireworks, rain, confetti, laserssystemImageNameprovides the corresponding system icon- Gesture-triggered effect positions may differ from programmatic triggers
- Frame rate may drop from 60fps to 30fps while effects are active
Core Takeaways
1. Add a “pro burst mode” to your camera app
What to build: A high-speed burst mode in your camera app using responsive capture APIs for 4–5 shots per second.
Why it’s worth doing: Traditional camera apps are limited by Deep Fusion processing time. Responsive capture overlaps processing and capture phases so users don’t miss action moments.
How to start: Enable isResponsiveCaptureEnabled and isFastCapturePrioritizationEnabled, use AVCapturePhotoOutputReadinessCoordinator to manage shutter button state, and give users clear capture feedback.
2. Build a “zero-wait” camera app
What to build: Combine deferred photo processing and zero shutter lag for a camera app where pressing the shutter captures instantly.
Why it’s worth doing: Deep Fusion quality and fast burst are no longer at odds. Proxy photos are available immediately; final processing completes in the background.
How to start: Enable isAutoDeferredPhotoDeliveryEnabled on AVCapturePhotoOutput, handle the didFinishCapturingDeferredPhotoProxy callback, and save proxy data to the photo library. Zero shutter lag is on by default—no extra configuration needed.
3. Add a reaction effects panel to video calling apps
What to build: A reaction effects button panel in video calling or live streaming apps so users can send hearts, fireworks, and more.
Why it’s worth doing: Reaction effects are system-level—no need to implement computer vision and animation rendering yourself. Users can trigger via gestures or in-app buttons.
How to start: Declare NSCameraReactionEffectsEnabled in Info.plist, use AVCaptureReactionType.systemImageName for button icons, call performEffect(for:) to trigger effects. Monitor reactionEffectsInProgress via KVO to show effect icons on the remote end.
4. Implement smart quality adaptation
What to build: Dynamically adjust quality priority based on user shooting behavior—lower quality during rapid bursts to maintain speed, highest quality for single shots.
Why it’s worth doing: isFastCapturePrioritizationEnabled already has this logic built in, but you can give users more control at the UI layer.
How to start: Observe AVCapturePhotoOutputReadinessCoordinator state changes, combine with user shooting frequency, and offer “speed priority” and “quality priority” options in settings.
Related Sessions
- Support external cameras in your iPadOS app — Use external cameras like Apple Studio Display in iPadOS apps
- What’s new in the Photos picker — New Photos picker improvements with embedding and continuous selection
- What’s new in Background Assets — Background asset downloads to reduce user wait time
- Meet SwiftUI for spatial computing — SwiftUI’s new capabilities on spatial computing platforms
Comments
GitHub Issues · utterances