
Highlight
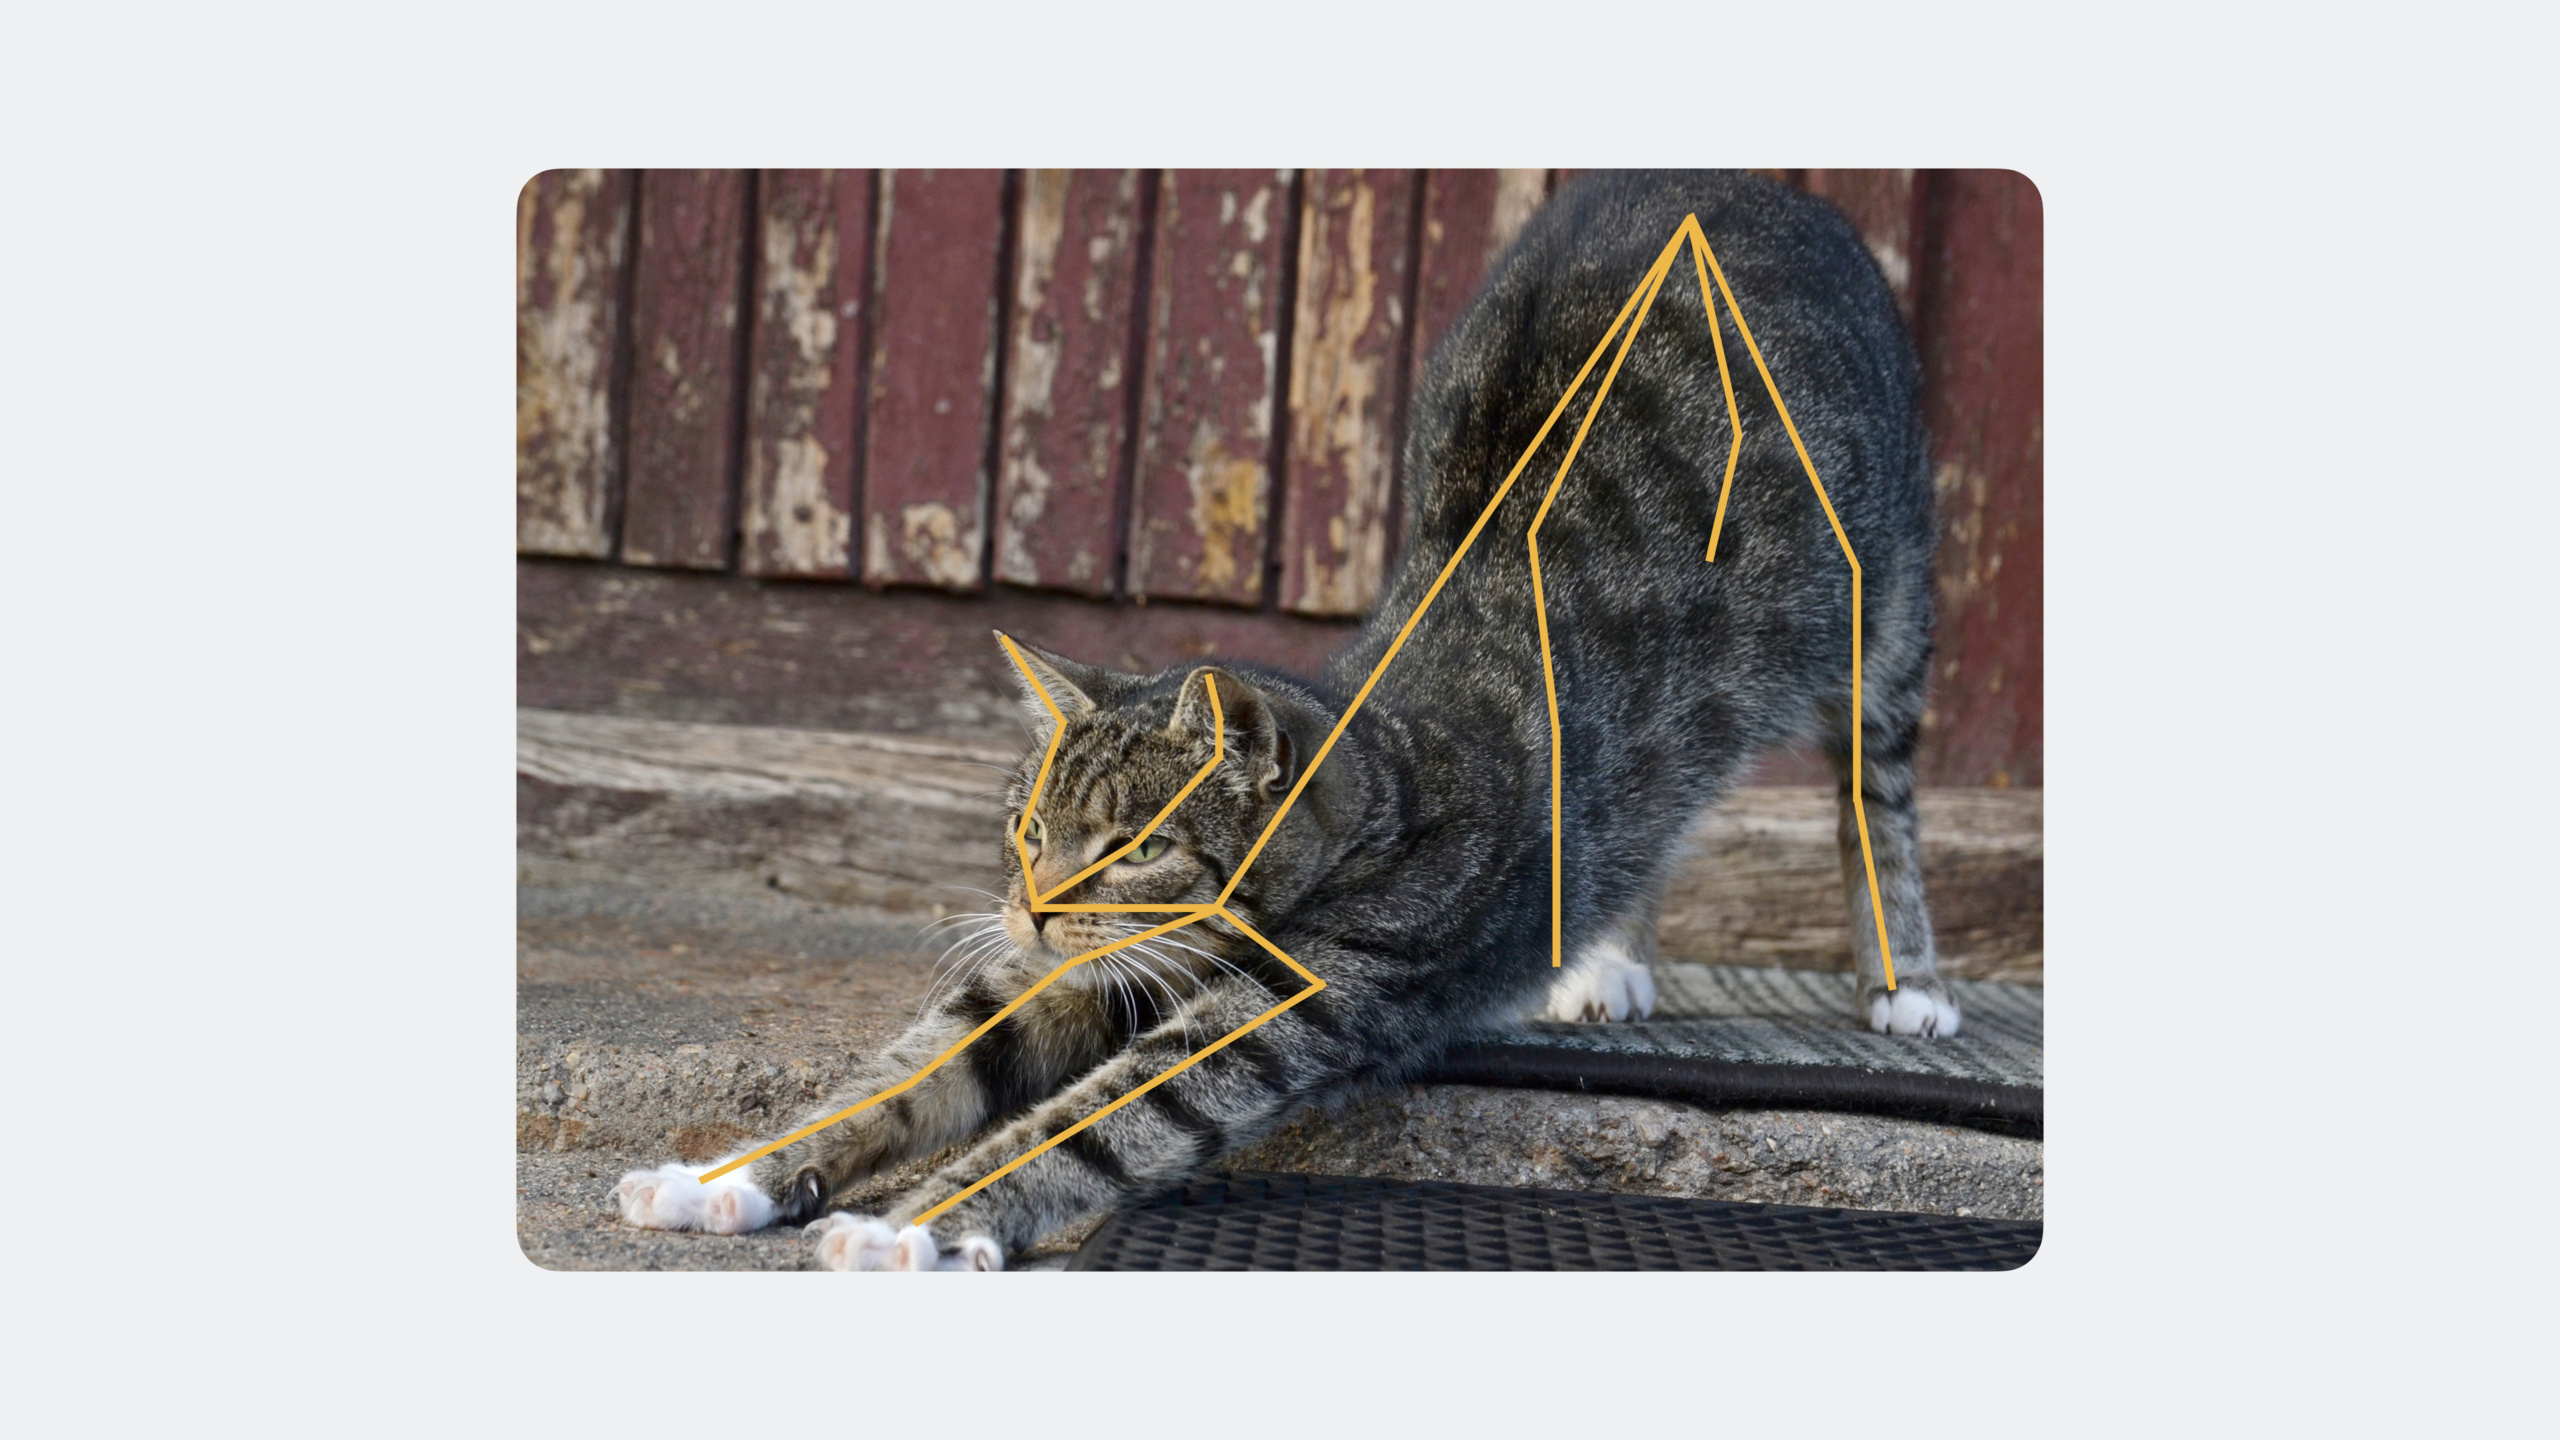
Vision now includes an Animal Body Pose API that detects 25 body joints for cats and dogs in real time—including tail and ears—organized into six joint groups: Head, Forelegs, Hindlegs, Trunk, Tail, and All. A single image supports up to two animals, with a minimum input size of 64×64 pixels, and Neural Engine acceleration enables real-time camera stream performance.
Core Content
Three years ago, Vision introduced Human Body Pose, which detects 19 joints on the human body. Developers have used it to build many health and fitness apps. But the real world is not limited to humans—pets are central to many apps as well.
Vision already had Animal Recognition, which detects and identifies cats and dogs, returning bounding boxes, labels, and confidence scores. But that only tells you “there is a dog in the frame”—not what the dog is doing. Is it standing, sitting, running, or curled up asleep? A bounding box alone makes that hard to infer.
Animal Body Pose fills that gap. It detects 25 body joints for cats and dogs, including ears, eyes, nose, four legs, neck, and tail. These joints are grouped into six sets: Head, Forelegs, Hindlegs, Trunk, Tail, and All.
Input can be a still image or a video stream. After processing, each detected animal returns a set of joint positions. Developers can use those positions to draw skeletons, analyze poses, track motion, or overlay AR decorations.
Detailed Content
Creating and running a detection request
(04:52) After obtaining a CMSampleBuffer from the camera stream, create a VNDetectAnimalBodyPoseRequest:
// Process camera frames in captureOutput(_:didOutput:from:)
func captureOutput(
    _ output: AVCaptureOutput,
    didOutput sampleBuffer: CMSampleBuffer,
    from connection: AVCaptureConnection
) {
    // 1. Create the detection request
    let request = VNDetectAnimalBodyPoseRequest()

    // 2. Create the request handler
    let handler = VNImageRequestHandler(
        cmSampleBuffer: sampleBuffer,
        orientation: .up,
        options: [:]
    )

    // 3. Perform the request
    do {
        try handler.perform([request])

        // 4. Get detection results
        guard let observations = request.results as? [VNAnimalBodyPoseObservation] else {
            return
        }

        for observation in observations {
            processAnimalPose(observation)
        }
    } catch {
        print("Detection failed: \(error)")
    }
}
Key points:
VNDetectAnimalBodyPoseRequestis the new Vision request typeVNImageRequestHandleracceptsCMSampleBufferfor video stream processingrequest.resultsreturns an array ofVNAnimalBodyPoseObservation, one per detected animal- A single image returns observations for at most two animals
Accessing joint data
(05:36) Retrieve joints from an observation:
func processAnimalPose(_ observation: VNAnimalBodyPoseObservation) {
    // Get all landmarks
    let allPoints = try? observation.recognizedPoints(.all)

    // Or get only head landmarks
    let headPoints = try? observation.recognizedPoints(.head)

    // Iterate over landmarks
    for (jointName, point) in allPoints ?? [:] {
        // point.location is normalized coordinates (0.0 - 1.0)
        // point.confidence is confidence (0.0 - 1.0)
        if point.confidence > 0.5 {
            let x = point.location.x * viewBounds.width
            let y = point.location.y * viewBounds.height
            drawJoint(at: CGPoint(x: x, y: y), label: jointName.rawValue)
        }
    }
}
Key points:
recognizedPoints(_:)takes aVNAnimalBodyPoseObservation.JointsGroupNameparameter- Options:
.head,.forelegs,.hindlegs,.trunk,.tail,.all - Returns a dictionary keyed by
VNAnimalBodyPoseObservation.JointNamewithVNRecognizedPointvalues locationis normalized; multiply by view dimensions to convert to screen coordinatesconfidenceindicates detection reliability; filter out points below 0.5
Drawing a skeleton
(06:04) Connect joints to draw an animal skeleton:
func drawSkeleton(observation: VNAnimalBodyPoseObservation, in context: CGContext) {
    guard let allPoints = try? observation.recognizedPoints(.all) else { return }

    // Define head connections
    let headConnections: [(VNAnimalBodyPoseObservation.JointName, VNAnimalBodyPoseObservation.JointName)] = [
        (.leftEar, .leftEye),
        (.leftEye, .nose),
        (.nose, .rightEye),
        (.rightEye, .rightEar),
        (.leftEar, .nose),
        (.rightEar, .nose)
    ]

    context.setStrokeColor(UIColor.green.cgColor)
    context.setLineWidth(2.0)

    for (startJoint, endJoint) in headConnections {
        guard let startPoint = allPoints[startJoint],
              let endPoint = allPoints[endJoint],
              startPoint.confidence > 0.5,
              endPoint.confidence > 0.5 else { continue }

        context.move(to: CGPoint(
            x: startPoint.location.x * viewBounds.width,
            y: startPoint.location.y * viewBounds.height
        ))
        context.addLine(to: CGPoint(
            x: endPoint.location.x * viewBounds.width,
            y: endPoint.location.y * viewBounds.height
        ))
    }

    context.strokePath()
}
Key points:
- Define connections between joints to draw a skeleton
- Head connections: left ear–left eye–nose–right eye–right ear
- Leg connections: shoulders/hips to corresponding leg joints
- Only connect joint pairs where both confidences exceed the threshold
- Tail joints can be drawn as a separate curve
Overlaying AR decorations at joint positions
(09:24) Use joint positions to place emoji or decorations:
func addEmojiOverlay(observation: VNAnimalBodyPoseObservation, on view: UIView) {
    guard let allPoints = try? observation.recognizedPoints(.all) else { return }

    // Place the helmet at the ear positions
    if let leftEar = allPoints[.leftEar],
       let rightEar = allPoints[.rightEar],
       leftEar.confidence > 0.5,
       rightEar.confidence > 0.5 {
        let centerX = (leftEar.location.x + rightEar.location.x) / 2 * view.bounds.width
        let centerY = (leftEar.location.y + rightEar.location.y) / 2 * view.bounds.height
        let width = abs(rightEar.location.x - leftEar.location.x) * view.bounds.width * 1.5

        let helmetLabel = UILabel()
        helmetLabel.text = "⛑️"
        helmetLabel.font = .systemFont(ofSize: width)
        helmetLabel.center = CGPoint(x: centerX, y: centerY - width / 2)
        view.addSubview(helmetLabel)
    }

    // Place sunglasses at the eye positions
    if let leftEye = allPoints[.leftEye],
       let rightEye = allPoints[.rightEye],
       leftEye.confidence > 0.5,
       rightEye.confidence > 0.5 {
        let centerX = (leftEye.location.x + rightEye.location.x) / 2 * view.bounds.width
        let centerY = (leftEye.location.y + rightEye.location.y) / 2 * view.bounds.height
        let width = abs(rightEye.location.x - leftEye.location.x) * view.bounds.width * 2

        let glassesLabel = UILabel()
        glassesLabel.text = "🕶️"
        glassesLabel.font = .systemFont(ofSize: width)
        glassesLabel.center = CGPoint(x: centerX, y: centerY)
        view.addSubview(glassesLabel)
    }
}
Key points:
- Use the midpoint between both ears for helmet placement; ear spacing determines helmet size
- Use the midpoint between both eyes for sunglasses placement; eye spacing determines sunglasses size
- Decoration size should scale proportionally to the animal’s size in the frame
- Combine with
VNRecognizeAnimalsRequestto get bounding boxes and further adjust decoration size
Combining Animal Recognition and Animal Body Pose
(07:43) Run both requests together for richer information:
let animalRecognitionRequest = VNRecognizeAnimalsRequest()
let bodyPoseRequest = VNDetectAnimalBodyPoseRequest()

let handler = VNImageRequestHandler(ciImage: image, options: [:])
try? handler.perform([animalRecognitionRequest, bodyPoseRequest])

// Animal recognition results: type and bounding box
if let recognitionResults = animalRecognitionRequest.results as? [VNRecognizedObjectObservation] {
    for result in recognitionResults {
        print("Detected: \(result.labels.first?.identifier ?? "unknown")")
        print("Bounding box: \(result.boundingBox)")
    }
}

// Pose detection results: landmarks
if let poseResults = bodyPoseRequest.results as? [VNAnimalBodyPoseObservation] {
    for result in poseResults {
        print("Joints detected: \(result.availableJointNames.count)")
    }
}
Key points:
VNRecognizeAnimalsRequestreturns animal species and bounding boxesVNDetectAnimalBodyPoseRequestreturns joint positions- Both requests can run in the same
VNImageRequestHandler - Combined use answers what animal is in the frame, where it is, and what pose it is in
Other Vision updates
(11:07) This session also covered several other Vision updates:
- Stateful Requests: Requests based on
VNTargetedImagenow support stateful requests; names using the “Track” verb are better suited for tracking scenarios - MLComputeDevice support: Query and specify which compute device (CPU, GPU, Neural Engine) runs a request
- Barcode Revision 4: Adds MSIPlessey barcode format and supports color-inverted QR codes
- Text Recognition: Adds Thai and Vietnamese support
- FaceCaptureQuality Revision 3: Improved quality and accuracy
Core Takeaways
-
Build a pet pose recognition camera app
- Detect pet poses in real time and automatically classify them as “standing,” “sitting,” “running,” “sleeping,” and similar labels
- Why it’s worth doing: pet owners want to know what their pets do at home; automatic classification is far more efficient than manually sorting photos
- How to start: use
VNDetectAnimalBodyPoseRequestto get joints, compute joint angles and relative positions, and build simple pose classification rules
-
Develop a pet AR sticker camera
- Overlay hats, glasses, scarves, and other decorations on pets in real time, following their movement
- Why it’s worth doing: Animal Body Pose provides precise joint positions, making it better suited for pet effects than face keypoints
- How to start: overlay
CALayeron the camera preview and update decorationpositionandtransformfrom joint positions in real time
-
Build a pet behavior analysis tool
- Record pet video, analyze pose changes over time, and generate activity reports (active time, rest duration, unusual behavior alerts)
- Why it’s worth doing: veterinarians and animal behaviorists need quantitative data to assess pet health
- How to start: process each video frame with
VNDetectAnimalBodyPoseRequest, record joint trajectories, and use a simple rule engine to identify behavior patterns
Related Sessions
- Explore 3D body pose and person segmentation in Vision — 3D human body pose and person segmentation APIs, part of the same Vision pose-detection family as Animal Body Pose
- Discover machine learning enhancements in Create ML — Create ML multi-label classification enhancements for training custom animal behavior models
- Lift subjects from images in your app — Segment any foreground object from images; combine with Animal Body Pose for more precise pet cutouts
Comments
GitHub Issues · utterances