
Highlight
In iOS 17 and iPadOS 17, Apple introduced Assistive Access—a system-level mode configured by a trusted supporter in Settings that simplifies the device interface to core functions. Third-party apps run in this mode without modification; apps with adaptive layouts can enable full-screen display with a single Info.plist key.
Core Content
iPhone and iPad are powerful, but for people with cognitive disabilities, too many options and interactions become barriers. A typical user faces dozens of app icons, notifications, search, and widgets—requiring the ability to filter information, remember paths, and ignore distractions. Apple’s Accessibility team previously addressed vision and motor needs with VoiceOver and AssistiveTouch, but support for cognitive disabilities had a gap.
Assistive Access fills that gap. It is a complete system-level mode: lock screen, Home Screen, and in-app interaction are all redesigned.
A trusted supporter configures it in the Settings app—choosing which apps can run, whether to show the battery icon, and setting the lock screen wallpaper. After setup, users enter Assistive Access via the Accessibility shortcut or a toggle in Settings.
In this mode, users see a very different interface: a customized lock screen and notification presentation, larger app icons and bolder text on the Home Screen. Apple rewrote dedicated apps for five core functions: Calls, Messages, Music, Camera, and Photos. Each keeps only the essential paths and removes extra options.
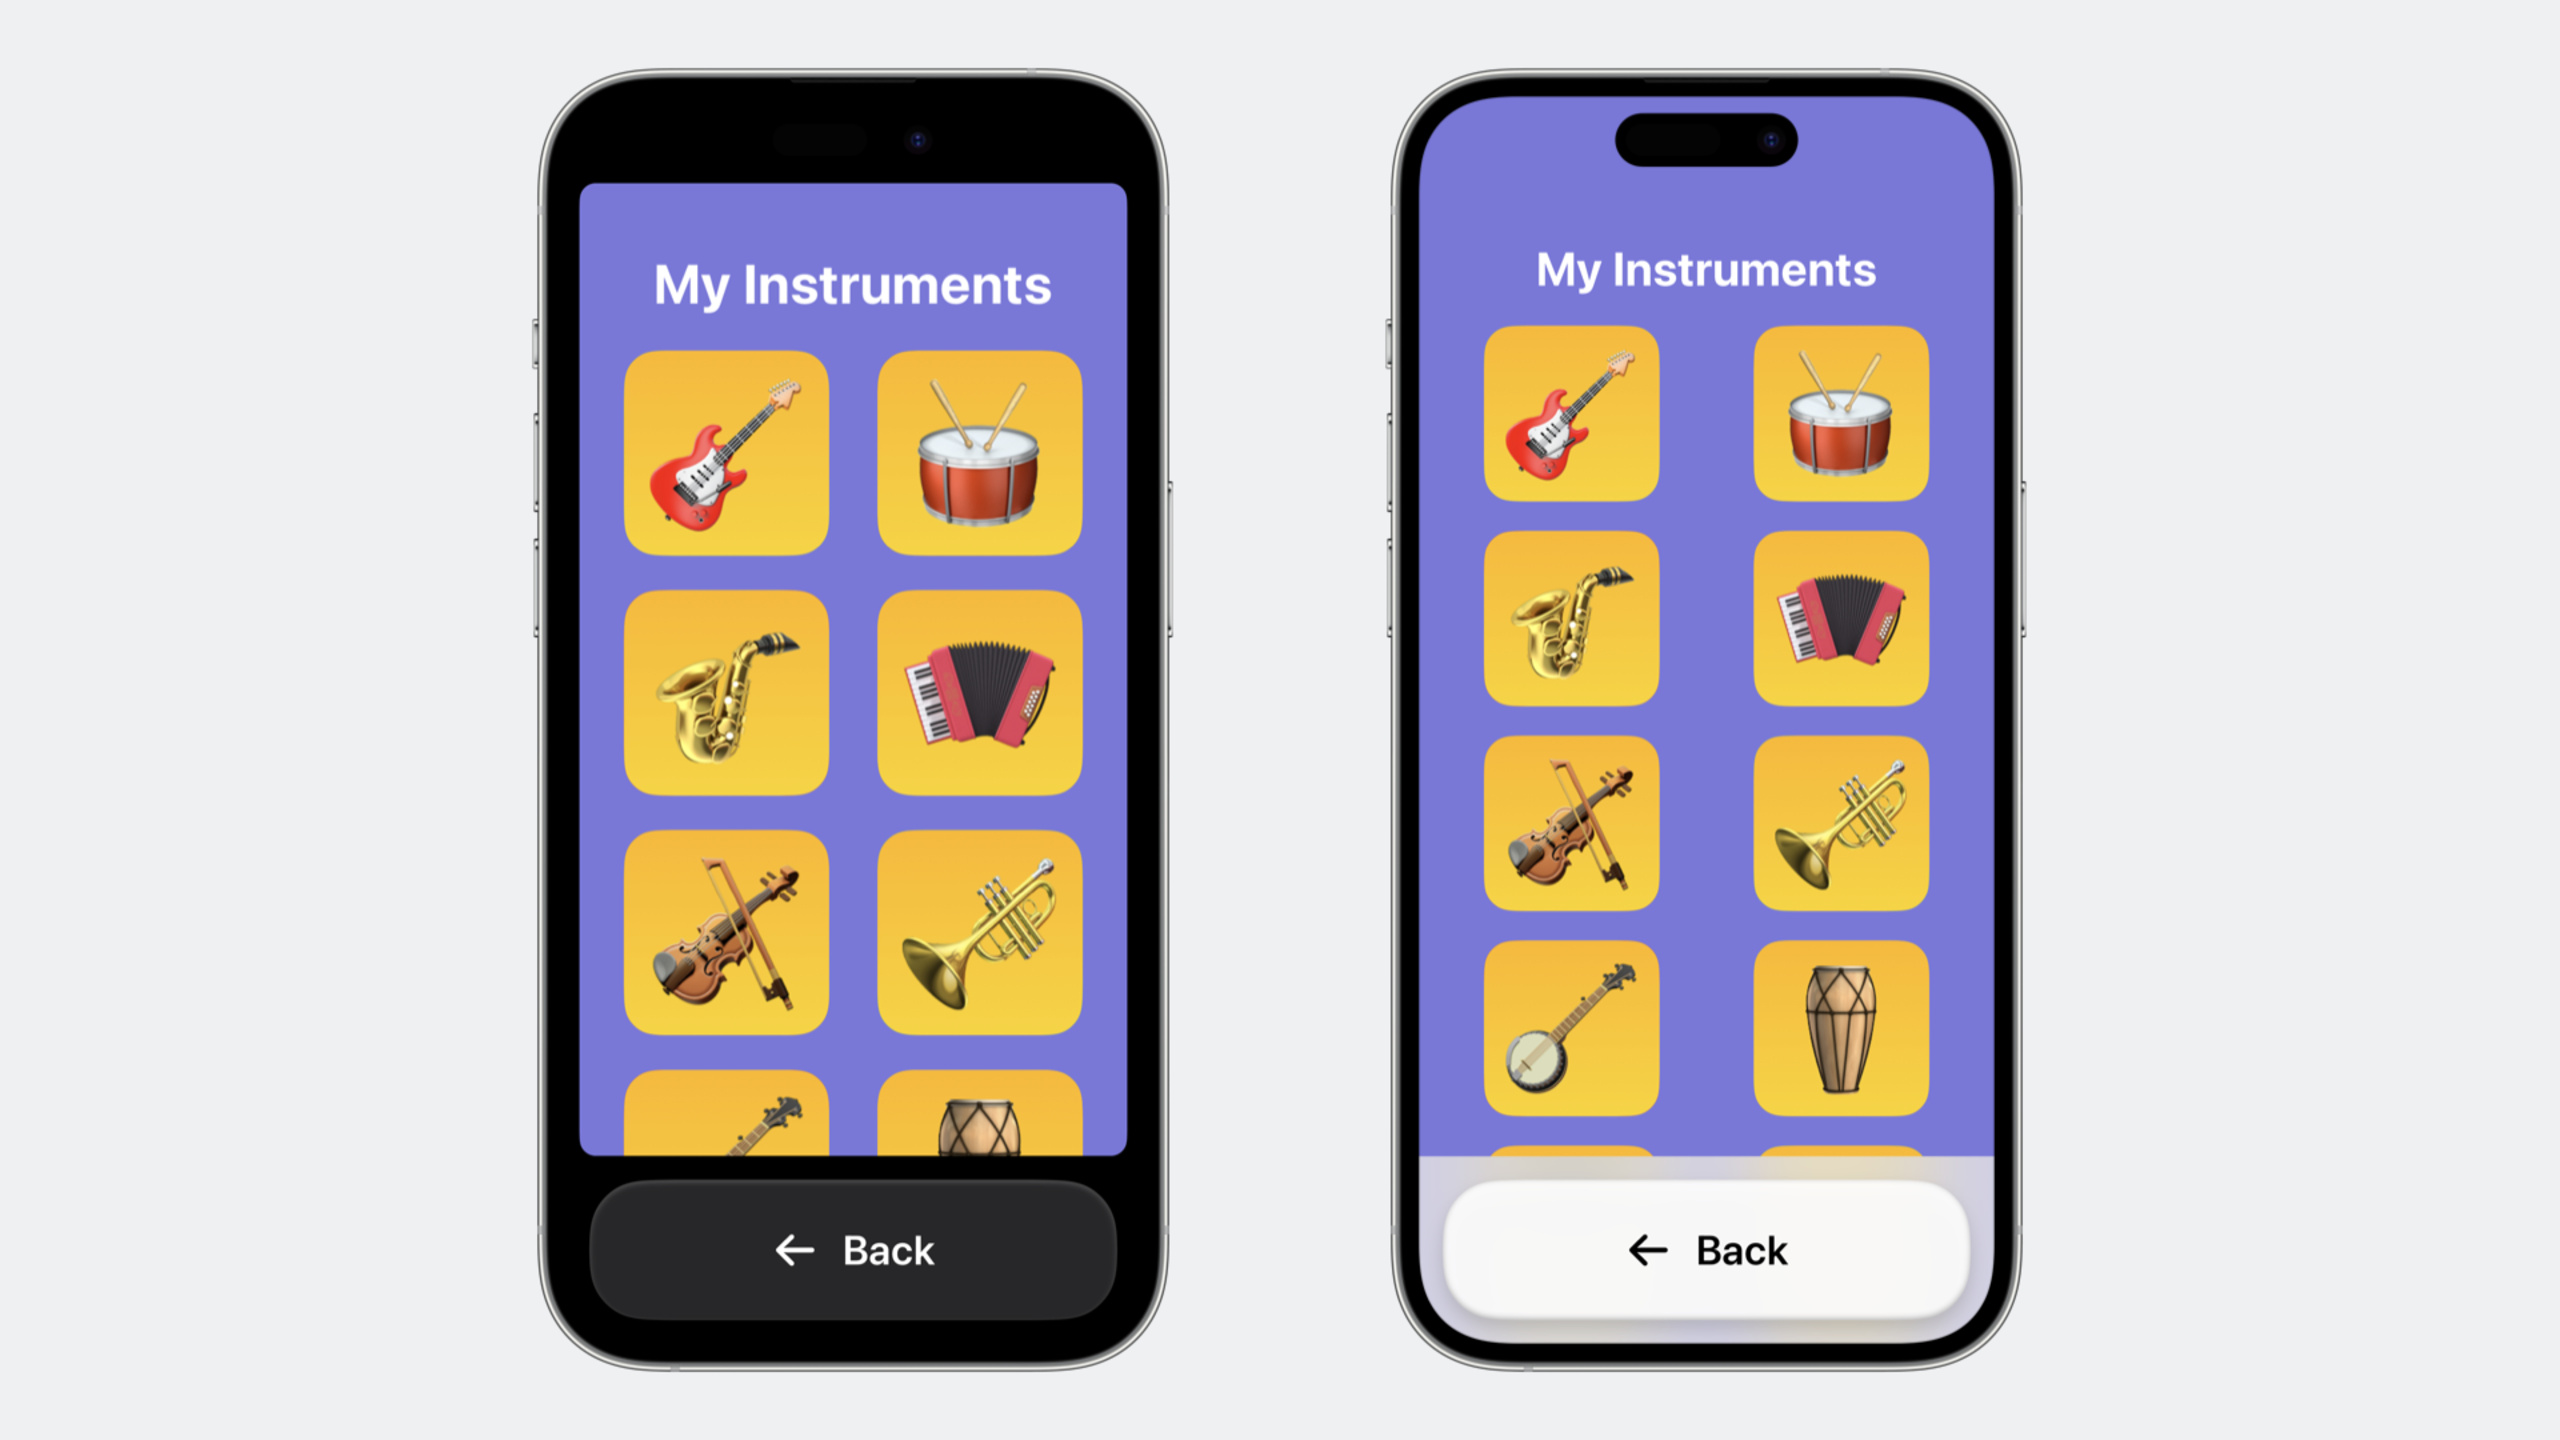
For third-party apps, the default is automatic compatibility: the app runs in a reduced area with a large Back button at the bottom. Tapping Back returns to the Home Screen. This ensures apps with hardcoded layouts do not break in Assistive Access.
If your app already uses adaptive layout (not fixed screen sizes), you can request full-screen display via one Info.plist key, removing the bottom back button area so the app uses the full available space.
Detailed Content
Three design principles
(02:55) Assistive Access is built on three principles.
First, reduce choices. Fewer options at each step make decisions easier. This shows up on the Home Screen (only allowed apps), inside each app (only core paths), and in navigation (fewer levels).
Second, error prevention and recovery. Consequential actions like deleting files need clear prompts so users understand before confirming. Reduce time-limited operations. Every action should be easy to undo.
Third, familiar and predictable interaction. Present information with text and images (multimodal), and use consistent interaction patterns to lower learning cost.
Default behavior for third-party apps
(04:46) Third-party apps work out of the box in Assistive Access. The system does two things automatically:
- Adds a large Back button at the bottom of the screen
- Shrinks the app’s rendering area to make room for the Back button
This keeps apps with hardcoded screen-size layouts from breaking. Tapping Back returns to the Home Screen.
No code or adaptation required—that is the default.
Enabling full-screen mode
(05:29) If your app already supports adaptive layout, add one key to Info.plist to request full-screen display:
<key>UISupportsFullScreenInAssistiveAccess</key>
<true/>
When set to YES, the system no longer adds the bottom Back button. The app’s rendering area expands to the full screen.
Key points:
- Set this key to
YESonly when the app uses adaptive layout. Hardcoded screen-size assumptions may cause layout issues in full-screen mode - With
YES, the system still keeps the status bar at the top but removes the extra back area at the bottom - This key applies to both SwiftUI and UIKit apps
Adaptive layout strategy in SwiftUI
(06:28) SwiftUI developers should use Stacks and Grids as layout containers instead of manual position calculation:
struct ContentView: View {
    var body: some View {
        VStack {
            HStack {
                Text("Title")
                Spacer()
                Button("Action") { }
            }
            LazyVGrid(columns: [GridItem(.adaptive(minimum: 80))]) {
                ForEach(items) { item in
                    ItemView(item: item)
                }
            }
        }
        .padding()
    }
}
Key points:
VStackandHStackadapt to container size without manual framesLazyVGridwith.adaptive(minimum:)adjusts column count at different widths- Modifiers like
.padding()compute margins from the system safe area - Do not use
UIScreen.main.boundsor similar fixed size values
Adaptive layout strategy in UIKit
(06:56) UIKit developers should rely on Safe Area and Layout Guide:
class ViewController: UIViewController {
    override func viewDidLoad() {
        super.viewDidLoad()

        let label = UILabel()
        label.text = "Hello"
        label.translatesAutoresizingMaskIntoConstraints = false
        view.addSubview(label)

        NSLayoutConstraint.activate([
            label.topAnchor.constraint(
                equalTo: view.safeAreaLayoutGuide.topAnchor,
                constant: 20
            ),
            label.leadingAnchor.constraint(
                equalTo: view.safeAreaLayoutGuide.leadingAnchor,
                constant: 16
            ),
            label.trailingAnchor.constraint(
                equalTo: view.safeAreaLayoutGuide.trailingAnchor,
                constant: -16
            )
        ])
    }
}
Key points:
- Use
safeAreaLayoutGuideinstead ofview.topAnchordirectly so content is not covered by system chrome - In Assistive Access full-screen mode, Safe Area adjusts automatically, removing space for the bottom Back button
- The
safeAreaInsetsproperty reads current safe area values at runtime for custom layout - Do not hardcode size logic based on device model
Core Takeaways
-
Enable Assistive Access full-screen for your existing app
- Check whether layout is fully adaptive. If you already use SwiftUI Stacks/Grids or UIKit Auto Layout + Safe Area, add one line to Info.plist:
UISupportsFullScreenInAssistiveAccess = YES - Why it’s worth doing: lowest-cost accessibility improvement—one setting gives users with cognitive disabilities a better experience
- How to start: Enter Assistive Access locally, observe default behavior, then decide whether to enable full screen
- Check whether layout is fully adaptive. If you already use SwiftUI Stacks/Grids or UIKit Auto Layout + Safe Area, add one line to Info.plist:
-
Fix pages that still use hardcoded layout
- Replace
UIScreen.main.bounds,UIDevice.current.model, or similar device-specific checks with Safe Area and adaptive layout - Why it’s worth doing: besides Assistive Access, these changes help in Split View, Stage Manager, external displays, and more
- How to start: Use Xcode’s View Hierarchy to find hardcoded views and replace with Auto Layout constraints or SwiftUI Stacks
- Replace
-
Design a simplified interface for cognitive accessibility
- Provide an in-app toggle that hides advanced features, enlarges fonts and buttons, and reduces navigation depth
- Why it’s worth doing: not everyone with cognitive disabilities will enable system Assistive Access; an in-app simplified mode has a lower barrier
- How to start: Follow Assistive Access’s three principles (reduce choices, error prevention, predictable interaction) and add a “Simplified mode” switch in settings
-
Revisit error-handling interactions
- Check whether delete, payment, sign-out, and similar actions give users enough confirmation
- Why it’s worth doing: good error prevention benefits all users, not only those with cognitive disabilities
- How to start: Audit all irreversible actions and add confirmation dialogs and undo paths
Related Sessions
- Build accessible apps with SwiftUI and UIKit — Latest accessibility advances in SwiftUI and UIKit, directly related to Assistive Access adaptive layout requirements
- What’s new in SwiftUI — New SwiftUI layout capabilities that underpin Assistive Access full-screen adaptive layout
- What’s new in UIKit — Latest UIKit enhancements for building adaptive modern interfaces
Comments
GitHub Issues · utterances