
Highlight
Apple has opened the EDR API on iOS. Developers can use AVFoundation and Metal to build a complete HDR video playback and real-time processing pipeline, from simple AVPlayer playback to frame-by-frame extraction, Core Image filter processing, and Metal shader rendering.
Core Content
Select the appropriate video frame level
When playing HDR video, developers face a choice: use a high-level framework to implement quickly, or use a low-level framework to gain greater control. Apple’s video framework, from high-level to low-level, is AVKit, AVFoundation, Core Video, Video Toolbox and Core Media. The principle is to use high-level frameworks instead of low-level ones, because high-level frameworks come with their own optimizations.
AVKit provides a complete playback UI, including progress bar, chapter navigation, picture-in-picture, and subtitles. If you only need to play HDR videos, AVPlayerViewController can handle EDR rendering with one line of code.
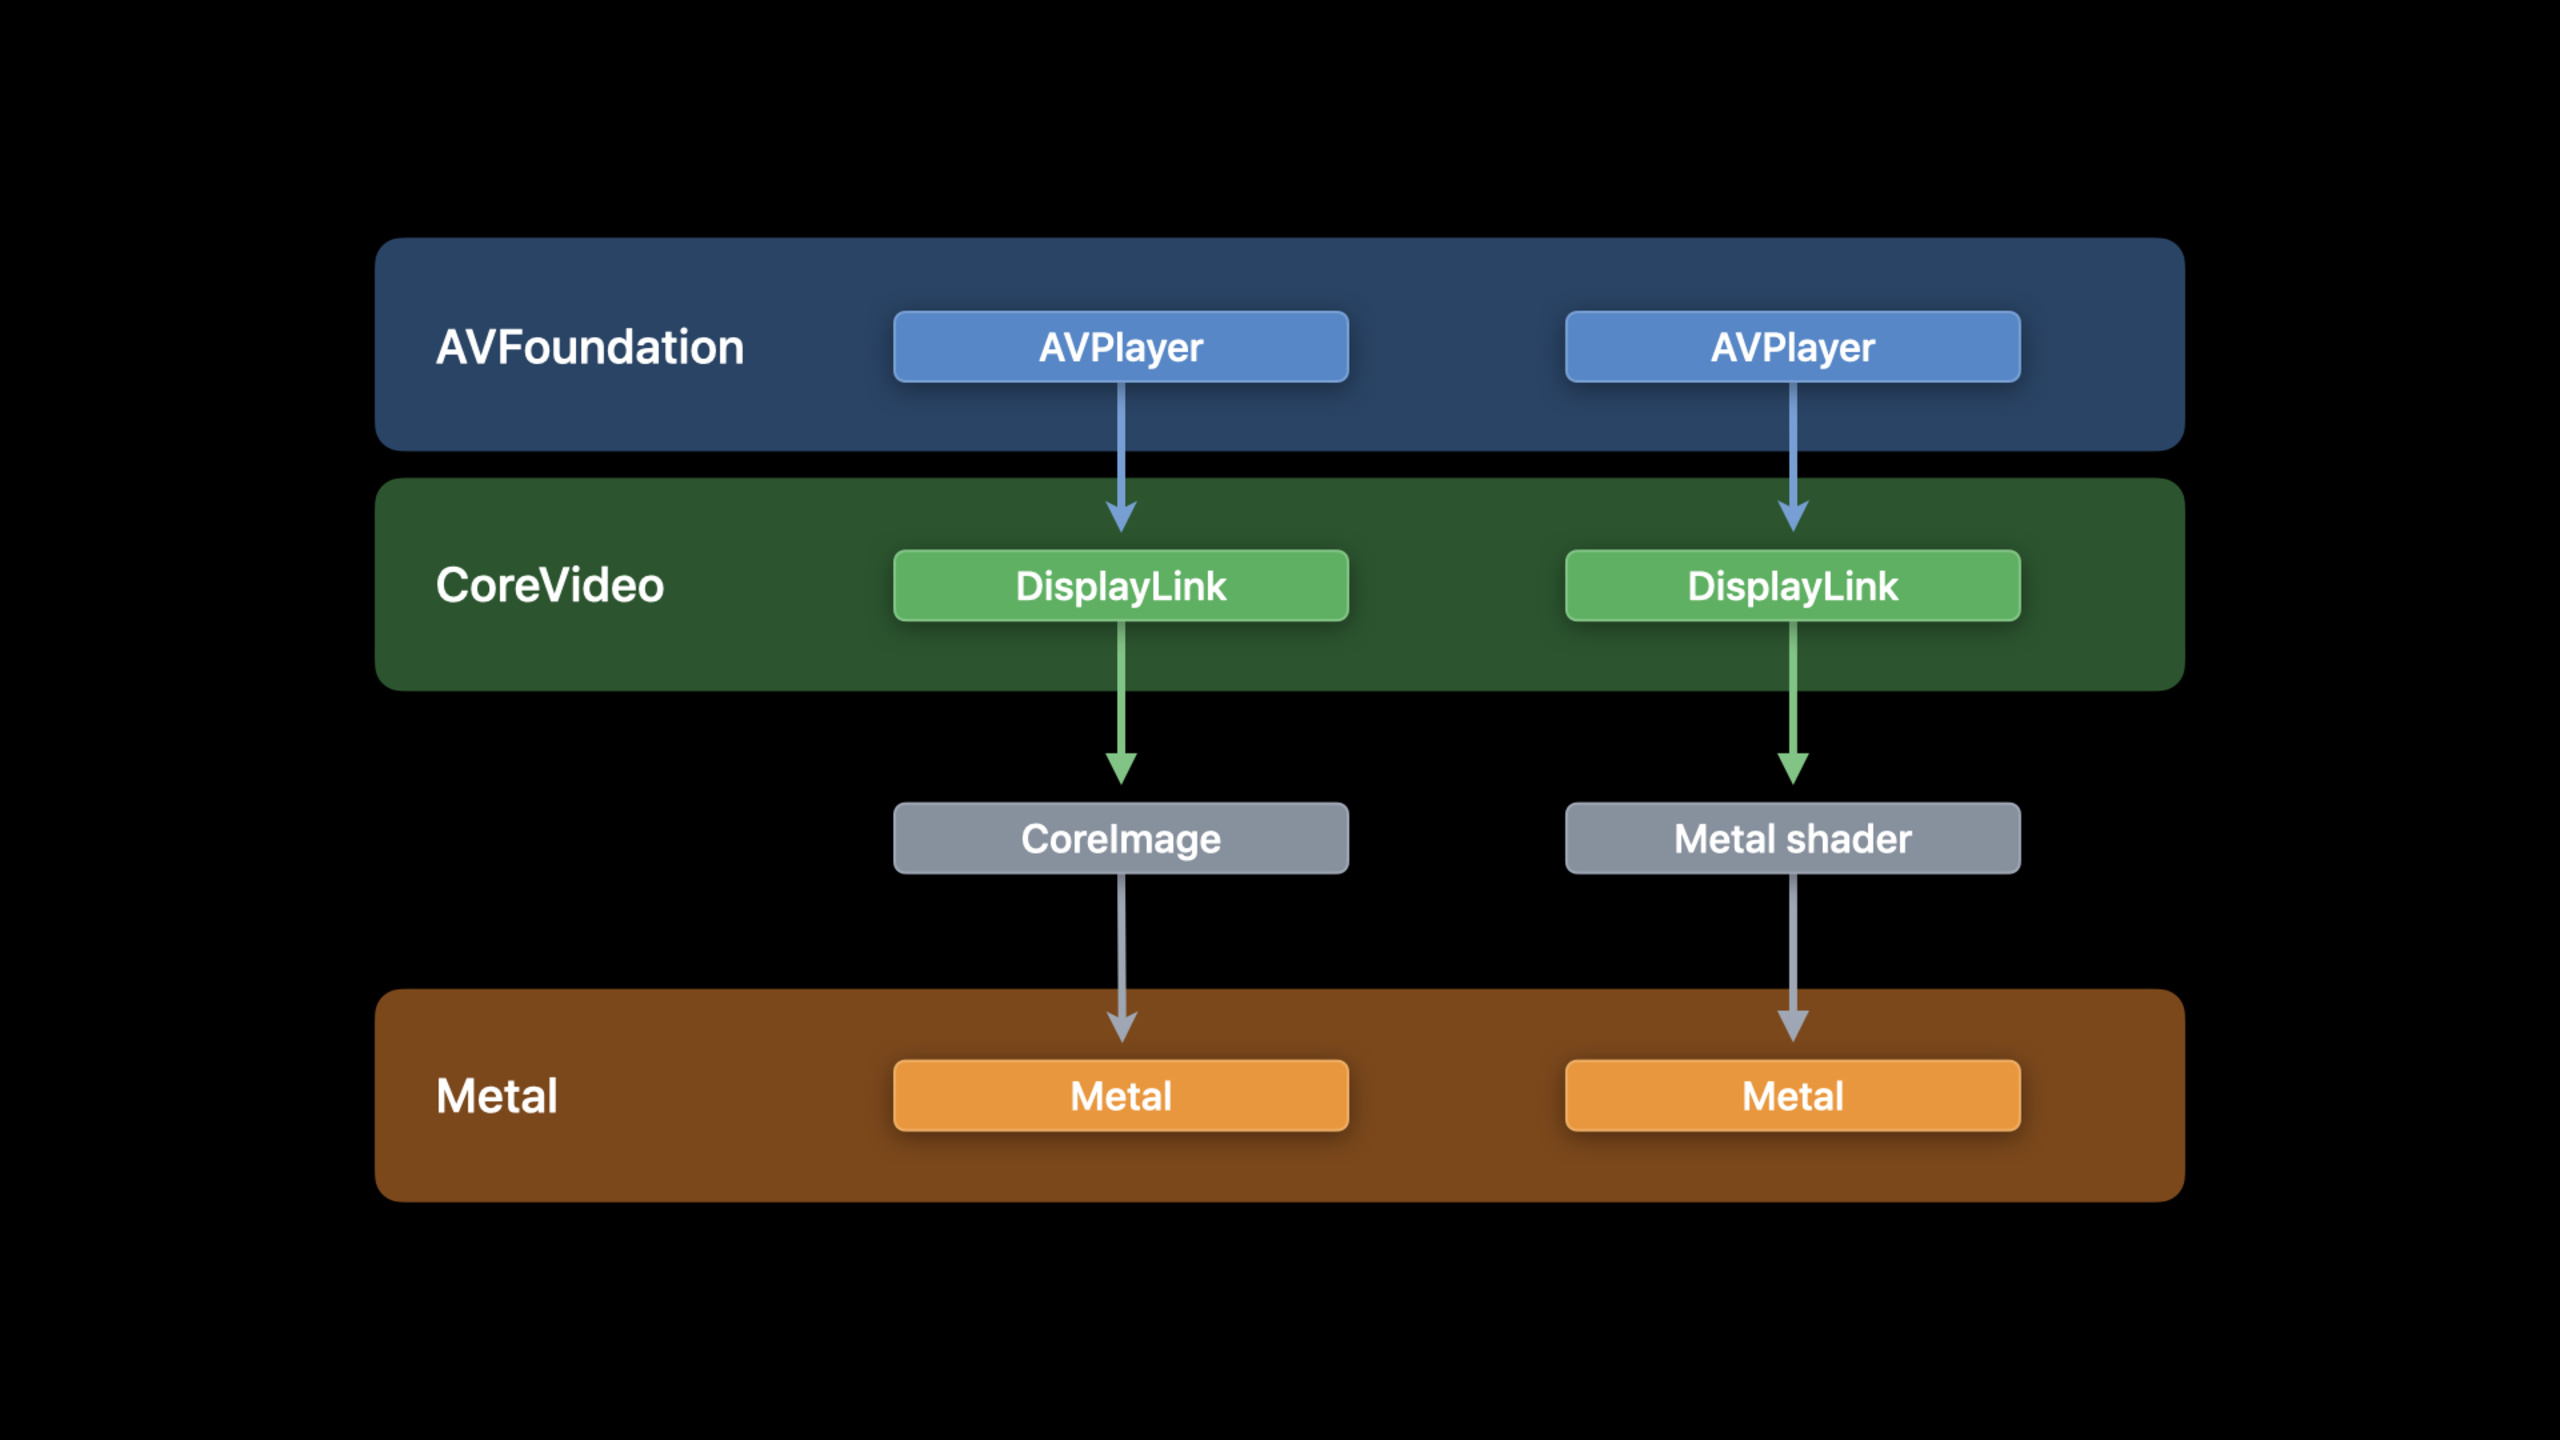
However, many applications require real-time processing of video frames, such as color grading, keying, and superimposing special effects. At this time, we need to go down and use AVFoundation to extract the decoded frames, and then hand them over to Core Image or Metal for processing.
Simple playback: two ways of AVPlayer
There are two basic HDR playback options.
The first one uses AVPlayerViewController, which is suitable for scenarios that require complete playback controls. (06:58)
let player = AVPlayer(url: videoURL)
var playerViewController = AVPlayerViewController()
playerViewController.player = player
self.present(playerViewController, animated: true) {
    playerViewController.player!.play()
}
Key points:
- AVPlayerViewController automatically handles all playback UI and EDR rendering
- Suitable for pure playback scenarios that do not require custom processing
The second type uses AVPlayerLayer, which is suitable for embedding videos into custom views. (07:38)
let player = AVPlayer(url: videoURL)
var playerLayer = AVPlayerLayer(player: player)
playerLayer.frame = self.view.bounds
self.view.layer.addSublayer(playerLayer)
player.play()
Key points:
- AVPlayerLayer renders video to a custom CALayer
- Also automatically supports EDR, no additional configuration required
- Suitable for scenarios where the video needs to be part of the view
Real-time processing: from decoded frames to Metal rendering
When special effects need to be added during playback, the process becomes: AVPlayer decoding -> CADisplayLink frame extraction -> Core Image or Metal processing -> CAMetalLayer rendering.
The key to this process is configuring CAMetalLayer correctly. Must enable EDR, use half-floating point pixel format, and set extended color gamut. (09:28)
Then create an AVPlayerItemVideoOutput, specifying the output format and color space. AVFoundation automatically handles color conversion between different clips. (11:33)
When CADisplayLink is called back each frame, copies the latest CVPixelBuffer from VideoOutput. Note that the screen refresh rate may be higher than the video frame rate, so copyPixelBuffer may not succeed every time. If it fails, just keep the previous frame. (13:02)
Detailed Content
Configure EDR rendering layer
let layer: CAMetalLayer

// Enable EDR
layer.wantsExtendedDynamicRangeContent = true

// Use a half-float pixel format
layer.pixelFormat = MTLPixelFormatRGBA16Float

// Use the extended linear Display P3 color gamut
layer.colorspace = kCGColorSpaceExtendedLinearDisplayP3
Key points:
wantsExtendedDynamicRangeContentMust be set to true, otherwise HDR content will be compressed to SDR -MTLPixelFormatRGBA16FloatIt is a half-floating point format that can store the extended brightness values required by EDR. -kCGColorSpaceExtendedLinearDisplayP3Is the wide color gamut most commonly used with Apple devices, and the linear transfer function preserves extended range values
Create video output and display links
let videoColorProperties = [
    AVVideoColorPrimariesKey: AVVideoColorPrimaries_P3_D65,
    AVVideoTransferFunctionKey: AVVideoTransferFunction_Linear,
    AVVideoYCbCrMatrixKey: AVVideoYCbCrMatrix_ITU_R_2020
]

let outputVideoSettings = [
    AVVideoAllowWideColorKey: true,
    AVVideoColorPropertiesKey: videoColorProperties,
    kCVPixelBufferPixelFormatTypeKey as String: NSNumber(value: kCVPixelFormatType_64RGBAHalf)
] as [String : Any]

let videoPlayerItemOutput = AVPlayerItemVideoOutput(outputSettings: outputVideoSettings)
Key points:
AVVideoColorPrimaries_P3_D65Specify Display P3 color gamut -AVVideoTransferFunction_LinearUse a linear transfer function, which is key to EDR, to avoid luminance values being compressed -kCVPixelFormatType_64RGBAHalfis a 64-bit RGBA half-floating point format -AVPlayerItemVideoOutputColor conversion is automatically handled even if the video contains multiple clips with different color gamuts
lazy var displayLink: CADisplayLink = CADisplayLink(
    target: self,
    selector: #selector(displayLinkCopyPixelBuffers(link:))
)

var statusObserver: NSKeyValueObservation?

statusObserver = videoPlayerItem.observe(\.status, options: [.new, .old]) { playerItem, change in
    if playerItem.status == .readyToPlay {
        playerItem.add(videoPlayerItemOutput)
        displayLink.add(to: .main, forMode: .common)
        videoPlayer?.play()
    }
}
Key points:
- Observe
statusProperties, wait until the player is ready before adding the output and start display links - CADisplayLink is associated with the common mode of the main run loop to ensure that callbacks can also be made during scrolling
- CVDisplayLink should be used instead of CADisplayLink on macOS
Frame-by-frame processing: Core Image filter
@objc func displayLinkCopyPixelBuffers(link: CADisplayLink) {
    let currentTime = videoPlayerItemOutput.itemTime(forHostTime: CACurrentMediaTime())

    if videoPlayerItemOutput.hasNewPixelBuffer(forItemTime: currentTime) {
        if let buffer = videoPlayerItemOutput.copyPixelBuffer(
            forItemTime: currentTime,
            itemTimeForDisplay: nil
        ) {
            let image = CIImage(cvPixelBuffer: buffer)

            let filter = CIFilter.sepiaTone()
            filter.inputImage = image
            let output = filter.outputImage ?? CIImage.empty()

            // Use the context to render to CIRenderDestination
        }
    }
}
Key points:
itemTime(forHostTime:)Map host time to video timeline -hasNewPixelBufferCheck for new frames to avoid unnecessary copying -copyPixelBufferMay fail (video frame rate is lower than screen refresh rate), skip rendering on failure- use
CIImage(cvPixelBuffer:)Create image directly from pixel buffer - NOTE: Not all CIFilters support EDR, you should use
CICategoryHighDynamicRangeFilter compatible filters
Frame-by-frame processing: Metal texture
let mtlDevice = MTLCreateSystemDefaultDevice()

var mtlTextureCache: CVMetalTextureCache? = nil
CVMetalTextureCacheCreate(
    allocator: kCFAllocatorDefault,
    cacheAttributes: nil,
    metalDevice: mtlDevice,
    textureAttributes: nil,
    cacheOut: &mtlTextureCache
)

let width = CVPixelBufferGetWidth(pixelBuffer)
let height = CVPixelBufferGetHeight(pixelBuffer)

var cvTexture: CVMetalTexture? = nil
CVMetalTextureCacheCreateTextureFromImage(
    allocator: kCFAllocatorDefault,
    textureCache: mtlTextureCache,
    sourceImage: pixelBuffer,
    textureAttributes: nil,
    pixelFormat: MTLPixelFormatRGBA16Float,
    width: width,
    height: height,
    planeIndex: 0,
    textureOut: &cvTexture
)

let texture = CVMetalTextureGetTexture(cvTexture)
Key points:
CVMetalTextureCacheIt is a bridge connecting Core Video and Metal to avoid manual management of IOSurface- The cache will maintain the mapping from MTLTexture to IOSurface to improve performance
- Use half floating point pixel format because Metal textures natively support this format
- CVMetalTextureRef needs to be released in the Metal command buffer completion callback in Objective-C
Core Takeaways
-
Real-time video color correction tool: Use AVPlayerItemVideoOutput + Core Image filter chain to create a real-time color correction panel that supports HDR. Users can slide the sliders to adjust color temperature and saturation, and the filter acts directly on the video frame. The entry API is
AVPlayerItemVideoOutputandCIFilter。 -
HDR video keying synthesis: Use the Metal shader to implement Chroma Key keying, and synthesize the green screen video and the background layer in real time. EDR ensures that the synthesized HDR content does not lose brightness information. The entry API is
CVMetalTextureCacheand custom Metal fragment shaders. -
Customized rendering engine for professional video players: Abandon AVPlayerViewController and use CADisplayLink + Metal to build your own playback rendering pipeline, supporting frame-by-frame precise control and special effects overlay. Suitable for editing software or professional players. The entry API is
CADisplayLinkandCAMetalLayer。 -
HDR screenshot and frame export: In the CADisplayLink callback, save the processed CVPixelBuffer as HEIF/PNG, retaining HDR metadata. Can be made into a video frame-by-frame export tool. The entry API is
CVPixelBufferandCIContext.writeHEIFRepresentation。
Related Sessions
- Explore EDR on iOS — EDR API supports iOS platform for the first time
- Display EDR content with Core Image, Metal, and SwiftUI — Display EDR content with SwiftUI
- Edit and play back HDR video with AVFoundation — Use AVVideoComposition to process HDR video
- Optimize the Core Image pipeline for your video app — Core Image video processing pipeline optimization
Comments
GitHub Issues · utterances