
Highlight
Swift Playgrounds 4 adds a new teaching system that allows content authors to embed guided learning experiences into app projects. Stephanie and Marcus demonstrated how to use Guide Module, Walkthrough Task and Experiment Task to turn a piece of SwiftUI animation code into an interactive tutorial. Learners can follow step by step in the Learning Center and can modify the code to see the effect.
Core Content
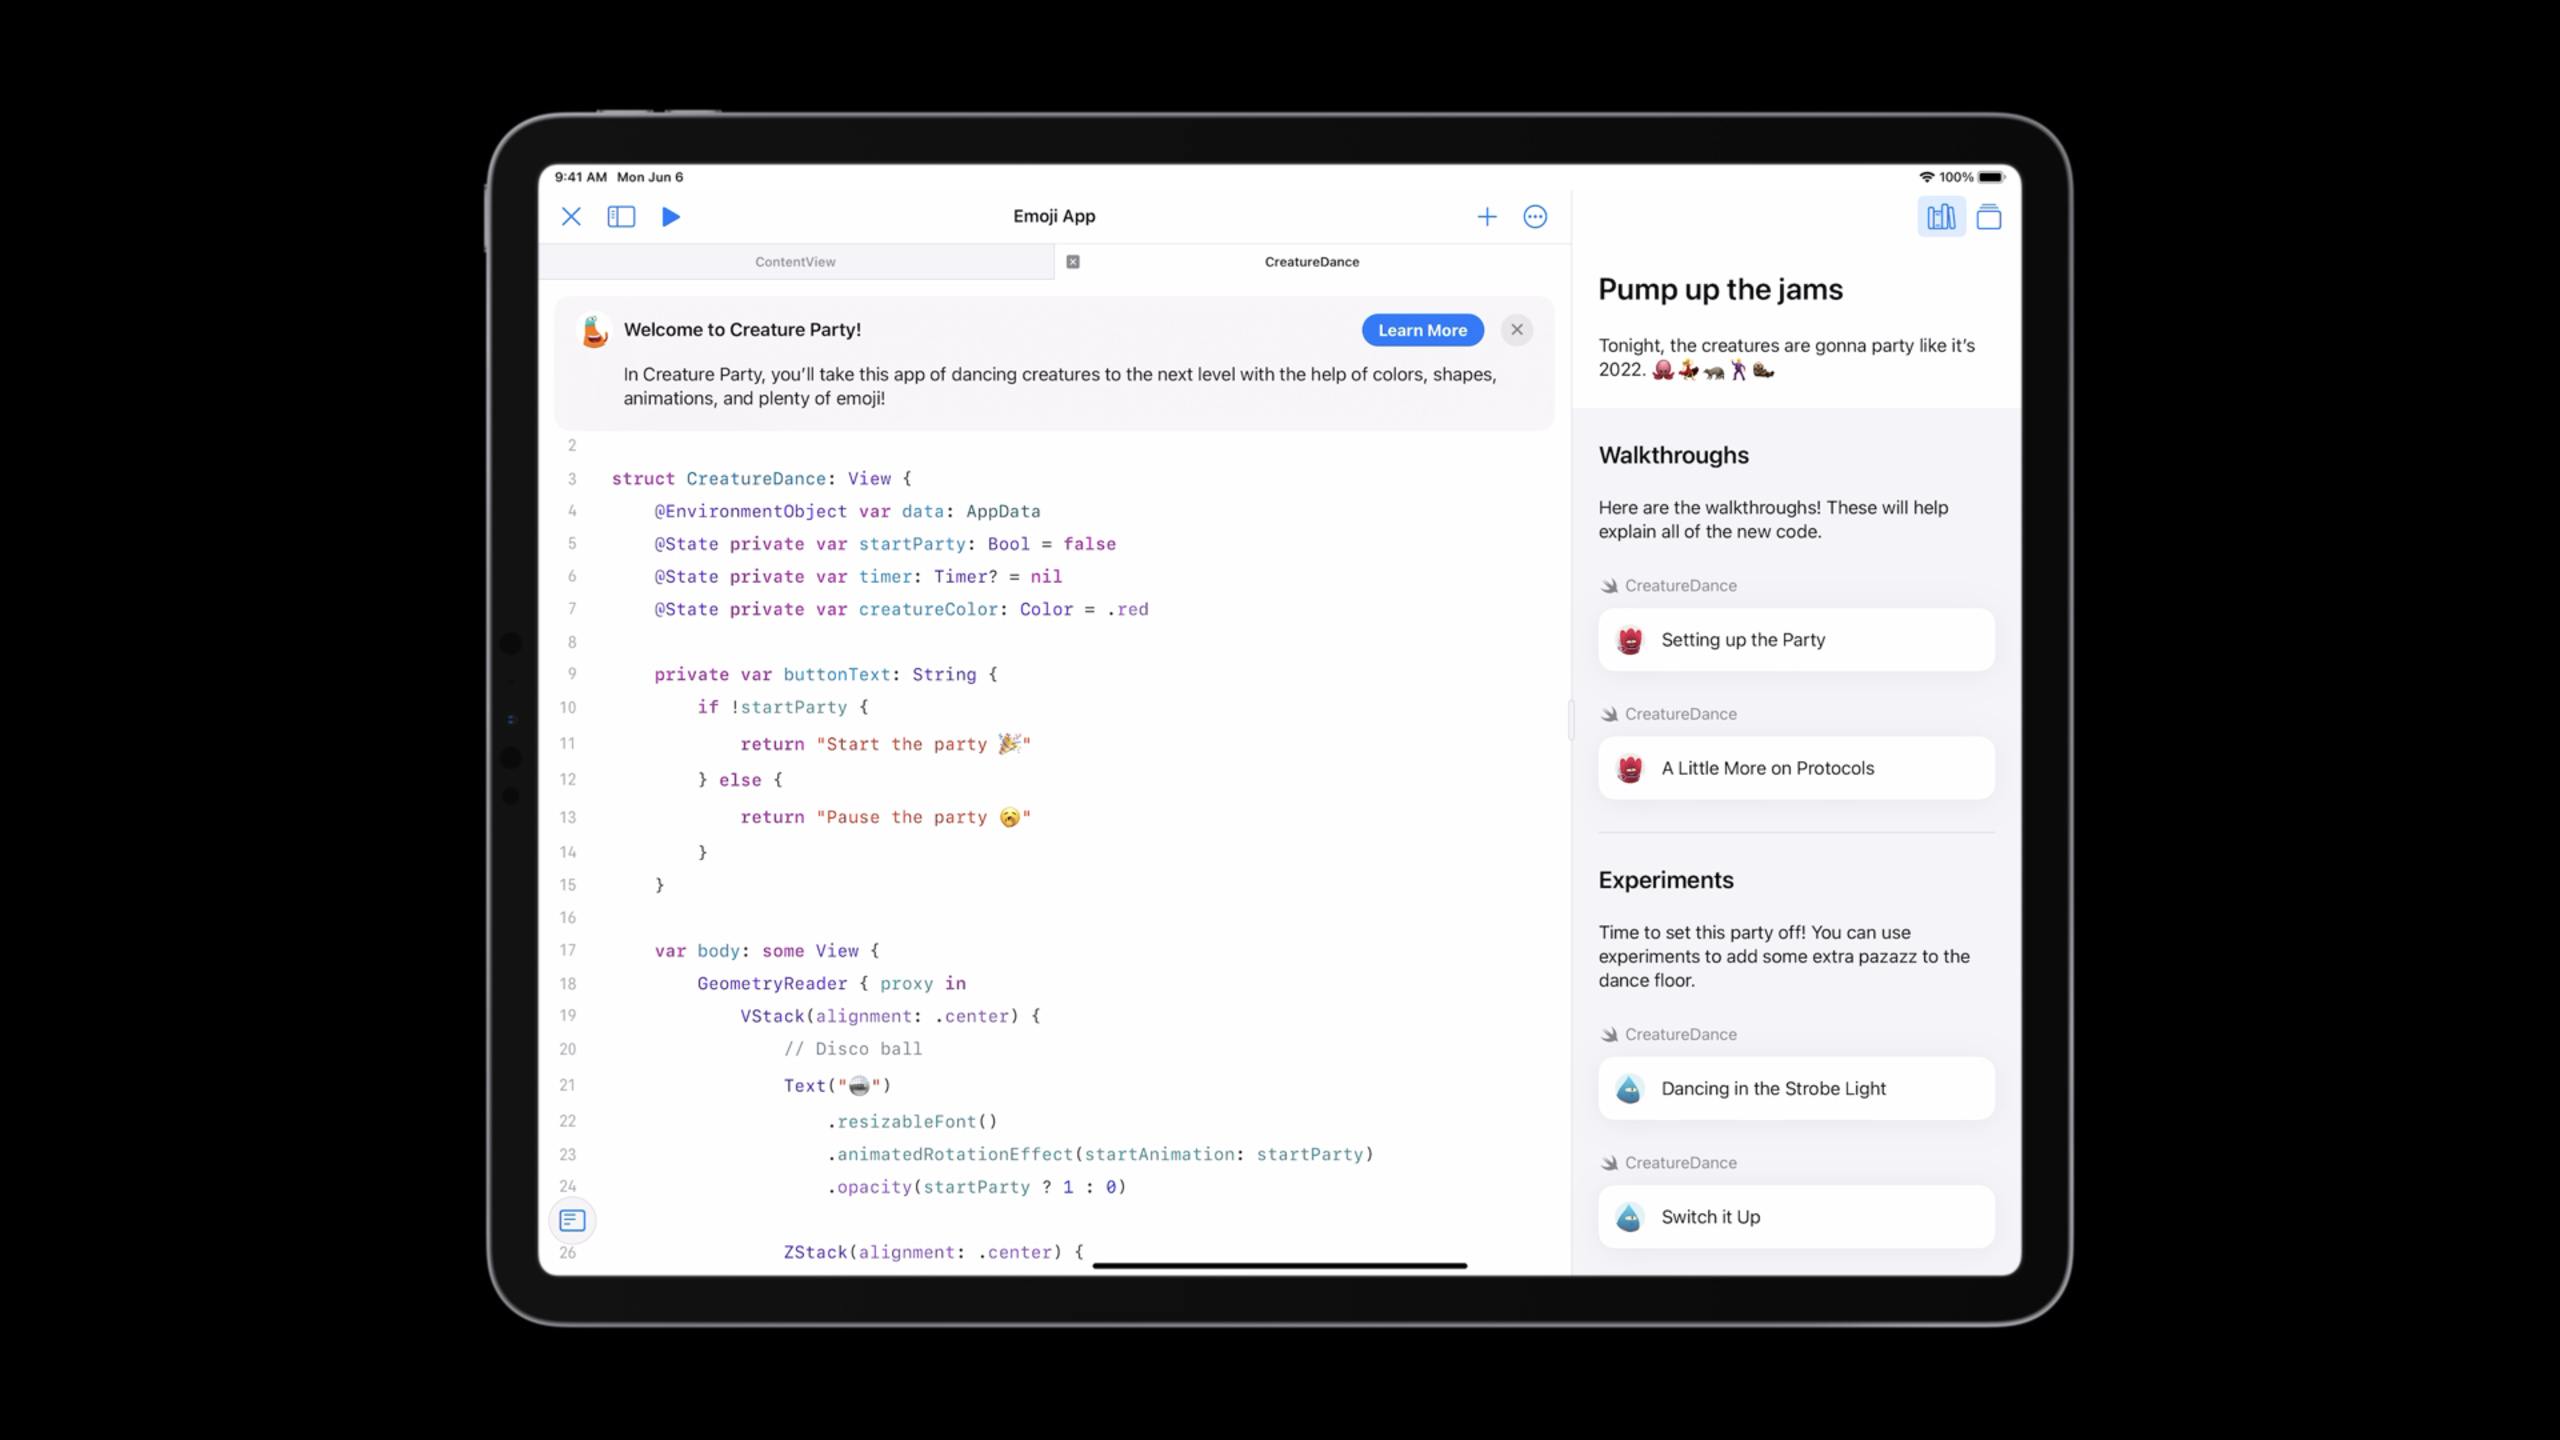
Swift Playgrounds 4 allows anyone to create apps, but how do you teach others to write apps? Apple’s content team has released a new teaching system that embeds tutorials directly into project code. After the learner opens the project, there is the source code editor on the left and the Learning Center on the right, which contains text descriptions, pictures, code snippets and task buttons. (00:21)
Stephanie and Marcus demonstrated using a project called “Creature Party”. This project is based on the Emoji App, the final project of the “Keep Going with Apps” tutorial. Learners can already make a list of animals and click on the animals to see them dance. Stephanie added several new features to the dancing interface: 10x10 colorful dance floor tiles, a custom View Modifier that allows animals to automatically scale/rotate/offset, and a spinning disco ball on top. These changes are cool, but the code complexity has increased, and learners need guidance to understand it. (01:27)
The core of the teaching system is a new module called Guide Module. The default swiftpm project puts all source code in the root directory. To use the teaching system, you need to adjust the file structure first: create an App Module and move all source codes and resources into it; leave Package.swift in the root directory; then create a Guide Module at the same level as the App Module and put the Guide file in it. (04:09)
Guide files are written using a mix of Directives and Markdown. Directive is an extension of Markdown that can accept string parameters and can also nest other Directive or Markdown elements. The outermost layer is@GuideBook, which contains@WelcomeMessage、@Guide、@Step、@ContentAndMedia、@TaskGroup、@Task、@PageWait for instructions. (05:12)
Marcus is responsible for explaining two mission types: Walkthrough and Experiment. Walkthrough is used to explain the code - after clicking the task button, the system will open the specified file, display the teaching card above the source code editor, and highlight the relevant code lines. Experiment is used for learners to make modifications - a piece of code that can be added is displayed in the card, and there is an Add button next to it. After clicking, the code is automatically inserted into the specified location of the source file. (07:15)
Detailed Content
Project structure adjustment and Guide Module
(04:09) Before using the teaching system, you need to adjust the project from the default flat structure to a modular structure.
Before adjustment:
MyApp.swiftpm/
  Package.swift
  MyApp.swift
  ContentView.swift
  Assets/
After adjustment:
MyApp.swiftpm/
  Package.swift
  App/
    MyApp.swift
    ContentView.swift
    Assets/
  Guide/
    Guide.swift
Key points:
- App Module contains all application source code and resources
- Package.swift must stay in the root directory
- Guide Module and App Module are at the same level
- At least one Guide file is required in the Guide Module
Basic structure of Guide file
(05:12) Guide files are written using Swift’s macro-style directive syntax:
@GuideBook(title: "Creature Party!", icon: icon.png, background: background.png, firstFile: CreatureDance.swift) {
    @WelcomeMessage(title: "Welcome to Creature Party!") {
        In Creature Party, you'll take this app of dancing creatures to the next level with the help of colors, shapes, animations, and plenty of emoji!
    }

    @Guide {
        @Step(title: "Pump up the jams") {
            @ContentAndMedia {
                Tonight, the creatures are gonna party like it's 2022. 🐙💃🦝🕺🦦
            }
        }
    }
}
Key points:
@GuideBookIt is the container of the entire Guide. The parameters include title, icon, background, and firstFile. -@WelcomeMessageOptional, displayed at the top of the source editor when the learner first opens the project -@GuideContains all steps -@StepCorresponds to a learning unit in Learning Center -@ContentAndMediaThe Markdown in is displayed at the top of the Learning Center
Walkthrough Task: Explain the code
(07:15) Walkthrough is used to guide learners through code. Creating a Walkthrough requires the TaskGroup and Task directives:
@TaskGroup(title: "Walkthroughs") {
    Here are the walkthroughs! These will help explain all of the new code.

    @Task(type: walkthrough, id: "partyMode", title: "Setting up the Party", file: CreatureDance.swift) {
        @Page(id: "1.modifier", title: "") {
            This is a [view modifier](https://developer.apple.com/documentation/swiftui/viewmodifier). Modifiers let you create unique versions of a view in SwiftUI.
        }
    }
}
Key points:
type: walkthroughSpecify task type -idMust be globally unique -fileSpecify which source file to open -titleAppears on the Learning Center task button -@PageIt’s a page from the teaching cards,idIt must also be globally unique -titleWhen left blank, the system uses the Task’s title
Code highlighting is achieved by adding comment tags in source files:
ForEach(data.creatures) { creature in
    Text(creature.emoji)
        .resizableFont()
        /*#-code-walkthrough(1.modifier)*/
        .animatedScalingEffect(startAnimation: startParty)
        /*#-code-walkthrough(1.modifier)*/
        .randomizedOffsetEffect(startAnimation: startParty,
                                x: midX * 0.6,
                                y: midY * 0.6)
        .animatedRotationEffect(startAnimation: startParty)
        .opacity(startParty ? 1.0 : 0.0)
}
Key points:
/*#-code-walkthrough(page-id)*/Wrap the lines of code to be highlighted- The code between the start tag and the end tag will be highlighted when the tutorial card is displayed
- If the highlighted code is not in the visible area, the source code editor will automatically scroll to the corresponding position
- In multi-page Walkthrough, you can use the Next button to turn pages. The last page displays “Next Walkthrough” to automatically enter the next task.
Experiment Task: Hands-on modification
(14:21) Experiment lets learners add their own code. The main difference from Walkthrough istype: experimentandisAddableparameter:
@TaskGroup(title: "Experiments") {
    Time to set this party off! You can use experiments to add some extra pazazz to the dance floor.

    @Task(type: experiment, id: "colors", title: "Dancing in the Strobe Light", file: CreatureDance.swift) {
        @Page(id: "3.lights", title: "") {
            Next, add some colors to the creatures so it looks like they're dancing under the lights!
        }
        @Page(id: "3.code", title: "", isAddable: true) {
.colorMultiply(creatureColor)
}
}
}
Key points:
isAddable: trueShow Add button next to code snippet- Addable code must be wrapped in a Markdown code block (three backticks)
- It is recommended that the code block should not exceed 10 lines to avoid the need for learners to scroll
Code insertion locations are marked by adding task comments in the source file:
ForEach(data.creatures) { creature in
    Text(creature.emoji)
        .resizableFont()
        .animatedScalingEffect(startAnimation: startParty)
        .randomizedOffsetEffect(startAnimation: startParty,
                                x: midX * 0.6,
                                y: midY * 0.6)
        .animatedRotationEffect(startAnimation: startParty)
        .opacity(startParty ? 1.0 : 0.0)
        //#-learning-task(colors)
}
Key points:
//#-learning-task(task-id)is a single line comment- After clicking the Add button, the code snippet will be inserted at the location of the comment
- An Experiment Task can have multiple alternating code pages and description pages
Core Takeaways
-
What to do: Create a Swift Playgrounds interactive tutorial for technical sharing within the team or for newbie training.
Why it’s worth doing: The traditional code explanation is “I’ll show you and you see”, while the Walkthrough + Experiment mode allows learners to operate by themselves. Stephanie and Marcus’s Creature Party demo proved that a complex piece of SwiftUI animation code can be broken down into 4 progressive tasks that learners can understand and modify in 15 minutes.
How to start: Choose a code pattern commonly used by your team (such as custom View Modifier, network request encapsulation), create a Swift Playgrounds project, use Guide Module to write 2-3 Walkthroughs to explain the core concepts, and add 1 Experiment to let learners change parameters. -
What to do: Use Experiment Task to make interactive API documentation.
Why it’s worth doing: Experiment’sisAddableMechanism makes documents no longer just static descriptions. Learners can insert code snippets with one click and see the effects in real time. This is more intuitive than looking at a README or DocC document.
How to start: Add a Guide Module to your open source library or internal framework sample project, write an Experiment for each core API, and provide several preset code snippets (different parameter combinations) for users to try with one click. -
What to do: Migrate existing tutorial projects to the new tutorial system.
Why it’s worth doing: Swift Playgrounds’ old tutorial format relied on page-based step-by-step, requiring learners to switch back and forth between pages and code. The new system’s Learning Center puts instructions and code on the same screen, and code highlighting and automatic scrolling allow for more focused attention.
How to start: Split the text content of the existing tutorial into@ContentAndMediaand@Page, change “Look here” to/*#-code-walkthrough*/Highlight the tag and change “Try adding this line of code” to Experiment Task.
Related Sessions
- Build your first app in Swift Playgrounds — learn how you can easily prototype and build apps with swift playgrounds.
- What’s new in SwiftUI — learn about the latest updates to swiftui, including new apis and features for building great apps.
- Meet Swift Package plugins — learn how swift package plugins can help you automate build tasks and customize your workflow.
Comments
GitHub Issues · utterances