
Highlight
For Apple
NSPersistentCloudKitContainerThe sample app demonstrates how to use data generators, XCTest, Instruments, unified logs, and sysdiagnose to analyze the performance and diagnose issues of a Core Data and CloudKit sync app.
Core Content
Synchronization problems between Core Data and CloudKit often occur after the data size increases. Small data sets run normally, but it does not mean that 10GB image data, first full import, background export, and push-triggered import will also work normally.
The focus of this session is a development cycle: first construct data to explore hypotheses, then use tools to analyze the results, and finally collect diagnostic data that allows the team or Apple to reproduce the problem. (00:42)
The model of the sample App is very specific: Post has a title and body, Post is associated with multiple Attachments, and the image data ImageData is placed behind the to-one relationship and loaded on demand. (02:51) This model allows large pictures, relationship traversal, and synchronous import and export to be stably tested.
Detailed Content
1. Use data generators to create repeatable large data sets
The built-in “Generate 1000 Posts” can only validate one data shape. Apple recommends writing exploration actions as data generators: using fixed rules to generate data of a specific size, structure, and variation range, and then connecting it to the test or debugging UI. (03:30)
The official example generates 60 Posts, each with 11 image attachments, for a total of 660 images. Each image averages 10 to 20MB, with the entire set approaching 10GB. (04:34)
class LargeDataGenerator {
    func generateData(context: NSManagedObjectContext) throws {
        try context.performAndWait {
            for postCount in 1...60 {
                //add a post
                for attachmentCount in 1...11 {
                    //add an attachment with an image
                    let imageFileData = NSData(contentsOf: url!)!
               }
            }
        }
    }
}
Key points:
LargeDataGeneratorEncapsulate the data construction logic into a separate type, and both tests and UI can call the same entry point. -generateData(context:)take overNSManagedObjectContext, the generation logic is not bound to a specific container. -context.performAndWaitPut Core Data writing into the context queue for execution.- Outer layer
1...60Control the number of Posts, inner layer1...11Control the number of attachments per Post. -NSData(contentsOf:)Read real picture data and let the test face real large objects instead of just testing empty shell objects.
With this entry point, unit tests can first verify the generator itself. (05:07)
class TestLargeDataGenerator: CoreDataCloudKitDemoUnitTestCase {
    func testGenerateData() throws {
        let context = self.coreDataStack.persistentContainer.newBackgroundContext()
        try self.generator.generateData(context: context)
        try context.performAndWait {
            let posts = try context.fetch(Post.fetchRequest())
            for post in posts {
                self.verify(post: post, has: 11, matching: imageDatas)
            }
        }
    }
}
Key points:
newBackgroundContext()Give the generator a background context to avoid putting a lot of writes into the main context. -try self.generator.generateData(context:)Representative data at the 10GB level was generated in the test. -Post.fetchRequest()Retrieve the generated Post. -verify(post:has:matching:)Assert that each Post has 11 image attachments to prevent errors in the test data itself.
2. Turn synchronization events into XCTest control points
This Session discussesNSPersistentCloudKitContainer, so export and import must be tested after generating data. (05:33) Official example creates an export container, generates data, and waits.exportEvent completed.
func testExportThenImport() throws {
    let exportContainer = newContainer(role: "export", postLoadEventType: .setup)
    try self.generator.generateData(context: exportContainer.newBackgroundContext())
    self.expectation(for: .export, from: exportContainer)
    self.waitForExpectations(timeout: 1200)
}
Key points:
newContainer(role:postLoadEventType:)Create for exportNSPersistentCloudKitContainer。generateData(context:)Write large data sets directly to the background context of this container. -expectation(for: .export, from:)Convert CloudKit export events into XCTest expectations. -waitForExpectations(timeout: 1200)Allow up to 20 minutes for big data upload.
Wait for logical dependenciesNSPersistentCloudKitContainer.eventChangedNotification。(06:35)
func expectation(for eventType: NSPersistentCloudKitContainer.EventType,
                 from container: NSPersistentCloudKitContainer) -> [XCTestExpectation] {
    var expectations = [XCTestExpectation]()
    for store in container.persistentStoreCoordinator.persistentStores {
        let expectation = self.expectation(
            forNotification: NSPersistentCloudKitContainer.eventChangedNotification,
            object: container
        ) { notification in
            let userInfoKey = NSPersistentCloudKitContainer.eventNotificationUserInfoKey
            let event = notification.userInfo![userInfoKey]
            return (event.type == eventType) &&
                (event.storeIdentifier == store.identifier) &&
                (event.endDate != nil)
        }
        expectations.append(expectation)
    }
    return expectations
}
Key points:
- in method parameters
eventTypeSpecify to wait.setup、.exportor.import. - Loop through
persistentStores, build an expectation for each store. -eventChangedNotificationyesNSPersistentCloudKitContainerEvent notification sent. -eventNotificationUserInfoKeyGet the event object from the notification. -event.type == eventTypeConfirm event types match. -event.storeIdentifier == store.identifierConfirm that the event belongs to the current store. -event.endDate != nilConfirm that the incident has ended.
Next, the test creates a new import container, triggers the first import with an empty store file, and observes what happens when the other device downloads all the data for the first time. (07:18)
func testExportThenImport() throws {
    let exportContainer = newContainer(role: "export", postLoadEventType: .setup)
    try self.generator.generateData(context: exportContainer.newBackgroundContext())
    self.expectation(for: .export, from: exportContainer)
    self.waitForExpectations(timeout: 1200)

    let importContainer = newContainer(role: "import", postLoadEventType: .import)
    self.waitForExpectations(timeout: 1200)
}
Key points:
- Complete the export of large data sets in the first half.
-
newContainer(role: "import", postLoadEventType: .import)Simulate the first import of an empty device with a new container. - second time
waitForExpectationsWait for the import to complete. - This test puts “upload big data” and “first download big data” into the same repeatable link.
The same generator can also be connected to the debug UI. (08:23)
UIAlertAction(title: "Generator: Large Data",
              style: .default) {_ in
    let generator = LargeDataGenerator()
    try generator.generateData(context: context)
    self.dismiss(animated: true)
}
Key points:
UIAlertActionExpose the generator as a debugging portal within the app. -LargeDataGenerator()Reuse data construction logic in tests. -generateData(context:)Generate the same large data set in the current App database. -dismiss(animated:)Close the debugging pop-up window to allow developers to directly observe the synchronization performance of lists and attachments.
3. Use Instruments to find the really time-consuming code
Data Generators make problems repeatable, and Instruments tell you where your time is spent. Apple selects Profile in the Xcode test gutter, starts Time Profiler, and directly analyzes an XCTest. (09:42)
The first analysis found thatLargeDataGeneratorThe re-stack is used to generate thumbnails. However, the data model is already designed to calculate thumbnails on demand from ImageData, so it is redundant work for the generator to generate thumbnails in advance. (10:38)
func generateData(context: NSManagedObjectContext) throws {
    try context.performAndWait {
        for postCount in 1...60 {
            for attachmentCount in 1...11 {
                let attachment = Attachment(context: context)
                let imageData = ImageData(context: context)
                imageData.attachment = attachment
                imageData.data = autoreleasepool {
                    let imageFileData = NSData(contentsOf: url!)!
                    attachment.thumbnail = Attachment.thumbnail(from: imageFileData,
                                                                thumbnailPixelSize: 80)
                    return imageFileData
                }
            }
        }
    }
}
Key points:
Attachment(context:)andImageData(context:)Create a Core Data object. -imageData.attachment = attachmentEstablish the relationship between image data and attachments. -autoreleasepoolControls the release range of temporary image data. -NSData(contentsOf:)Read large pictures. -attachment.thumbnail = Attachment.thumbnail(...)Generate thumbnails ahead of time; this is exactly the additional cost that Time Profiler finds.
The revised generator removes thumbnail generation and only saves the original image data. (11:13)
func generateData(context: NSManagedObjectContext) throws {
    try context.performAndWait {
        for postCount in 1...60 {
            for attachmentCount in 1...11 {
                let attachment = Attachment(context: context)
                let imageData = ImageData(context: context)
                imageData.attachment = attachment
                imageData.data = autoreleasepool {
                    return NSData(contentsOf: url!)!
                }
            }
        }
    }
}
Key points:
- Object creation and relationship settings remain unchanged, and the shape of the test data does not change.
-
imageData.dataReal images are still saved, and CloudKit synchronization pressure is still there. - delete
attachment.thumbnailAssign a value to return the thumbnail to the on-demand calculation path of the model design. -The results shown by Apple aregenerateDataTest running time is reduced to one-tenth of the original time. (11:55)
4. Use Allocations to control the memory limit of Core Data testing
While Time Profiler solved the time-consuming problem, Allocations revealed another problem: the test was running with more than 10GB of memory, and almost the entire set of data was retained in memory. (12:26)
The problem is with the validation code. It first fetches all Posts, and then accesses Attachment and ImageData through relationship. This will cause the attachment and image data to be registered in the managed object context and will not be released until the context completes its work. (14:15)
func verifyPosts(in context: NSManagedObjectContext) throws {
    try context.performAndWait {
        let fetchRequest = Post.fetchRequest()
        let posts = try context.fetch(fetchRequest)

        for post in posts {
            // verify post

            let attachments = post.attachments as! Set<Attachment>
            for attachment in attachments {

                XCTAssertNotNil(attachment.imageData)
                //verify image
            }
        }
    }
}
Key points:
Post.fetchRequest()Put the verification entry on Post. -context.fetch(fetchRequest)Retrieve all Posts at once. -post.attachmentsThe attachment collection will be accessed along the relationship. -attachment.imageDataImage data will be loaded.- In fast-executing tests, these objects will not have time to be released naturally, and the memory peak will increase.
Apple’s modification is to fetch Attachment in reverse, and only fetch the objectID first. Then materialize the object on demand, resetting the context every 10 attachments verified. (14:49)
func verifyPosts(in context: NSManagedObjectContext) throws {
    try context.performAndWait {
        let fetchRequest = Attachment.fetchRequest()
        fetchRequest.resultType = .managedObjectIDResultType
        let attachments = try context.fetch(fetchRequest) as! [NSManagedObjectID]

        for index in 0...attachments.count - 1 {
            let attachment = context.object(with: attachments[index]) as! Attachment

            //verify attachment
            let post = attachment.post!
            //verify post

            if 0 == (index % 10) {
                context.reset()
            }
        }
    }
}
Key points:
Attachment.fetchRequest()Let validation start from the attachment dimension. -.managedObjectIDResultTypelet fetch returnNSManagedObjectID, do not load the complete object into the context yet. -context.object(with:)Retrieve the current attachment as needed in the loop. -attachment.post!Then reversely verify the belonging Post. -index % 10Control the frequency of cleaning. -context.reset()Release the context cached objects and associated memory.
The value of such changes is not just “memory saving”. It establishes an adjustable high-water mark for testing, allowing the same test to be run on machines with less memory. (16:27)
5. Use unified logs to observe synchronization links
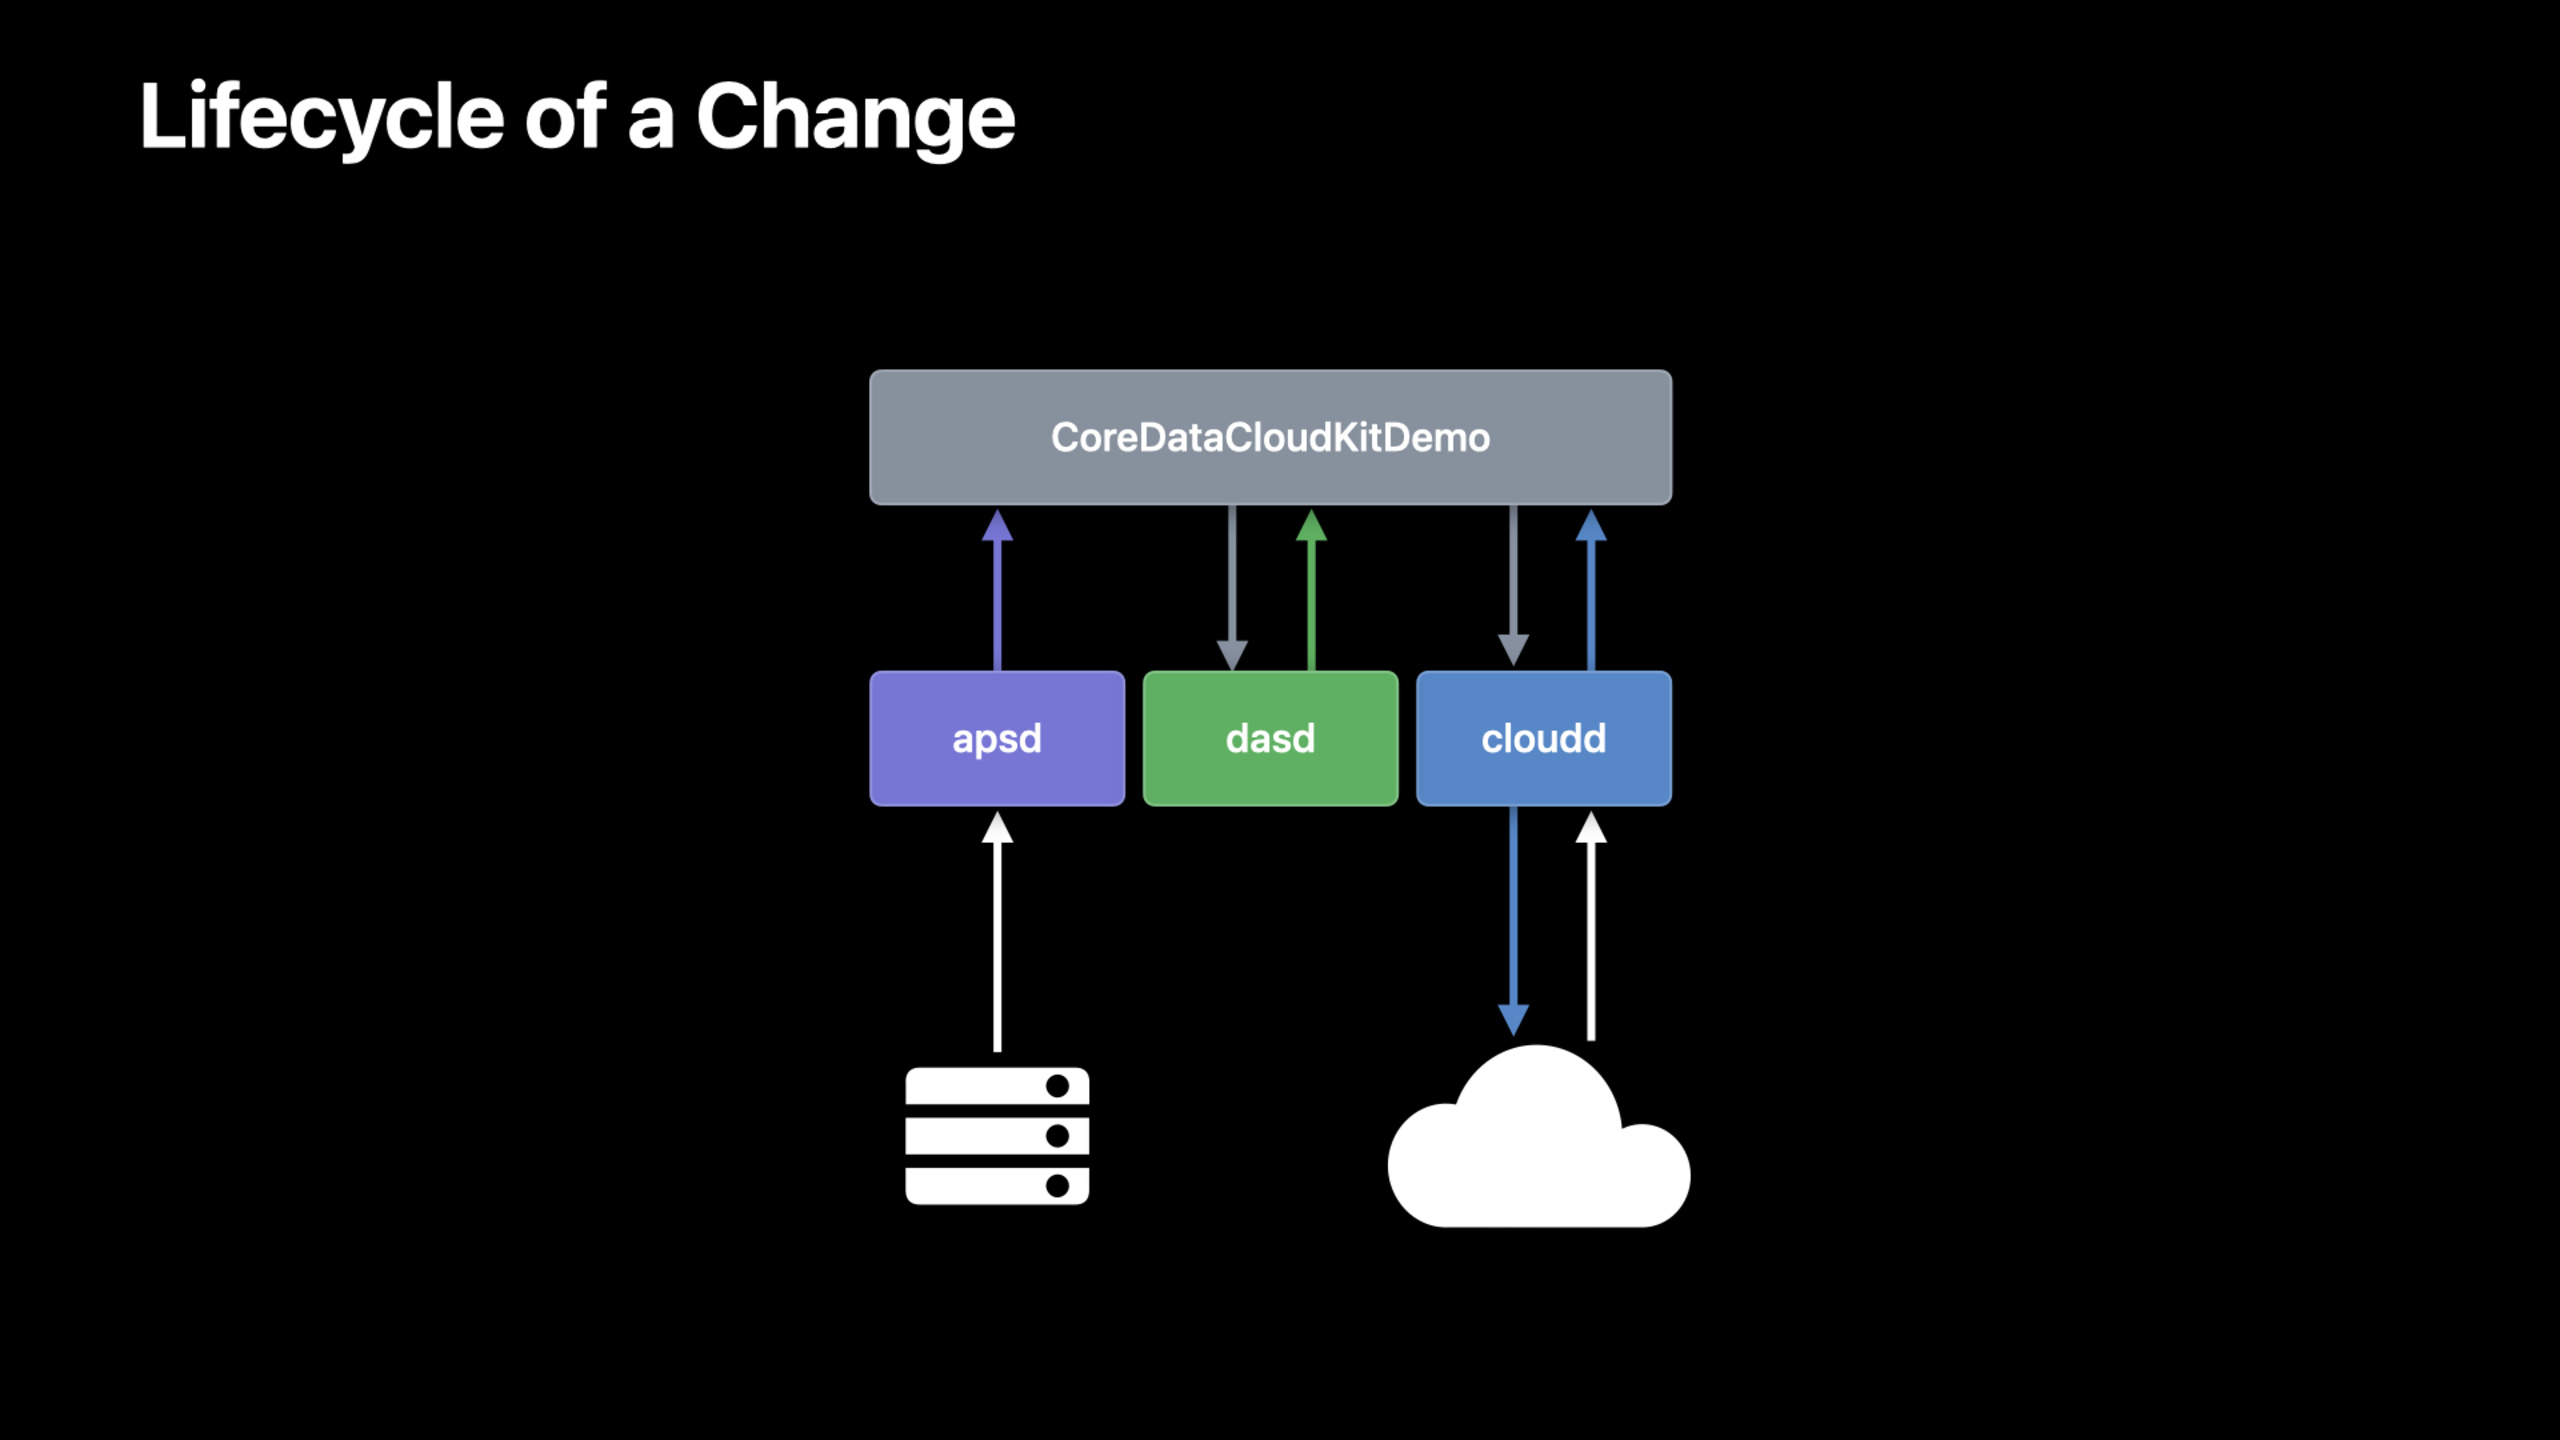
NSPersistentCloudKitContainerSynchronization does not only occur within the App process. Apple shows an export and import link: After the App is written to the store, the container will askdasdIs it suitable to perform an export; subsequently passedclouddExport the object to CloudKit; the receiving device isapsdAfter receiving the push, the import is triggered. (17:27)
Can be used during developmentlog streamOpen multiple Terminal tabs and view App, CloudKit, Push, and scheduling logs respectively. (20:41)
# Application
log stream --predicate 'process = "CoreDataCloudKitDemo" AND
                        (sender = "CoreData" OR sender = "CloudKit")'

# CloudKit
log stream --predicate 'process = "cloudd" AND
                        message contains[cd] "iCloud.com.example.CloudKitCoreDataDemo"'

# Push
log stream --predicate 'process = "apsd" AND message contains[cd] "CoreDataCloudKitDemo"'

# Scheduling
log stream --predicate 'process = "dasd" AND
                        message contains[cd] "com.apple.coredata.cloudkit.activity" AND
                        message contains[cd] "CEF8F02F-81DC-48E6-B293-6FCD357EF80F"'
Key points:
- App predicate Follow
CoreDataCloudKitDemoIn-process Core Data and CloudKit logs. -clouddpredicate uses container identifier to filter CloudKit server-related operations. -apsdpredicate observes whether the push notification reaches the device. -dasdpredicate observationNSPersistentCloudKitContainerScheduled background activity. - The UUID in the last paragraph is the store identifier, which can converge the logs to the specific persistent store.
6. Turn diagnostic data into shareable feedback
If the problem occurs on the device, Session provides a three-step data collection process: install CloudKit logging profile, reproduce the problem and capture sysdiagnose. If the device can be accessed, use Xcode Device Organizer to download the store file in the App container. (21:59)
After getting sysdiagnose, you can uselog showfromsystem_logs.logarchiveCheck the log here. (24:36)
log show --info --debug
    --predicate 'process = "apsd" AND
                 message contains[cd] "iCloud.com.example.CloudKitCoreDataDemo"'
    system_logs.logarchive

log show --info --debug
    --start "2022-06-04 09:40:00"
    --end "2022-06-04 09:42:00"
    --predicate 'process = "apsd" AND
                 message contains[cd] "iCloud.com.example.CloudKitCoreDataDemo"'
    system_logs.logarchive
Key points:
--info --debugTurn on a more verbose log level. ---predicateReuse filters from the development stage. -system_logs.logarchivePoint to the log archive in sysdiagnose. ---startand--endLimit queries to the time window that reproduces the problem.
You can also combine the four types of logs into a predicate and send it to teammates or Apple as part of a feedback report. (25:17)
log show --info --debug
    --start "2022-06-04 09:40:00" --end "2022-06-04 09:42:00"
    --predicate '(process = "CoreDataCloudKitDemo" AND
                      (sender = "CoreData" or sender = "CloudKit")) OR
                 (process = "cloudd" AND
                      message contains[cd] "iCloud.com.example.CloudKitCoreDataDemo") OR
                 (process = "apsd" AND message contains[cd] "CoreDataCloudKitDemo") OR
                 (process = "dasd" AND
                     message contains[cd] "com.apple.coredata.cloudkit.activity" AND
                     message contains[cd] "CEF8F02F-81DC-48E6-B293-6FCD357EF80F")'
    system_logs.logarchive
Key points:
- One command to cover App,
cloudd、apsd、dasdFour links. - The time window controls the log volume within the recurrence interval.
- container identifier and store identifier allow feedback to be directed to a specific App and specific store.
- The command itself can be shared with the feedback report, allowing recipients to reuse the same set of filters.
Core Takeaways
-
What to do: Add a debug data generator to your sync app.
Why is it worth doing: in SessionLargeDataGeneratorMake 10GB level data sets reproducible in tests and UI.
How to start: Write a receiveNSManagedObjectContextofgenerateData(context:), first generate the most problematic data shapes, such as large images, multiple attachments, empty fields, or extreme numbers of relationships. -
What to do: Put
NSPersistentCloudKitContainerThe synchronization events are accessed by XCTest.
Why it’s worth doing: There are clear end events for export and first import, which can reduce “wait and see” manual verification.
How to start: MonitoringNSPersistentCloudKitContainer.eventChangedNotification,useevent.type、event.storeIdentifierandevent.endDateFilter target events. -
What to do: Establish Time Profiler and Allocations baselines for big data testing.
Why it’s worth doing: In Apple’s example, Time Profiler found the problem of redundant thumbnail generation, and Allocations found the problem of verifier retaining large images.
How to start: Select Profile for a single XCTest in Xcode, first look at the most important call stack, and then use Allocations to check the allocation and release stack of large objects. -
What: Prepare a set of sync log commands.
Why it’s worth doing: Core Data + CloudKit’s synchronization spans apps,dasd、cloudd、apsd, it is easy to miss scheduling or push issues by just looking at App logs.
How to get started: Adapt this article for your bundle, CloudKit container identifier, and persistent store identifierlog streampredicate。 -
What to do: Write the customer equipment diagnostic process into the team playbook.
Why it’s worth doing: Session clearly displays three types of data: CloudKit logging profile, sysdiagnose, and Device Organizer download container.
How to start: Record profile installation steps, sysdiagnose keystrokes, problem recurrence time, andlog showQuery command.
Related Sessions
- Evolve your Core Data schema — Continue learning about Core Data schema migration and how schema changes affect CloudKit synchronization.
- Track down hangs with Xcode and on-device detection — Learn to use Xcode and device diagnostic data to locate hangs in real applications.
- Diagnose performance issues with the Xcode Organizer — Learn how to use Xcode Organizer to view aggregated performance data on real devices.
Comments
GitHub Issues · utterances