
Highlight
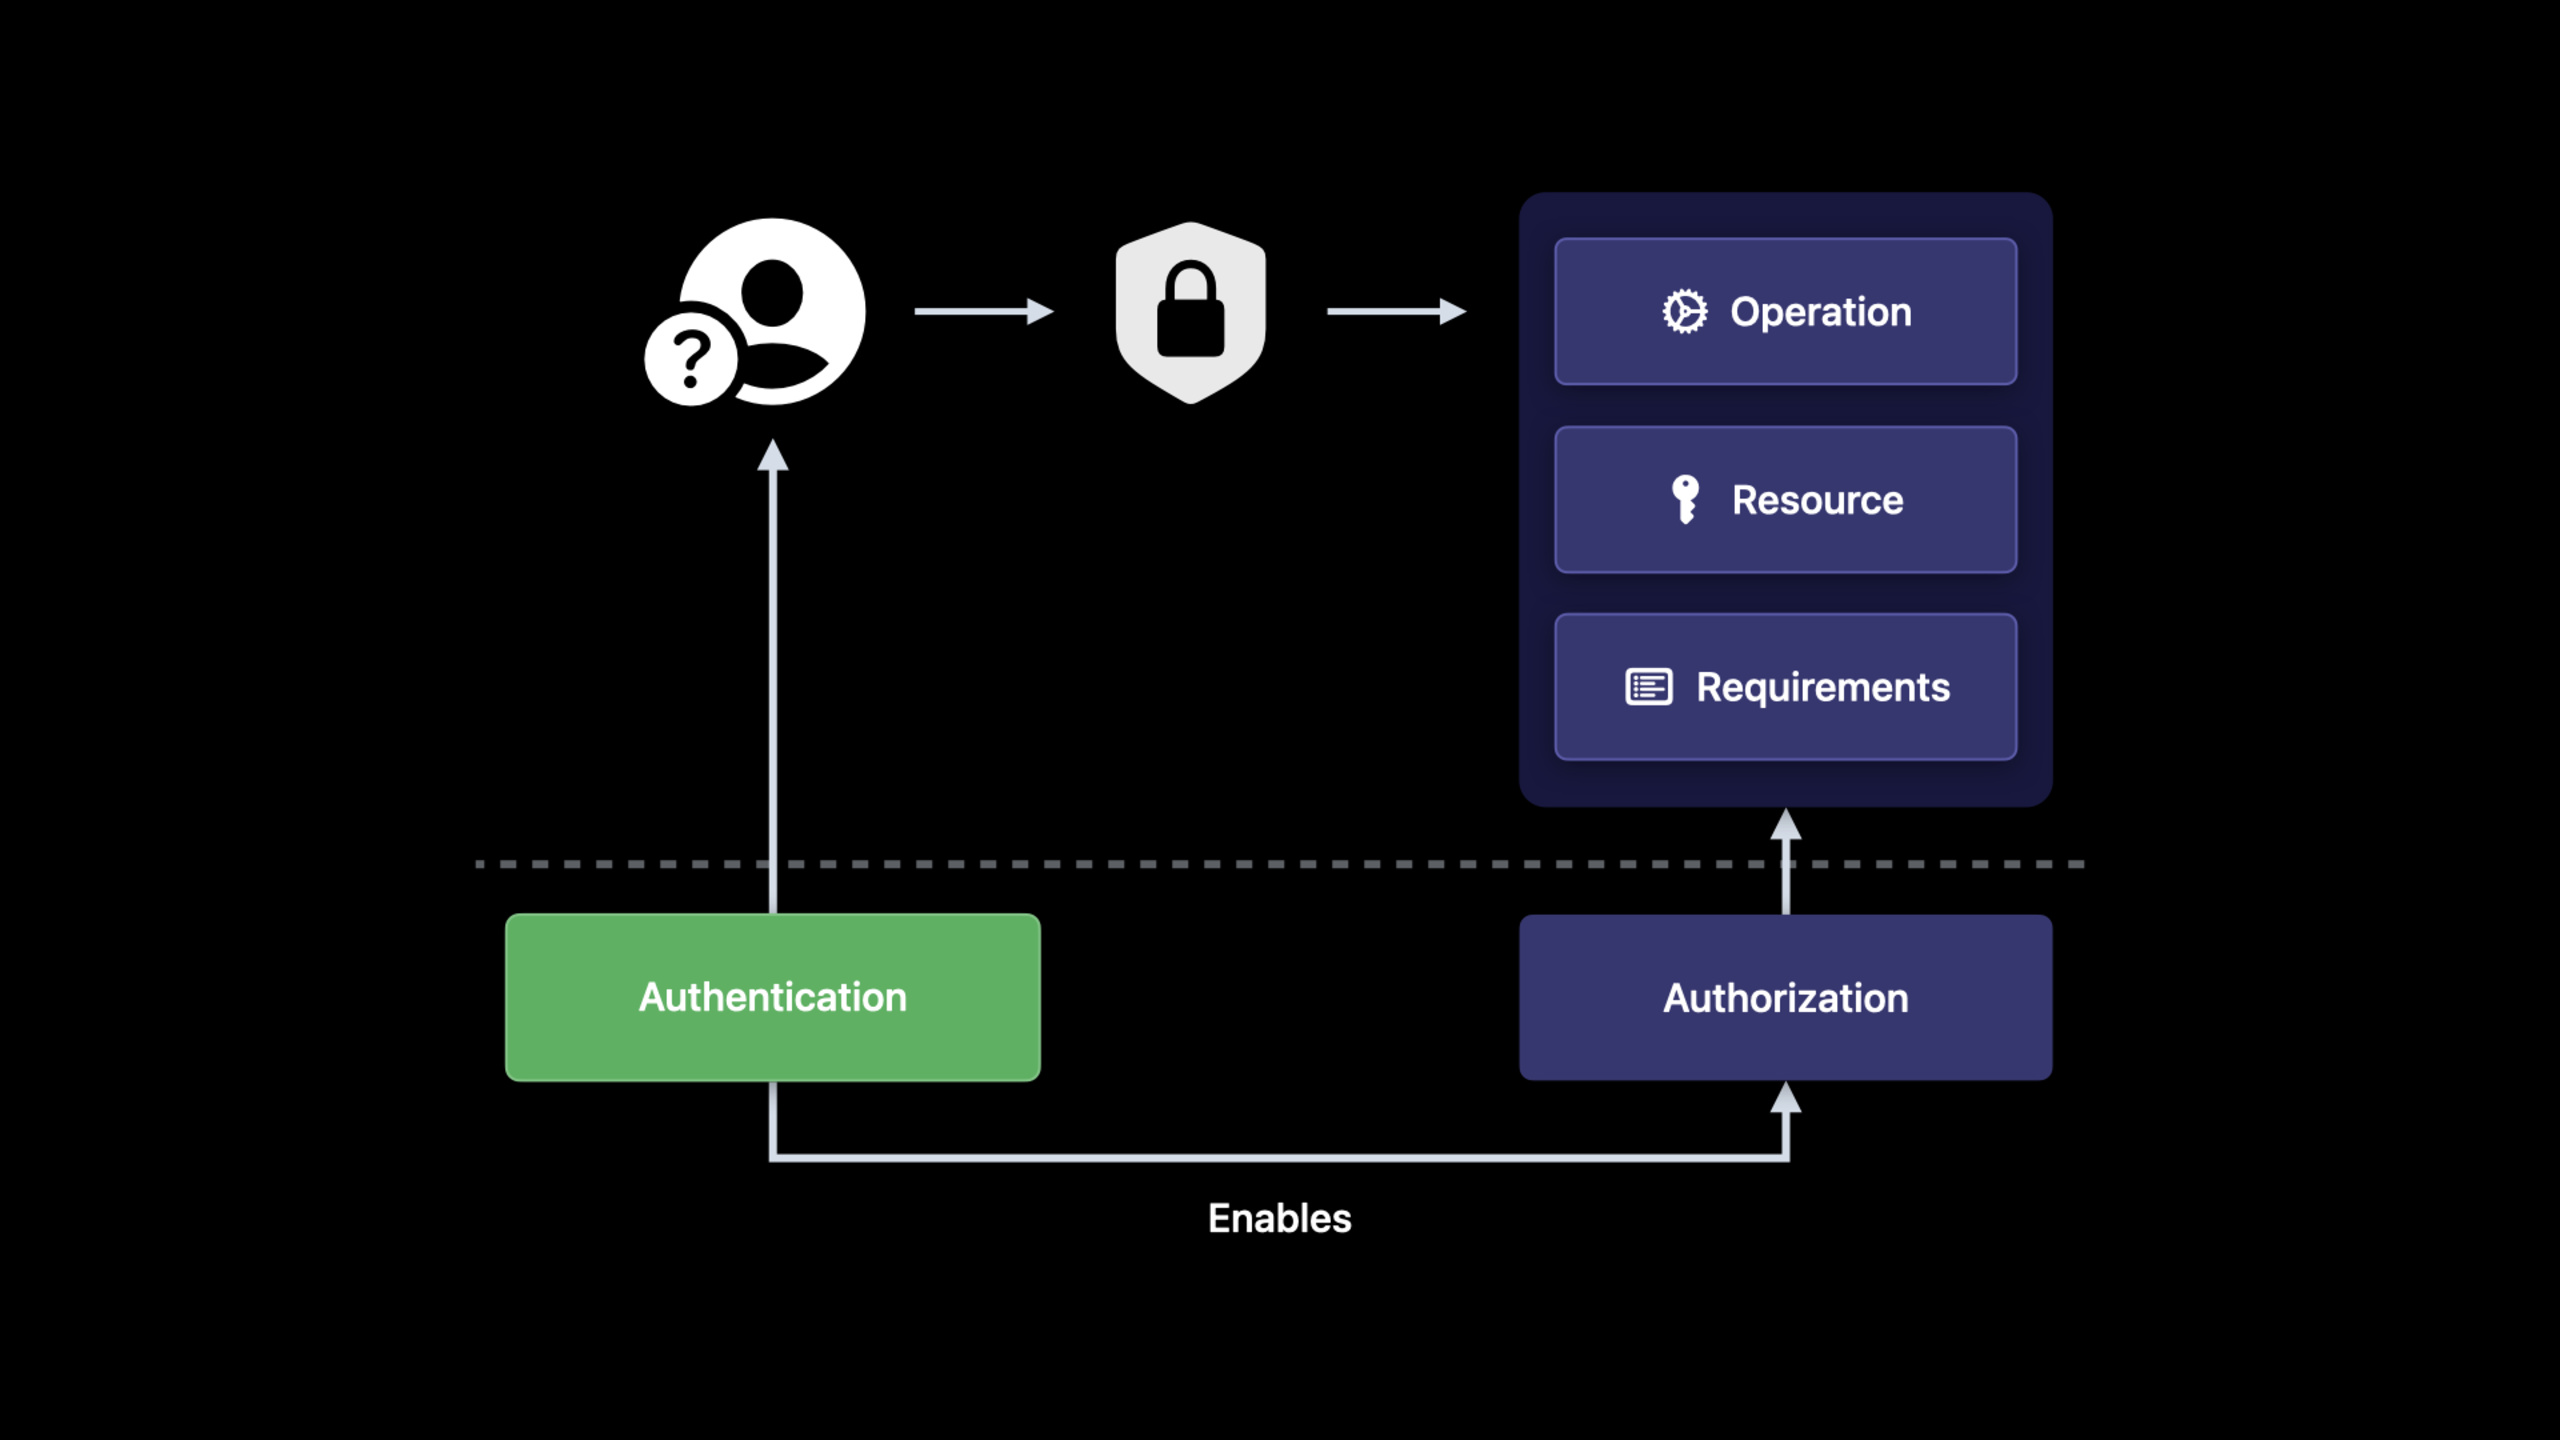
This Session talks about the new changes of the LocalAuthentication framework on iOS 16 and macOS 13. The core concept is to distinguish between “authentication” and “authorization”.
Core Content
Many apps must protect sensitive resources: user information, private keys, file decryption capabilities, and transaction confirmation buttons. Old practice usually starts with “authenticate the user”: createLAContext, let the system display the Face ID, Touch ID or password interface, and then hand this context to the Security framework for continued use.
This process works, but developers have to string together multiple concepts themselves. What the resource is, which operation is allowed, what authentication method is required by the access control list (ACL), and which query the authorization result is bound to, all must be processed in the code. Example of using a Secure Enclave private key to sign a Session: the private key is in the Secure Enclave, and the App does not directly obtain the private key and only requests the Secure Enclave to complete the signature operation.
Apple has added a high-level API for authorization in LocalAuthentication in iOS 16 and macOS 13. The core abstraction isLARight: A Right representing an App-defined protected operation. Developers can push the question from “user authentication” to “can this user perform this operation now?”
LARightSuitable for protecting internal resources of the app, such as access to user data area.LAPersistedRightSuitable for saving authorization requirements across boots and backed by a unique key in the Secure Enclave. Private key operations must still be authorized first, while public key operations can be performed directly, which saves a lot of low-level assembly code for processes such as secondary verification and challenge signatures.
Detailed Content
Use LAContext to authorize a Secure Enclave signature (04:58)
Session starts by reviewing existing practices. Before signing, the App must retrieve the access control list associated with the Secure Enclave private key. This relies on the Security frameworkSecItemCopyMatching, and require the returned attributes in the query.
let query: [String: Any] = [
    kSecClass as String: kSecClassKey,
    kSecAttrTokenID as String: kSecAttrTokenIDSecureEnclave,
    kSecAttrApplicationTag as String: "com.example.app.key",
    kSecReturnAttributes as String: true,
]

var item: CFTypeRef? = nil
guard SecItemCopyMatching(query as CFDictionary, &item) == errSecSuccess, let attrs = item as? NSDictionary, let accessControl = attrs[kSecAttrAccessControl] else {
    throw .aclNotFound
}
Key points:
kSecClassKeyIndicates that the query target is the key. -kSecAttrTokenIDSecureEnclaveLimit the scope to keys in the Secure Enclave. -kSecAttrApplicationTagUse the stable tag to find the key created by the app. -kSecReturnAttributesRequires the key attribute to be returned, thus readingkSecAttrAccessControl。SecItemCopyMatchingOn success, the code retrieves the ACL from the returned attribute; on failure, it throwsaclNotFound。
After getting the ACL,LAContextThe authorization UI can be triggered at the time selected by the App (05:15).
let context = LAContext()
try await context.evaluateAccessControl(accessControl as! SecAccessControl,
                      operation: .useKeySign,
                       localizedReason: "Authentication is required to proceed")
Key points:
LAContext()Create the context for this authorized use. -evaluateAccessControlDirectly evaluate the previously removed ACL. -operation: .useKeySignIndicates that this authorization is to perform a signing operation. -localizedReasonIt is the reason description that users see in the system authorization interface.
After authorization is completed, the sameLAContextBind to the query to retrieve the private key reference (05:44).
let query: [String: Any] = [
    kSecClass as String: kSecClassKey,
    kSecAttrTokenID as String: kSecAttrTokenIDSecureEnclave,
    kSecAttrApplicationTag as String: "com.example.app.key",
    kSecReturnRef as String: true,
    kSecUseAuthenticationContext as String: context
]

var item: CFTypeRef? = nil
guard SecItemCopyMatching(query as CFDictionary, &item) == errSecSuccess, item != nil else {
    throw .keyNotFound
}
Key points:
kSecReturnRefRequires a key reference to be returned that can be used in subsequent operations. -kSecUseAuthenticationContextthe authorizedcontextPassed to Security for query.- After the same context is bound to the private key reference, the authentication interface will not pop up again when signing.
- This effect of avoiding repeated reminders lasts until
LAContextInvalid.
Finally, the App uses the returnedSecKeyExecute signing (06:00).
let privateKey = item as! SecKey

var error: Unmanaged<CFError>?
guard let sgt = SecKeyCreateSignature(privateKey, self.algorithm, blob, &error) as Data? else {
    throw .signatureFailure
}
Key points:
itemis converted toSecKey, which is the private key reference. -SecKeyCreateSignatureRequest Secure Enclave to use private key pairblobsign.- The private key itself will not be given to the App; the App only gets the signature result.
- When the signature fails, the code throws
signatureFailure。
Use LARight to express your app’s own protected operations (08:28)
If the app only wants to protect one in-app resource, such as the user profile page, use it directlyLARightSimpler. Right’s requirement could be written as “requires biometrics, allows device password as fallback”.
// LARight: Basic usage

func login() async {
   self.loginRight = LARight(requirement: .biometry(fallback: .devicePasscode))
   do {
       try await loginRight.checkCanAuthorize()
   } catch {
       navigateTo(section: .public)
       return
   }
   do {
      try await self.loginRight.authorize(localizedReason: self.localizedReason)
 navigateTo(section: .protected)
   } catch {
      showError(.authenticationRequired)
   }
}
Key points:
LARight(requirement:)Create a protected authorization object. -.biometry(fallback: .devicePasscode)Indicates that biometrics will be used first, and device passwords will also be used to complete authorization. -checkCanAuthorize()First check whether the current user can obtain this Right, and enter the public area if authorization is not available. -authorize(localizedReason:)Trigger the system-driven authorization UI.- Enter the protected area after successful authorization, and display the error required for authentication when it fails.
Right has status. It goes from unknown to authorizing, and then to authorized or notAuthorized depending on the result. App can readstate, you can also use KVO, Combine, or monitor the defaultNotificationCenterindidBecomeAuthorizedanddidBecomeUnauthorizedNotification (09:38).
When logging out, the App actively revokes this Right (11:01).
// LARight: Basic usage

func login() async {
   self.loginRight = LARight(requirement: .biometry(fallback: .devicePasscode))
   // ...
   do {
       try await self.loginRight.authorize(localizedReason: self.localizedReason)
  navigateTo(section: .protected)
   } catch {
       showError(.authenticationRequired)
   }
}

func logout() async {
   await self.loginRight.deauthorize()
}
Key points:
self.loginRightIt needs to be saved by a strong reference; the authorization status will also be lost after the instance is released. -deauthorize()Change the authorized Right back to the unauthorized state.- The next time you log in, the user needs to go through the authorization process again.
- This model is suitable for the protection scenario of “valid while this app is running”.
Use LAPersistedRight for cross-session secondary authentication (13:44)
LAPersistedRightCreated by Right Store. Once saved, it is backed by a unique Secure Enclave key and the authorization requirements remain immutable. The public key can be exported directly; operations such as private key signing, decryption, and key exchange must first be authorized.
// LAPersistedRight: Retrieval and private key usage

func generateClientKeys() async throws -> Data {
    let login2FA = LARight(requirement: .biometryCurrentSet)
    let persisted2FA = try await LARightStore.shared.saveRight(login2FA, identifier: "2fa")
    return try await persisted2FA.key.publicKey.bytes
}

func signChallenge(_ challenge: Data, algorithm: SecKeyAlgorithm) async throws -> Data {
    let persisted2FA = try await LARightStore.shared.right(forIdentifier: "2fa")
    let localizedReason = "Biometric authentication is required to proceed"
    try await persisted2FA.authorize(localizedReason: localizedReason)
    return try await persisted2FA.key.sign(challenge, algorithm: algorithm)
}
Key points:
.biometryCurrentSetRequires authorization to be tied to the biometric set that was enrolled on the device when the Right was created. -LARightStore.shared.saveRightSave a normal Right as a persistent Right with a unique identifier. -persisted2FA.key.publicKey.bytesExport the public key bytes, suitable for storage or verification by the backend. -right(forIdentifier:)Retrieve the same persistent Right in subsequent App sessions. -authorize(localizedReason:)Only after success does the private key allow protected operations to be performed. -persisted2FA.key.signUse the private key to sign the challenge issued by the backend.
This example corresponds to a common login enhancement process: the public key bound to the device is generated during the registration phase, and the backend saves the public key; during login or high-risk operations, the backend issues a challenge, the device signs with the private key after the user completes biometric identification, and the backend uses the public key to verify the signature.
Core Takeaways
-
**What to do: Add local unlocking to sensitive pages. ** Such as password library, health records, financial details page. Why it’s worth doing:
LARightYou can directly express “authorization is required before entering this area.” How to get started: Hold aLARight(requirement: .biometry(fallback: .devicePasscode)), called before enteringcheckCanAuthorize()andauthorize(localizedReason:)。 -
**What to do: Give the logout button a real local undo. ** Why it’s worth doing: The authorization status of Right can be actively revoked by the App to prevent the protected area from continuing to be visible after the user leaves the device. How to start: Called when logging out, switching accounts, or entering the background policy is triggered
deauthorize(), re-authorize when accessing again. -
**What to do: Use Secure Enclave for secondary verification of device binding. **Why it’s worth doing:
LAPersistedRightThe private key behind it can only be used after authorization and is suitable for signing high-risk operations. How to get started: Save when registeringLARight(requirement: .biometryCurrentSet)And upload the public key; retrieve Right during operation, and sign the backend challenge after authorization. -
**What to do: Gradually converge the old LAContext + Security code. ** Why it’s worth doing: If you just want to protect app content,
LARightCan reduce handwritten ACL queries, context binding and state management. How to start: Keep the paths that require underlying key control, change the normal content unlocking to the Right model, and refresh the UI with state observation.
Related Sessions
- Discover Managed Device Attestation — Continue to talk about how the Secure Enclave private key and device attestation are used for server-side trust judgment.
- Meet passkeys — Talk about the integration of platform authentication capabilities and anti-phishing credentials from the perspective of account login.
- Replace CAPTCHAs with Private Access Tokens — Talk about how to improve the credibility of requests while protecting privacy.
- Improve DNS security for apps and servers — Talking about network layer security capabilities, it is suitable to be included in the security transformation list together with local authorization.
Comments
GitHub Issues · utterances