
Highlight
There are two paths to bringing iOS apps to Mac, both new this year:
Core Content
Many iOS apps are already available in the M1 Mac App Store.As long as they do not actively exit, users will see them under the “iPhone and iPad Apps” label when searching (03:09).
This path is the least costly.The problem is also straightforward: touch input, screen size, and full-screen launch are not necessarily like real Mac apps.
Apple splits the path into two in this session.
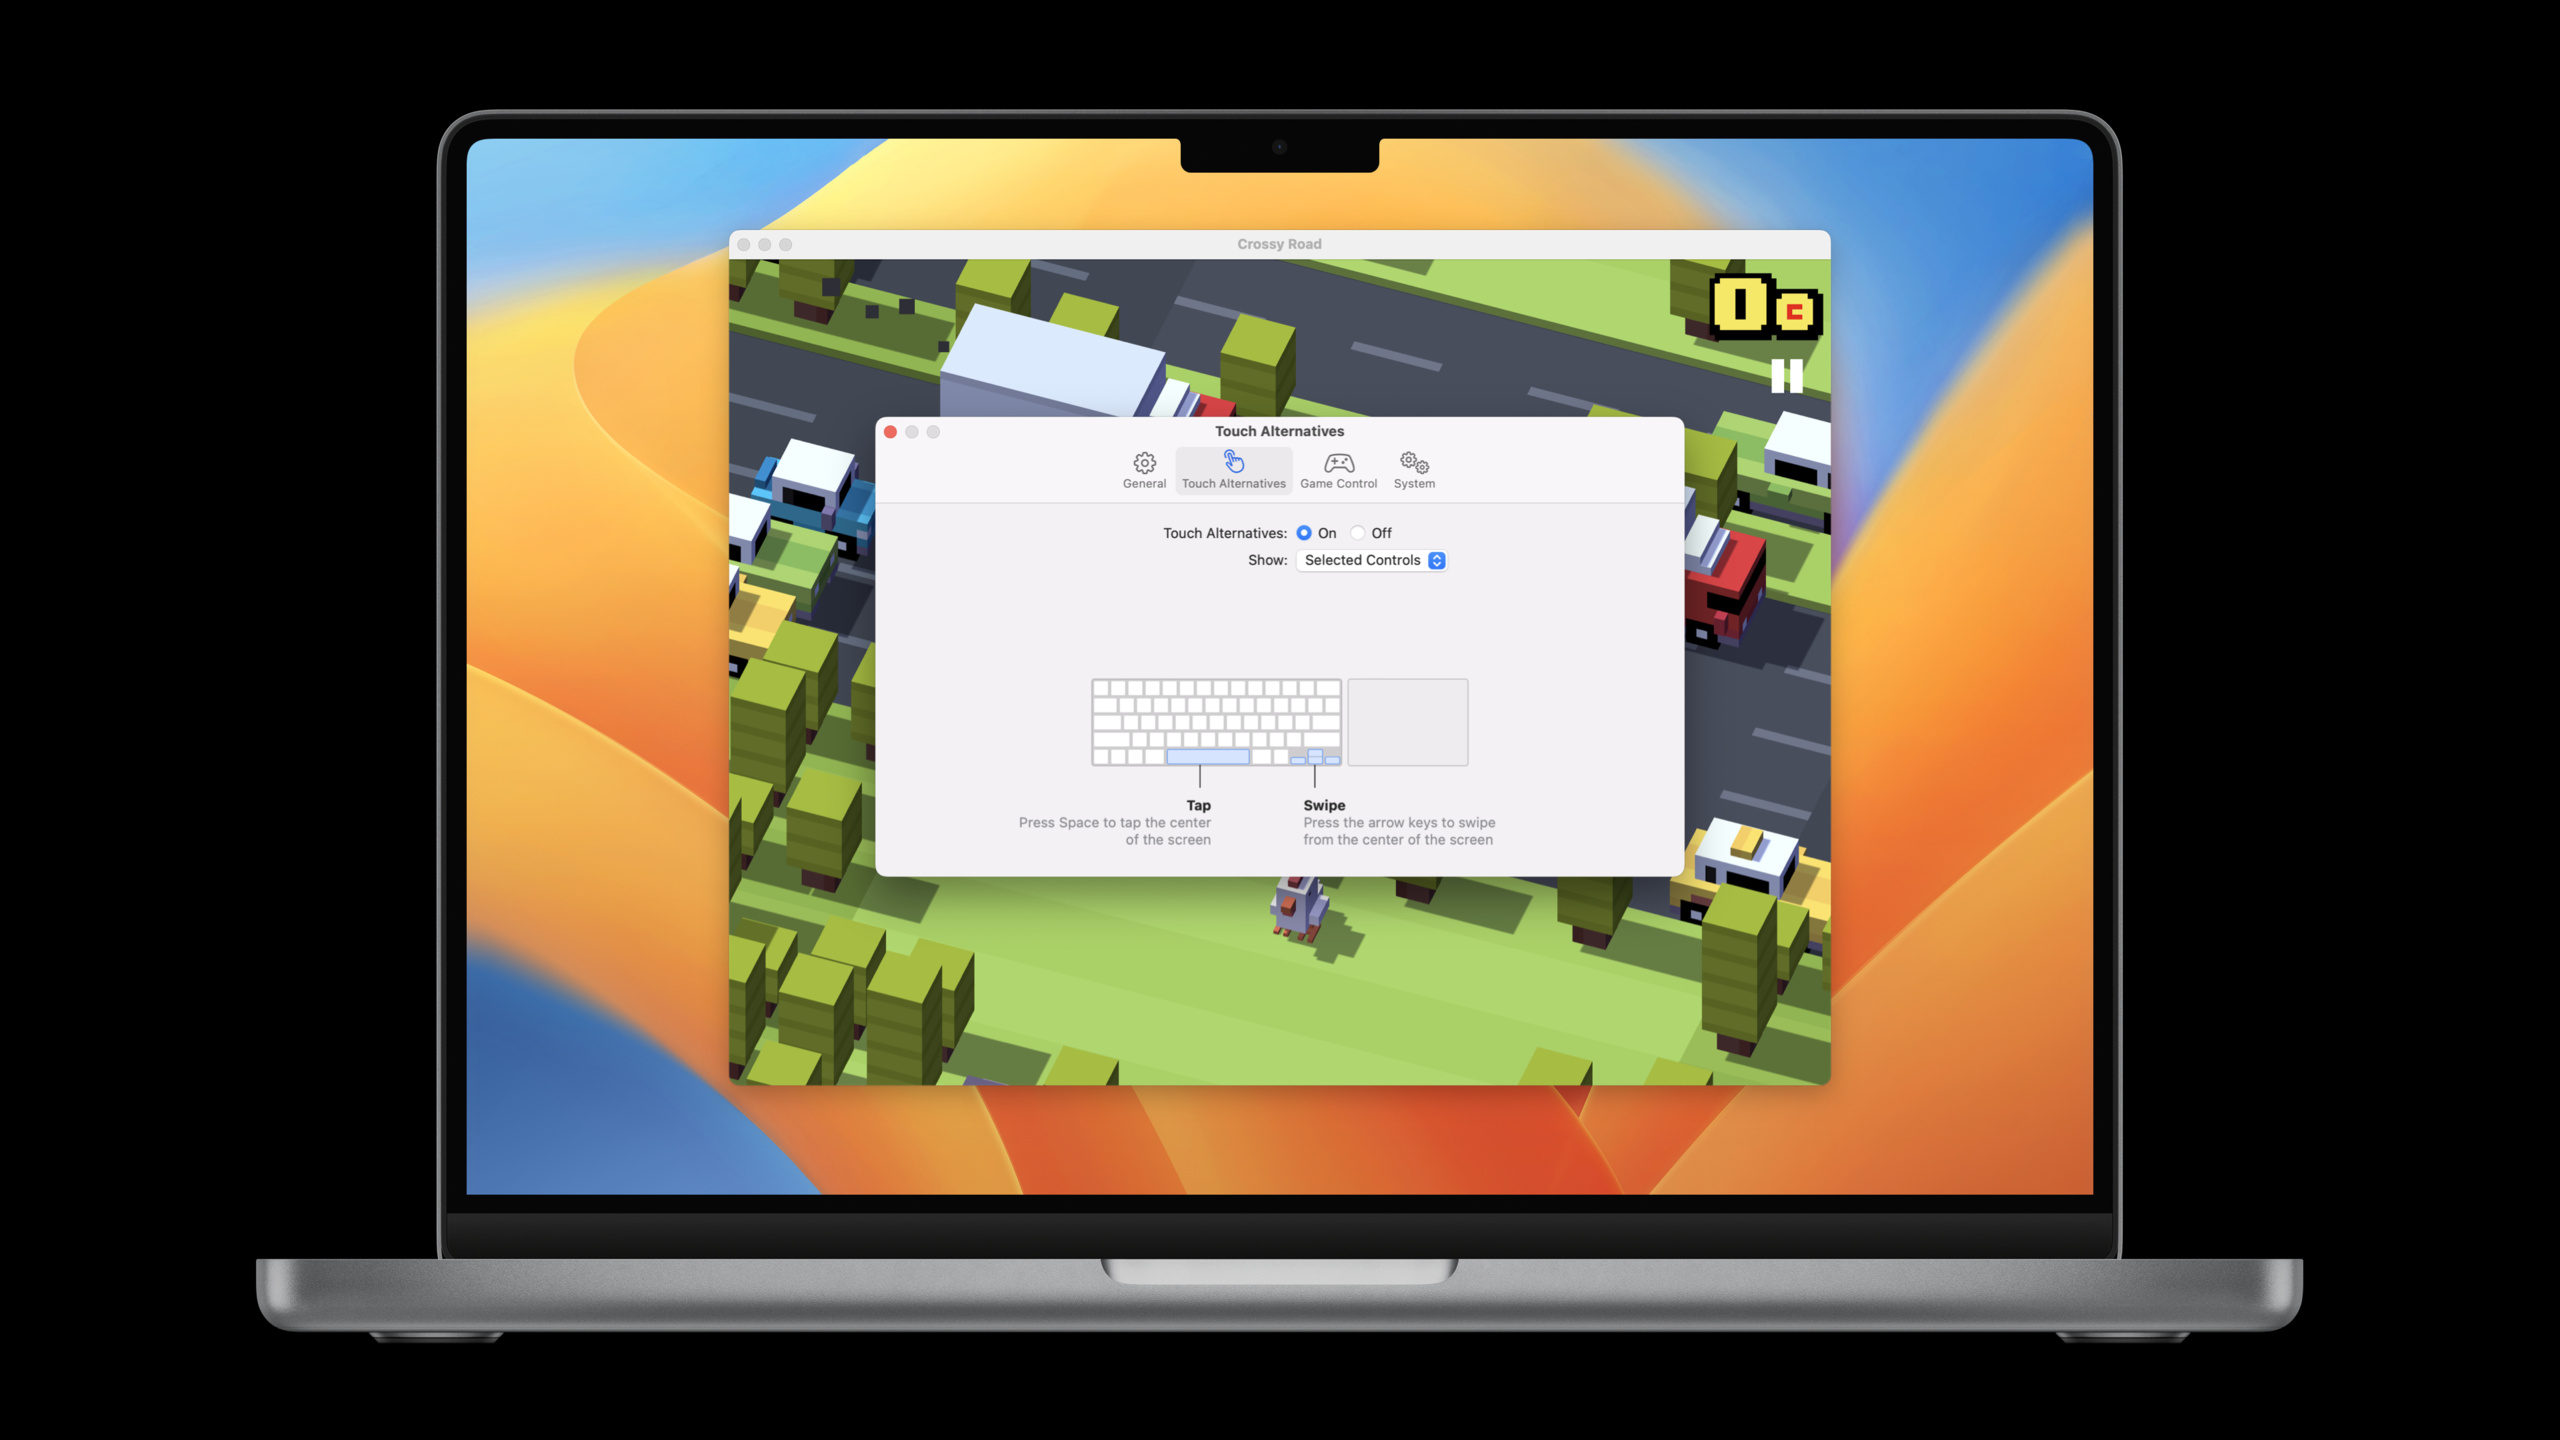
The first one is to continue running iOS apps natively on M1 Mac.Developers can add twoInfo.plistkey, allowing games and multimedia apps to use the real screen size and go directly to full screen on launch (03:29).You can also use Touch Alternatives to convert keyboard, mouse, and trackpad input into the multi-touch gestures that iOS apps expect (04:52).
The second step is to add Mac Catalyst destination to the project.This allows the app to run on all Macs and use the Mac Catalyst API for deeper customization (07:35).If you select Optimize for Mac, UIKit controls will become AppKit style and text will be rendered using native Mac fonts (07:52).
This is not a once-and-done job.It is more like a ladder: first let the app appear on the Mac, then add input and display, and then use Catalyst to take over the desktop capabilities of toolbars, windows, menus, and pop-up layers.
Detailed Content
1. Native iOS app: two startup keys
(03:29) Apple has added two new ones that can be put inInfo.plistkey.They are not bound to the SDK version and will be ignored on iOS and Macs before macOS 12.1, so they can be safely added to existing apps.
<!-- Info.plist -->
<key>UISupportsTrueScreenSizeOnMac</key>
<true/>
<key>UILaunchToFullScreenByDefaultOnMac</key>
<true/>
Key points:
UISupportsTrueScreenSizeOnMacIndicates that the app is ready to handle the different display sizes and pixel densities on the Mac.- When enabled, the app gets the real screen size and real pixel density, not the compatible iPad size.
UILaunchToFullScreenByDefaultOnMacIndicates that the app wants to enter full screen immediately after launching.- Both keys are suitable for use together.The video clearly mentions that games and multimedia apps can thus obtain a pixel-perfect, edge-to-edge full-screen experience.
This type of change does not require you to change the UI architecture.It solves the problem of “the picture is put into a compatible window”.
2. Touch Alternatives: Use plist to describe input conversion
(04:52) iOS games often only handle touch and device motion.Mac users get a keyboard, mouse, and trackpad.
Touch Alternatives automatically converts these Mac inputs into the multi-touch gestures and device movements that iOS apps expect.
To turn on automatic Touch Alternatives, create a file namedcom.apple.uikit.inputalternatives.plistfile (05:35).
<!-- com.apple.uikit.inputalternatives.plist -->
<key>defaultEnablement</key>
<string>enabled</string>
<key>requiredOnboarding</key>
<array>
  <string>tap</string>
  <string>tilt</string>
  <string>drag</string>
  <string>swipe</string>
</array>
Key points:
defaultEnablementset toenabled, indicating that Touch Alternatives will be opened immediately when the app starts.requiredOnboardingIs an array that lists the controls you want the first launch tutorial to focus on.- The video lists displayable controls including tap, tilt, drag, swipe, and direct touch input from the trackpad.
- Once Touch Alternatives is enabled, all control methods will take effect;
requiredOnboardingJust decide what the tutorial will focus on.
(07:02) Apple also emphasizes that it is better to implement keyboard and cursor support directly.This way the app will behave the same on both iPad and Mac with keyboards.Touch Alternatives is better suited as a bridging layer for existing touch apps on Mac.
3. Optimize for Mac: Translate UIKit structure into Mac representation
(07:35) After adding Mac Catalyst destination in Xcode, the app will become a complete Mac Catalyst app that can run on every Mac.
If you enable Optimize for Mac, the system will do several things (08:18):
UINavigationBar        -> NSToolbar
center item controls   -> NSToolbarItems
UISearchTextField      -> hosted inside an NSToolbarItem
iPad text rendering    -> native Mac font rendering
Key points:
UINavigationBarwill be translated intoNSToolbar, and use native AppKit controls.- The controls in the center area will become
NSToolbarItem。 - The search bar will first appear as a search button in the toolbar, and will expand into a search bar after clicking.
- The search suggestions menu and search scope bar will also be converted to native AppKit controls.
- Text under Mac idiom is rendered using Mac native fonts, which the video calls pixel-perfect scale.
(09:49) If your Catalyst app does not create its own toolbar, the system will automatically provide one.If you already manage it yourselfNSToolbar, the system will avoid it and not cover your implementation.
4. File menu: Use responder chain to catch the File menu
(10:42) After adopting the desktop-level iPad API, the Documents app will automatically get new File menu items: Duplicate, Move, Rename, and Export As.
The condition for enabling these menu items is that there is an object in the responder chain. UIResponder provides duplicate, move, rename, and export functions (10:53).
If your app doesn’t need these document menu items, you can add them to the app delegate’sbuildMenuUsed insideUIMenuBuilderRemove.Video explaining these document menu itemsUIMenuIdentifiervalue is.document(11:07)。
func buildMenu(with builder: UIMenuBuilder) {
    builder.remove(menu: .document)
}
Key points:
buildMenu(with:)Is the app delegate controlling the location of the menu.UIMenuBuilderResponsible for adding, deleting and modifying system menus..documentPoints to this set of document-related menu items.- If the app does not provide corresponding document operations, removing the menu is more consistent with Mac habits than leaving an invalid entry.
5. Window geometry: Set size and behavior for auxiliary windows
(13:56) Catalyst app has been usedUIWindowSceneSupports multiple windows.macOS Ventura further adds custom APIs for window frames, window control buttons, and full-screen behavior.
The example in the video is that the Markdown app opens a Markdown Hints auxiliary window.The window is smaller, and the minimize and zoom buttons are disabled (14:22).
The following is the concept code organized by API name in transcript to illustrate the calling sequence:
func scene(
    _ scene: UIScene,
    willConnectTo session: UISceneSession,
    options connectionOptions: UIScene.ConnectionOptions
) {
    guard let windowScene = scene as? UIWindowScene else { return }

    var frame = windowScene.effectiveGeometry.systemFrame
    frame.size = CGSize(width: 480, height: 360)

    let preferences = UIWindowScene.GeometryPreferences.Mac(systemFrame: frame)
    windowScene.requestGeometryUpdate(preferences) { error in
        // The system can reject the request and report details here.
    }

    windowScene.windowingBehaviors.miniaturizable = false
    windowScene.sizeRestrictions?.allowsFullScreen = false
}
Key points:
effectiveGeometryProvides the current frame; video suggestions always start from it.- Before the scene is created, the current frame will be initialized to
CGRectNull, the system knows to ignore these values when first created. - Revise
systemFrameAfter, passrequestGeometryUpdate()Submit a request. - This is a request, not a command; the system can reject it and return details via the error handler.
windowingBehaviors.miniaturizableControl the yellow minimize button.sizeRestrictions.allowsFullScreenControls the ability of the green button to go to full screen.
(16:53) Window geometry also has two scaling rules.systemFrameUsing Mac desktop coordinates, 1 point is always 1 AppKit point.If the app is in Scaled to Match iPad mode, there is a 77% scaling difference between it and the UI elements.The coordinate origin is at the upper left corner of the main display.
6. UIView and popup layer in toolbar
(18:46) The last set of APIs in this session is used to refine the Mac toolbar.
New capabilities in Mac Catalyst:UIViewCan be put in as itemNSToolbar.If you use the new desktop-level iPad API,UIBarButtonItemofcustomViewIt will be automatically wrapped and added to the toolbar (19:04).
If you manage it yourselfNSToolbar, you can use the newNSUIViewToolbarItem.it isNSToolbarItemA subclass of , which receives aUIView(19:37)。
func toolbar(
    _ toolbar: NSToolbar,
    itemForItemIdentifier itemIdentifier: NSToolbarItem.Identifier,
    willBeInsertedIntoToolbar flag: Bool
) -> NSToolbarItem? {
    let wordCountView = WordCountView()
    return NSUIViewToolbarItem(itemIdentifier: itemIdentifier, view: wordCountView)
}
Key points:
NSUIViewToolbarItemused toUIViewBao JinNSToolbarItem。NSToolbarDelegateofitemForItemIdentifierIs the location where the toolbar item is created.- Special reminder for video:
NSToolbarThe custom mode requires a unique toolbar item instance. - If you manage it yourself
NSToolbar, delegate should also be assigned to eachNSUIViewToolbarItemcreate uniqueUIViewinstance, don’t reuse the same view.
(20:43) This item can also be used as the anchor point of the popover.After clicking the word count item in the Markdown app in the video, details such as the number of paragraphs, chapters, and reading time will pop up.
@objc func showWordCountDetails(_ sender: NSToolbarItem) {
    let detailsController = WordCountDetailsViewController()
    detailsController.modalPresentationStyle = .popover
    detailsController.popoverPresentationController?.sourceItem = sender
    present(detailsController, animated: true)
}
Key points:
- Create a popover view controller in the action.
modalPresentationStyle = .popoverUse pop-up layers to display.sourceItemSet to the current toolbar item to anchor the popup layer to the toolbar button.- This type of mode is suitable for summary information and secondary operations on Mac toolbars.
7. Choose whether to translate UINavigationBar
(21:12) If you don’t want the navigation bar to be automatically translated into the Mac toolbar, you can setUINavigationBarofpreferredBehavioralStyle。
navigationController.navigationBar.preferredBehavioralStyle = .padKey points:
- The default value is
automatic。 - set to
.macTranslation will be explicitly requested. - set to
.padAutomatic translation of the navigation bar will be turned off. - This switch is suitable for Catalyst apps that already have a custom toolbar solution.
Core Takeaways
-
Make a truly full-screen Mac version of your iOS game: Use
UISupportsTrueScreenSizeOnMacandUILaunchToFullScreenByDefaultOnMacHandle the display and use Touch Alternatives to receive keyboard and mouse input.Great for making existing touch games playable on Mac first. -
Complete Mac file operations for Documents app: Check whether the responder chain covers duplicate, move, rename, and export functions.Keep the File menu when needed; use it when not
UIMenuBuilderRemove.documentmenu. -
Upgrade iPad toolbar to Mac toolbar: Use desktop-level iPad API to make
UINavigationBar, center items and the search bar are automatically mapped toNSToolbar.If you already manage the toolbar yourself, use.padTurn off automatic translation. -
Make a separate small window for auxiliary information: use
UIWindowSceneThe geometry request sets the initial dimensions, withwindowingBehaviorsandsizeRestrictionsDisable unsuitable window buttons.Suitable for auxiliary panels such as Markdown help, inspector, and palette. -
Put status view in toolbar: use
customViewAutomatically enter the toolbar, or useNSUIViewToolbarItempackUIView.After clicking, use the popover to display more detailed content, such as word count, reading time, and synchronization status.
Related Sessions
- What’s new in UIKit — An annual update to UIKit, including desktop-level APIs used by iPadOS, iOS, and Mac Catalyst apps.
- Meet desktop-class iPad — Introducing desktop-class iPad capabilities such as UINavigationBar, document menu, search, etc., which will be mapped to Mac Catalyst.
- Adopt desktop-class editing interactions — Explains the edit menu and search interactions to help iPad apps obtain a desktop-class editing experience on Mac Catalyst.
- Use SwiftUI with UIKit — Describes how to embed SwiftUI views in UIKit applications, which can be used for Catalyst toolbars and pop-up content.
Comments
GitHub Issues · utterances