
Highlight
Apple added the Metal Performance Shaders backend to PyTorch 1.12 and extended TensorFlow Metal and MPS Graph, allowing machine learning training, custom operators and calculation graph synchronization on Mac to use Apple GPUs.
Core Content
Machine learning training consumes the most computing power. The model needs to repeatedly run forward, backward and gradient updates, and the CPU will quickly become a bottleneck. GPUs are suitable for parallel work, but developers also need a framework to connect the training code to the GPU.
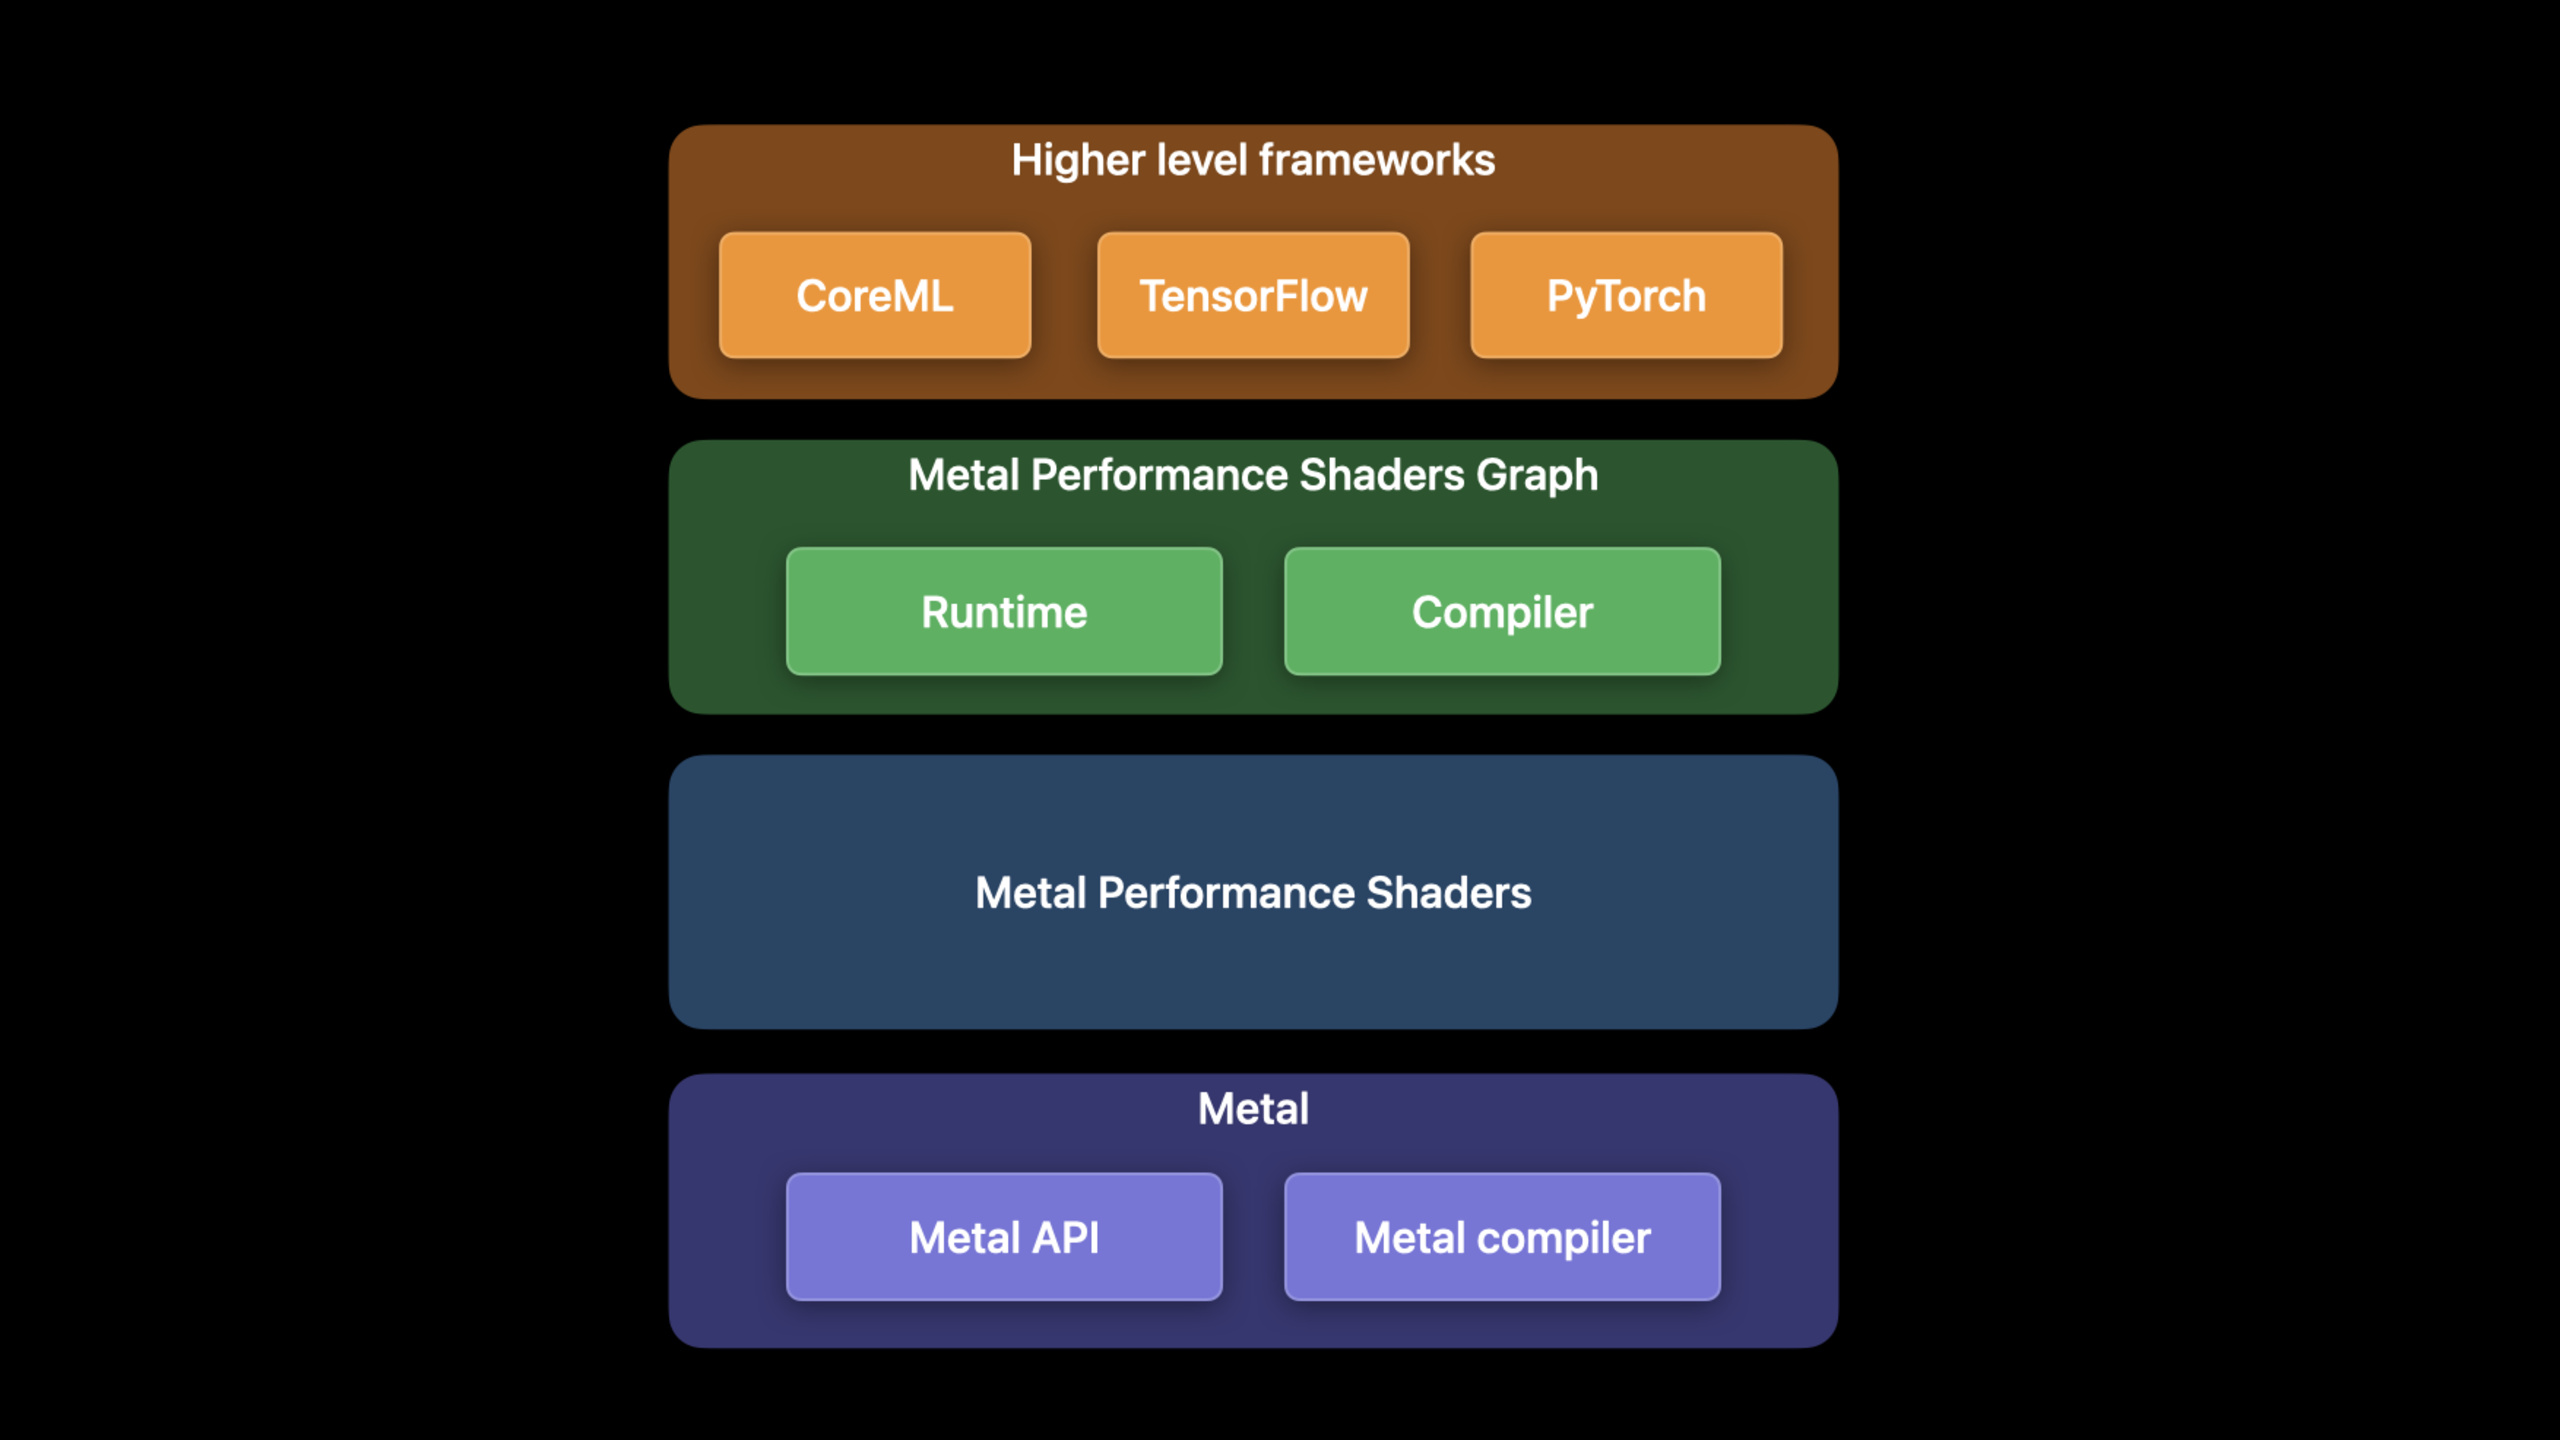
The machine learning entry point for Metal is Metal Performance Shaders (MPS). MPS provides high-performance GPU primitives, and MPS Graph provides general-purpose computational graphs and multi-dimensional tensor support on top of it. Upper-layer frameworks such as Core ML, TensorFlow, and PyTorch can place operators on MPS Graph, MPS, and Metal command queue.
This session is explained clearly in three paragraphs: PyTorch now has an official MPS backend; TensorFlow Metal supports larger batches, custom ops and distributed training; MPS Graph adds shared events, RNN/LSTM/GRU, max pooling indices, Philox random and tensor transformation operations.
PyTorch: Switch to MPS device in three steps
(03:32) One of the most frequently requested capabilities from the PyTorch community is the use of GPU acceleration on Apple silicon. Apple merged the MPS backend into the official PyTorch GitHub repo and entered PyTorch 1.12. It includes PyTorch operation kernels and runtime framework: operators call MPS Graph/MPS, and runtime uses Metal’s command queue, command buffer, and synchronization primitives.
Developers do not need to change the training framework. Install PyTorch, create an MPS device, and move the model and input to this device so that subsequent operations can be executed on the GPU.
TensorFlow: Keep missing operators in GPU timeline
(08:01) TensorFlow Metal provides GPU acceleration via plugins starting with TensorFlow 2.5. 2022 updates include larger batch sizes, new GPU-accelerated operations, custom ops, RNN improvements, and distributed training.
The problem occurs with custom losses or operators that are not yet supported by the TensorFlow API. If this work goes back to the CPU timeline, it will introduce synchronization overhead and make the GPU wait. TensorFlow Metal Stream protocol exposes command buffer, dispatch queue, commit and commitAndWait to custom ops, allowing developers to encode custom GPU kernels into the same Metal stream.
MPS Graph: multi-queue synchronization and more training operators
(18:13) Some applications will divide compute, post processing, and display into different command queues to obtain more GPU parallelism. Doing so introduces data races: post-processing may start before compute produces results. MPS Graph’s shared events API uses signal/wait to establish cross-queue dependencies.
(20:43) MPS Graph also adds a batch of common operations for training and reasoning: RNN, LSTM, GRU; max pooling with return indices; Philox random; Hamming distance; expandDims, squeeze, split, stack, coordinateAlongAxis Equal tensor transformation.
Detailed Content
Minimum path of PyTorch MPS backend
(03:44) Starting with PyTorch 1.12, the base package can be installed directly via pip.
python -m pip install torchKey points:
python -m pipUse pip from the current Python environment to avoid installing to another interpreter environment. -install torchInstall the official PyTorch package; the MPS backend is part of PyTorch 1.12.
(03:59) When creating a device, first check whether the MPS is available, and then fall back to the CPU.
import torch

mpsDevice = torch.device("mps" if torch.backends.mps.is_available() else "cpu")
Key points:
import torchIntroducing PyTorch. -torch.backends.mps.is_available()Determine whether the current environment can use MPS backend. -torch.device("mps" ...)Create MPS device; used if unavailablecpu, the same piece of code can still run.
(04:15) Models run on the CPU by default. To allow the intermediate tensor to use MPS, the model needs to be moved to the MPS device.
import torchvision

model = torchvision.models.resnet50()

model_mps = model.to(device=mpsDevice)
Key points:
torchvision.models.resnet50()Create a ResNet50 model. -model.to(device=mpsDevice)Transfer the model to MPS device. -model_mpsIn subsequent executions, the intermediate tensors generated inside the model will also use the accelerated MPS backend.
(04:46) The input tensor must also be placed in the same device. By default, tensor is allocated on the CPU. If you forget to specify device, the model and input will fall in different locations.
sample_input = torch.randn((32, 3, 254, 254), device=mpsDevice)

prediction = model_mps(sample_input)
Key points:
torch.randn(...)Create a batch of random inputs. -device=mpsDeviceLet the input tensor be allocated directly on the MPS device. -model_mps(sample_input)Perform inference and subsequent tensor operations are accelerated on the GPU.
(05:15) Apple uses the StyleTransfer network to demonstrate the training effect. On M1 Ultra, the PyTorch benchmark has a maximum speedup of 20x and an average of 8.3x. This number comes from the PyTorch benchmarks shown in the session.
TensorFlow Metal custom op
(09:21) To customize TensorFlow op to access Metal, the core isTF_MetalStreamprotocol. It provides the current command buffer, a dispatch queue for CPU-side synchronization, and methods for submitting GPU work.
@protocol TF_MetalStream

- (id <MTLCommandBuffer>)currentCommandBuffer;
- (dispatch_queue_t)queue;
- (void)commit;
- (void)commitAndWait;

@end
Key points:
currentCommandBufferReturns the Metal command buffer currently encoding the GPU kernel. -queueReturns the dispatch queue; used to serialize the encoding process when multiple threads submit work. -commitSubmit the current command buffer to the GPU. -commitAndWaitWill wait for the current command buffer to complete, suitable for debugging the submission sequence.
(10:04) There are three steps to implement custom op: register the op, use Metal stream to implement the op, and import the dynamic library in the training script.
// Register the operation
REGISTER_OP("ZeroOut")
    .Input("to_zero: int32")
    .Output("zeroed: int32")
    .SetShapeFn([](::tensorflow::shape_inference::InferenceContext* c) {
      c->set_output(0, c->input(0));
      return Status::OK();
    });
Key points:
REGISTER_OP("ZeroOut")Register the name with TensorFlowZeroOutoperation. -.Input("to_zero: int32")Declare the input tensor name and type. -.Output("zeroed: int32")Declare the output tensor name and type. -SetShapeFnIndicates that the output shape is the same as the input shape.
(10:41) In the calculation function, first take the input and output, and then passTF_GetStreamGet the Metal stream and encode the GPU kernel in the stream’s queue.
// Define Compute function
void MetalZeroOut::Compute(TF_OpKernelContext *ctx) {
    // Get input and allocate outputs
    TF_Tensor* input = nullptr;
    TF_GetInput(ctx, 0, &input, status);
    TF_Tensor* output;
    OP_REQUIRES_OK(ctx, ctx->allocate_output(0, input.shape(), &output));

    // Use TF_MetalStream to encode the custom op
    id<TF_MetalStream> metalStream = (id<TF_MetalStream>)(TF_GetStream(ctx, status));
    dispatch_sync(metalStream.queue, ^() {
        id<MTLCommandBuffer> commandBuffer = metalStream.currentCommandBuffer;
        // Create encoder and encode GPU kernel
        [metalStream commit];
    });

    // Delete the TF_Tensors
    TF_DeleteTensor(input);
    TF_DeleteTensor(output);
}
Key points:
TF_GetInputGet the input tensor passed in by TensorFlow. -allocate_outputAllocate space for the output tensor. -TF_GetStreamRetrieve the Metal stream from the current op context. -dispatch_sync(metalStream.queue, ^{ ... })Put the encoding process into the queue provided by stream to avoid multi-thread submissions from stepping on each other. -metalStream.currentCommandBufferIt is the entry point for subsequent creation of encoder and encoding GPU kernel. -[metalStream commit]Submit this piece of GPU work. -TF_DeleteTensorRelease input and output tensor references.
(11:30) After the dynamic library is built, it can be loaded in the Python training script.
# Import operation in python script for training
import tensorflow as tf
zero_out_module = tf.load_op_library('./zero_out.so')
print(zero_out_module.zero_out([[1, 2], [3, 4]]).numpy())
Key points:
import tensorflow as tfIntroducing TensorFlow. -tf.load_op_library('./zero_out.so')Load the shared dynamic library of custom op. -zero_out_module.zero_out(...)Call the registered op like a normal Python function. -.numpy()Convert the results to NumPy representation for easy inspection of the output.
(12:00) Apple explains the value of custom ops with a NeRF example. The original two-layer MLP version takes about 100 seconds per epoch, and is still blurry after 30 minutes of training; after adding a custom hash table op, each epoch takes about 10 seconds, and a clear model can be obtained faster. This example proves that hash tables that are not natively supported by TensorFlow can also be implemented in the Metal plug-in.
MPS Graph shared events
(19:21) When the compute graph and post-process graph run on different command queues, explicit synchronization is required. The usage of shared event is: the first descriptor signal, the second descriptor wait.
// Using shared events
let executionDescriptor = MPSGraphExecutionDescriptor()
let event = MTLCreateSystemDefaultDevice()!.makeSharedEvent()!
executionDescriptor.signal(event, atExecutionEvent: .completed, value: 1)

let fetch = computeGraph.runAsync(with: commandQueue1,
                                  feeds: [input0Tensor: input0,
                                          input1Tensor: input1],
                                  targetTensors: [finalTensor],
                                  targetOperations: nil,
                                  executionDescriptor: executionDescriptor)

let executionDescriptor2 = MPSGraphExecutionDescriptor()
executionDescriptor2.wait(for: event, value: 1)

let fetch2 = postProcessGraph.runAsync(with: commandQueue2,
                                       feeds: [input0Tensor: fetch[finalTensor]!,
                                               input1Tensor: input1],
                                       targetTensors: [finalTensor],
                                       targetOperations: nil,
                                       executionDescriptor: executionDescriptor2)
Key points:
MPSGraphExecutionDescriptor()Execution descriptor used when creating run graphs. -makeSharedEvent()Create a shared event on the Metal device. -signal(... .completed, value: 1)Requires a signal to be emitted when the compute graph is complete. -computeGraph.runAsync(...)existcommandQueue1Run compute graph asynchronously. -executionDescriptor2.wait(for: event, value: 1)Asks the second graph to wait for the same event to reach the specified value. -postProcessGraph.runAsync(...)existcommandQueue2Run the post-processing graph on it, but the dependency has passed the event constraint.
MPS Graph new operations: LSTM, pooling indices, random and tensor operations
(22:03) RNN, LSTM, and GRU are commonly used layers in recurrent neural networks. In the past, complex subgraphs could be written by hand, but now they can be used directlyMPSGraphLSTMDescriptorandgraph.LSTM(...)。
let descriptor = MPSGraphLSTMDescriptor()

descriptor.inputGateActivation = .sigmoid
descriptor.forgetGateActivation = .sigmoid
descriptor.cellGateActivation = .tanh
descriptor.outputGateActivation = .sigmoid
descriptor.activation = .tanh
descriptor.bidirectional = false
descriptor.training = true

let lstm = graph.LSTM(inputTensor,
                      recurrentWeight: recurrentWeightsTensor,
                      inputWeight: weightsTensor,
                      bias: nil,
                      initState: nil,
                      initCell: nil,
                      descriptor: descriptor,
                      name: nil)
Key points:
MPSGraphLSTMDescriptor()Save the LSTM configuration.- The four gate activations set the activation functions of input, forget, cell, and output gate respectively.
-
descriptor.activationSet the activation function used by the cell output. -bidirectional = falseRepresents a one-way LSTM. -training = trueIndicates the training path used by this LSTM. -graph.LSTM(...)Add the LSTM unit to the calculation graph and pass in input, recurrent weight, input weight and descriptor.
(23:35) Max pooling API can return the indices where the maximum value is located. During training, backpropagation transfers the gradient back to the maximum position, and reusing indices can be up to 6 times faster in PyTorch and TensorFlow.
// Forward pass
let descriptor = MPSGraphPooling4DOpDescriptor(kernelSizes: @[1,1,3,3],
                                               paddingStyle: .TF_SAME)
descriptor.returnIndicesMode = .globalFlatten4D

let [poolingTensor, indicesTensor] = graph.maxPooling4DReturnIndices(sourceTensor,
                                                                     descriptor: descriptor,
                                                                     name: nil)

// Backward pass
let outputShape = graph.shapeOf(destination, name: nil)
let gradientTensor = graph.maxPooling4DGradient(gradient: gradientTensor,
                                                indices: indicesTensor,
                                                outputShape: outputShape,
                                                descriptor: descriptor,
                                                name: nil)
Key points:
MPSGraphPooling4DOpDescriptorDescribe pooling window and padding. -returnIndicesMode = .globalFlatten4DSpecifies the return mode of indices. -maxPooling4DReturnIndicesReturns both pooling results and indices. -indicesTensorCan be cached into the reverse phase of the training pipeline. -maxPooling4DGradientUse indices to pass the gradient back to the position where the maximum value was obtained in the forward pass.
(24:42) The new random operation uses the Philox algorithm. Given the same seed, it returns results consistent with TensorFlow, which can be used for weight initialization of the training graph.
// Declare Philox state tensor
let stateTensor = graph.randomPhiloxStateTensor(seed: 2022, name: nil)

// Declare RandomOp descriptor
let descriptor = MPSGraphRandomOpDescriptor(distribution: .truncatedNormal,
                                            dataType: .float32)
descriptor.mean = -1.0
 descriptor.standardDeviation = 2.5
descriptor.min = descriptor.mean - 2 * descriptor.standardDeviation
descriptor.max = descriptor.mean + 2 * descriptor.standardDeviation

let [randomTensor, stateTensor] = graph.randomTensor(shapeTensor: shapeTensor,
                                                     descriptor: descriptor,
                                                     stateTensor: stateTensor,
                                                     name: nil)
Key points:
randomPhiloxStateTensor(seed:)Create a seeded Philox state tensor. -MPSGraphRandomOpDescriptorSpecify distribution type and data type. -.truncatedNormalRepresents a truncated normal distribution. -mean、standardDeviation、min、maxDefine distribution range. -randomTensor(...)Output a random tensor and a new state tensor; the new state can continue to be passed to the next random operation.
(26:18) MPS Graph also adds a set of tensor transformation operations to expand dimensions, compress dimensions, segment, stack and generate coordinates.
// Expand the input tensor dimensions, 4x2 -> 4x1x2
let expandedTensor = graph.expandDims(inputTensor,
                                      axis: 1,
                                      name: nil)

// Squeeze the input tensor dimensions, 4x1x2 -> 4x2
let squeezedTensor = graph.squeeze(expandedTensor,
                                   axis: 1,
                                   name: nil)

// Split the tensor in two, 4x2 -> (4x1, 4x1)
let [split1, split2] = graph.split(squeezedTensor,
                                   numSplits: 2,
                                   axis: 0,
                                   name: nil)

// Stack the tensor back together, (4x1, 4x1) -> 2x4x1
let stackedTensor = graph.stack([split1, split2],
                                axis: 0,
                                name: nil)
Key points:
expandDims(... axis: 1)Insert a new dimension in dimension 1. -squeeze(... axis: 1)Remove the single-element dimension on dimension 1. -split(... numSplits: 2, axis: 0)Cut the tensor into two equal parts along the 0th dimension. -stack([split1, split2], axis: 0)Re-stack multiple tensors along the 0th dimension.
Core Takeaways
-
What to do: Add the MPS device switch to the PyTorch training script
- Why is it worth doing: The session shows that the MPS backend of PyTorch 1.12 has entered the official package. After the model and input are moved to the MPS device, subsequent tensor operations will go to the GPU.
- How to start: Use first
torch.backends.mps.is_available()Create device, and thenmodel.to(device=mpsDevice)and the input tensordevice=mpsDeviceComplete.
-
What to do: Leave custom losses in TensorFlow training on the GPU
- Why it’s worth doing: Customizing loss back to the CPU will bring synchronization overhead and leave holes in the GPU timeline.
- How to start: Use
REGISTER_OPRegistration operation, inComputepassTF_GetStreamobtainTF_MetalStream, againmetalStream.queueMedium encoding Metal kernel.
-
What to do: Unpack ML post-processing pipeline with shared events
- Why it’s worth doing: Putting compute and post processing in different command queues can take advantage of more GPU parallelism, but data dependencies must be handled.
- How to start: In compute graph
MPSGraphExecutionDescriptorOn the signal shared event, wait for the same event on the descriptor of the post-process graph.
-
What to do: Replace the handwritten LSTM subgraph for the training graph
- Why it’s worth doing: MPS Graph adds a new LSTM operation, and the session clearly points out that it can efficiently encode the GPU work required by the recurrent unit.
- How to get started: Create
MPSGraphLSTMDescriptor, set gate activation, training and other attributes, and then callgraph.LSTM(...)Add units to the diagram.
-
What to do: cache indices during pooling backpropagation
- Why is it worth doing: The max pooling return indices API allows the reverse phase to reuse the maximum value position of forward. The maximum acceleration of PyTorch and TensorFlow training given by the session is 6 times.
- How to start: Use forward
graph.maxPooling4DReturnIndices(...)take outindicesTensor, use backwardgraph.maxPooling4DGradient(...)Pass in the same indices.
Related Sessions
- Discover Metal 3 — An overview of Metal 3, including where machine learning training acceleration fits into Metal 3 capabilities.
- Scale compute workloads across Apple GPUs — Continue to discuss how to split, arrange and improve utilization of GPU compute work.
- Optimize your Core ML usage — Analyze model performance choices on CPU, GPU and Neural Engine from a Core ML perspective.
- Explore the machine learning development experience — Covers the complete development process of machine learning model discovery, transformation, training and evaluation.
Comments
GitHub Issues · utterances