
Highlight
SwiftUI has had obvious shortcomings in window management since its inception: you cannot easily open new windows, manage multiple window instances, or define different types of windows for different scenarios. iOS 16 and macOS Ventura are enhanced with
WindowGroupand introduce newWindowThe scene type greatly improves this situation.
Core Content
SwiftUI app byApp、SceneandViewcomposition.ViewResponsible for the interface,SceneResponsible for placing the interface in shells such as system windows, document windows, and settings windows.
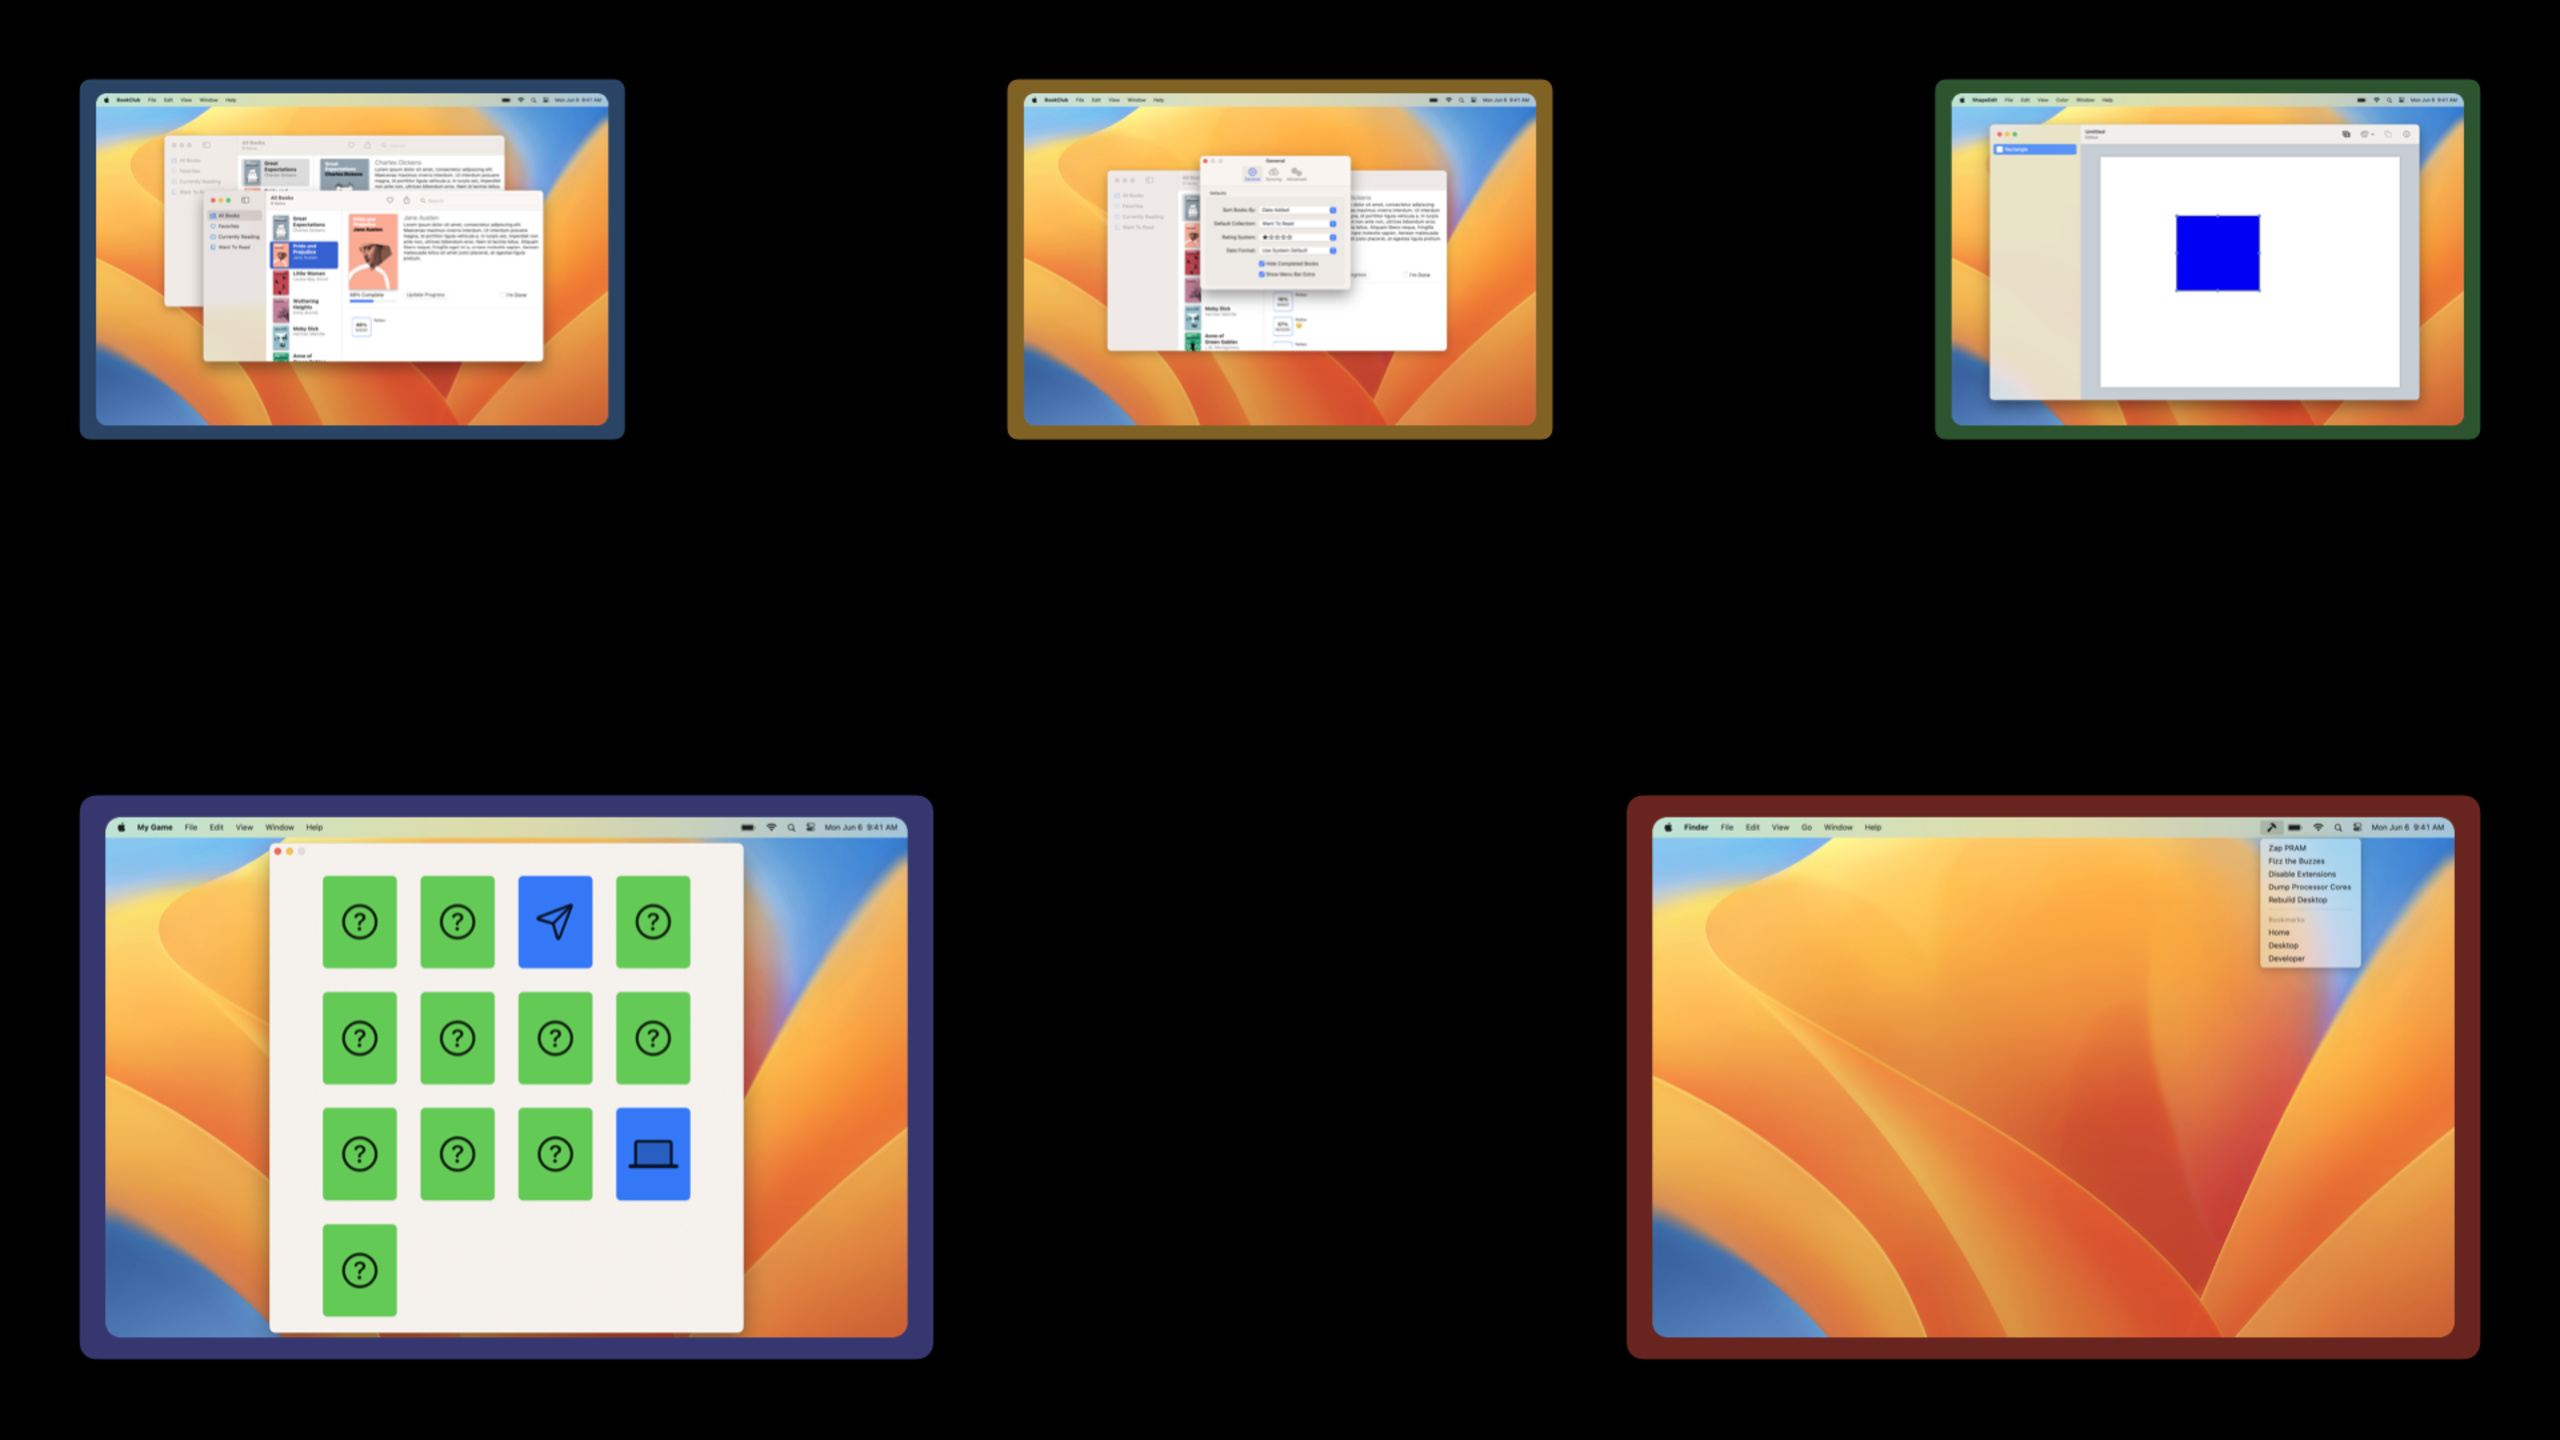
In the past, many SwiftUI apps had only oneWindowGroup. This is enough for the main window, but once you want to make a desktop-level experience, you will encounter specific problems: the reading list needs a separate activity statistics window; book details are suitable for opening new windows from the context menu; the Documents app needs to create new documents or open existing files from buttons; and menu bar tools want to be permanent in the system menu bar.
This session breaks these questions into three categories.
The first type is the new scene type.WindowRepresents a single window, suitable for global status;MenuBarExtraIt is a macOS-specific scene and will place a permanent entry in the system menu bar.
The second category is to actively open the window from the interface code. SwiftUI is provided through the environmentopenWindow、newDocument、openDocument. The button does not need to know the AppKit or UIKit window object, it only needs to call the corresponding action.
The third category is window behavior customization. Scenes can now remove default commands, specify default positions and sizes, and bind keyboard shortcuts for opening windows. In this way, the window is no longer just the default behavior of the system, but part of the app structure.
Detailed Content
Scene can be combined: one App defines multiple entrances
(02:01) SwiftUI’s App body can return multiple scenes. For main interfaceWindowGroup, for document interfaceDocumentGroup, for macOS settingsSettings. Each scene describes a system-level entry point.
import SwiftUI
import UniformTypeIdentifiers

@main
struct MultiSceneApp: App {
    var body: some Scene {
        WindowGroup {
            ContentView()
        }

        #if os(iOS) || os(macOS)
        DocumentGroup(viewing: CustomImageDocument.self) { file in
            ImageViewer(file.document)
        }
        #endif

        #if os(macOS)
        Settings {
            SettingsView()
        }
        #endif
    }
}

struct ContentView: View {
    var body: some View {
        Text("Content")
    }
}

struct ImageViewer: View {
    var document: CustomImageDocument

    init(_ document: CustomImageDocument) {
        self.document = document
    }

    var body: some View {
        Text("Image")
    }
}

struct SettingsView: View {
    var body: some View {
        Text("Settings")
    }
}

struct CustomImageDocument: FileDocument {
    var data: Data

    static var readableContentTypes: [UTType] { [UTType.image] }

    init(configuration: ReadConfiguration) throws {
        guard let data = configuration.file.regularFileContents
        else {
            throw CocoaError(.fileReadCorruptFile)
        }
        self.data = data
    }

    func fileWrapper(configuration: WriteConfiguration) throws -> FileWrapper {
        FileWrapper(regularFileWithContents: data)
    }
}
Key points:
WindowGroupDefines a normal app window, which can have multiple instances on platforms that support multi-window. -DocumentGroupBind the file type to the document interface, and the system is responsible for the life cycle of the document window. -SettingsCompiled only on macOS, it represents the app’s settings interface. -CustomImageDocumentobeyFileDocument,passreadableContentTypesDeclare the file types that can be read.
Window: Give the global state a unique window
(04:38)WindowIt is a new scene type added in 2022. it andWindowGroupThe difference is clear: the sameWindowscene will only have one window instance. The Activity window of BookClub displays global reading activities. It makes no sense to open multiple ones repeatedly, so it is suitable to useWindow。
import SwiftUI

@main
struct BookClub: App {
    @StateObject private var store = ReadingListStore()

    var body: some Scene {
        WindowGroup {
            ReadingListViewer(store: store)
        }
        Window("Activity", id: "activity") {
            ReadingActivity(store: store)
        }
    }
}

struct ReadingListViewer: View {
    @ObservedObject var store: ReadingListStore

    var body: some View {
        Text("Reading List")
    }
}

struct ReadingActivity: View {
    @ObservedObject var store: ReadingListStore

    var body: some View {
        Text("Reading Activity")
    }
}

class ReadingListStore: ObservableObject {
}
Key points:
@StateObject private var storeput onAppHere, the main window and Activity window share the same app state. -WindowGroupContinue to be responsible for the main interface of the reading list. -Window("Activity", id: "activity")Define a singleton window with an identifier. -id: "activity"Will be lateropenWindow(id:)When used, the string must match the scene definition.
(05:34) When opening this window, remove it from the environmentopenWindow, just call it in the button action. If the window already exists, the system will bring the existing window to the foreground.
struct OpenWindowButton: View {
    @Environment(\.openWindow) private var openWindow

    var body: some View {
        Button("Open Activity Window") {
            openWindow(id: "activity")
        }
    }
}
Key points:
@Environment(\.openWindow)Read the window opening action provided by SwiftUI. -ButtonThe action is called directlyopenWindow, without touching the platform window object. -openWindow(id: "activity")Corresponding to the aboveWindowscene identifier.
WindowGroup can open the details window by value
(05:57) The details page is not suitable for useWindow. Each book may have its own details window, so usefor:parameters newWindowGroupInitializer. The button passes in the book ID, and the scene creates or reuses the window based on the ID.
import SwiftUI

@main
struct BookClub: App {
    @StateObject private var store = ReadingListStore()

    var body: some Scene {
        WindowGroup {
            ReadingListViewer(store: store)
        }
        Window("Activity", id: "activity") {
            ReadingActivity(store: store)
        }
        WindowGroup("Book Details", for: Book.ID.self) { $bookId in
            BookDetail(id: $bookId, store: store)
        }
    }
}

struct OpenWindowButton: View {
    var book: Book
    @Environment(\.openWindow) private var openWindow

    var body: some View {
        Button("Open In New Window") {
            openWindow(value: book.id)
        }
    }
}

struct BookDetail: View {
    @Binding var id: Book.ID?
    @ObservedObject var store: ReadingListStore

    var body: some View {
        Text("Book Details")
    }
}

struct Book: Identifiable {
    var id: UUID
}

class ReadingListStore: ObservableObject {
}
Key points:
WindowGroup("Book Details", for: Book.ID.self)Declare this scene to receiveBook.IDDisplay value of type. -openWindow(value: book.id)Only by passing in the same type can SwiftUI find the corresponding scene.- what the view builder receives is
Binding<Book.ID?>, the details view can update this value after opening. - The talk recommends passing the model identifier instead of the entire value type model. This way multiple windows still pass
storepoint to the same data. - Incoming values must comply with
HashableandCodable: The former is used to match open windows, and the latter is used to restore status.
(09:36) This matching rule solves the duplicate window problem. When the same book is already open, if you open it again from the context menu, the system will reuse the existing window and move it to the front.
The document window also has environment actions
(06:16) The documentation app can be usednewDocumentCreate a new document window. The premise is that the App defines an editor with an editor roleDocumentGroup, and the incoming document type matches.
import SwiftUI
import UniformTypeIdentifiers

@main
struct TextFileApp: App {
    var body: some Scene {
        DocumentGroup(viewing: TextFile.self) { file in
            TextEditor(text: file.$document.text)
        }
    }
}

struct NewDocumentButton: View {
    @Environment(\.newDocument) private var newDocument

    var body: some View {
        Button("Open New Document") {
            newDocument(TextFile())
        }
    }
}

struct TextFile: FileDocument {
    var text: String

    static var readableContentTypes: [UTType] { [UTType.plainText] }

    init() {
        text = ""
    }

    init(configuration: ReadConfiguration) throws {
        guard let data = configuration.file.regularFileContents,
              let string = String(data: data, encoding: .utf8)
        else {
            throw CocoaError(.fileReadCorruptFile)
        }
        text = string
    }

    func fileWrapper(configuration: WriteConfiguration) throws -> FileWrapper {
        let data = text.data(using: .utf8)!
        return FileWrapper(regularFileWithContents: data)
    }
}
Key points:
DocumentGroup(viewing: TextFile.self)BundleTextFileDocumentation andTextEditorThe interface is connected. -@Environment(\.newDocument)Get the action of creating a new document. -newDocument(TextFile())Each call will use a new oneTextFilevalue opens the document window. -TextFilepassFileDocumentHandles file reading and writing back.
(06:41) There are already files availableopenDocument. It receives a file URL and is an asynchronous, error-throwing call.
struct OpenDocumentButton: View {
    var documentURL: URL
    @Environment(\.openDocument) private var openDocument

    var body: some View {
        Button("Open Document") {
            Task {
                do {
                    try await openDocument(at: documentURL)
                } catch {
                    // Handle error
                }
            }
        }
    }
}
Key points:
@Environment(\.openDocument)Get the action to open an existing document. -TaskUsed to call asynchronousopenDocument(at:)。documentURLPoints to a file on disk. -catchThe branch handles errors such as file failure to open, type mismatch, etc.
MenuBarExtra: macOS menu bar also becomes Scene
(03:01)MenuBarExtraIt is a macOS-specific scene. It does not display the main window first, but displays a label in the system menu bar. When clicked, the menu or borderless window is displayed.
import SwiftUI

@main
struct UtilityApp: App {
    var body: some Scene {
        MenuBarExtra("Utility App", systemImage: "hammer") {
            AppMenu()
        }
    }
}

struct AppMenu: View {
    var body: some View {
        Text("App Menu Item")
    }
}
Key points:
MenuBarExtraappear directly inAppin the scene list.- The first parameter is the menu bar item title.
-
systemImageUse SF Symbol as menu bar icon. - Content closure returns the SwiftUI view displayed when the menu bar item is clicked.
(03:49) The default style will pull down a menu. If the content is more like a dashboard, you can change it to a window style.
import SwiftUI

@main
struct UtilityApp: App {
    var body: some Scene {
        MenuBarExtra("Time Tracker", systemImage: "rectangle.stack.fill") {
            TimeTrackerChart()
        }
        .menuBarExtraStyle(.window)
    }
}

struct TimeTrackerChart: View {
    var body: some View {
        Text("Time Tracker Chart")
    }
}
Key points:
.menuBarExtraStyle(.window)Change the presentation to a borderless window anchored to the menu bar item.- This style is suitable for content such as charts and control panels that require more space.
-
MenuBarExtraIt can be used as a separate tool app or in combination with the main window scene.
Scene modifiers control window commands, position, size and shortcut keys
(11:16) MultipleWindowGroupWill bring up the default menu commands. The default command for this scene can be removed when Book details can only be opened from the context menu.
WindowGroup("Book Details", for: Book.ID.self) { $bookId in
    BookDetail(id: $bookId, store: store)
}
.commandsRemoved()
Key points:
commandsRemoved()Acts on the scene.- It removes the default commands automatically provided by this scene.
- In the lecture example, it leaves the File menu open only
WindowGroupproject.
(11:46) When a scene needs to have multiple modifiers, you can customize itScene. This way the App definition is shorter and easier to reuse.
struct ReadingActivityScene: Scene {
    @ObservedObject var store: ReadingListStore

    var body: some Scene {
        Window("Activity", id: "activity") {
            ReadingActivity(store: store)
        }
        #if os(macOS)
        .defaultPosition(.topTrailing)
        .defaultSize(width: 400, height: 800)
        #endif
        #if os(macOS) || os(iOS)
        .keyboardShortcut("0", modifiers: [.option, .command])
        #endif
    }
}
Key points:
ReadingActivitySceneobeyScene,andViewThe idea of extracting components is the same. -.defaultPosition(.topTrailing)Specifies the window’s default position when there is no history state. -.defaultSize(width: 400, height: 800)Give the window an initial size and the window can still be resized. -.keyboardShortcut("0", modifiers: [.option, .command])Bind the command that opens this scene to Option-Command-0. -#if os(macOS)and#if os(macOS) || os(iOS)Platform boundaries are preserved to avoid compiling related modifiers on unsupported platforms.
Core Takeaways
-
Make a details window of a reading or learning app: The list remains in the main window, and the item details are displayed in
WindowGroup("Details", for: Item.ID.self)Open. Start by asking the model to obeyIdentifiable, called from the buttonopenWindow(value: item.id)。 -
Make a global status panel: Statistics, activity records, synchronization status and other content are suitable
Window("Activity", id: "activity"). Put the shared status inAppof@StateObject, both the main window and the auxiliary window read the same store. -
Make a menu bar tool: timer, clipboard, build status can all be used
MenuBarExtraThe resident macOS menu bar. Use the default menu style when the content is simple; add it when charts or complex controls are needed..menuBarExtraStyle(.window)。 -
Add desktop-level entry to windows: Commonly used windows can be added
.keyboardShortcut. If a window should only be opened from the business entrance, use.commandsRemoved()Remove the default menu command to prevent users from opening an empty window without context from the File menu. -
Add a quick open button to the document app: for creating new files
newDocument(DocumentType()), used to open existing filestry await openDocument(at: url). Confirm firstDocumentGroupSupport the corresponding document type, and then access the environment action in the button.
Related Sessions
- What’s new in SwiftUI — SwiftUI 2022 overview, including scene, navigation, layout, and cross-platform structural updates.
- The SwiftUI cookbook for navigation — Explains SwiftUI navigation state, deep link and state recovery, adjacent to the idea of opening windows by value.
- SwiftUI on iPad: Organize your interface — Explains SwiftUI columns, selections, and context menus on iPad, which are the interface foundation for multi-window experience.
- Build a desktop-class iPad app — From a UIKit perspective, a desktop-class iPad app is complementary to the iPadOS/macOS window capabilities in this field.
Comments
GitHub Issues · utterances