
Highlight
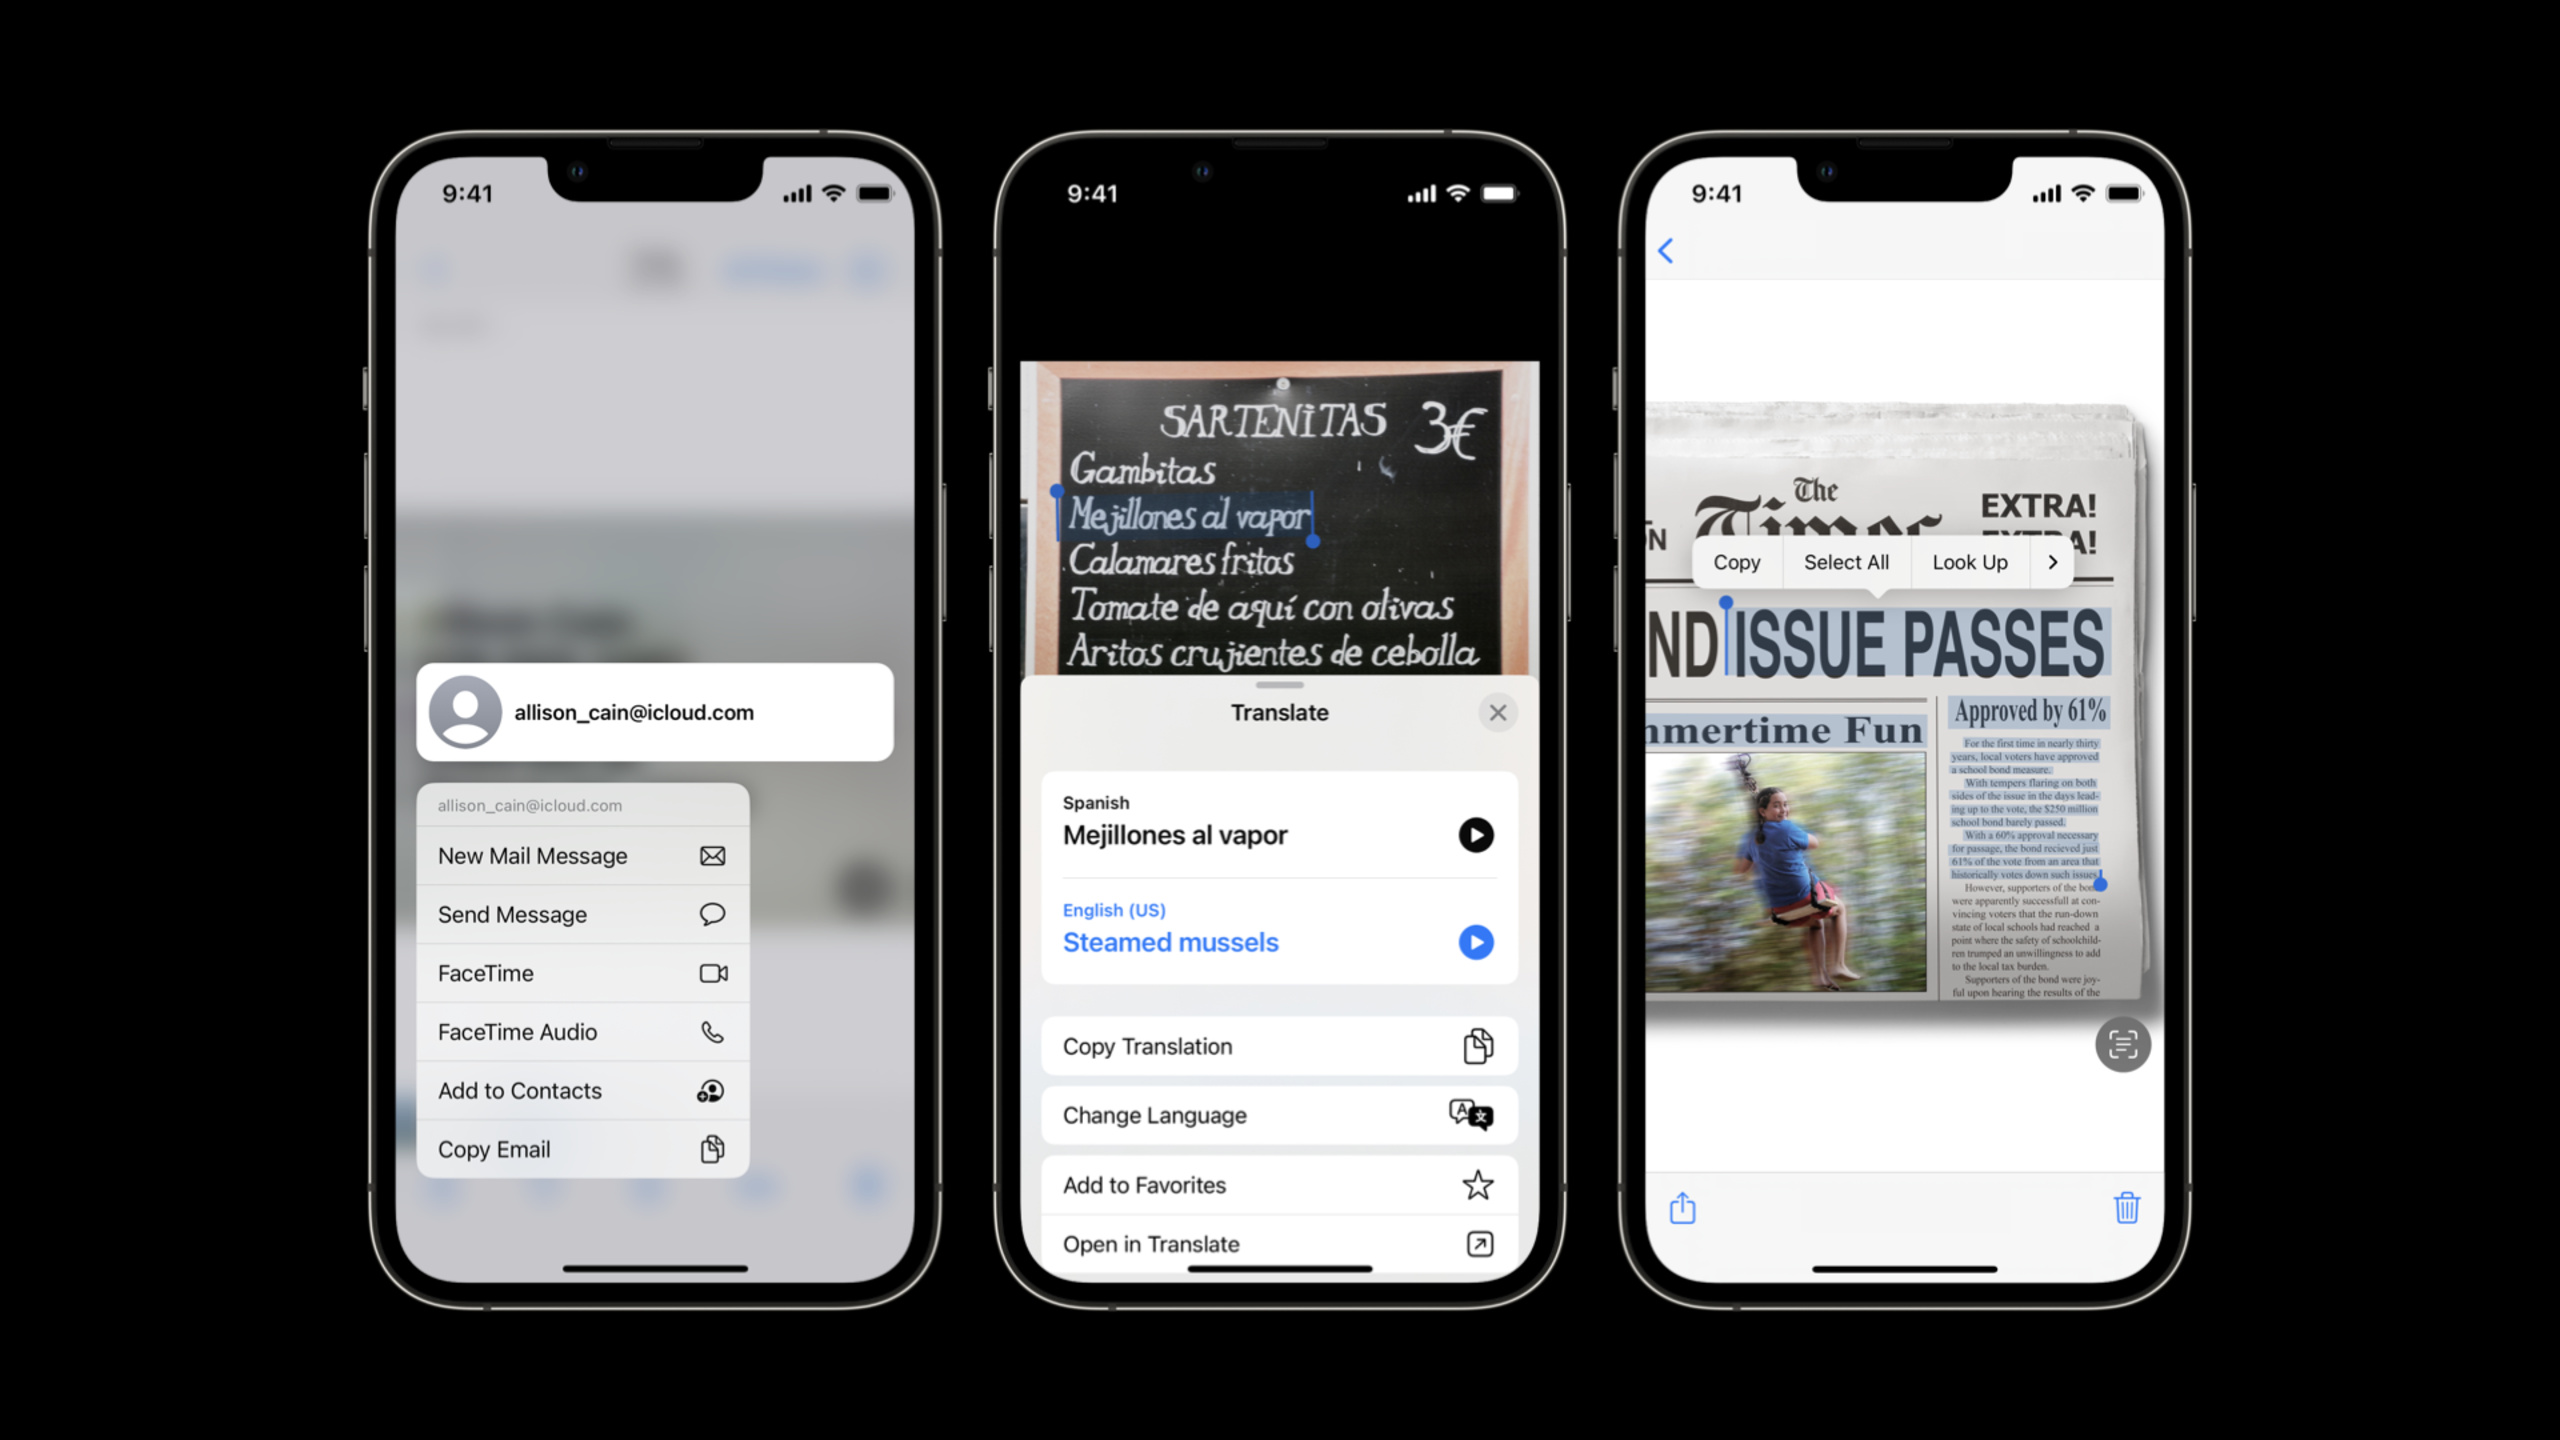
iOS 16 VisionKit lets apps add Live Text to still images and paused video frames so users can select text, translate content, trigger data detection for addresses and phone numbers, and interact with QR codes.
Core Content
A typical image viewer only displays, zooms, and pans images. When an image contains phone numbers, addresses, URLs, or QR codes, users must copy manually or save to the system Photos library to use Live Text.
This session covers iOS 16 and macOS 13 VisionKit APIs. They expose the system’s Live Text interaction layer to apps. You provide an image; ImageAnalyzer analyzes asynchronously; results are stored as ImageAnalysis and handed to ImageAnalysisInteraction or macOS ImageAnalysisOverlayView to show the interaction layer (01:33).
The demo project is an image viewer inside a scroll view. After adding Live Text, users can select text, copy, look up, translate, tap phone numbers to dial, tap addresses to open Maps, and interact with QR codes (04:20).
The API focus is control. You can use .automatic for system default behavior, or enable only text selection or only data detection. The bottom Live Text button and Quick Actions can also be hidden, inset, or given custom fonts (05:26).
Detailed Content
1. Minimal integration: analyze the image, then hand results to interaction (02:37)
Official code compresses integration into three objects: ImageAnalyzer, ImageAnalysisInteraction, and ImageAnalyzer.Configuration. When the image changes, clear old analysis results first, then start new async analysis. After analysis completes, confirm the currently displayed image has not been swapped.
import UIKit
import VisionKit

class LiveTextDemoController: BaseController, ImageAnalysisInteractionDelegate, UIGestureRecognizerDelegate {

    let analyzer = ImageAnalyzer()
    let interaction = ImageAnalysisInteraction()

    override func viewDidLoad() {
        super.viewDidLoad()
        imageview.addInteraction(interaction)
    }

    override var image: UIImage? {
        didSet {
            interaction.preferredInteractionTypes = []
            interaction.analysis = nil
            analyzeCurrentImage()
        }
    }

    func analyzeCurrentImage() {
        if let image = image {
            Task {
               let configuration = ImageAnalyzer.Configuration([.text, .machineReadableCode])
                do {
                    let analysis = try await analyzer.analyze(image, configuration: configuration)
                    if let analysis = analysis, image == self.image {
                        interaction.analysis = analysis;
                        interaction.preferredInteractionTypes = .automatic
                    }
                }
                catch {
                    // Handle error…
                }
            }
        }
    }
}
Key points:
import VisionKitbrings in the Live Text framework.let analyzer = ImageAnalyzer()creates the image analyzer. The session recommends sharing one analyzer across the app for better system resource use (12:12).let interaction = ImageAnalysisInteraction()creates the interaction object on iOS and macOS.imageview.addInteraction(interaction)attaches the interaction layer to the view holding the image.- When the image changes,
preferredInteractionTypes = []andanalysis = nilclear interaction state from the old image. ImageAnalyzer.Configuration([.text, .machineReadableCode])tells the analyzer to find both text and machine-readable codes.try await analyzer.analyze(image, configuration: configuration)generates analysis results asynchronously.image == self.imageprevents old analysis from covering a new image if the UI switched while analysis ran.interaction.analysis = analysishands recognition results to the interaction layer.preferredInteractionTypes = .automaticuses system default Live Text behavior.
This example also explains why old state must be cleared first. Analysis takes an uncertain amount of time. Users may switch to the next image during analysis. Without checking the current image, old results could cover the new one.
2. Interaction types: trade off between text selection and data detection (05:26)
preferredInteractionTypes decides what users can do. .automatic provides text selection and underlines data detection items when the Live Text button is active, matching built-in system apps.
Conceptual example:
// Conceptual Swift based on the session transcript.
interaction.preferredInteractionTypes = .automatic
Key points:
.automaticis the default behavior the session recommends for most apps.- Text can be selected, copied, looked up, and translated.
- After the Live Text button activates, addresses, phone numbers, URLs, and other data detection items get one-tap actions.
If the app only wants text selection, use .textSelection. In this mode, Live Text button state does not change interaction type.
// Conceptual Swift based on the session transcript.
interaction.preferredInteractionTypes = .textSelection
Key points:
.textSelectionkeeps only text selection.- Data detection does not appear automatically based on Live Text button state.
- Good for image editing, annotation, and interfaces that need fewer accidental taps.
If the app only needs action entry points for addresses, phones, URLs, etc., use .dataDetectors. The session states this mode does not show the Live Text button because text selection is disabled.
// Conceptual Swift based on the session transcript.
interaction.preferredInteractionTypes = .dataDetectors
Key points:
.dataDetectorsdisables text selection.- Detected items are underlined directly.
- Users can trigger the corresponding action with one tap.
One more detail: in text selection or .automatic mode, long press can still trigger data detection. This is controlled by allowLongPressForDataDetectorsInTextMode, enabled by default (06:21).
// Conceptual Swift based on the session transcript.
interaction.allowLongPressForDataDetectorsInTextMode = false
Key points:
- The property name shows scope: it only affects long-press data detection in text mode.
- Setting
falsecan reduce conflicts with the app’s own long-press gestures. - Text selection itself is unaffected by this setting.
3. Supplementary interface: handle the Live Text button and Quick Actions (06:43)
The system’s bottom Live Text interface is managed by the interaction. The Live Text button is bottom-right; Quick Actions are bottom-left. Quick Actions come from data detection items in analysis results and appear only when the Live Text button is active.
If the app already has its own bottom toolbar, hide the supplementary interface and keep text selection only.
// Conceptual Swift based on the session transcript.
interaction.isSupplementaryInterfaceHidden = true
Key points:
isSupplementaryInterfaceHiddencontrols visibility of the Live Text button and Quick Actions.- When
true, users can still operate on image content within enabled interaction types. - Good for image browsers with dense bottom UI.
If you only want to avoid covering existing buttons, adjust insets so the system interface avoids app content.
// Conceptual Swift based on the session transcript.
interaction.supplementaryInterfaceContentInsets = UIEdgeInsets(
    top: 0,
    left: 0,
    bottom: 44,
    right: 16
)
Key points:
supplementaryInterfaceContentInsetstells VisionKit which edges to avoid.- Bottom inset leaves space for the app’s own toolbar.
- Right inset can avoid floating buttons.
- Values here are conceptual; real projects should compute from layout.
If the app uses custom fonts, Live Text button and Quick Actions can use the same font. The session notes that to keep button size consistent, Live Text ignores point size (07:52).
// Conceptual Swift based on the session transcript.
interaction.supplementaryInterfaceFont = UIFont.preferredFont(forTextStyle: .body)
Key points:
supplementaryInterfaceFontaffects font weight for text and symbols.- Point size is not used for button dimensions.
- This property suits image viewers that need unified visual style.
4. Non-UIImageView: align highlights with contentsRect (08:10)
UIImageView can use its own contentMode to compute image content area automatically. Custom views lack this convenience. Interaction bounds may be larger than the actual displayed image area, causing text highlights to misalign with image content.
Fix this by implementing delegate method contentsRectForInteraction, returning the image content rectangle in unit coordinate space.
// Conceptual Swift based on the session transcript.
func contentsRect(for interaction: ImageAnalysisInteraction) -> CGRect {
    return CGRect(x: 0.1, y: 0.2, width: 0.8, height: 0.6)
}
Key points:
contentsRectuses unit coordinate space normalized to view bounds.- The returned rectangle describes image content position relative to interaction bounds.
- Example values illustrate shape only; real projects must compute from current layout.
- When interaction bounds change, VisionKit re-queries this rect.
If image content area changes but interaction bounds do not, actively notify VisionKit to update.
// Conceptual Swift based on the session transcript.
interaction.setContentsRectNeedsUpdate()
Key points:
setContentsRectNeedsUpdate()requests a fresh contents rect.- Good when crop, content mode, or custom layout changes.
- No need to re-analyze the image; only update correspondence between interaction layer and content area.
When an image sits in a scroll view, the session advises placing the interaction on the view holding image content, not on the scroll view (09:18). Scroll view visible area and zoom change continuously, making contents rect harder to maintain.
5. Gesture conflicts: let the app and Live Text each handle their own events (10:08)
Live Text brings its own complex gestures. Image browsers, annotation tools, and map screenshot viewers may have their own tap, long-press, and drag gestures. When conflicts appear, handle them from two directions.
First, prevent Live Text from starting interaction at certain points. The session recommends implementing interaction(_:shouldBeginAt:for:): if there is no interactive item under the point and no active text selection, return false so Live Text does not handle the action.
Conceptual flow: Live Text delegate decides whether to begin interaction
1. Receive interaction, touch point, interactionType
2. Check whether there is a Live Text interactive item under the point
3. Check whether there is active text selection
4. If neither, return false
5. Otherwise return true and let Live Text continue
Key points:
interaction(_:shouldBeginAt:for:)is the entry point for Live Text gesture conflicts.- “Interactive item under point” covers text, links, phone, address, QR code, and other analysis results.
- “Active text selection” preserves tapping blank space to cancel selection.
- Returning
falsemeans Live Text does not perform the corresponding action.
Second, let the app’s own gesture recognizer yield when Live Text needs events. The session’s approach is the same check inside gestureRecognizerShouldBegin.
Conceptual flow: App gesture recognizer decides whether to begin
1. Read touch point from gestureRecognizer
2. Convert point to window coordinates first
3. Then convert to coordinates in the interaction's view
4. If that point has a Live Text interactive item, return false
5. If there is active text selection, return false
6. Otherwise return true and let the app's gesture continue
Key points:
- Converting to window coordinates first, then to the interaction view, helps in scroll view zoom scenarios.
- The session specifically notes trying this coordinate conversion if points do not align.
- Returning
falseprevents the app’s gesture from starting so Live Text can take over.
The session also mentions overriding UIView’s hitTest(_:with:) for similar decisions, routing events by hit location (11:46).
6. Performance and video frames: reduce conversion, analyze only what you need (12:00)
ImageAnalyzer uses the Neural Engine efficiently but still needs to be called at the right UI moments. The session gives three rules.
First, share one ImageAnalyzer across the app when possible. Second, pass the raw image type you already have to reduce format conversion; if you already have CVPixelBuffer, it is the most efficient input. Third, analyze only when the image is about to appear or has appeared. In timeline scenarios, start analysis after scrolling stops (12:12).
Conceptual example:
// Conceptual Swift based on the session transcript.
final class LiveTextAnalyzerStore {
    static let sharedAnalyzer = ImageAnalyzer()
}
Key points:
static letmeans one shared analyzer in the app.- Sharing avoids creating multiple analyzers across pages.
- Real projects should also cancel unneeded analysis tasks based on page lifecycle.
Video has two entry points. With AVPlayerView or AVPlayerViewController, iOS 16 supports paused-frame Live Text by default through allowsVideoFrameAnalysis, only for non-FairPlay protected content (13:12).
// Conceptual Swift based on the session transcript.
playerViewController.allowsVideoFrameAnalysis = true
Key points:
allowsVideoFrameAnalysiscontrols AVKit paused-frame analysis.- The session notes it is enabled by default.
- FairPlay protected content does not support this capability.
With AVPlayerLayer, the app manages analysis and interaction itself. The key is currentlyDisplayedPixelBuffer for the current frame. The session states this is the only way to guarantee analyzing the correct frame. It returns a valid value only when playback rate is zero; it returns a shallow copy that must not be written (13:32).
// Conceptual Swift based on the session transcript.
if player.rate == 0,
   let pixelBuffer = playerLayer.currentlyDisplayedPixelBuffer {
    Task {
        let configuration = ImageAnalyzer.Configuration([.text, .machineReadableCode])
        let analysis = try await analyzer.analyze(pixelBuffer, configuration: configuration)
        interaction.analysis = analysis
        interaction.preferredInteractionTypes = .automatic
    }
}
Key points:
player.rate == 0corresponds to paused-frame scenarios.currentlyDisplayedPixelBufferreads the video frame currently on screen.analyze(pixelBuffer, configuration:)avoids converting the video frame to another image type first.interaction.analysis = analysishands results to the interaction layer.- The example does not show full error handling and state checks; real projects should handle async completion like the still-image example.
Core Takeaways
-
What to do: Add “select text in image and copy” to an image notes app. Why it’s worth it: Live Text handles OCR, selection gestures, and the copy menu; the app does not need its own OCR interaction layer. How to start: Add
ImageAnalysisInteractionto the image view; analyze the current image withImageAnalyzer.Configuration([.text]). -
What to do: Add one-tap dial, open Maps, and visit URL for receipt, business card, and poster images. Why it’s worth it:
.automaticand.dataDetectorsturn phone numbers, addresses, and URLs into tappable actions. How to start: SetpreferredInteractionTypesto.automatic; if the interface only needs action entry points, use.dataDetectors. -
What to do: Keep a custom bottom toolbar in an image viewer while enabling Live Text. Why it’s worth it: The supplementary interface can be hidden or avoided with content insets. How to start: Integrate interaction first, then choose
isSupplementaryInterfaceHiddenorsupplementaryInterfaceContentInsetsbased on UI density. -
What to do: Add paused-frame text and QR code recognition to a video player. Why it’s worth it: AVKit already provides default paused-frame analysis for
AVPlayerViewandAVPlayerViewController; customAVPlayerLayercan join the same analysis flow via the current pixel buffer. How to start: For AVKit, confirmallowsVideoFrameAnalysis; for custom layer, readcurrentlyDisplayedPixelBufferwhen paused and hand it toImageAnalyzer. -
What to do: Add controllable Live Text to an image annotation app with zoom and gestures. Why it’s worth it: Delegate and gesture recognizer delegate can separate text selection, annotation drag, and tap-blank-to-cancel selection. How to start: Put interaction on the image view first, then use
interactionShouldBeginAtPointandgestureRecognizerShouldBeginfor conflicting points.
Related Sessions
- Capture machine-readable codes and text with VisionKit — Uses
DataScannerViewControllerfor text and machine-readable codes in a live camera feed, complementing this session’s still images and paused video frames. - What’s new in Vision — Explains Vision text recognition, barcode detection, and model revision updates to understand recognition behind Live Text.
- Create a great video playback experience — Introduces system media player updates on iOS and iPadOS, covering video Live Text and paused-frame playback experience.
Comments
GitHub Issues · utterances