
Highlight
For live data scanning on iOS, previous options were either AVFoundation metadata output (machine codes only) or combining AVFoundation with Vision (more code, awkward coordinate conversion). iOS 16’s
DataScannerViewControllerwraps all of that into a ready-to-use ViewController.
Core Content
Building a scan UI used to offer two paths.
For QR codes and barcodes only, you could use AVFoundation: wire inputs and outputs to a capture session and get AVMetadataObject. For text too, you connected AVFoundation and Vision: camera outputs sample buffers, Vision runs text or barcode requests, then you map observations back to the UI.
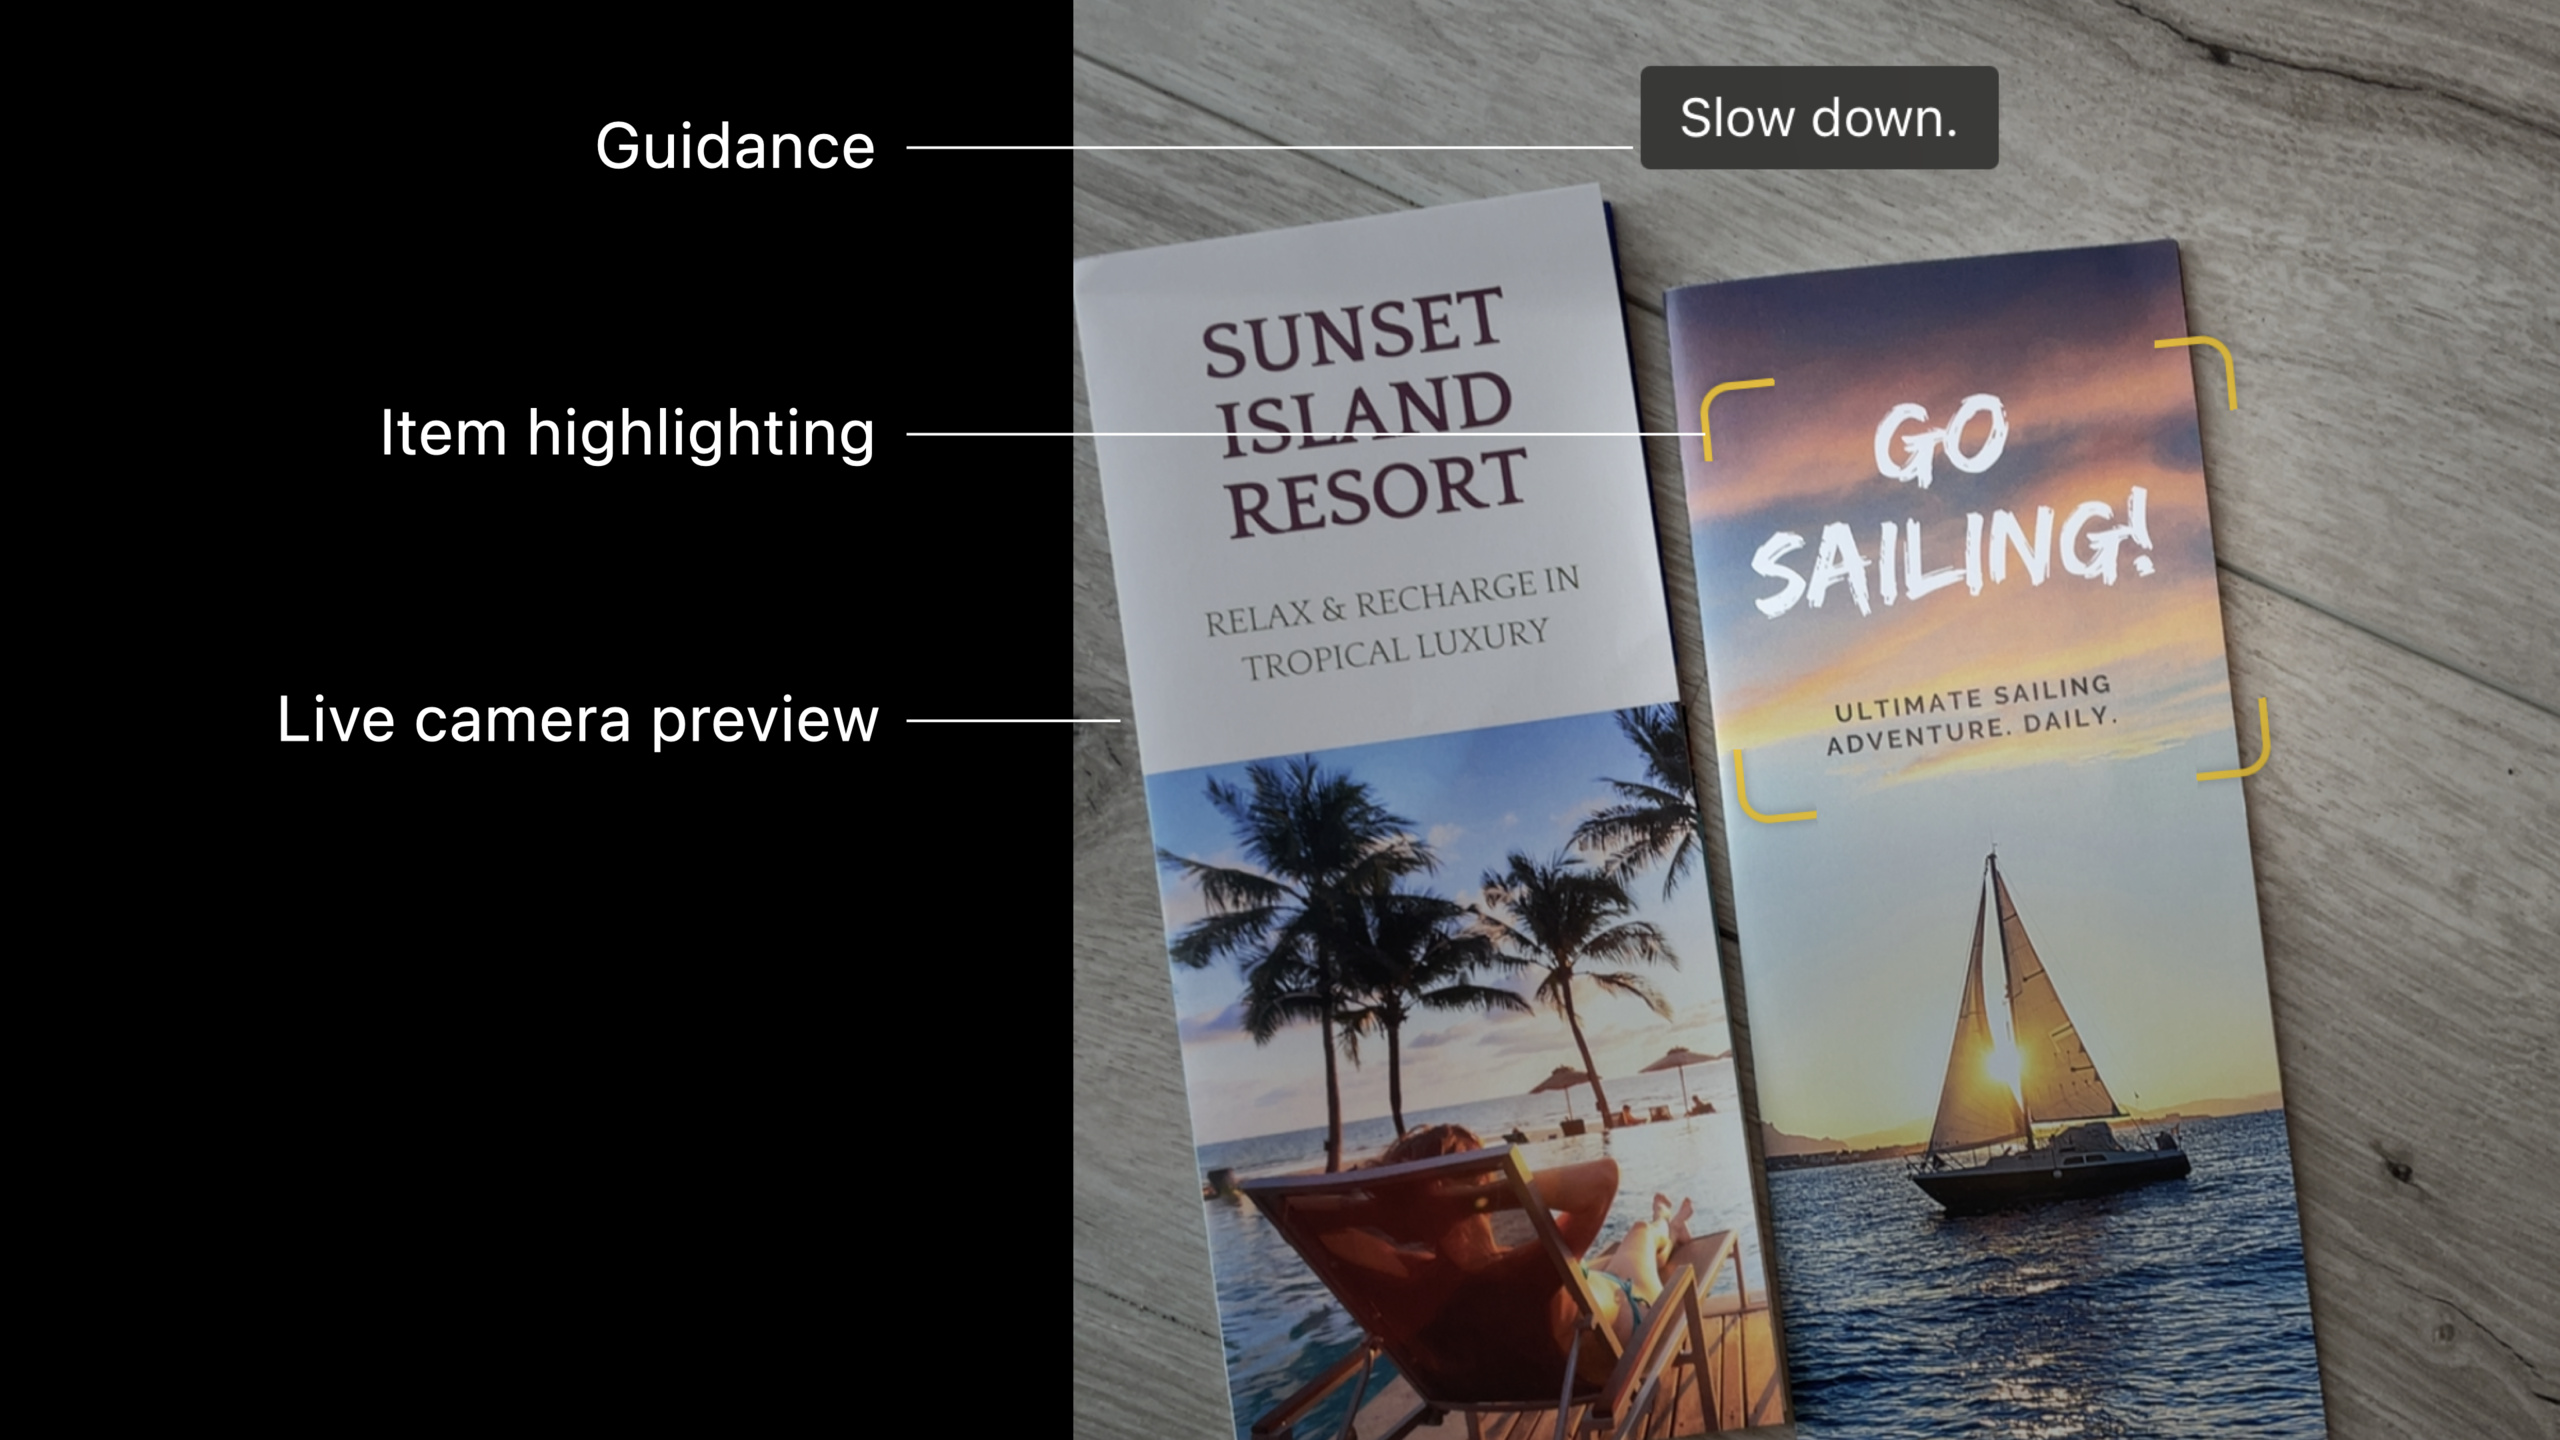
The hard part is not recognition itself. It is live camera preview, user permission, tap-to-focus, pinch-to-zoom, item highlighting, and converting from image space to Vision coordinates to view coordinates.
DataScannerViewController is the iOS 16 option. In VisionKit, it wraps AVFoundation and Vision in a UIViewController subclass. Specify what to recognize, present it, call startScanning(). Camera preview, guidance text, system highlights, tap-to-focus, and zoom are all handled by the system.
It fits straightforward scenarios: warehouse picking, checkout, receipt entry, on-site inventory. These apps’ main work starts after data is scanned. Data Scanner shortens the scanning part.
Detailed Content
Check device and permission first
(04:01) Data Scanner is not supported on all devices. Apple states in the talk that iPhones and iPads from 2018 onward with Apple Neural Engine support it.
So the entry button should not always show. Use isSupported for hardware support, then isAvailable for current availability. isAvailable is affected by camera permission and device restrictions, such as camera access limits in Screen Time.
import VisionKit

if DataScannerViewController.isSupported,
   DataScannerViewController.isAvailable {
    showScanButton()
} else {
    hideScanButton()
}
Key points:
import VisionKitbrings inDataScannerViewController.isSupportedchecks whether device hardware supports live data scanning.isAvailablechecks whether scanning is allowed now, including camera permission and system restrictions.- When conditions are not met, hide the entry to avoid a broken scan flow.
Also add a camera usage description in Info.plist. The talk reminds you to explain why the camera is needed so users know what they are authorizing.
Create the scanner
(04:40) When creating the scanner, the most important parameter is recognizedDataTypes. It tells the system what to look for.
The official example scans QR codes first and also shows how to switch to text, specify languages, or find URLs only.
import VisionKit

// Specify the types of data to recognize
let recognizedDataTypes:Set<DataScannerViewController.RecognizedDataType> = [
    .barcode(symbologies: [.qr]),
    // uncomment to filter on specific languages (e.g., Japanese)
    // .text(languages: ["ja"])
    // uncomment to filter on specific content types (e.g., URLs)
    // .text(textContentType: .URL)
]

// Create the data scanner, present it, and start scanning!
let dataScanner = DataScannerViewController(recognizedDataTypes: recognizedDataTypes)
present(dataScanner, animated: true) {
    try? dataScanner.startScanning()
}
Key points:
Set<DataScannerViewController.RecognizedDataType>can include both machine codes and text..barcode(symbologies: [.qr])limits machine code recognition to QR codes..text(languages: ["ja"])passes language hints for text recognition; the talk specifically mentions Japanese and Korean as new iOS 16 Live Text languages..text(textContentType: .URL)lets the scanner look only for specific semantic text such as URLs.DataScannerViewController(recognizedDataTypes:)creates a normal view controller usable full screen, as a sheet, or in a custom hierarchy.- Call
startScanning()after presentation completes to search the live video stream for data.
(06:29) Initialization parameters can also control experience. qualityLevel can be balanced, fast, or accurate. Apple recommends starting with balanced. Large clear text can use fast; very small QR codes or serial numbers can use accurate.
let dataScanner = DataScannerViewController(
    recognizedDataTypes: recognizedDataTypes,
    qualityLevel: .balanced,
    recognizesMultipleItems: true,
    isHighFrameRateTrackingEnabled: true,
    isPinchToZoomEnabled: true,
    isGuidanceEnabled: true,
    isHighlightingEnabled: true
)
Key points:
qualityLevel: .balancedis the starting point for most scenarios.recognizesMultipleItems: trueallows multiple items in one frame, good for scanning several barcodes at once.isHighFrameRateTrackingEnabledkeeps custom highlights tighter on moving targets.isPinchToZoomEnabledcontrols whether users can pinch to zoom.isGuidanceEnabledshows top guidance labels to help users aim at targets.isHighlightingEnabledturns on system highlights; turn it off if you draw your own.
Handle items the user taps
(08:11) If the app needs to know what the user tapped, set a delegate.
// Specify the types of data to recognize
let recognizedDataTypes:Set<DataScannerViewController.RecognizedDataType> = [
    .barcode(symbologies: [.qr]),
    .text(textContentType: .URL)
]

// Create the data scanner, present it, and start scanning!
let dataScanner = DataScannerViewController(recognizedDataTypes: recognizedDataTypes)
dataScanner.delegate = self
present(dataScanner, animated: true) {
    try? dataScanner.startScanning()
}
Key points:
- Here both QR codes and URL text are recognized.
dataScanner.delegate = selflets the current object receive scanner events.- The delegate receives callbacks for taps, added items, updated items, removed items, and more.
- Start scanning after presentation completes so the scanner is on screen before work begins.
(08:19) When the user taps a recognized item, the delegate receives RecognizedItem. It is an enum that can be text or a barcode.
func dataScanner(_ dataScanner: DataScannerViewController, didTapOn item: RecognizedItem) {
    switch item {
    case .text(let text):
        print("text: \(text.transcript)")
    case .barcode(let barcode):
        print("barcode: \(barcode.payloadStringValue ?? "unknown")")
    default:
        print("unexpected item")
    }
}
Key points:
didTapOnfires when the user taps a recognized item..text(let text)reads text recognition results.text.transcriptis the recognized string..barcode(let barcode)handles machine codes.barcode.payloadStringValueis only available when the payload can be converted to a string, so the example uses?? "unknown"as fallback.RecognizedItemalso carries a stableidandboundsfor tracking and drawing highlights.
Custom highlights
(08:54) Each RecognizedItem has bounds. The talk specifically notes this value is four corner points; under perspective transform text or codes may be trapezoidal, so do not treat it as a normal rectangle.
If system highlights do not match app style, draw your own with three delegate method groups.
(09:11) When an item first appears, create a highlight view and add it to overlayContainerView.
// Dictionary to store our custom highlights keyed by their associated item ID.
var itemHighlightViews: [RecognizedItem.ID: HighlightView] = [:]

// For each new item, create a new highlight view and add it to the view hierarchy.
func dataScanner(_ dataScanner: DataScannerViewController, didAdd addedItems: [RecognizedItem], allItems: [RecognizedItem]) {
    for item in addedItems {
        let newView = newHighlightView(forItem: item)
        itemHighlightViews[item.id] = newView
        dataScanner.overlayContainerView.addSubview(newView)
    }
}
Key points:
itemHighlightViewsusesRecognizedItem.IDas key to bind items and custom highlights.didAddis called when new items are recognized.newHighlightView(forItem:)creates a highlight view for the item.item.idstays stable for the item’s lifetime until it leaves the frame.overlayContainerViewsits above the camera preview and is suitable for custom highlights.
(09:37) When items or the camera move, update highlight positions.
// Animate highlight views to their new bounds
func dataScanner(_ dataScanner: DataScannerViewController, didUpdate updatedItems: [RecognizedItem], allItems: [RecognizedItem]) {
    for item in updatedItems {
        if let view = itemHighlightViews[item.id] {
            animate(view: view, toNewBounds: item.bounds)
        }
    }
}
Key points:
didUpdateis called when items move, the camera moves, or text transcript changes.updatedItemscontains only items that changed.- Find the existing highlight view through
item.id. item.boundsis the new four-corner coordinates; use them to drive highlight animation.
(10:03) When items leave the frame, remove the corresponding highlight.
// Remove highlights when their associated items are removed.
func dataScanner(_ dataScanner: DataScannerViewController, didRemove removedItems: [RecognizedItem], allItems: [RecognizedItem]) {
    for item in removedItems {
        if let view = itemHighlightViews[item.id] {
            itemHighlightViews.removeValue(forKey: item.id)
            view.removeFromSuperview()
        }
    }
}
Key points:
didRemoveis called when items are no longer visible.removedItemslists items that just left the scene.removeValue(forKey:)clears the dictionary reference.removeFromSuperview()removes the highlight from the UI.- The
allItemsparameter contains all items still recognized; in text recognition, this array is in natural reading order.
Photos and AsyncStream
(10:54) The scanner can also capture a high-quality still image. The example saves it to the photo library.
// Take a still photo and save to the camera roll
if let image = try? await dataScanner.capturePhoto() {
    UIImageWriteToSavedPhotosAlbum(image, nil, nil, nil)
}
Key points:
capturePhoto()is async.- On success it returns a
UIImage. - The example uses
UIImageWriteToSavedPhotosAlbumto save to the system photo library. - This fits archiving scan results with on-site photos, such as receipts, shelves, or equipment nameplates.
(11:10) If you do not need custom highlights, you can skip the three delegate method groups. recognizedItems provides a continuously updating AsyncStream.
// Send a notification when the recognized items change.
var currentItems: [RecognizedItem] = []

func updateViaAsyncStream() async {
    guard let scanner = dataScannerViewController else { return }

    let stream = scanner.recognizedItems
    for await newItems: [RecognizedItem] in stream {
        let diff = newItems.difference(from: currentItems) { a, b in
            return a.id == b.id
        }

        if !diff.isEmpty {
            currentItems = newItems
            sendDidChangeNotification()
        }
    }
}
Key points:
currentItemsstores the previous recognition results.- Return early if
dataScannerViewControllerdoes not exist. scanner.recognizedItemsis an async stream that outputs[RecognizedItem].for awaitreceives new arrays as the scene changes.difference(from:)compares items byid.- Update state and send notification only when the diff is non-empty.
Core Takeaways
1. Warehouse picking scanner
- What to do: Recognize multiple QR codes or barcodes on a shelf at once; after tapping an item, enter the picking flow.
- Why it’s worth it:
recognizesMultipleItemssupports multiple items in one frame;didTapOnreturns the item the user selected. - How to start: Set
recognizedDataTypesto.barcode(...), enable multi-item recognition, match inventory SKUs withbarcode.payloadStringValue.
2. Receipt URL and phone number extraction
- What to do: Use the camera on paper receipts or posters to extract only URLs or phone numbers.
- Why it’s worth it: Data Scanner supports text content type filtering, reducing irrelevant text entering business flows.
- How to start: Use
.text(textContentType: .URL)or the corresponding semantic type; readtext.transcriptafter the user taps a recognized item.
3. On-site asset inventory
- What to do: Scan small serial numbers on equipment nameplates and capture on-site photos for records.
- Why it’s worth it:
qualityLevel: .accuratesuits small items;capturePhoto()can save high-quality still images. - How to start: Choose
.accurateat initialization; after recognizing a serial number, callawait dataScanner.capturePhoto()and store image and recognized text together.
4. Branded scan interface
- What to do: Turn off system highlights and mark recognized items with your own colors, animations, and shapes.
- Why it’s worth it:
overlayContainerViewanddidAdd,didUpdate,didRemoveprovide a full lifecycle. - How to start: Maintain a highlight dictionary with
RecognizedItem.ID; update four-corner positions fromitem.boundsindidUpdate.
5. Real-time text dashboard
- What to do: Aggregate text the camera currently sees into a side list or debug panel in real time.
- Why it’s worth it:
recognizedItemsis anAsyncStream, good for wiring recognition changes into Swift Concurrency workflows. - How to start: In a task,
for awaitreadscanner.recognizedItems; usedifference(from:)to skip frames with no changes.
Related Sessions
- Add Live Text interaction to your app — Data Scanner handles live camera streams; that session covers Live Text interaction in still images and paused video frames.
- Extract document data using Vision — Data Scanner wraps common live scan flows; that session shows using Vision directly for document text and barcodes.
- Create camera extensions with Core Media IO — If you care about the camera input pipeline itself, that session covers macOS camera system extensions.
- Discover PhotoKit change history — Scan results often land in photo or image workflows; that session covers tracking photo library changes.
Comments
GitHub Issues · utterances