
Highlight
Using automatic colorization of old black-and-white photos as an example, this session walks through model discovery, PyTorch-to-Core ML conversion, Xcode performance evaluation, Swift integration, and Instruments tuning—and optimizes a 90ms static-image model into a ~16ms real-time camera solution.
Core Content
Many apps want to add machine learning, but the first step is not writing model code. Developers first need to decide whether the problem suits ML, where the model comes from, how to bring it to Apple platforms, whether conversion is correct, and whether it is fast enough on target devices.
This session answers those questions with a concrete task: automatically colorizing black-and-white family photos from an old box in the basement. Manual retouching requires a professional photographer and image editing tools; machine learning can shorten the process to seconds.
Apple’s example flow is straightforward. Find an open-source PyTorch Colorizer model; convert it with coremltools; validate the conversion in Python; use Xcode 14’s Core ML Performance Report to see on-device prediction time; then integrate the model into a Swift app with Core Image and Core ML.
The static-image version is already useful. The Performance Report shows the original model predicting in about 90ms on iPad Pro M1 with iPadOS 16. When the requirement shifts to a real-time camera, that number is not enough: a 30fps camera produces a frame roughly every 30ms, and 90ms means losing two to three frames during each colorization.
The second half therefore enters optimization. The presenter changes the model architecture, retrains with PyTorch on Metal on Apple Silicon, then converts, validates, and integrates. The new model runs entirely on the Neural Engine with prediction time around 16ms. Finally, Instruments’ Core ML template reveals the app queuing predictions and mistakenly setting 60fps; the fix is to process the next frame only after the previous prediction finishes, and set the camera back to 30fps.
Detailed Content
1. Split RGB images into the L channel the model needs (03:06)
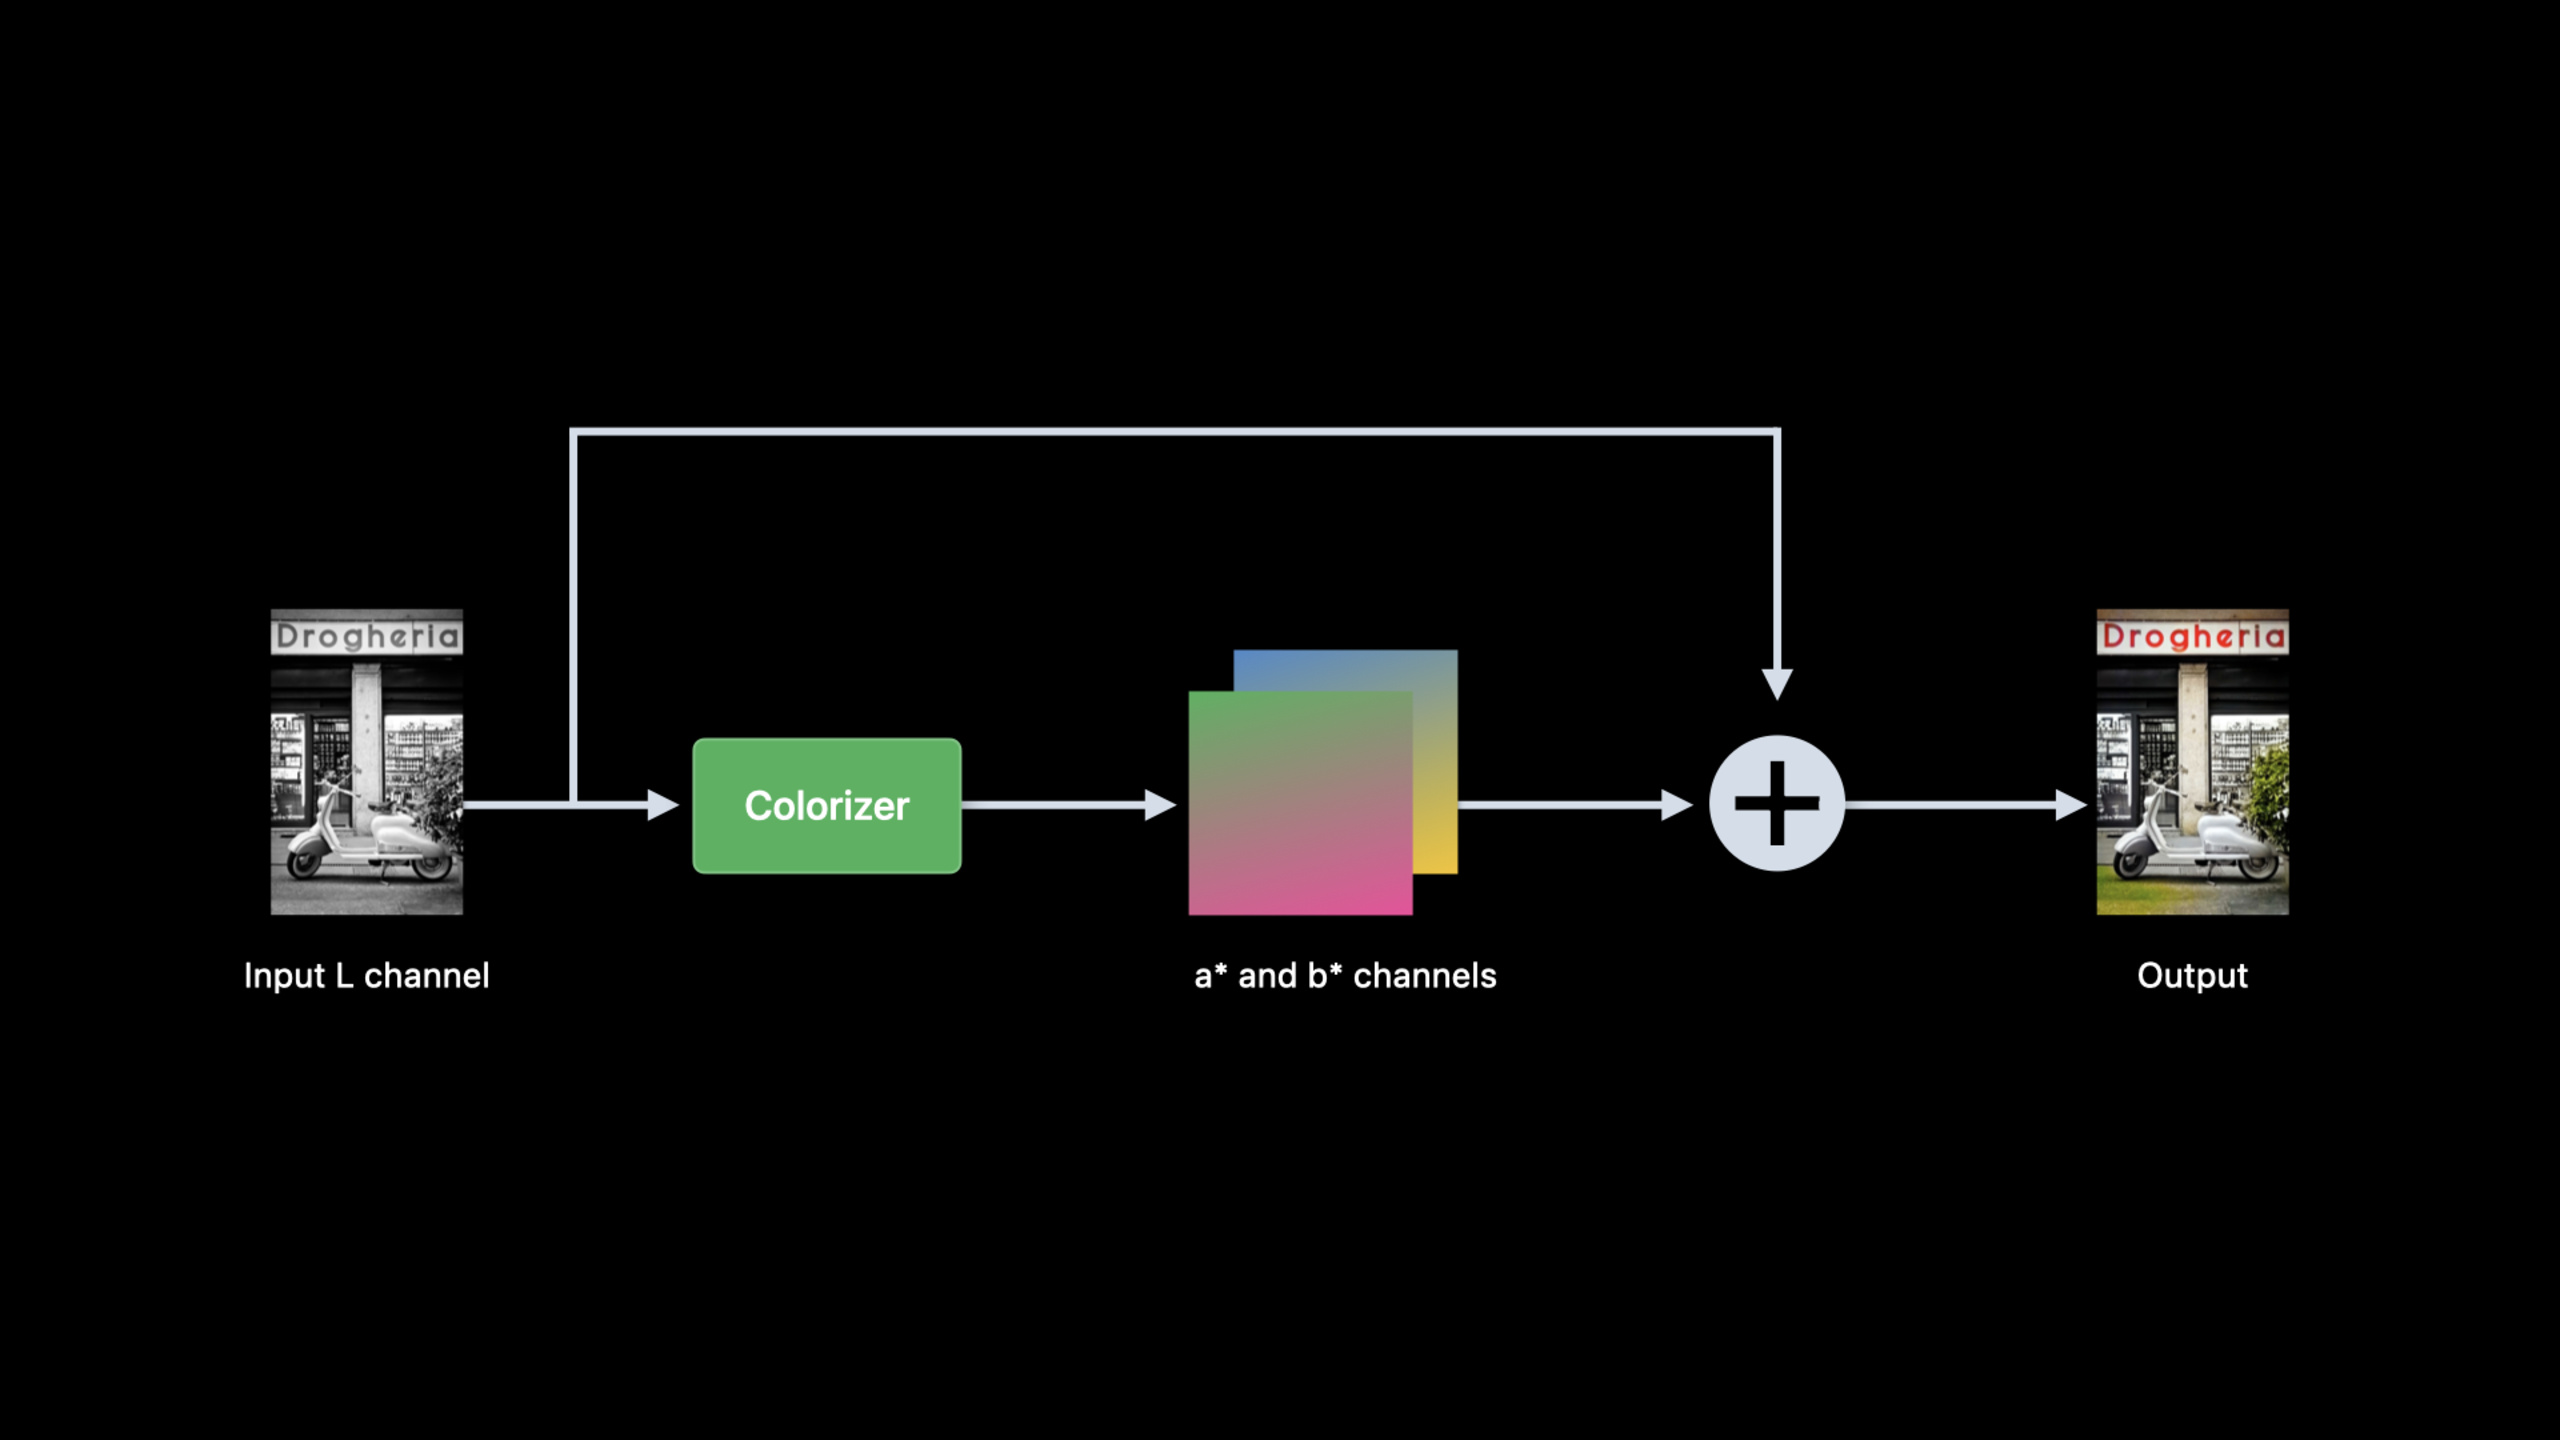
Colorizer uses the Lab color space. Lab has three channels: L for lightness, and a and b for color components. For black-and-white input, the model needs only the L channel, then predicts new a and b channels.
from skimage import color

in_lab = color.rgb2lab(in_rgb)
in_l = in_lab[:,:,0]
Key points:
color.rgb2lab(in_rgb)converts the RGB image to Lab color space.in_lab[:,:,0]extracts the first channel, lightness L.- The a and b color channels are discarded at input and left for the model to predict.
After model output, recombine input L with predicted a and b back into Lab, then convert to RGB.
from skimage import color
import numpy as np
import torch

out_lab = torch.cat((in_l, out_ab), dim=1)
out_rgb = color.lab2rgb(out_lab.data.numpy()[0,…].transpose((1,2,0)))
Key points:
torch.cat((in_l, out_ab), dim=1)concatenates original lightness and model output color components along the channel dimension.out_lab.data.numpy()converts the tensor to NumPy data for image processing libraries.transpose((1,2,0))moves the channel dimension last to match the layoutlab2rgbexpects.color.lab2rgb(...)produces the final color image.
2. Convert the PyTorch model with coremltools (03:56)
After finding an open-source model, the next step is running it on Apple platforms. The example uses coremltools to convert the PyTorch model to a Core ML mlpackage.
import coremltools as ct
import torch
import Colorizer

torch_model = Colorizer().eval()

example_input = torch.rand([1, 1, 256, 256])
traced_model = torch.jit.trace(torch_model, example_input)

coreml_model = ct.convert(traced_model,
                          inputs=[ct.TensorType(name="input", shape=example_input.shape)])

coreml_model.save("Colorizer.mlpackage")
Key points:
Colorizer().eval()loads model architecture and weights and switches to inference mode.example_inputdefines a sample input with 1 channel and 256×256 size.torch.jit.tracetraces the PyTorch model with the sample input to produce a convertible representation.ct.convertconverts the traced model to Core ML and declares input name and shape.save("Colorizer.mlpackage")generates a model package you can drag into Xcode.
3. Validate the Core ML model in Python (04:26)
Conversion success does not mean correct functionality. The presenter runs the Core ML model directly in Python to verify it matches the original PyTorch flow.
import coremltools as ct
from PIL import Image
from skimage import color

in_img = Image.open("image.png").convert("RGB")
in_rgb = np.array(in_img)
in_lab = color.rgb2lab(in_rgb, channel_axis=2)

lab_components = np.split(in_lab, indices_or_sections=3, axis=-1)
(in_l, _, _) = [
    np.expand_dims(array.transpose((2, 0, 1)).astype(np.float32), 0)
    for array in lab_components
]
out_ab = coreml_model.predict({"input": in_l})[0]

out_lab = np.squeeze(np.concatenate([in_l, out_ab], axis=1), axis=0).transpose((1, 2, 0))
out_rgb = color.lab2rgb(out_lab, channel_axis=2).astype(np.uint8)
out_img = Image.fromarray(out_rgb)
Key points:
Image.open(...).convert("RGB")reads the test image and normalizes to RGB.color.rgb2lab(..., channel_axis=2)converts to Lab with the last dimension as color channels.np.split(..., axis=-1)splits out L, a, and b channels.np.expand_dims(..., 0)adds a batch dimension to form model input.coreml_model.predict({"input": in_l})runs the converted Core ML model to predict color channels.np.concatenate([in_l, out_ab], axis=1)merges input lightness and output color.color.lab2rgbconverts back to RGB;Image.fromarrayproduces a viewable image.
4. Integrate the model in a Swift app (07:11)
Swift integration follows the same flow as Python: extract lightness, send to Core ML, retrieve two color channels, then rebuild the RGB image.
import CoreImage
import CoreML

func colorize(image inputImage: CIImage) throws -> CIImage {

    let lightness: CIImage = extractLightness(from: inputImage)

    let modelInput = try ColorizerInput(inputWith: lightness.cgImage!)

    let modelOutput: ColorizerOutput = try colorizer.prediction(input: modelInput)

    let (aChannel, bChannel): (CIImage, CIImage) = extractColorChannels(from: modelOutput)

    let colorizedImage = reconstructRGBImage(l: lightness, a: aChannel, b: bChannel)
    return colorizedImage
}
Key points:
extractLightness(from:)corresponds to RGB to Lab and taking the L channel in Python.ColorizerInput(inputWith:)prepares the lightness image as Core ML input.colorizer.prediction(input:)runs model inference.extractColorChannels(from:)converts the model’s twoMLShapedArrayoutputs into Core Image-processable images.reconstructRGBImagecombines L, a, and b into Lab, then converts back to RGB.
5. Use Core Image for Lab conversion and channel composition (07:41, 08:51)
The presenter does not hand-write color space conversion in Swift. Core Image provides new convertRGBtoLab and convertLabToRGB filters.
import CoreImage.CIFilterBuiltins

func extractLightness(from inputImage: CIImage) -> CIImage {

    let rgbToLabFilter = CIFilter.convertRGBtoLab()
    rgbToLabFilter.inputImage = inputImage
    rgbToLabFilter.normalize = true
    let labImage = rgbToLabFilter.outputImage

    let matrixFilter = CIFilter.colorMatrix()
    matrixFilter.inputImage = labImage
    matrixFilter.rVector = CIVector(x: 1, y: 0, z: 0)
    matrixFilter.gVector = CIVector(x: 1, y: 0, z: 0)
    matrixFilter.bVector = CIVector(x: 1, y: 0, z: 0)
    let lightness = matrixFilter.outputImage!
    return lightness
}
Key points:
CIFilter.convertRGBtoLab()converts input from RGB to Lab.normalize = truekeeps lightness values in the normalized range the model needs.CIFilter.colorMatrix()filters out the L channel with a matrix.rVector,gVector, andbVectorall take the first component of input so output retains only lightness.
The model outputs two MLShapedArray values. The example converts them into two single-channel CIImage instances.
func extractColorChannels(from output: ColorizerOutput) -> (CIImage, CIImage) {

    let outA: [Float] = output.output_aShapedArray.scalars
    let outB: [Float] = output.output_bShapedArray.scalars
    let dataA = Data(bytes: outA, count: outA.count * MemoryLayout<Float>.stride)
    let dataB = Data(bytes: outB, count: outB.count * MemoryLayout<Float>.stride)

    let outImageA = CIImage(bitmapData: dataA,
        bytesPerRow: 4 * 256,
        size: CGSize(width: 256, height: 256),
        format: CIFormat.Lh,
        colorSpace: CGColorSpaceCreateDeviceGray())
    let outImageB = CIImage(bitmapData: dataB,
        bytesPerRow: 4 * 256,
        size: CGSize(width: 256, height: 256),
        format: CIFormat.Lh,
        colorSpace: CGColorSpaceCreateDeviceGray())
   return (outImageA, outImageB)
}
Key points:
output_aShapedArray.scalarsandoutput_bShapedArray.scalarsextract predicted color components.Data(bytes:count:)wraps float arrays into byte data readable as images.CIImage(bitmapData:...)creates single-channel Core Image images for each color component.bytesPerRow: 4 * 256corresponds to 256-pixel width with 4 bytes per Float.CIFormat.Lhis the single-channel float image format.
Finally, use a custom CIKernel to combine three channels into a Lab image, then convert back to RGB.
func reconstructRGBImage(l lightness: CIImage,
                         a aChannel: CIImage,
                         b bChannel: CIImage) -> CIImage {
    guard
        let kernel = try? CIKernel.kernels(withMetalString: source)[0] as? CIColorKernel,
        let kernelOutputImage = kernel.apply(extent: lightness.extent,
                                             arguments: [lightness, aChannel, bChannel])
    else { fatalError() }

    let labToRGBFilter = CIFilter.convertLabToRGBFilter()
    labToRGBFilter.inputImage = kernelOutputImage
    labToRGBFilter.normalize = true
    let rgbImage = labToRGBFilter.outputImage!
    return rgbImage
}
Key points:
CIKernel.kernels(withMetalString:)creates a Core Image kernel from a Metal string.kernel.applyuses the lightness image extent as output range and passes L, a, and b as arguments.CIFilter.convertLabToRGBFilter()converts the combined Lab image back to RGB.normalize = truepairs with the earlier RGB-to-Lab conversion.
Channel composition itself is a small kernel.
let source = """
#include <CoreImage/CoreImage.h>
[[stichable]] float4 labCombine(coreimage::sample_t imL, coreimage::sample_t imA, coreimage::sample_t imB)
{
   return float4(imL.r, imA.r, imB.r, imL.a);
}
"""
Key points:
imL,imA, andimBrepresent lightness, a channel, and b channel image samples.float4(imL.r, imA.r, imB.r, imL.a)puts three single-channel values back into the first three components of a Lab image.- Alpha uses
imL.ato preserve input lightness image transparency.
6. From 90ms static processing to 16ms real-time processing (05:17, 12:45)
Xcode 14’s Core ML Performance Report provides time-based analysis of Core ML models. The presenter drags the model into Xcode and sees the original model at about 90ms on iPad Pro M1 within seconds. That speed suits static photos.
Real-time camera needs lower latency. The presenter changes model architecture and retrains using PyTorch on Metal to accelerate training on Apple Silicon. The new model’s Performance Report shows it running entirely on the Neural Engine with prediction time around 16ms.
The Performance Report only describes the model itself. The app still does not run smoothly; Instruments’ Core ML template shows prediction requests stacking: the second prediction is submitted before the first completes, and subsequent requests keep queuing. The presenter also finds the camera frame rate mistakenly set to 60fps.
Below is conceptual control flow expressing the session’s fix; it is not official code.
// Conceptual pseudocode based on the runtime issue shown in Instruments.
if previousPredictionDidFinish {
    processNextCameraFrame()
}

cameraFrameRate = 30
Key points:
previousPredictionDidFinishmeans process a new frame only after the previous prediction completes.processNextCameraFrame()corresponds to one Core ML prediction request, avoiding request queuing.cameraFrameRate = 30matches the presenter’s fix of changing the mistaken 60fps back to the target 30fps.- This fix lets Core ML correctly dispatch one prediction at a time to the Neural Engine for stable real-time results.
Core Takeaways
-
Build an old photo scan colorization tool: Use Vision’s
VNDetectRectangleRequestto find photo regions in the viewfinder, then send cropped results to the Core ML Colorizer. The session demonstrates this combination at 15:26. -
Add a “local ML pre-check” flow to an existing image app: Before the model enters the app, run the same input image through coremltools in Python to confirm Core ML output matches the original model flow, then proceed to Swift integration.
-
Move model performance evaluation to the prototype stage: When designing a feature, drag candidate models into Xcode 14 Performance Report and record prediction time and compute unit distribution on target devices to avoid discovering real-time limitations after the UI is done.
-
Build queue protection for real-time camera filters: Camera frames arrive every frame, but Core ML prediction takes time. Use Instruments to check whether predictions are stacking, then change processing to “accept the next frame only after the previous one completes.”
-
Train a smaller replacement model on Apple Silicon: If an open-source model is too slow, keep the same input/output shape, switch to a lighter architecture, retrain with PyTorch on Metal, then replace the model following convert-validate-integrate flow.
Related Sessions
- Optimize your Core ML usage — Continues with Xcode Performance Report, Core ML Instrument, and on-device inference optimization.
- Get to know Create ML Components — Introduces combining Transformer and Estimator for custom machine learning tasks.
- Compose advanced models with Create ML Components — Covers temporal pipelines, incremental training, and more complex model composition.
Comments
GitHub Issues · utterances