
Highlight
CarPlay’s design philosophy has always been “serve the driver.” Your app on CarPlay should offer only what drivers truly need while driving; sign-in, configuration, and reading terms belong on iPhone.
Core Content
The challenge with CarPlay apps is restraint. Users in the car are driving; the interface must be minimal, tasks must be short, and information must be readable at a glance.
(00:55) Apple sets a clear boundary at the start: CarPlay is designed for drivers. One-time setup, sign-in, and reading terms should happen before or after driving, not in the CarPlay UI.
That boundary shapes every design decision that follows.
(01:59) iOS 16 adds two new CarPlay app types: Fueling and Driving Task. The former extends the iOS 14 EV Charging approach to gas stations and alternative fuel scenarios; the latter provides a formal entry point for very simple driving tasks.
(09:16) Apple also released CarPlay Simulator, a standalone Mac app that connects to an iPhone and reproduces a real CarPlay environment on the desktop. Developers can use Xcode and Instruments simultaneously and test different screen sizes, appearances, disconnect/reconnect, and instrument cluster displays.
(14:53) Navigation apps gain a new capability: on supported vehicles, display a live map or turn card on the digital instrument cluster. If your app already supports CarPlay Dashboard, this follows the same pattern—declare the scene in Info.plist, then implement the corresponding delegate.
Detailed Content
CarPlay templates control complexity for you
(02:14) CarPlay UI is built from templates. Your app provides data; the system renders the UI on the car display.
This delivers three direct benefits.
First, developers do not need to handle font sizes and in-car input device differences themselves. Second, templates keep UI complexity low. Third, the same template types stay consistent across CarPlay apps, so drivers complete actions faster.
This session does not show official template API code snippets, but it clearly lists use cases for several templates:
// Conceptual example: choose UI style based on templates mentioned in the session
let roadStatusTemplate = CPPointOfInterestTemplate(...)
let accessoryTemplate = CPInformationTemplate(...)
let quickChoiceTemplate = CPGridTemplate(...)
Key points:
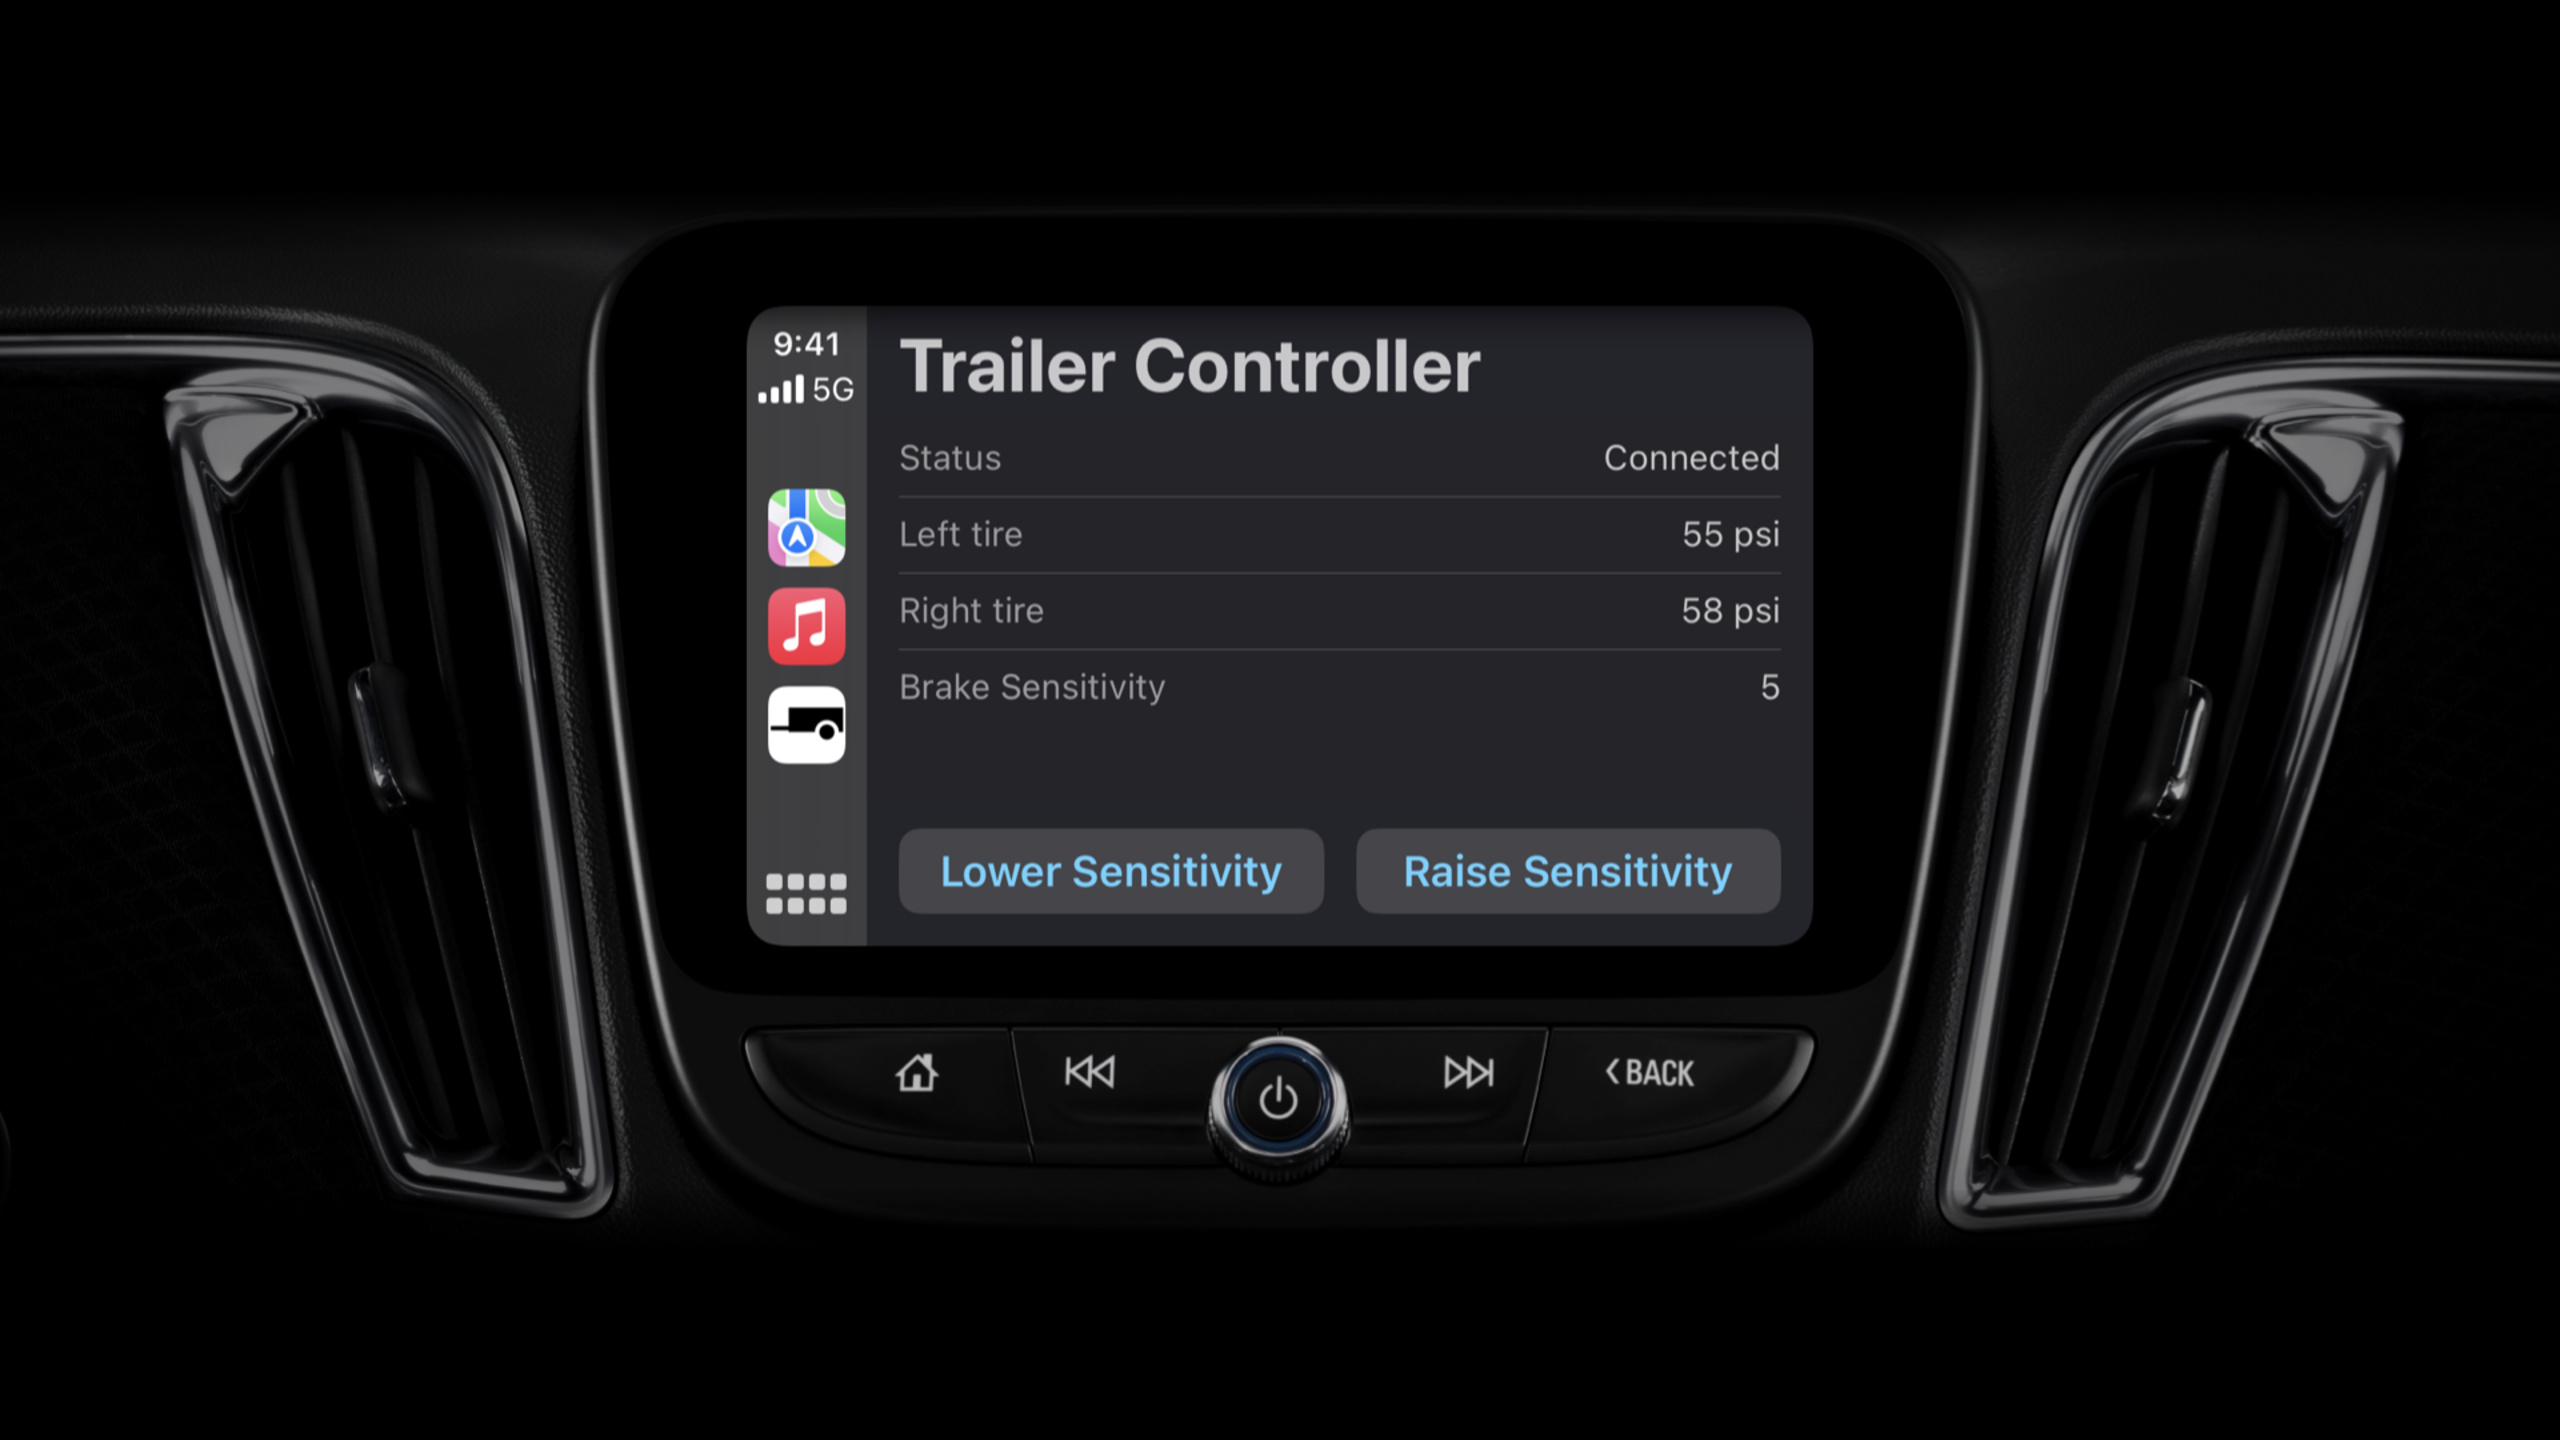
CPPointOfInterestTemplate: The session uses it for a road status app, suitable for showing a small set of important nearby locations.CPInformationTemplate: The session uses it for a trailer controller, suitable for showing accessory status and a few action buttons.CPGridTemplate: The session uses it for mileage logging and express lane tolls, suitable for one or two quick-choice buttons.
The key point is template constraints. Each app type can only use templates relevant to and appropriate for driving scenarios; Apple provides a corresponding table in the developer documentation.
Fueling apps should handle refueling, not just find locations
(04:26) iOS 16 adds the Fueling app type. It extends the iOS 14 EV Charging app approach, but targets traditional gas vehicles and alternative fuel vehicles.
Apple specifically notes that many users already use navigation apps to find and drive to a location. So a Fueling app that only “finds gas stations” on CarPlay is not enough.
Better functionality covers what drivers actually need while refueling—for example, connecting to the correct station equipment or directly starting the fuel pump.
// Conceptual example: CarPlay UI for a Fueling app should focus on in-car actions
struct FuelingAction {
    let stationName: String
    let pumpIdentifier: String
    let primaryActionTitle = "Start Pump"
}
Key points:
stationName: CarPlay UI should show only the currently relevant location, not full trip planning.pumpIdentifier: The session explicitly mentions that the app can help users connect to the correct device.primaryActionTitle: The core action should be tasks needed while driving, such as starting the fuel pump.
This example is a conceptual model, not a new API from Apple. The official transcript only describes product boundaries and scenarios; it does not provide code snippets for the Fueling type.
Driving Task apps should finish in seconds
(05:22) Driving Task is a new CarPlay app type for a broader range of simple driving tasks.
Apple gives four examples: road status information, vehicle accessory control, tasks at trip start or end, and express lane occupancy selection. What they share is small scope—ideally completed on a single screen.
(08:40) The design rules are strict: consider making it a single-screen app, offer only the minimum necessary functionality while driving, allow only tasks completable in a few seconds, and avoid complex or infrequent use cases.
// Conceptual example: Driving Task actions should be minimal
let mileageActions = [
    CPGridButton(titleVariants: ["Personal"], image: personalImage) { _ in
        recordPersonalMileage()
    },
    CPGridButton(titleVariants: ["Business"], image: businessImage) { _ in
        recordBusinessMileage()
    }
]
Key points:
mileageActions: The session’s mileage logging app has only two buttons, for personal or business mileage.CPGridButton: The session notes that these apps can useCPGridTemplate; button-style selection suits tasks finished in seconds.recordPersonalMileage()/recordBusinessMileage(): Example functions represent business actions; the session does not provide specific implementations.
This example preserves the UI pattern from the transcript, but the function names are conceptual. Do not treat it as an official complete API example.
CarPlay Simulator brings real-device debugging to the desktop
(10:18) CarPlay Simulator is a standalone Mac app. Download Additional Tools for Xcode, run the app, connect an iPhone to your Mac with a cable, and CarPlay starts as if connected to a real car.
It solves testing cost.
Previously, testing CarPlay UI on a real iPhone usually required a real vehicle or an aftermarket head unit. Now you can debug a real device app at your desk while using Xcode breakpoints and Instruments for performance analysis.
(12:38) The Simulator also offers multiple vehicle behavior toggles: Limit UI, switch light/dark appearance, simulate disconnect and reconnect, adjust main display size, and enable instrument cluster second screen.
CarPlay Simulator test checklist:
1. Switch light / dark appearance and check image assets.
2. Tap Limit UI and confirm in-motion content is appropriately shortened.
3. Change main display size and check template and map rendering.
4. Enable instrument cluster display and check second-screen map or turn card.
5. Simulate disconnect / reconnect and debug reconnection logic.
Key points:
- Step 1: The session demonstrates the Express Lane app providing different artwork for light and dark modes.
- Step 2: The Limit UI button simulates the vehicle requiring CarPlay to restrict on-screen content while driving.
- Step 3: Template UI is usually adapted by the system; navigation app map rendering code needs focused verification.
- Step 4: The instrument cluster second screen is primarily for navigation apps.
- Step 5: The phone remains connected to the Mac, so disconnect/reconnect scenarios can be debugged directly in Xcode.
Navigation apps connect to the digital instrument cluster
(15:07) Digital instrument cluster support follows the iOS 13 CarPlay Dashboard pattern. First declare support in Info.plist, then add the corresponding Scene Session Role.
Official code snippet:
<key>UIApplicationSceneManifest</key>
<dict>
    <!-- Indicate support for CarPlay dashboard -->
    <key>CPSupportsDashboardNavigationScene</key>
    <true/>
    <!-- Indicate support for instrument cluster displays -->
    <key>CPSupportsInstrumentClusterNavigationScene</key>
    <true/>
    <!-- Indicate support for multiple scenes -->
    <key>UIApplicationSupportsMultipleScenes</key>
    <true/>
    <key>UISceneConfigurations</key>
    <dict>
        <!-- For device scenes -->
        <key>UIWindowSceneSessionRoleApplication</key>
        <array>
            <dict>
                <key>UISceneClassName</key>
                <string>UIWindowScene</string>
                <key>UISceneConfigurationName</key>
                <string>Phone</string>
                <key>UISceneDelegateClassName</key>
                <string>MyAppWindowSceneDelegate</string>
            </dict>
        </array>
        <!-- For the main CarPlay scene -->
        <key>CPTemplateApplicationSceneSessionRoleApplication</key>
        <array>
            <dict>
                <key>UISceneClassName</key>
                <string>CPTemplateApplicationScene</string>
                <key>UISceneConfigurationName</key>
                <string>CarPlay</string>
                <key>UISceneDelegateClassName</key>
                <string>MyAppCarPlaySceneDelegate</string>
            </dict>
        </array>
        <!-- For the CarPlay Dashboard scene -->
        <key>CPTemplateApplicationDashboardSceneSessionRoleApplication</key>
        <array>
            <dict>
                <key>UISceneClassName</key>
                <string>CPTemplateApplicationDashboardScene</string>
                <key>UISceneConfigurationName</key>
                <string>CarPlay-Dashboard</string>
                <key>UISceneDelegateClassName</key>
                <string>MyAppCarPlayDashboardSceneDelegate</string>
            </dict>
        </array>
        <!-- For the CarPlay instrument cluster scene -->
        <key>CPTemplateApplicationInstrumentClusterSceneSessionRoleApplication</key>
        <array>
            <dict>
                <key>UISceneClassName</key>
                <string>CPTemplateApplicationInstrumentClusterScene</string>
                <key>UISceneConfigurationName</key>
                <string>CarPlay-Instrument-Cluster</string>
                <key>UISceneDelegateClassName</key>
                <string>MyAppCarPlayInstrumentClusterSceneDelegate</string>
            </dict>
        </array>
    </dict>
</dict>
Key points:
CPSupportsDashboardNavigationScene: Declares support for the CarPlay Dashboard navigation scene.CPSupportsInstrumentClusterNavigationScene: Declares support for the digital instrument cluster navigation scene.UIApplicationSupportsMultipleScenes: Allows the app to manage multiple scenes simultaneously.CPTemplateApplicationSceneSessionRoleApplication: Main CarPlay scene for the head unit main display.CPTemplateApplicationDashboardSceneSessionRoleApplication: Dashboard scene for CarPlay Dashboard.CPTemplateApplicationInstrumentClusterSceneSessionRoleApplication: Instrument cluster scene for dashboard map or turn card.UISceneDelegateClassName: Binds a delegate to each scene for phone, CarPlay, Dashboard, and instrument cluster respectively.
(16:00) After declaring scenes, implement the instrument cluster delegate. Official snippet:
extension TemplateApplicationSceneDelegate: CPTemplateApplicationInstrumentClusterSceneDelegate {

    func templateApplicationInstrumentClusterScene(
        _ templateApplicationInstrumentClusterScene: CPTemplateApplicationInstrumentClusterScene,
        didConnect instrumentClusterController: CPInstrumentClusterController) {
        // Connected to Instrument Cluster
        TemplateManager.shared.clusterController(instrumentClusterController, didConnectWith: templateApplicationInstrumentClusterScene.contentStyle)
    }

…

    func instrumentClusterControllerDidConnect(_ instrumentClusterWindow: UIWindow) {
        // Window in which to draw instrument cluster contents
       self.instrumentClusterWindow = instrumentClusterWindow
    }
Key points:
CPTemplateApplicationInstrumentClusterSceneDelegate: Lets the scene delegate receive instrument cluster scene connection events.didConnect instrumentClusterController: Called when CarPlay connects to the instrument cluster controller.CPInstrumentClusterController: Handles instrument cluster controls, such as zoom, compass, and speed limit display timing mentioned later in the session.templateApplicationInstrumentClusterScene.contentStyle: Passes the current content style to your app’s template management logic.instrumentClusterControllerDidConnect(_:): The system hands your app a drawableUIWindow.self.instrumentClusterWindow: Your app stores this window and draws instrument cluster content in it.
(16:26) The instrument cluster has additional considerations. The vehicle may allow users to zoom the map, which requires implementing CPInstrumentClusterControllerDelegate. Compass or speed limit display should also wait until the delegate tells your app when it is appropriate to draw.
(16:57) Instrument cluster content may be obscured by other in-car elements. Handle this with safe area: override viewSafeAreaInsetsDidChange in your view controller and constrain key content using the cluster view’s safeAreaLayoutGuide.
// Conceptual example: constrain key map content within the safe area
final class ClusterMapViewController: UIViewController {
    override func viewSafeAreaInsetsDidChange() {
        super.viewSafeAreaInsetsDidChange()
        updateRouteOverlayLayout(using: view.safeAreaLayoutGuide)
    }
}
Key points:
viewSafeAreaInsetsDidChange(): The session explicitly mentions overriding this to learn about safe area changes.view.safeAreaLayoutGuide: The session recommends using it to keep key content in the visible region.updateRouteOverlayLayout: Conceptual function representing your app updating route lines, current location, and other key map content.
Core Takeaways
1. Build a CarPlay UI for accessory control with only driving actions
- What to do: Compress trailer, roof box, and tire pressure device control into a single
CPInformationTemplatepage. - Why it is worth doing: The session’s trailer controller example shows that CarPlay UI can contain only status and a few buttons; pairing and configuration stay on iPhone.
- How to start: List the one or two actions required while driving, express them with CarPlay templates; do not migrate iPhone settings pages to CarPlay.
2. Build a two-button mileage logging entry
- What to do: At trip start or end, let users record personal or business mileage with two buttons.
- Why it is worth doing: Apple uses this example to show the ideal Driving Task app: single screen, short task, finished in seconds.
- How to start: Organize a few buttons with
CPGridTemplate; button callbacks only write the current trip category; detailed statistics stay in the iPhone app.
3. Add instrument cluster map validation for navigation apps
- What to do: Enable instrument cluster display in CarPlay Simulator and check map, turn card, and safe area.
- Why it is worth doing: iOS 16 lets navigation apps place a map or turn card on the digital instrument cluster in the driver’s line of sight.
- How to start: Add
CPSupportsInstrumentClusterNavigationSceneand the instrument cluster scene role in Info.plist, then implementCPTemplateApplicationInstrumentClusterSceneDelegate.
4. Establish a CarPlay Simulator regression test checklist
- What to do: Before each release, test light/dark mode, Limit UI, screen size, disconnect/reconnect, and instrument cluster second screen.
- Why it is worth doing: These are vehicle environment simulation capabilities explicitly supported by CarPlay Simulator in the session.
- How to start: Add Additional Tools for Xcode to your team development environment, connect a real device to a Mac, and verify each item; for navigation apps, focus on different display sizes and aspect ratios.
Related Sessions
- What’s new in MapKit — Learn about MapKit’s 3D maps, overlays, and Look Around updates to further optimize the map experience for navigation apps.
- Meet Apple Maps Server APIs — Learn geocoding and ETA server-side map capabilities to supplement route and location services on the backend.
- Bring multiple windows to your SwiftUI app — Understand scene and window structure to apply multi-scene thinking to CarPlay configuration.
- Explore navigation design for iOS — Compare information structure and interaction simplification against CarPlay’s driving scenario constraints.
Comments
GitHub Issues · utterances