
Highlight
iOS 15 New in UIKit
UIKeyboardLayoutGuideandUITrackingLayoutGuide, allowing developers to use Auto Layout constraints to follow the on-screen keyboard, floating keyboard and shortcut bar, reducing notification listening, frame calculation and handwritten animation code.
Core Content
When making chat input boxes, comment boxes, and editors, the keyboard is always a troublesome point in the layout.
UIKit code in the past often started with notifications. You want to monitorkeyboardWillShowNotificationandkeyboardWillHideNotification,fromuserInfoGet the end position of the keyboard and figure out how much the view should move. You also have to take out the keyboard animation duration yourself, and finally call it manuallylayoutIfNeeded()。
This solution works, but has many boundaries. Keyboards may be stowed and security areas may change height. There are also floating keyboards, split keyboards, and hardware keyboard shortcut bars on the iPad. After your app enters Split View, the keyboard only covers part of the window. For every additional form, there is an additional section of judgment.
iOS 15 puts the keyboard into Auto Layout.UIViewNewkeyboardLayoutGuide, which represents the space occupied by the keyboard in the current App window. You constrain the input box, toolbar, or content view to this guide, and the system will automatically update the layout as the keyboard pops up, collapses, and changes in height.
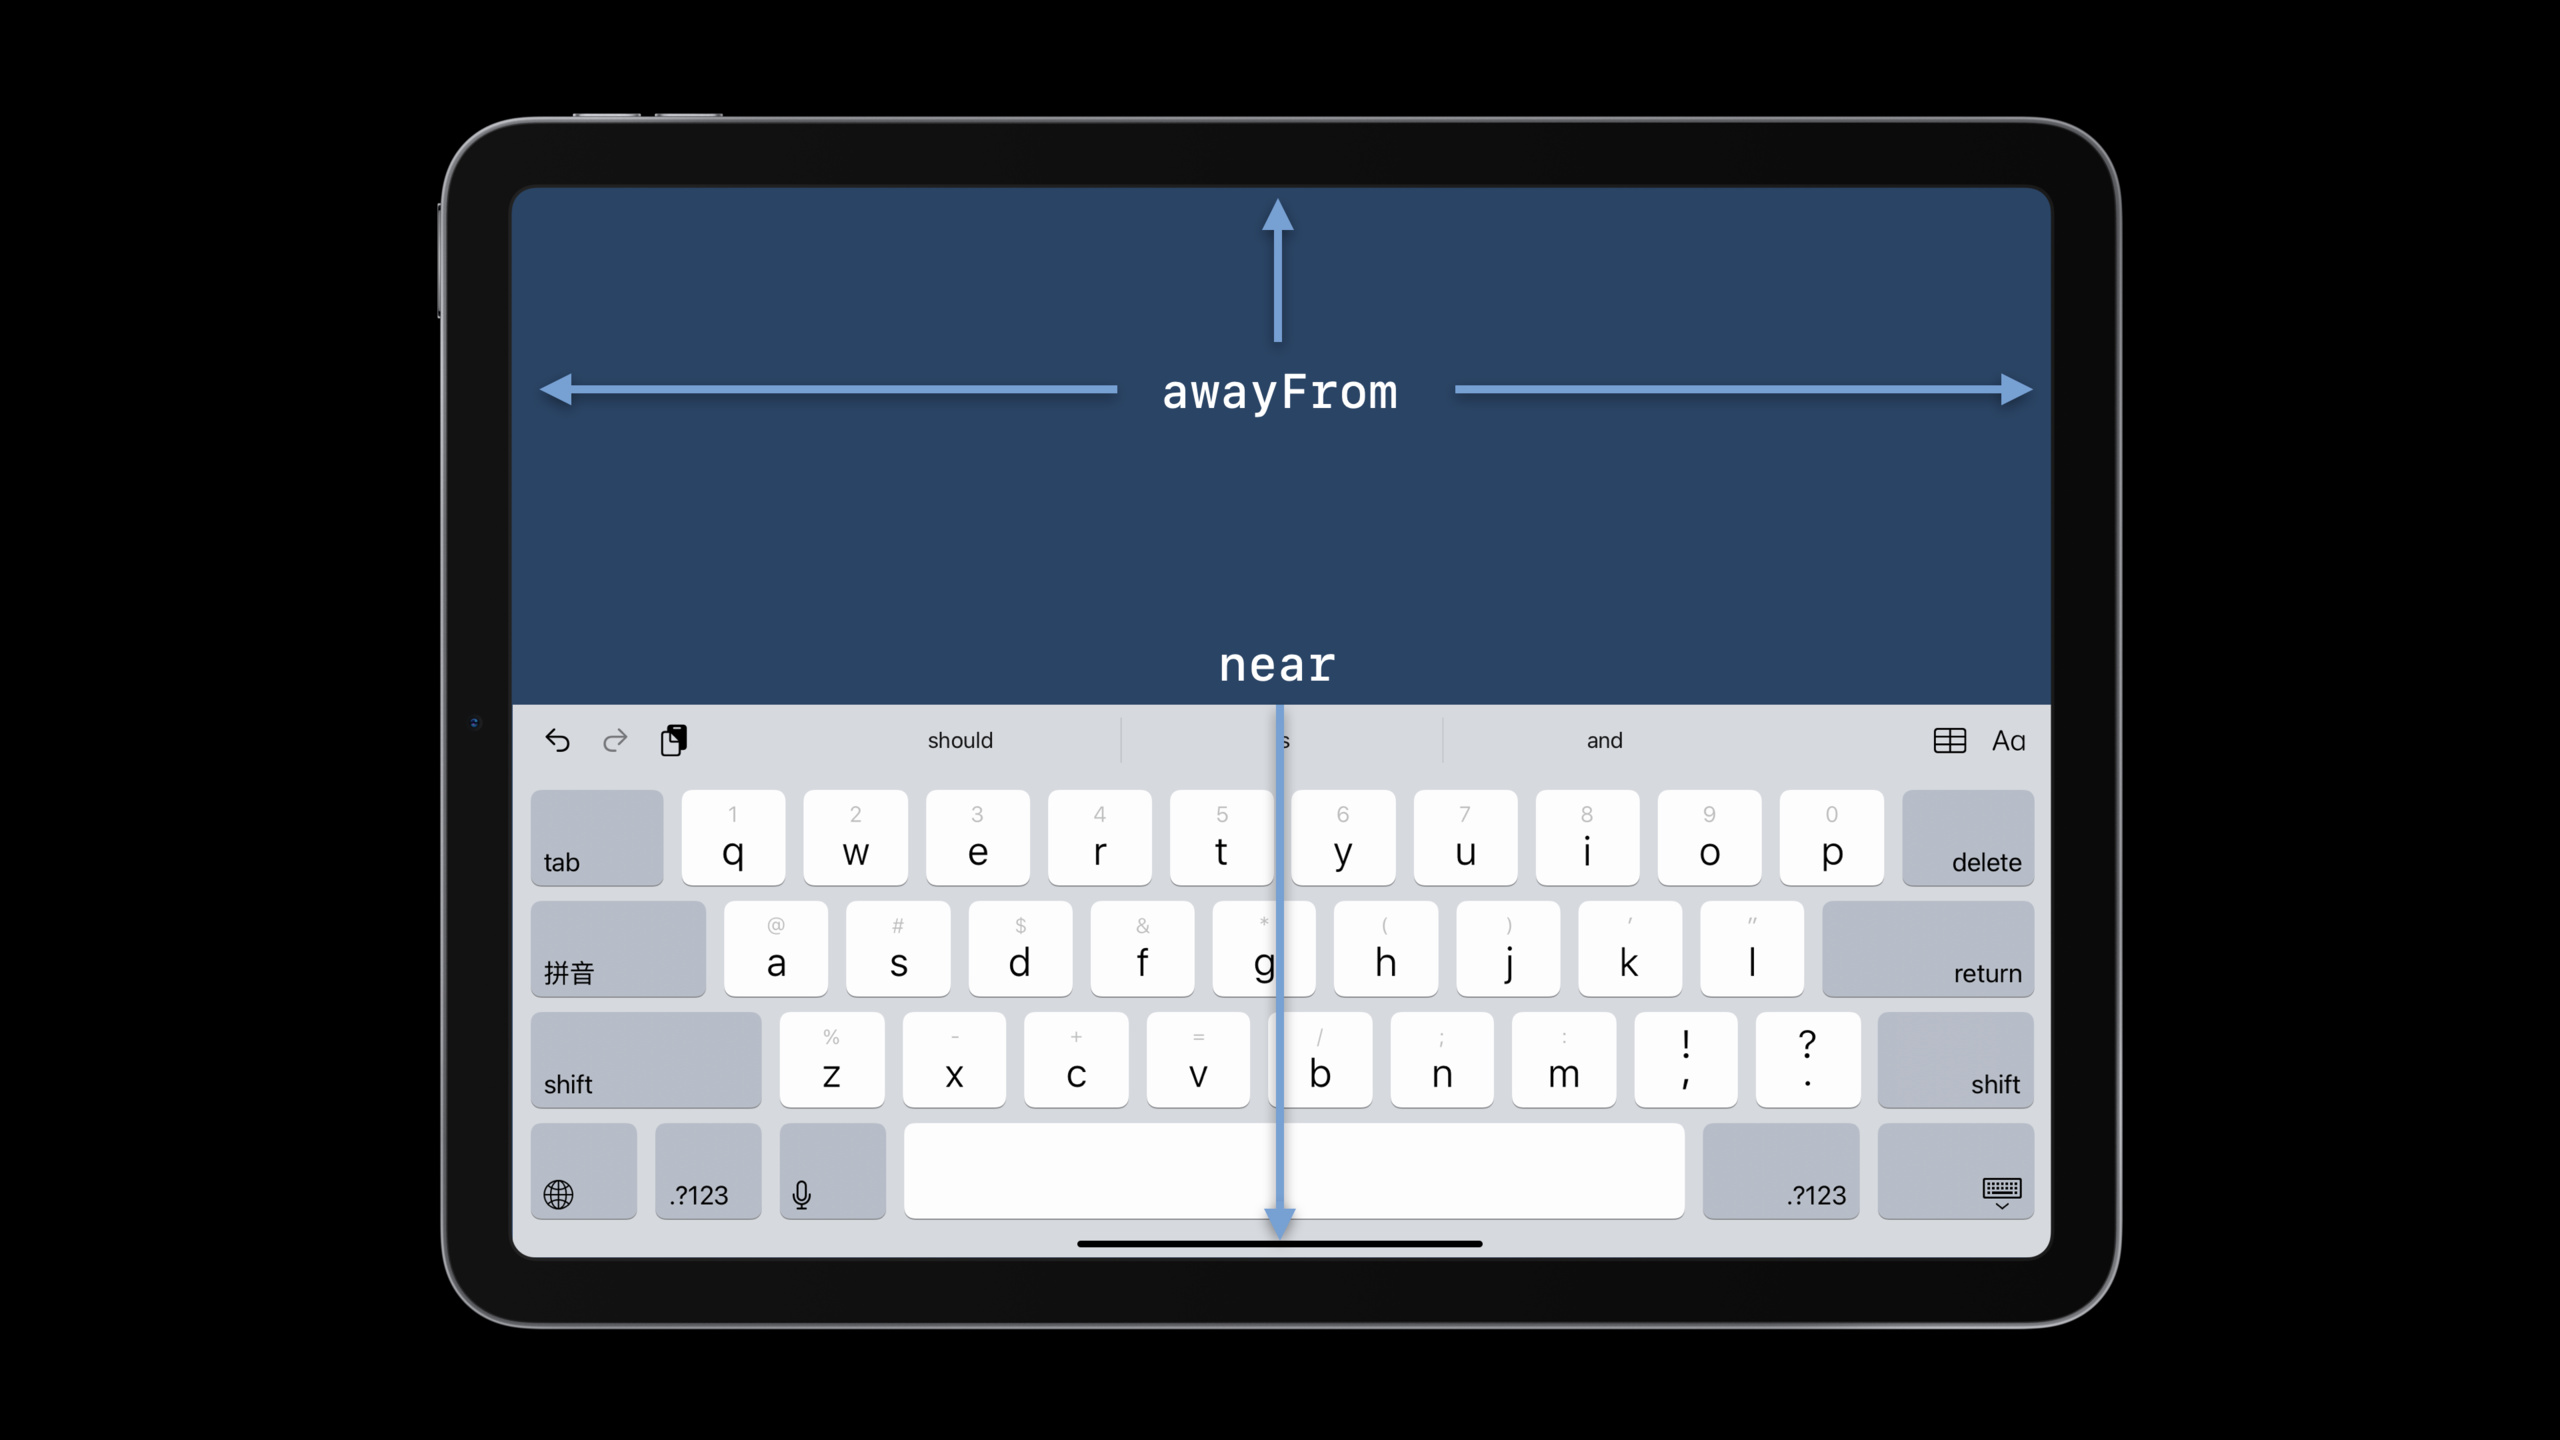
This update also includesUITrackingLayoutGuide. It can automatically enable or disable a set of constraints based on whether the guide is close to an edge. When the floating keyboard is near the top, the input toolbar can return to the bottom; when the floating keyboard is near the left, the picture view can make room.
From avoiding the keyboard to incorporating the keyboard into the layout
Keyboard used to act like an external event. It pops up and the App fixes it.
iOS 15’s idea is more straightforward: the keyboard is also a layout space. Instead of reading the frame to do math, developers declare the relationship between the view and the keyboard. How the keyboard is animated, how the constraints are updated.
This is even more important with the iPad. Users can move the floating keyboard, switch to a split keyboard, or connect a hardware keyboard.keyboardLayoutGuideHandles common scenarios by default; openfollowsUndockedKeyboardFinally, the layout can also follow the position of the floating keyboard.
Detailed Content
The old way of using notifications to handle the keyboard
(01:31) The speech first showed the typical writing method before iOS 15: create a custom layout guide, listen to keyboard notifications, and then use the frame and animation information in the notification to update constraints.
import UIKit

final class NotificationKeyboardViewController: UIViewController {
    private let textView = UITextView()
    private let keyboardGuide = UILayoutGuide()
    private var keyboardHeight: NSLayoutConstraint!

    override func viewDidLoad() {
        super.viewDidLoad()

        view.addSubview(textView)
        view.addLayoutGuide(keyboardGuide)
        textView.translatesAutoresizingMaskIntoConstraints = false

        NSLayoutConstraint.activate([
            textView.leadingAnchor.constraint(equalTo: view.safeAreaLayoutGuide.leadingAnchor),
            textView.trailingAnchor.constraint(equalTo: view.safeAreaLayoutGuide.trailingAnchor),
            textView.topAnchor.constraint(equalTo: view.safeAreaLayoutGuide.topAnchor),
            keyboardGuide.bottomAnchor.constraint(equalTo: view.bottomAnchor),
            keyboardGuide.topAnchor.constraint(equalTo: textView.bottomAnchor)
        ])

        keyboardHeight = keyboardGuide.heightAnchor.constraint(equalToConstant: view.safeAreaInsets.bottom)
        keyboardHeight.isActive = true

        NotificationCenter.default.addObserver(
            self,
            selector: #selector(respondToKeyboard),
            name: UIResponder.keyboardWillShowNotification,
            object: nil
        )
    }

    @objc func respondToKeyboard(notification: Notification) {
        let info = notification.userInfo
        if let endRect = info?[UIResponder.keyboardFrameEndUserInfoKey] as? CGRect {
            var offset = view.bounds.size.height - endRect.origin.y
            if offset == 0.0 {
                offset = view.safeAreaInsets.bottom
            }
            let duration = info?[UIResponder.keyboardAnimationDurationUserInfoKey] as? TimeInterval ?? 2.0
            UIView.animate(withDuration: duration, animations: {
                self.keyboardHeight.constant = offset
                self.view.layoutIfNeeded()
            })
        }
    }
}
Key points:
keyboardGuideCreated by the developers themselvesUILayoutGuide, used to represent the available space above the keyboard. -keyboardGuide.bottomAnchorbind toview.bottomAnchor, causing the guide to start counting from the bottom of the screen. -keyboardGuide.topAnchorbind totextView.bottomAnchor, so that the bottom of the text view follows the top of the guide. -keyboardHeightSave the guide height constraint and modify it laterconstantChange the layout. -NotificationCenter.default.addObserverRegister keyboard to display notifications. -respondToKeyboardfromuserInforeadkeyboardFrameEndUserInfoKey。offsetSubtract the end position of the keyboard from the view heightyvalue to get the keyboard coverage height. -offset == 0.0fall back tosafeAreaInsets.bottom, handle the situation when the keyboard leaves the screen. -keyboardAnimationDurationUserInfoKeyProvide keyboard animation duration. -UIView.animateUpdate the constraint constants within and calllayoutIfNeeded(), let the custom guide follow the keyboard animation.
This code illustrates the cost of the old solution. Developers need to care about notifications, frames, safe areas, and animations at the same time.
UIKeyboardLayoutGuideTurn the keyboard into a constraint target
(03:09) iOS 15 NewUIView.keyboardLayoutGuide. it isUILayoutGuide, has the same anchors as the view, used to represent the space occupied by the keyboard.
import UIKit

final class KeyboardLayoutGuideViewController: UIViewController {
    private let textView = UITextView()

    override func viewDidLoad() {
        super.viewDidLoad()

        view.addSubview(textView)
        textView.translatesAutoresizingMaskIntoConstraints = false

        NSLayoutConstraint.activate([
            textView.leadingAnchor.constraint(equalTo: view.safeAreaLayoutGuide.leadingAnchor),
            textView.trailingAnchor.constraint(equalTo: view.safeAreaLayoutGuide.trailingAnchor),
            textView.topAnchor.constraint(equalTo: view.safeAreaLayoutGuide.topAnchor),
            view.keyboardLayoutGuide.topAnchor.constraint(
                equalToSystemSpacingBelow: textView.bottomAnchor,
                multiplier: 1.0
            )
        ])
    }
}
Key points:
view.keyboardLayoutGuideyesUIViewproperties, available in iOS 15. -topAnchorIndicates the top of the area currently occupied by the keyboard. -textView.bottomAnchorConstrained to the top of the keyboard guide, the text view will not be obscured when the keyboard pops up. -equalToSystemSpacingBelowUse system spacing to maintain a standard distance between the text view and the keyboard.- The code does not register keyboard notifications and does not read the keyboard frame.
- The guide will match the keyboard pop-up and collapse animation, and will also follow the keyboard height changes.
- The guide will handle the safe area, and the basic scenario does not require developers to calculate the bottom inset.
By default, when a floating or undocked keyboard appears, the guide falls at the bottom of the screen, with a width equal to the window width. Views bound to the top of the guide can still follow the bottom position.
Follow floating keyboard
(05:07) If your interface wants to really move against the iPad floating keyboard, you can turn it onfollowsUndockedKeyboard。
import UIKit

final class FloatingKeyboardViewController: UIViewController {
    private let editView = UIView()

    override func viewDidLoad() {
        super.viewDidLoad()

        view.addSubview(editView)
        editView.translatesAutoresizingMaskIntoConstraints = false

        view.keyboardLayoutGuide.followsUndockedKeyboard = true

        NSLayoutConstraint.activate([
            editView.centerXAnchor.constraint(equalTo: view.keyboardLayoutGuide.centerXAnchor),
            editView.bottomAnchor.constraint(equalTo: view.keyboardLayoutGuide.topAnchor)
        ])
    }
}
Key points:
followsUndockedKeyboardThe default isfalse.- set to
trueAfterwards, the guide follows the position of undocked and floating keyboards. -centerXAnchorleteditViewAlign the center of the keyboard horizontally. -bottomAnchorleteditViewFits snugly to the top of the keyboard. - When the user drags the floating keyboard,
editViewWill move with the guide. - The speech reminds developers: after turning on this attribute, the layout must consider more keyboard shapes and screen edges.
After turning on following, the keyboard position is no longer stable. The floating keyboard may be off all sides, or it may be close to the top, left, or right side. Cooperate at this timeUITrackingLayoutGuideHandle edge cases.
Switch constraints based on vertical edges
(06:46)UIKeyboardLayoutGuideyesUITrackingLayoutGuidesubcategory. It can save multiple sets of constraints and automatically switch when the guide approaches or moves away from an edge.
import UIKit

final class VerticalTrackingViewController: UIViewController {
    private let editView = UIView()

    override func viewDidLoad() {
        super.viewDidLoad()

        view.addSubview(editView)
        editView.translatesAutoresizingMaskIntoConstraints = false
        view.keyboardLayoutGuide.followsUndockedKeyboard = true

        let awayFromTopConstraints = [
            view.keyboardLayoutGuide.topAnchor.constraint(equalTo: editView.bottomAnchor),
        ]
        view.keyboardLayoutGuide.setConstraints(awayFromTopConstraints, activeWhenAwayFrom: .top)

        let nearTopConstraints = [
            view.safeAreaLayoutGuide.bottomAnchor.constraint(equalTo: editView.bottomAnchor),
        ]
        view.keyboardLayoutGuide.setConstraints(nearTopConstraints, activeWhenNearEdge: .top)
    }
}
Key points:
awayFromTopConstraintsTakes effect when the keyboard guide is away from the top.- The first constraint
editView.bottomAnchorConnect tokeyboardLayoutGuide.topAnchorto keep the editing toolbar above the keyboard. -setConstraints(_:activeWhenAwayFrom:)Leave this set of constraints to the tracking guide for management. -nearTopConstraintsTakes effect when the keyboard guide is near the top. -view.safeAreaLayoutGuide.bottomAnchor.constraint(equalTo: editView.bottomAnchor)BundleeditViewReturn to the bottom of the safe area. -setConstraints(_:activeWhenNearEdge:)Enable this set of constraints when specified near the top. - When the floating keyboard is dragged near the top of the screen, the top constraint will be disabled, the bottom constraint will be enabled, and the toolbar will not run off the screen.
This mode is suitable for input attachment bars, formatting toolbars, and comment boxes. When the user drags the floating keyboard to the top, the toolbar can return to the bottom to avoid being squeezed out by the edge of the screen.
Switch constraints based on horizontal edges
(07:44) The same mechanism can also handle horizontal movement. In the speech example, when the keyboard is far away from the left and right edges, the editing view follows the keyboard and is centered; when the keyboard is close to one side, the picture view moves to the other side.
import UIKit

final class HorizontalTrackingViewController: UIViewController {
    private let editView = UIView()
    private let imageView = UIImageView()

    override func viewDidLoad() {
        super.viewDidLoad()

        view.addSubview(editView)
        view.addSubview(imageView)
        editView.translatesAutoresizingMaskIntoConstraints = false
        imageView.translatesAutoresizingMaskIntoConstraints = false
        view.keyboardLayoutGuide.followsUndockedKeyboard = true

        let awayFromSides = [
            view.keyboardLayoutGuide.centerXAnchor.constraint(equalTo: editView.centerXAnchor),
            imageView.centerXAnchor.constraint(equalTo: view.centerXAnchor),
        ]
        view.keyboardLayoutGuide.setConstraints(awayFromSides, activeWhenAwayFrom: [.leading, .trailing])

        let nearTrailingConstraints = [
            view.keyboardLayoutGuide.trailingAnchor.constraint(equalTo: editView.trailingAnchor),
            imageView.leadingAnchor.constraint(
                equalToSystemSpacingAfter: view.safeAreaLayoutGuide.leadingAnchor,
                multiplier: 1.0
            )
        ]
        view.keyboardLayoutGuide.setConstraints(nearTrailingConstraints, activeWhenNearEdge: .trailing)

        let nearLeadingConstraints = [
            editView.leadingAnchor.constraint(equalTo: view.keyboardLayoutGuide.leadingAnchor),
            view.safeAreaLayoutGuide.trailingAnchor.constraint(
                equalToSystemSpacingAfter: imageView.trailingAnchor,
                multiplier: 1.0
            )
        ]
        view.keyboardLayoutGuide.setConstraints(nearLeadingConstraints, activeWhenNearEdge: .leading)
    }
}
Key points:
awayFromSidesTakes effect when the keyboard is moved away from the left and right sides. -keyboardLayoutGuide.centerXAnchorAlignmenteditView.centerXAnchorto make the editing view follow the center of the keyboard. -imageView.centerXAnchorAlignmentview.centerXAnchor, keeping the image in the middle of the window. -activeWhenAwayFrom: [.leading, .trailing]Ask the guide to stay away from the left and right sides at the same time. -nearTrailingConstraintsTakes effect when the keyboard is close to the right. -keyboardLayoutGuide.trailingAnchor.constraint(equalTo: editView.trailingAnchor)Make the edit view snap to the right of the keyboard. -imageView.leadingAnchorConstrain it to the left of the safe area and move the image to the opposite direction of the keyboard. -nearLeadingConstraintsHandle symmetrical scenes with the keyboard close to the left.- The tracking guide automatically enables and disables these constraints when the keyboard enters or leaves the edge area.
This capability is suitable for iPad editors, artboards, and chat interfaces. When the floating keyboard moves, the content can actively give way and the input controls remain close to the keyboard.
Keyboard shapes to consider when designing
(08:55) The speech clearly explains the judgment rules for near and awayFrom.
view.keyboardLayoutGuide.followsUndockedKeyboard = true

let dockedKeyboardBehavior = [
    view.keyboardLayoutGuide.topAnchor.constraint(equalTo: editView.bottomAnchor)
]
view.keyboardLayoutGuide.setConstraints(dockedKeyboardBehavior, activeWhenAwayFrom: [.top, .leading, .trailing])

let topEdgeBehavior = [
    view.safeAreaLayoutGuide.bottomAnchor.constraint(equalTo: editView.bottomAnchor)
]
view.keyboardLayoutGuide.setConstraints(topEdgeBehavior, activeWhenNearEdge: .top)
Key points:
- Docked keyboards are seen closer to the bottom and further away from the top, left and right.
- Undocking and split keyboards may be away from all sides or close to the top.
- The floating keyboard can be close to any edge, or to two adjacent edges at the same time.
- These rules are only available in
followsUndockedKeyboardfortruetime affects the layout. -activeWhenAwayFrom: [.top, .leading, .trailing]Suitable for expressing the general state of “the keyboard is not close to the top and left and right edges”. -activeWhenNearEdge: .topSuitable for handling the fallback layout after dragging the keyboard to the top.
The speech also reminded not to rely easily onkeyboardLayoutGuide.widthAnchor. The width of the hardware keyboard’s adaptive shortcuts bar changes with language and number of buttons in iOS 15; it may also be closer to the left or right when collapsed.
(12:02) Multitasking will also affect the guide. The keyboard may leave your app space, in which case the system will treat it as closed. When the app is in split screen or Slide Over, the size of the guide only covers the part of the keyboard that is within the current window.
view.keyboardLayoutGuide.followsUndockedKeyboard = true

let visibleKeyboardConstraints = [
    editView.bottomAnchor.constraint(equalTo: view.keyboardLayoutGuide.topAnchor)
]
view.keyboardLayoutGuide.setConstraints(visibleKeyboardConstraints, activeWhenAwayFrom: .top)

let safeFallbackConstraints = [
    editView.bottomAnchor.constraint(equalTo: view.safeAreaLayoutGuide.bottomAnchor)
]
view.keyboardLayoutGuide.setConstraints(safeFallbackConstraints, activeWhenNearEdge: .top)
Key points:
- In Split View and Slide Over, the keyboard may only cover part of the current app.
- The size of the guide is calculated based on the portion of the current window covered by the keyboard.
- When the keyboard leaves the App space, the guide will be processed by the keyboard.
-
visibleKeyboardConstraintsKeep the control close to the keyboard in its normal state. -safeFallbackConstraintsProvides a safe fallback position for top edge scenes. - This type of fallback constraint can prevent controls from running off the screen with the floating keyboard.
Core Takeaways
1. The chat input field follows the keyboard
- What to do: Make a chat input field. When the keyboard pops up, the input field automatically stops above the keyboard.
- Why it’s worth doing:
keyboardLayoutGuide.topAnchorKeyboard animation and height changes will be matched, and the input field does not require handwriting notification monitoring. - How to start: Put the input field
bottomAnchorconstrained toview.keyboardLayoutGuide.topAnchor, while constraining the bottom of the message list to the top of the input field.
2. iPad floating keyboard special editing toolbar
- What to do: Make the bold, list, and illustration buttons move with the floating keyboard in the note app.
- Why it’s worth doing:
followsUndockedKeyboard = trueYou can make the toolbar follow the undocked keyboard position. - How to start: Enable
view.keyboardLayoutGuide.followsUndockedKeyboard, constrain the center and bottom of the toolbar tokeyboardLayoutGuide.centerXAnchorandtopAnchor。
3. Form with top edge automatically retracting
- What: Move the form action bar to the bottom of the safe area when the floating keyboard is dragged to the top of the screen.
- Why it’s worth doing:
UITrackingLayoutGuideAble to automatically switch constraints when the guide is near the top. - How to start: Use
setConstraints(_:activeWhenAwayFrom: .top)To manage “paste keyboard” constraints, usesetConstraints(_:activeWhenNearEdge: .top)Managing “back to bottom” constraints.
4. Keyboard avoidance layout of Sketchpad App
- What: Have the canvas preview or layers panel automatically move to the other side of the keyboard when the user moves the floating keyboard.
- Why is it worth doing: tracking guide can distinguish
.leadingand.trailing, the horizontal edge state can drive content to give way. - How to start: Prepare constraint arrays for the keyboard away from the left and right edges, close to the left, and close to the right, and then hand them over
keyboardLayoutGuide.setConstraints。
5. Editor that supports hardware keyboard shortcut bar
- What to do: Make the bottom control of the editor adapt to the real width of the adaptive shortcuts bar when a hardware keyboard is connected.
- Why it’s worth doing: The shortcut bar width of iOS 15 is no longer fixed to full screen.
keyboardLayoutGuideCan expose real leading and trailing edges. - How to start: Enable
followsUndockedKeyboardFinally, avoid relying on a fixed width and use the guide’s edge anchors and near/awayFrom states to determine the toolbar position.
Related Sessions
- Focus on iPad keyboard navigation — Continuing on hardware keyboard navigation, focus movement, and tab cycling in iPad and Mac Catalyst.
- Direct and reflect focus in SwiftUI — Focus management and keyboard closing capabilities on the SwiftUI side, suitable for forms and cross-platform input experiences.
- What’s new in SwiftUI — Overview of SwiftUI improvements to text fields, focus, and keyboard interaction in 2021.
- The keys to a better text input experience — Understand the old scheme of keyboard notifications and text input experience to facilitate migration to
UIKeyboardLayoutGuide。
Comments
GitHub Issues · utterances