
Highlight
Apple uses DeviceCheck and App Attest to provide device-level promotion status, application integrity verification and request signing capabilities, allowing the server to identify duplicate claims, modified clients and tampered sensitive requests.
Core Content
A common promotion is to send a free item for a new feature. The problem is with the installation package itself. Users can uninstall the app, install it again, and claim it again. Your account system may be able to block some abuses, but changing accounts, clearing data, and reinstalling apps on the same device will still bypass many simple rules.
DeviceCheck solves this type of promotion status problem. It allows developers to save two bits and a timestamp for a device on Apple servers. This state persists across app reinstalls, device transfers, and even Erase All Content and Settings. Developers decide the meaning of bits themselves, such as “already received a novice gift pack” or “participated in fraudulent activities”.
The other question is more difficult. When the server receives a request, it is difficult to confirm that it comes from a genuine app. The repackaged client can fake the geographical location and collect all the collections in the travel collection application; the game plug-in can give you unlimited acceleration; the script can also directly hit your interface, making the server mistakenly think that the traffic comes from real users.
App Attest solves the problem of request source and request content. It lets the app create a hardware-protected key that Apple certifies. After server-side verification, you can know that the key comes from a real Apple device and belongs to your real App, and the payload of subsequent requests has not been changed midway.
The boundaries of this mechanism are also very clear. App Attest’s keys are generated per App installation and will not be retained across reinstallations, nor will they be backed up or synchronized. DeviceCheck is more suitable for recording device-level historical status. App Attest is more suitable for protecting important but infrequent server requests.
Detailed Content
DeviceCheck: Save device-level state on Apple servers
(00:50) DeviceCheck is a framework introduced in iOS 11 to mitigate promotion abuse. It saves two bits and a timestamp associated with a device on Apple servers. Apple is responsible for maintaining state, and developers are responsible for defining the meaning of state.
import DeviceCheck

let device = DCDevice.current

if device.isSupported {
    device.generateToken { token, error in
        guard let token = token, error == nil else {
            // Handle the error.
            return
        }

        // Send token to your server.
    }
} else {
    // Treat as a risk signal in your fraud assessment.
}
Key points:
import DeviceCheckIntroducing the DeviceCheck framework. -DCDevice.currentGet the DeviceCheck entry of the current device. -device.isSupportedFirst determine whether the device supports DeviceCheck. -generateTokenGenerate a device token, and the App sends it to its own server.- The server uses the token to call Apple’s DeviceCheck service to query or update two bits of the device.
- When it is not supported or the generation fails, do not directly release sensitive rights and interests. Failure should be used as a risk control signal.
These two bits are shared by all apps under the same developer account. When designing the meaning, it should cover the entire product line and cannot be named based on the local logic of a single App. Timestamps can be used for periodic resets, such as re-allowing claims once per activity cycle.
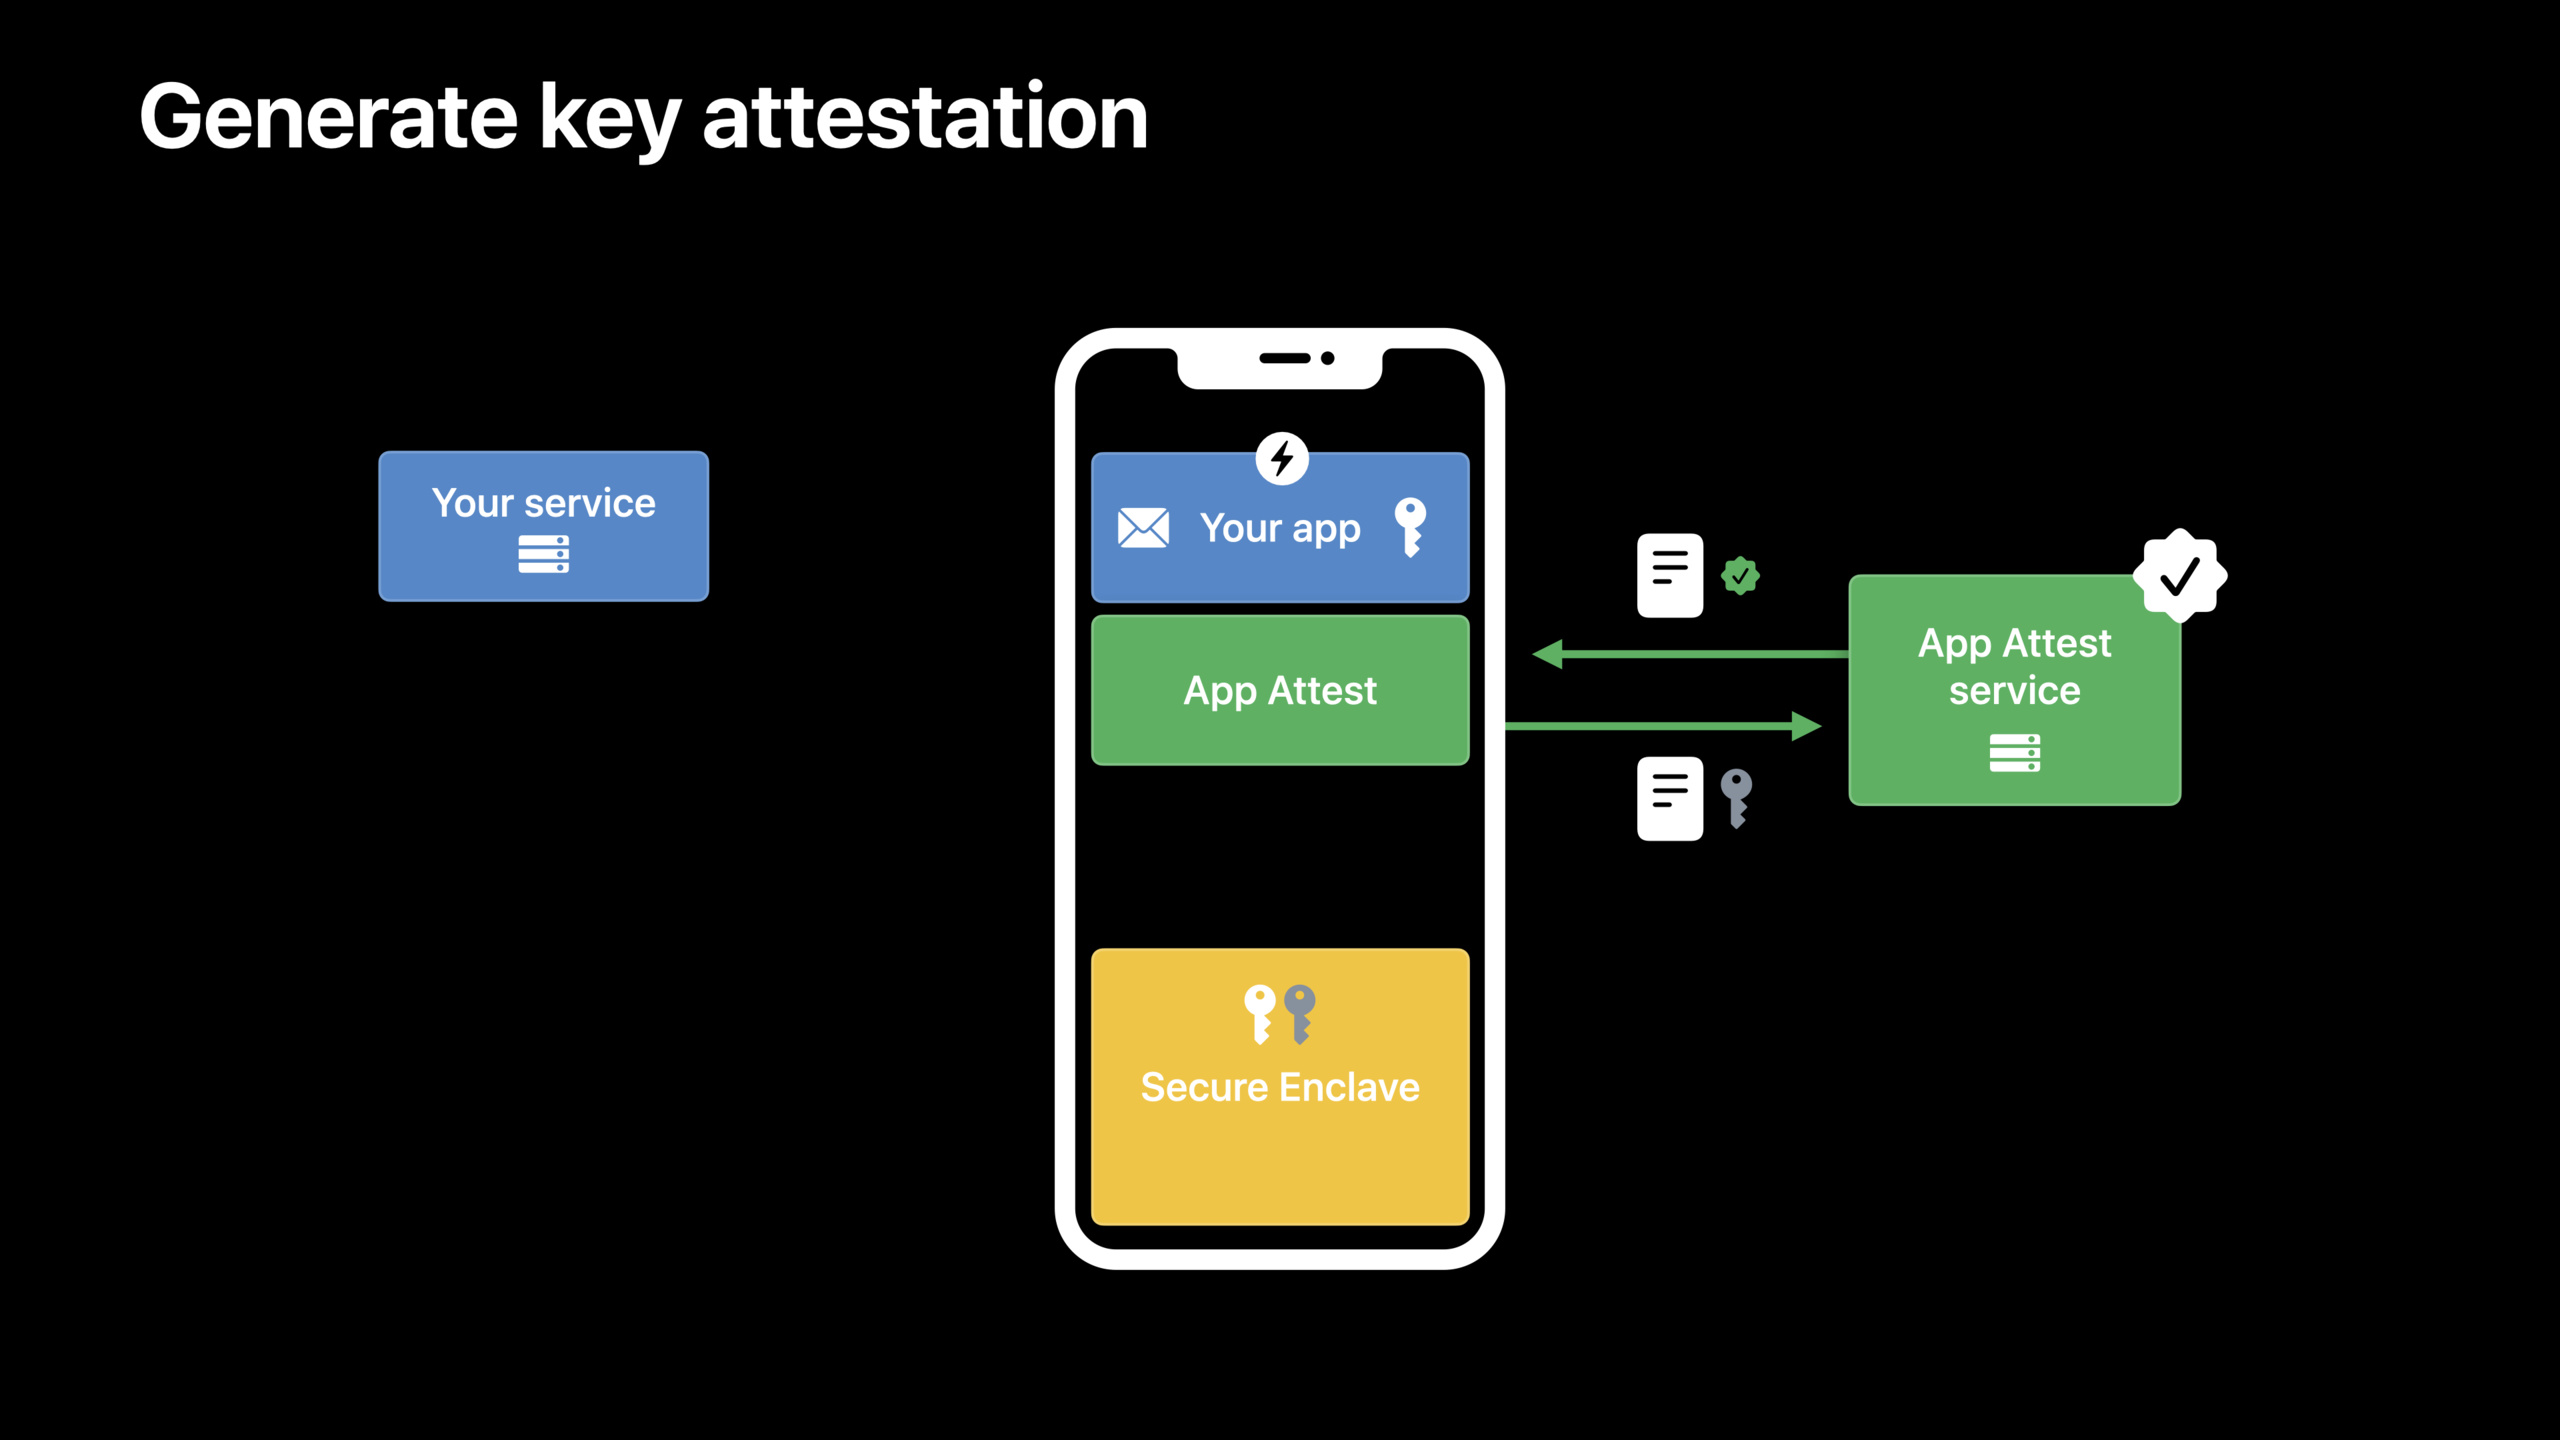
App Attest Step 1: Create a hardware-protected key
(08:02) App Attest belongs to the DeviceCheck framework. At its core is a pair of security keys. Private keys are only accessible in the Secure Enclave via the App Attest API. The server then uses the public key to verify the request signature.
let appAttestService = DCAppAttestService.shared

if appAttestService.isSupported {
    appAttestService.generateKey { keyId, error in
        guard error == nil else { /* Handle the error. */ }
        // Cache keyId for subsequent operations.
    }
} else {
   // Handle fallback as untrusted device
}
Key points:
DCAppAttestService.sharedGet the App Attest service object. -appAttestService.isSupportedMust check support first.- App Attest requires a device with Secure Enclave, but App Extension and other scenarios may still return
false。 generateKeyCreate an App Attest key on the device. -keyIdis the index for subsequent proof keys and generated assertions, and the App needs to cache it.- When it is not supported, Apple recommends classifying the caller as untrusted first, and then leaving it to the overall risk control logic for judgment.
Don’t put it hereisSupported == falseas the only ban condition. The talk suggests monitoring the proportion of “App Attest Not Supported”. If the ratio suddenly drops, it could be that the repackaged app is trying to bypass the check.
App Attest Step 2: Prove that the key belongs to the real device and the real App
(09:17) After the key is created, it cannot be trusted directly. The server first sends a one-time challenge. App hashes the challenge, user account ID or other business values together to getclientDataHash. This hash binds the proof process to the current business context, preventing middlemen and replay attacks.
appAttestService.attestKey(keyId, clientDataHash: clientDataHash) { attestationObject, error in
    guard error == nil else { /* Handle error. */ }

    // Send the attestation object to your server for verification.
}
Key points:
keyIdfrom previous stepgenerateKey。clientDataHashObtained from server-side challenge and business data hash. -attestKeyCreate a hardware certification request using the private key and submit it to Apple for verification.- Return anonymous after Apple verification
attestationObject. -App handleattestationObjectand business payload to your own server. - After the server verification is passed, the App Attest key is saved and used to verify subsequent requests.
(10:22) The server verifies the Web Authentication standard format. The proof object contains three types of content: Apple-signed certificate chain, Authenticator Data, and risk metric receipt.
struct AppAttestVerificationInput {
    let attestationObject: Data
    let clientDataHash: Data
    let expectedAppIdentifier: String
    let keyId: String
}

func verifyAttestation(_ input: AppAttestVerificationInput) throws {
    // 1. Validate the certificate chain against the App Attest root certificate.
    // 2. Reconstruct the nonce from clientDataHash and verify it in the leaf certificate.
    // 3. Validate the app identity hash in authenticator data.
    // 4. Store the public key and risk metric receipt for later requests.
}
Key points:
attestationObjectIt is the certification object sent by the App. -clientDataHashMust be called with AppattestKeyThe hash used is consistent. -expectedAppIdentifierRepresents the App identity expected by the server.- The first step is to verify the certificate chain. The root certificate comes from the Apple Private PKI repository.
- The second step is to rebuild the nonce and confirm that it appears in the leaf certificate.
- The third step is to check the App identity hash in Authenticator Data to confirm that the request comes from your App.
- The fourth step is to save the public key and risk metric receipt for subsequent assertions and risk assessment.
Nor does failure to prove necessarily indicate an attack. Normal failures listed in the speech includeisSupportedforfalse, the current is limited during the grayscale period, and the network fails. When going online, the coverage should be gradually expanded to avoid simultaneous calls from a large number of installations.attestKeyTrigger current limit.
App Attest Step 3: Generate assertions for sensitive requests
(13:14) After completing the key certification, subsequent requests usegenerateAssertion. This process no longer accesses Apple servers. The assertion is generated on the device and verified by the server using the previously saved public key.
appAttestService.generateAssertion(keyId, clientDataHash: clientDataHash) { assertionObject, error in
    guard error == nil else { /* Handle error. */ }

    // Send assertion object with your data to your server for verification
}
Key points:
- Before requesting, the server still sends a unique challenge.
- App generates digests for payload and challenge as
clientDataHash。 generateAssertionSign this digest with the App Attest private key. -assertionObjectIt must be sent to the server together with the original business data.- The server reconstructs the nonce and verifies the signature using the saved public key.
- When the signature is valid, the server can trust that the payload has not been tampered with.
(14:09) The assertion object contains the signature and Authenticator Data. The server also checks the App identity hash and saves an incrementing counter. The counter of the next request should be larger to reduce the risk of replay attacks.
struct AppAttestAssertionInput {
    let assertionObject: Data
    let payload: Data
    let challenge: Data
    let storedPublicKey: Data
    let previousCounter: UInt32
}

func verifyAssertion(_ input: AppAttestAssertionInput) throws {
    // 1. Recreate clientDataHash from payload and challenge.
    // 2. Reconstruct the nonce from clientDataHash.
    // 3. Verify the signature with the stored public key.
    // 4. Validate the app identity hash in authenticator data.
    // 5. Confirm the counter is greater than previousCounter, then store it.
}
Key points:
payloadIt is the business data that needs to be protected, such as receiving awards, redeeming, and uploading results. -challengeIt is a one-time value generated by the server for this request. -storedPublicKeyfrom the previous key attestation stage. -previousCounterIt is the last round counter saved by the server.- Signature verification confirms that payload and challenge have not been replaced.
- App identity hash verification confirms that the assertion comes from your app.
- A counter increment check is used to detect duplicate submissions of old assertions.
Assertions are cryptographic operations and add latency. The speech suggested using it for important but low-frequency calls, such as redeeming, receiving, and submitting key results. Real-time high-frequency network commands are not suitable for generating assertions every time.
Risk Metric Service: Discovered a device batch manufacturing keys
(16:04) An attacker may use a real device to create many App Attest keys, and then use this device as a transit to provide communication for many modified apps. App Attest Risk Metric Service is used to discover such patterns.
struct RiskMetricRecord {
    let keyId: String
    let receipt: Data
    let approximateKeyCount: Int?
}

func updateRiskMetric(_ record: RiskMetricRecord) {
    // Submit the latest receipt to the App Attest Risk Metric Service.
    // Store the new receipt and the approximate number of keys for this app/device pair.
}
Key points:
attestKeyThe returned certificate includes risk metric receipt.- The server saves this receipt.
- The subsequent server submits the receipt to the risk indicator service in exchange for a new receipt.
- The new receipt will contain the approximate number of keys created by this device for your app.
- The server can periodically exchange the latest receipt and update the risk signal of the same app/device pair.
This indicator is suitable for entering risk control scoring. It does not replace business rules. When the number of keys on the device is abnormal, you can require additional verification, reduce the reward amount, or delay the issuance of sensitive rights and interests.
App Clips: App Clips and full apps share the App Attest identity
(17:17) iOS 15 adds App Attest support for App Clips. In order for the App Clip to be successfully upgraded to the full App, the App Clip and the full App share the same App identity in the App Attest context.
struct AppIdentityPolicy {
    let fullAppIdentifier: String
    let appClipIdentifier: String

    func accepts(_ attestedAppIdentity: String) -> Bool {
        attestedAppIdentity == fullAppIdentifier || attestedAppIdentity == appClipIdentifier
    }
}
Key points:
fullAppIdentifierRepresents the identity of the complete app. -appClipIdentifierIndicates the identity of the App Clip.- The server should take the App Clip upgrade path into consideration when verifying App identity.
- Manual removal or expired App Clip will invalidate its App Attest key.
- When a complete app is uninstalled, its App Attest key will also become invalid.
Core Takeaways
-
What to do: Add a “once per device” limit to the novice package. Why it’s worth doing: The two bits of DeviceCheck will be retained across reinstallations, which can cover the scenario of repeated uninstallation and installation to receive rewards. How to start: Use
DCDevice.current.generateTokenSend the device token to the server, and the server uses the DeviceCheck API to query and update the “received” bit. -
What to do: Protect redemption codes, withdraw points, and receive interfaces for rare items. Why it’s worth doing: App Attest asserts that it can bind the payload, server challenge and device key to reduce the risk of modifying the client’s forged request. How to start: Use
DCAppAttestService.generateKeyCreate a key,attestKeyComplete server registration and use it before calling sensitive interfacesgenerateAssertionGenerate assertions. -
What to do: Add client integrity signal for leaderboard submission. Why it’s worth doing: The server can check that the request comes from a real Apple device and a real App, and then decide whether the results will be directly included in the ranking. How to start: Hash the score payload and one-time challenge and call
generateAssertion, the server verifies the signature, App identity hash and increments the counter. -
What to do: Monitor the proportion of devices that “do not support App Attest”. Why it’s worth doing: The talk points out that sudden changes in scale may represent an attempt by the repackaged app to bypass a check. How to start: Record on the server side
isSupported == false, attestation failures, assertion failures, and other events, observe trends by version, region, and device type. -
What to do: Upgrade and protect App Clip discounts. Why it’s worth doing: iOS 15 supports App Clip to use App Attest. App Clip and full App share the App Attest identity, which is suitable for protecting the equity link from lightweight experience to full installation. How to start: When verifying App identity, the server accepts the legal identity of both the App Clip and the complete App. The rights issuance still uses DeviceCheck or account status to remove duplicates.
Related Sessions
- Safeguard your accounts, promotions, and content — Introduce account, promotion, and content protection from a business perspective, and fill in the project implementation details in this session.
- Apple’s privacy pillars in focus — Explains Apple’s privacy principles to help understand the design of App Attest anonymous attestations and no hardware identifiers.
- Secure login with iCloud Keychain verification codes — Demonstrates user experience improvements for login security, and can build account protection together with server-side risk control.
- Move beyond passwords — Introducing the direction of account security based on public key certificates, which like App Attest relies on the server to verify public key materials.
Comments
GitHub Issues · utterances