
Highlight
Apple has extended DocC to interactive tutorial writing in Xcode 13. Developers can use Markdown commands to organize tutorial directories, chapters, steps, codes and pictures, allowing framework users to build real apps step by step in the document window.
Core Content
You have released a Swift framework and the API reference has been written. The user will still be stuck.
They know a genre exists, but they don’t know what to write about it as a first step. They can read the description of a single method, but they can’t see how several APIs are combined into a single function. In the end, they can only go to the sample project to look up the code, or ask you in the issue.
DocC’s interactive tutorial solves this problem. It treats the tutorial as part of the documentation and places it directly in the Developer Documentation window of Xcode. Tutorials are written in Markdown and use DocC directives to describe the structure.
This session uses the SlothCreator framework as an example. The author first groups the framework APIs: creating sloths, taking care of sloths, and interacting with other frameworks. Then turn these groupings into tutorial chapters. Each chapter contains multiple tutorials. Each tutorial is divided into sections and steps.
What users read is a learning path that can be advanced step by step: first create an Xcode project, then add framework dependencies, then write SwiftUI views, and then check the results against preview screenshots.
This moves the documentation from “describing the API” to “training users to use the API.” What developers need to do is also very specific: prepare a Documentation Catalog, write tutorial directory files, add tutorial files, put pictures and code files, and finally use Product > Build Documentation to preview.
Detailed Content
Tutorial directory: use@TutorialsOrganization entrance
(11:26)
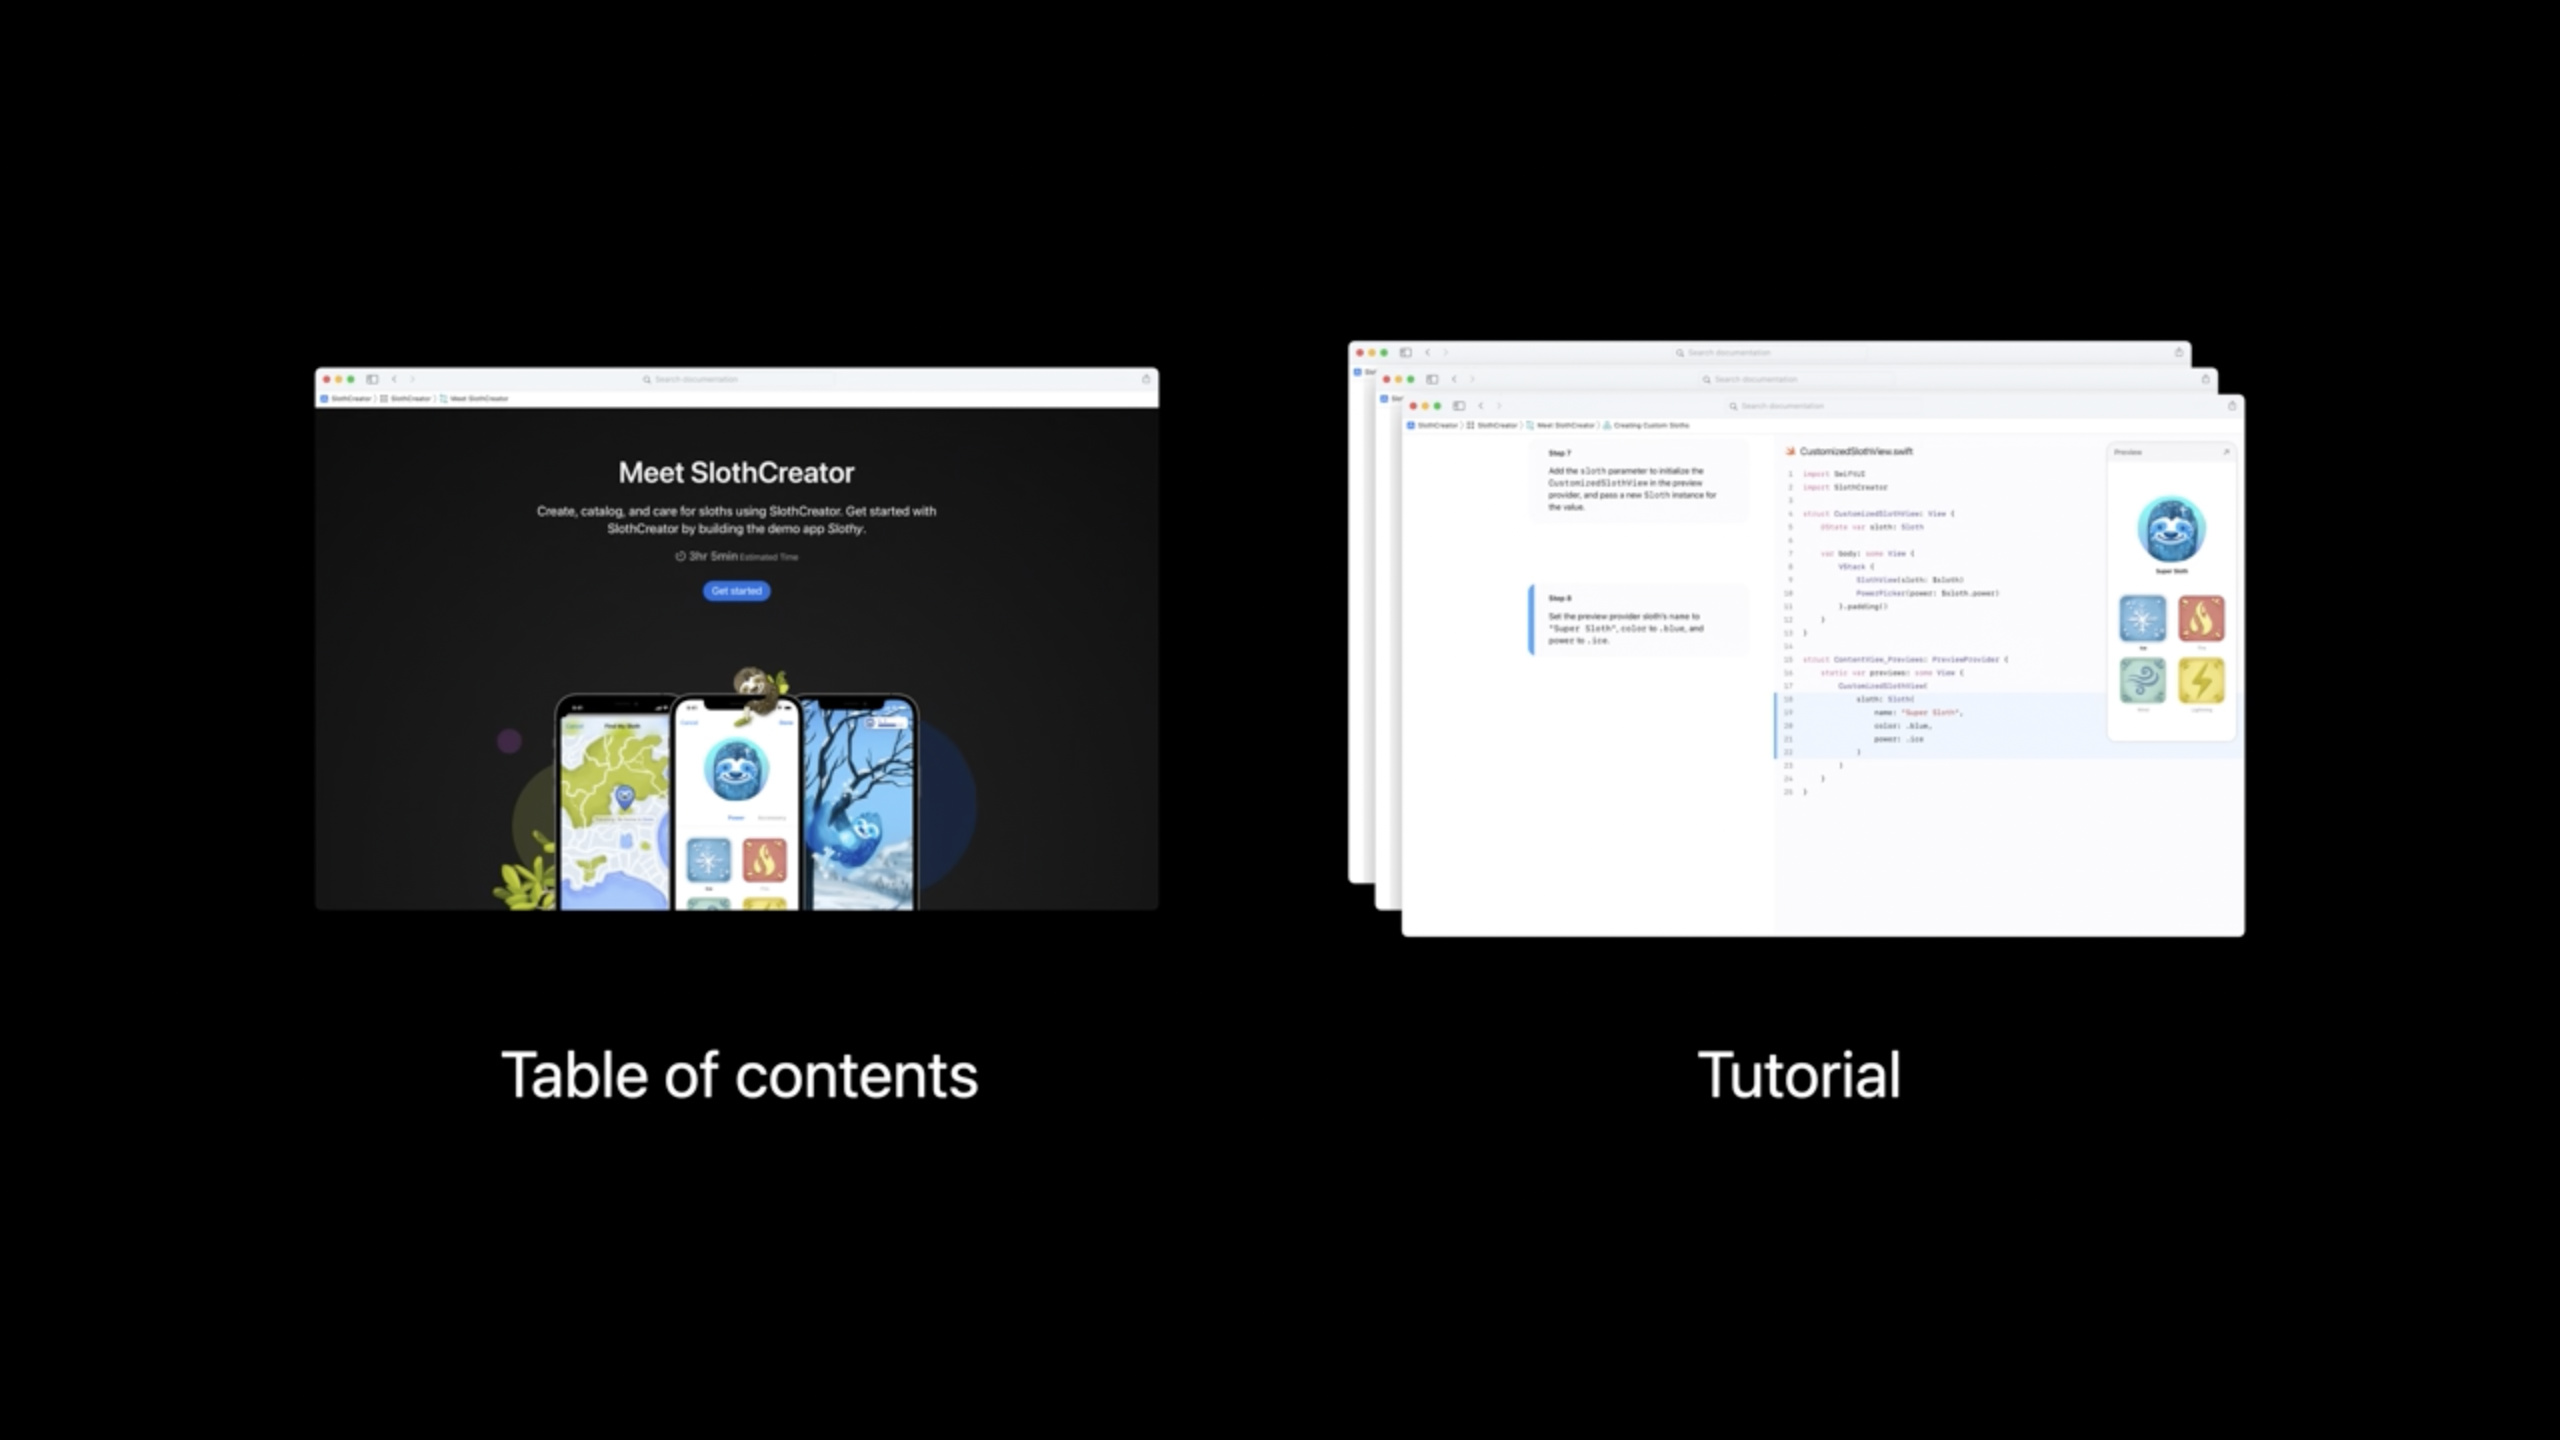
The DocC tutorial collection requires a Table of Contents file. This file uses@Tutorialsas root command. It contains an introduction, chapters, and links to specific tutorials.
@Tutorials(name: "SlothCreator") {
    @Intro(title: "Meet SlothCreator") {
        Create, catalog, and care for sloths using SlothCreator. Get started with SlothCreator by building the demo app _Slothy_.

        @Image(source: slothcreator-intro.png, alt: "An illustration of 3 iPhones in portrait mode, displaying the UI of finding, creating, and taking care of a sloth in Slothy — the sample app that you build in this collection of tutorials.")
    }

    @Chapter(name: "SlothCreator Essentials") {
        @Image(source: chapter1-slothcreatorEssentials.png, alt: "A wireframe of an app interface that has an outline of a sloth and four buttons below the sloth. The buttons display the following symbols, from left to right: snowflake, fire, wind, and lightning.")

        Create custom sloths and edit their attributes and powers using SlothCreator.

        @TutorialReference(tutorial: "doc:Creating-Custom-Sloths")
    }
}
Key points:
@Tutorials(name: "SlothCreator")Define a tutorial collection whose name will appear in the document navigation. -@Intro(title: "Meet SlothCreator")Define the title and introductory text of the collection entry. -@Image(source:alt:)Add an image to the entrance and provide an accessibility description. -@Chapter(name:)Group tutorials into learning stages. -@TutorialReference(tutorial:)Links to individual tutorial files will be used by DocC to generate entry and progress information.
Tutorial Files: Start with Title, Overview and Pictures
(12:21)
Hannah created a new Tutorial file in Xcode 13 and named the first tutorialCreating Custom Sloths. The tutorial template already has intro, section and steps, and you can add content based on this.
Creating Custom SlothsKey points:
- This title corresponds to the main title of the tutorial page.
- Xcode’s Tutorial file template generates the basic structure, and the author only needs to replace the title, introduction, and steps.
- The title should correspond to the task the user wants to complete, in this case creating a custom sloth.
(12:27)
The tutorial overview tells the reader what to build.
This tutorial guides you through building _Slothy_ — an app for creating and caring for custom sloths. You'll start by building the sloth creation view.Key points:
- The first part states that the final product is
_Slothy_App. - What follows the dash is what the app does: create and care for custom sloths.
- The last sentence explains the learning task of the first paragraph: construct sloth creation view.
-
_Slothy_DocC preserves Markdown rendering using Markdown italic syntax.
(13:04)
Tutorials can reference images placed in the Documentation Catalog Resources folder.
creating-intro.pngKey points:
- The file name is written in
@Imageofsourceparameters. - Picture resources are placed in the Resources folder of Documentation Catalog.
- The session emphasizes adding accessible descriptions to images so that readers can understand the tutorial content by reading and listening.
Section and Step: Divide large tasks into executable steps
(15:57)
The first section lets the reader create an Xcode project and add the SlothCreator dependency. each@StepJust do one thing and take a screenshot.
@Step {
    Enter "Slothy" as the Product Name.

    @Image(source: creating-01-02.png, alt: "A screenshot of the project sheet, which shows the Product Name for the app being built as Slothy. The Interface is set to SwiftUI, and the Life Cycle is set to SwiftUI App.")
}

@Step {
    Select "SwiftUI" from the Interface pop-up menu and "SwiftUI App" from the Life Cycle pop-up menu, then click Next. Choose a location to save the Slothy project on your Mac.

    @Image(source: creating-01-03.png, alt: "A screenshot of the project sheet, which shows the Interface is set to SwiftUI and the Life Cycle is set to SwiftUI App.")
}

@Step {
    Add `SlothCreator` as a dependency to the project.

    @Image(source: creating-01-04.png, alt:"A screenshot shows the SlothCreator package in Xcode's navigator.")
}
Key points:
- each
@StepContains a command text. - The first step requires entering a Product Name and the scope of the task is very small.
- The second step requires selecting SwiftUI Interface and SwiftUI App Life Cycle.
- The third step requires
SlothCreatorAdd project dependencies. - Follow every step
@Image, a picture showing what the reader should see in the state of Xcode. -altText describing the screenshot content, serving VoiceOver and other assistive technologies.
(16:09)
After writing, the author builds the document using Product > Build Documentation, or by pressing Control-Shift-Command-D. Xcode will open the Developer Documentation window to preview the tutorial.
Product > Build Documentation
Control + Shift + Command + D
Key points:
Product > Build DocumentationBuild DocC documents in Xcode. -Control + Shift + Command + DIt is a shortcut key for the same operation.- After a successful build, you can inspect the Table of Contents, Chapters, and Tutorial pages in the Developer Documentation window.
- Examples in the session have chapter links, tutorial intros, step-to-image switching, and estimated completion times confirmed in the preview.
Code Step: Put the code file and preview image into the tutorial
(17:58)
In the second section, start writing SwiftUI code. DocC@CodeThe directive can display the Swift file corresponding to a certain step. It will also compare with the previous step of code to highlight the new parts.
@Section(title: "Add a customization view") {
    @ContentAndMedia(layout: horizontal) {
        Add the ability for users to customize sloths and select their powers.

        @Image(source: 01-creating-section2.png, alt: "An outline of a sloth surrounded by four power type icons. The power type icons are arranged in the following order, clockwise from the top: fire, wind, lightning, and ice.")
    }

    @Steps {
        @Step {
            Create a new SwiftUI View file named `CustomizedSlothView.swift`.

            @Code(name: "CustomizedSlothView.swift", file: 01-creating-code-02-01.swift) {
                @Image(source: preview-01-creating-code-02-01.png, alt: "A screenshot from the Xcode preview as it would appear on iPhone, with the text, Hello, World!, centered in the middle of the display.")
            }
        }

        @Step {
            Import the `SlothCreator` package.

            @Code(name: "<#display name#>", file: <#filename.swift#>)
        }
    }
}
Key points:
@Section(title:)Defines a stage in the tutorial. -@ContentAndMedia(layout: horizontal)Keep captions and images aligned horizontally. -@StepsWrap a set of steps.- first
@StepRequest to createCustomizedSlothView.swift。 @Code(name:file:)Point to the Swift file to display.- nested in
@Codewithin@ImageDisplay Xcode Preview results. - the second
@StepTemplate placeholders are used, which are subsequently replaced with real file names.
(19:05)
The author replaced the display name of the second code step with the real file name.
CustomizedSlothView.swiftKey points:
- This value is used for
@Codeofnameparameter. - It appears at the top of the code step and tells the reader which file is being edited.
- The name is consistent with the real Swift file, and readers can find it directly in the Xcode navigator.
(19:08)
The code content comes from a separate Swift file.
01-creating-code-02-02.swiftKey points:
- This value is used for
@Codeoffileparameter. - DocC reads the Swift file and displays it to the right of the tutorial.
- The session explains that DocC will compare the current code file with the previous code file and highlight the new code.
(19:25)
Continue to use subsequent steps@CodeShow Swift files for each step and use previews to let readers check the results.
@Step {
    Create a ``Sloth`` state variable called `sloth`.

    @Code(name: "CustomizedSlothView.swift", file: 01-creating-code-02-03.swift) {
         @Image(source: preview-01-creating-code-02-01.png, alt: "A screenshot from the Xcode preview as it would appear on iPhone, with the text, Hello, World!, centered in the middle of the display.")
    }
}

@Step {
    Delete the template `Text` view, then add a new `VStack` with trailing padding.

    This adds space around and between any views inside.

    @Code(name: "CustomizedSlothView.swift", file: 01-creating-code-02-04.swift) {
         @Image(source: preview-01-creating-code-02-04.png, alt: "A screenshot of a blank preview canvas.")
    }
}

@Step {
    Add a `SlothView`. Specify the `sloth` state variable for the view's `sloth` binding.

    @Code(name: "CustomizedSlothView.swift", file: 01-creating-code-02-05.swift) {
         @Image(source: preview-01-creating-code-02-04.png, alt: "A screenshot of a blank preview canvas.")
    }
}

@Step {
    Add a `PowerPicker`. Specify the `sloth`'s `power` for the picker view's `power` binding.

    @Code(name: "CustomizedSlothView.swift", file: 01-creating-code-02-06.swift) {
         @Image(source: preview-01-creating-code-02-04.png, alt: "A screenshot of a blank preview canvas.")
    }
}

The following steps display your customized sloth view in the SwiftUI preview.

@Step {
    Add the `sloth` parameter to initialize the `CustomizedSlothView` in the preview provider, and pass a new `Sloth` instance for the value.

    @Code(name: "CustomizedSlothView.swift", file: 01-creating-code-02-07.swift) {
         @Image(source: preview-01-creating-code-02-07.png, alt: "A portrait of a generic sloth displayed in the center of the canvas.")
    }
}

@Step {
    Set the preview provider sloth's `name` to `"Super Sloth"`, `color` to `.blue`, and `power` to `.ice`.

    @Code(name: "CustomizedSlothView.swift", file: 01-creating-code-02-08.swift) {
         @Image(source: preview-01-creating-code-02-08.png, alt: "A portrait of an ice sloth on top, followed by four power icons below. The power icons, clockwise from top left, include: ice, fire, wind, and lightning. The ice icon is selected.")
    }
}
Key points:
- First step to create
SlothState variables, and use double backticksSlothLink to DocC symbols. - The second step is to delete the template
Text, switch to one with trailing paddingVStack. - The third step is to add
SlothView, and putslothThe state variable is passed to itslothbinding. - Step 4 Add
PowerPicker, and bindsloth.power. - The last two steps adjust the SwiftUI preview provider so that the preview can show the specific sloth state.
-
name、color、powerExample values for are"Super Sloth"、.blue、.ice。
Multi-chapter training: let the tutorial cover a set of real tasks
(20:10)
A single tutorial can only teach one partial task. SlothCreator’s complete tutorial collection contains eight tutorials divided into three chapters. Chapters correspond to the API groups organized previously by the author.
@Chapter(name: "Sloth Health & Happiness") {
    @Image(source: chapter2-healthAndHappiness.png, alt: "A popover window pointing at a button with a leaf symbol on it. To the right of the leaf button, there is a button with a smiley face and a button with a dumbbell.")

    Discover how to track sloth's activity levels, measure their overall happiness, and feed them their favorite foods.

    @TutorialReference(tutorial: "doc:Feeding-Sloths")
    @TutorialReference(tutorial: "doc:Tracking-Sloth-Activity")
    @TutorialReference(tutorial: "doc:Measuring-Sloth-Happiness")
}

@Chapter(name: "Finding Hidden Sloths") {
    @Image(source: chapter3-findingHiddenSloths.png, alt: "An illustration of a radar scanning over a map. The map displays a pin with a smiley sloth face in the upper left quadrant.")

    Find sloths as they move around their neighborhoods and make friends.

    @TutorialReference(tutorial: "doc:Locating-Sloths")
    @TutorialReference(tutorial: "doc:Finding-Sloth-Habitats")
}
Key points:
Sloth Health & HappinessChapters cover activities, happiness levels and feeding.- This chapter references three tutorials:
Feeding-Sloths、Tracking-Sloth-Activity、Measuring-Sloth-Happiness。 Finding Hidden SlothsChapters cover positioning and habitat.- This chapter references two tutorials:
Locating-Sloths、Finding-Sloth-Habitats. - Each chapter has pictures and short descriptions, so readers can understand the learning path on the content page.
Core Takeaways
-
What to do: Add a “10-minute Getting Started” tutorial to your Swift package. Why it’s worth doing: The tutorials in the session start with a real app, allowing users to quickly see how the framework API works together. How to start: Create the Tutorials folder in the Documentation Catalog and add
@TutorialsDirectory, reuse@TutorialReferenceLink to first tutorial. -
What to do: Design a chapter for each key API grouping. Why it’s worth doing: Will first divided the SlothCreator API into three groups: creation, care, and interaction, and then turned the groups into tutorial chapters. How to get started: List the most important types and views of the framework, group them by tasks, and then write one for each group
@Chapter。 -
What to do: Break the installation, configuration and first code into independent steps. Why it’s worth doing: The first section in the session only handles creating projects and adding dependencies, reducing the entry cost for new users. How to get started: Use multiple
@StepWrite down the Product Name, Interface, Life Cycle, package dependency and other actions clearly, with a picture for each step@Image。 -
What: Provide Swift files and Xcode Preview screenshots for code steps. Why it’s worth doing: DocC can display code files, compare them with the previous step, and highlight new code. Preview images allow readers to check if they are following along. How to get started: Prepare a Swift file for each step, using
@Code(name:file:)Quote, again@CodeNested preview in@Image。 -
What to do: Complete accessibility descriptions for tutorial images. Why it’s worth doing: Hannah clearly mentioned that the tutorial should be experienced by both reading and listening. How to get started: Check each
@Image,foraltWrite down the information in the picture that will help you complete the task.
Related Sessions
- Meet DocC documentation in Xcode — Learn how DocC generates documentation for Swift frameworks and packages in Xcode.
- Elevate your DocC documentation in Xcode — Learn to use DocC to organize articles, tables of contents, and extended content.
- Host and automate your DocC documentation — Integrate DocC document building, hosting and publishing into automated processes.
- Write a DSL in Swift using result builders — Understand the Swift result builders idea behind the declarative syntax.
Comments
GitHub Issues · utterances