
Highlight
iOS 15 launches virtual screen controller
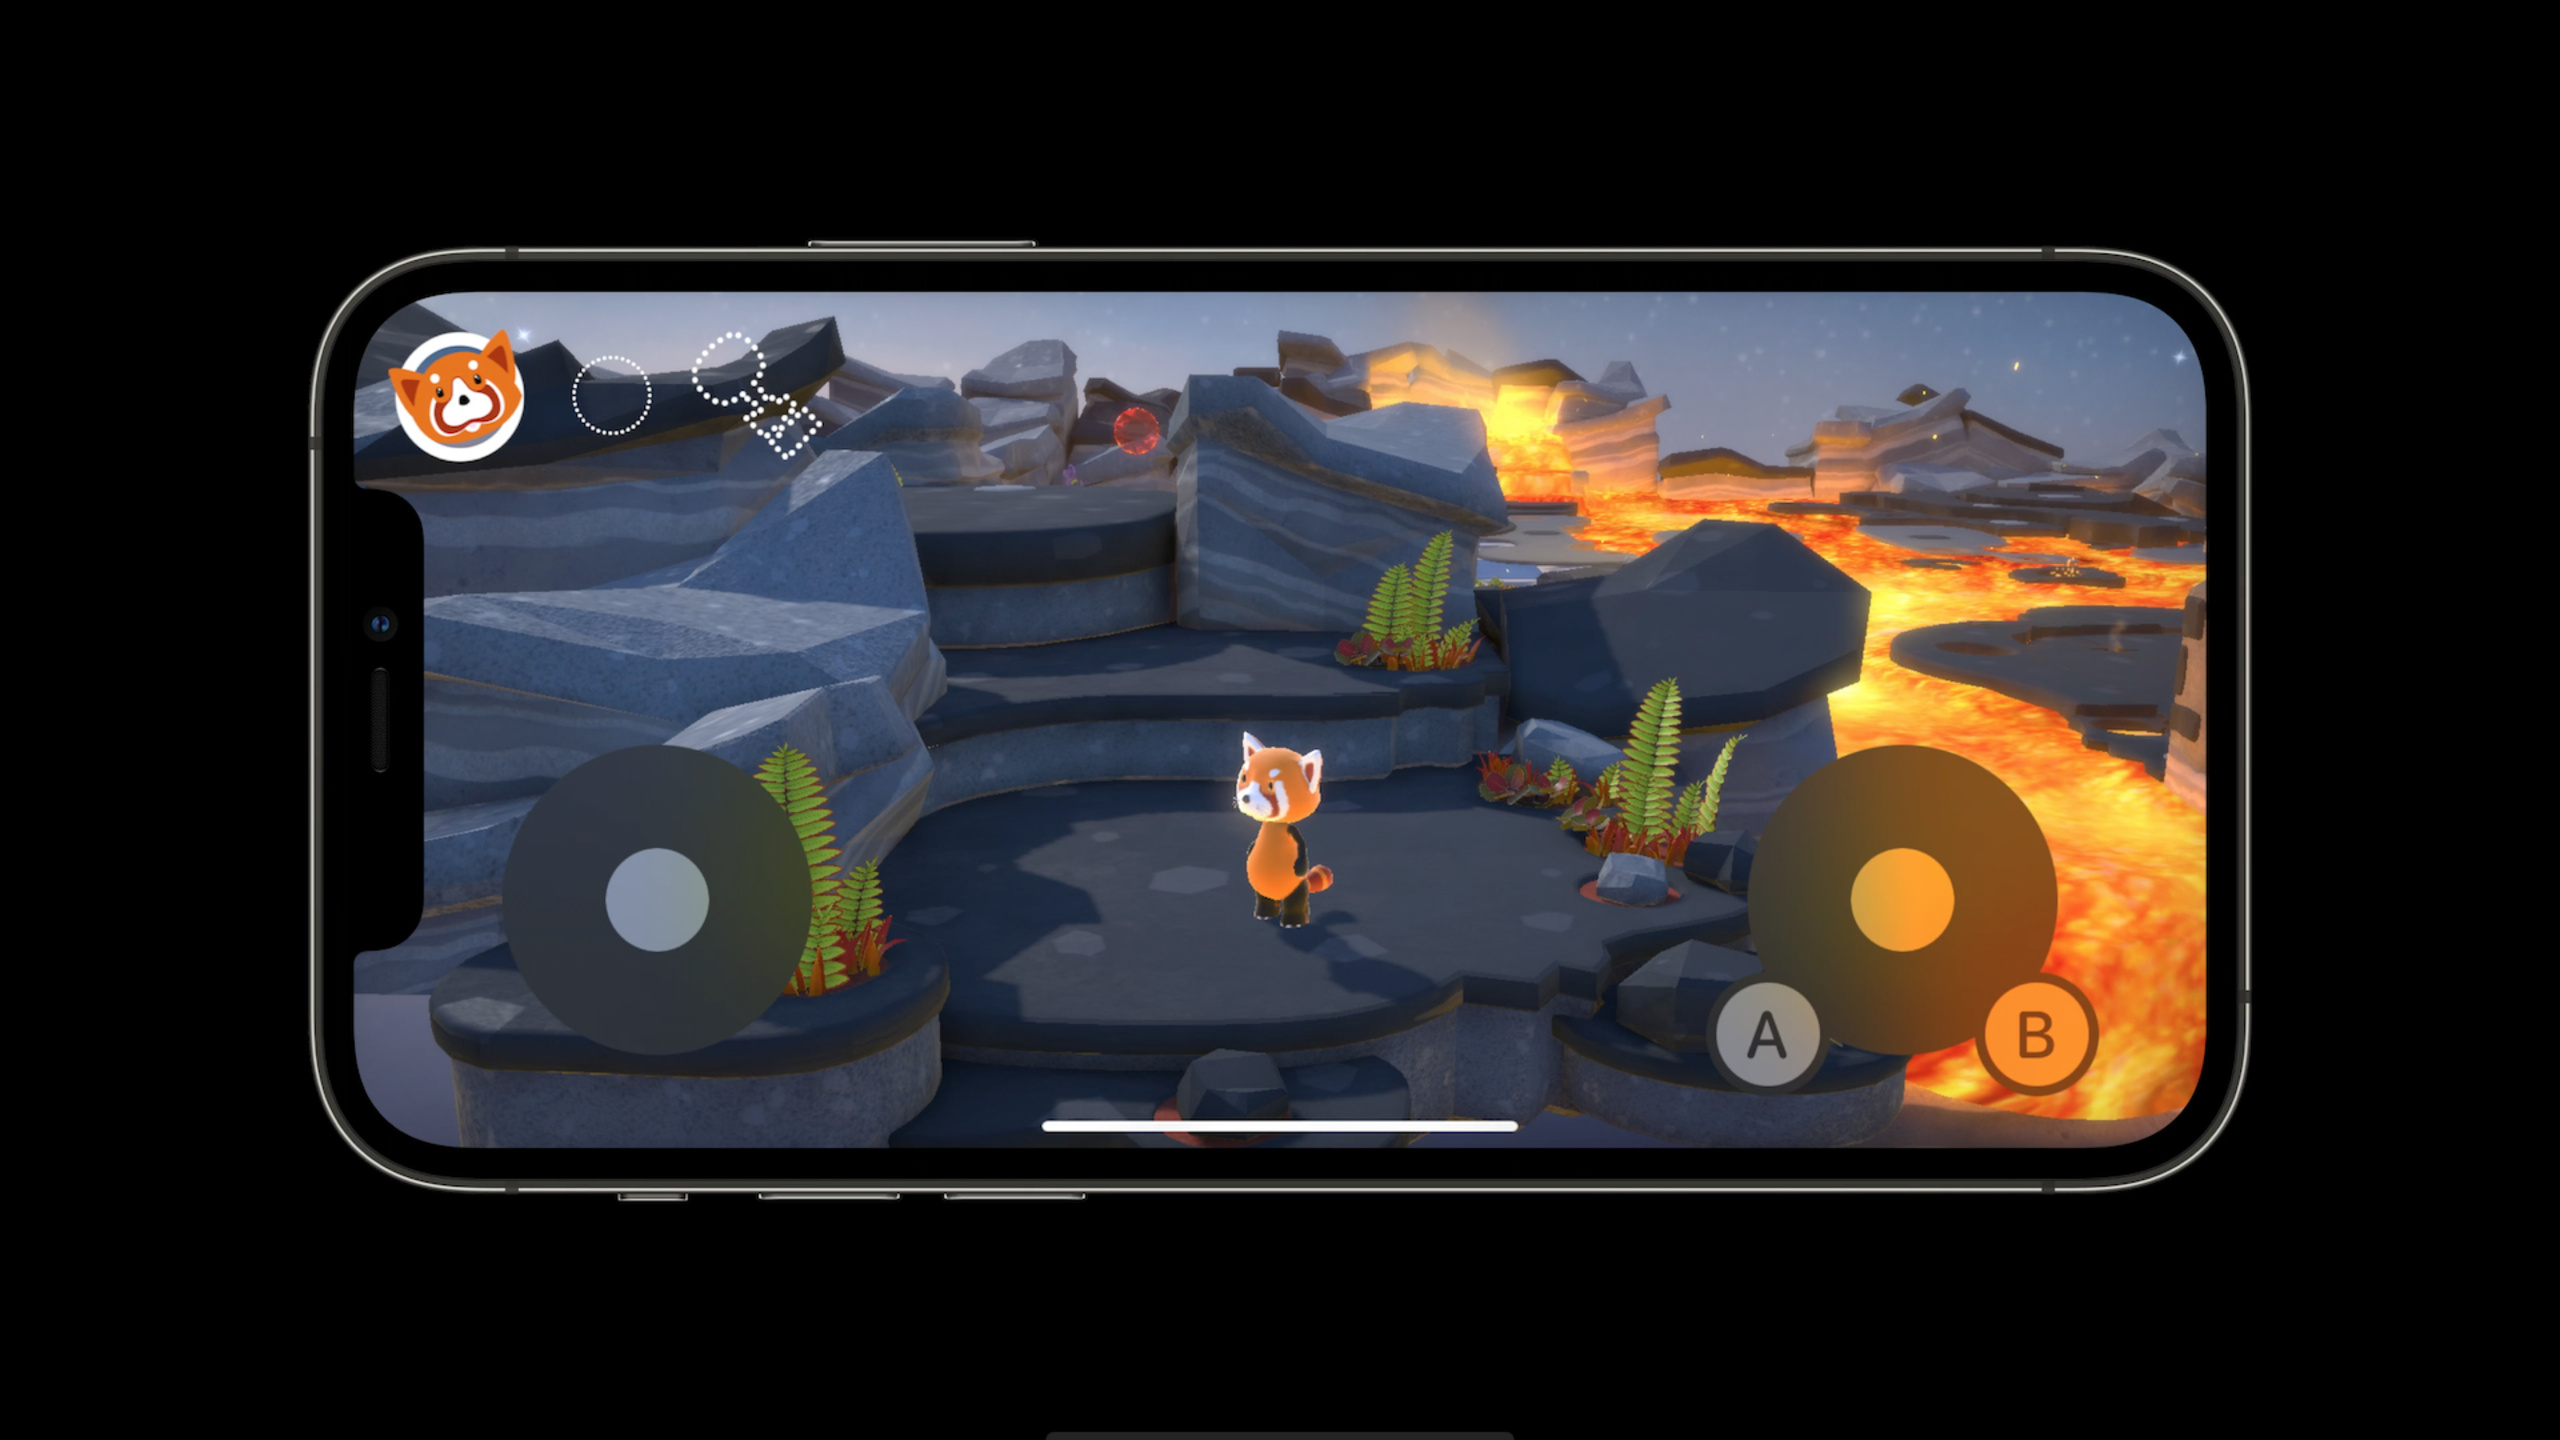
GCVirtualController, converts touch input to game controller input, and existingGCControllerCode compatible; also supports adaptive trigger effects for the PlayStation DualSense controller.
Core Content
Pain points of mobile game control
Games ported from console platforms to iOS/iPadOS are often designed to use two analog sticks, a d-pad, and number buttons.Developers have reported that it is difficult to build consistent, good-feeling, and beautiful-looking touch input for these games.Touch input handling code has a different path than keyboard, mouse, and game controller input code, increasing maintenance costs.(06:13)
Solutions for virtual controllers
Apple has launched a new virtual screen controller specifically to address these issues.These screen controls:
- Exquisite appearance: Carefully adjusted for different hand grip positions, quick response
- Code Unification: The virtual controller is represented in the code as
GCControllerObject, using the same input processing logic as the physical controller - Customizable: Supports custom symbols, colors, and styles while maintaining the iOS/iPadOS design language
- Adaptive Layout: Automatically adjust layout according to configuration
The core principle of the virtual controller is that the left and right areas are configured independently, and the layout is determined by the configuration.Each side can contain 0-4 buttons, as well as a joystick, D-pad, or touchpad.(07:22)
Game Controller Framework Basics
The goal of the Game Controller framework is to allow developers to easily support various efficient, low-latency input methods on Apple platforms.By abstracting input hardware through a common API, developers only need to write input code once and don’t need to worry about how inputs are remapped or differ between different controllers.(00:40)
On iOS, iPadOS, and tvOS, players can create system-wide and per-app game controller input remaps to make games more customizable and accessible.(01:04)
Detailed Content
Controller connection and disconnection processing
Basic pattern for handling controller connections and disconnections: (01:27)
import GameController

// Listen for controller connection notifications
NotificationCenter.default.addObserver(
    self,
    selector: #selector(controllerDidConnect),
    name: .GCControllerDidConnect,
    object: nil
)

// Listen for controller disconnection notifications
NotificationCenter.default.addObserver(
    self,
    selector: #selector(controllerDidDisconnect),
    name: .GCControllerDidDisconnect,
    object: nil
)

@objc func controllerDidConnect(_ notification: Notification) {
    let controller = notification.object as? GCController
    // Set up input handling or poll controller state
}

@objc func controllerDidDisconnect(_ notification: Notification) {
    let controller = notification.object as? GCController
    // Clean up controller-related resources
}
Key points:
- System creation or removal when controller is connected or disconnected
GCControllerobject - send
GCControllerDidConnectandGCControllerDidDisconnectnotify - The same pattern applies to
GCKeyboardandGCMouseobject - Option to set value change handler or poll input status
Create virtual controller
Steps to create a virtual controller: (08:42)
import GameController

// Create the configuration object
let configuration = GCVirtualControllerConfiguration()

// Set the left element
configuration.leftThumbstick = true
configuration.leftButtons = [GCInputButtonOptions.a]

// Set the right element
configuration.rightThumbstick = true
configuration.rightButtons = [
    GCInputButtonOptions.a,
    GCInputButtonOptions.b
]

// Create the virtual controller
let virtualController = GCVirtualController(configuration: configuration)

// Connect the controller, triggering the GCControllerDidConnect notification
virtualController.connect()
Key points:
GCVirtualControllerConfigurationDefine the layout of the virtual controller- Each side can be configured with a joystick, direction keys or touchpad (choose one of the three)
- Can be configured with 0-4 buttons per side
- call
connect()Afterwards, the virtual controller behaves as a standardGCControllerobject - Configurations are fixed when created, elements can be shown and hidden, but cannot be added or removed
Customize button appearance
Customize the button appearance of the virtual controller: (09:17)
// Get the button configuration
if let buttonA = virtualController.controller?.extendedGamepad?.buttonA {
    // Create a custom shape (such as a spin-attack icon)
    let attackPath = UIBezierPath()
    attackPath.move(to: CGPoint(x: 0.5, y: 0))
    attackPath.addLine(to: CGPoint(x: 1, y: 1))
    attackPath.addLine(to: CGPoint(x: 0, y: 1))
    attackPath.close()

    buttonA.path = attackPath
}

if let buttonB = virtualController.controller?.extendedGamepad?.buttonB {
    // Create the jump icon
    let jumpPath = UIBezierPath()
    jumpPath.move(to: CGPoint(x: 0.2, y: 0.8))
    jumpPath.addLine(to: CGPoint(x: 0.5, y: 0.2))
    jumpPath.addLine(to: CGPoint(x: 0.8, y: 0.8))
    jumpPath.close()

    buttonB.path = jumpPath
}

// Hide the button
if let buttonX = virtualController.controller?.extendedGamepad?.buttonX {
    buttonA.isHidden = true
}
Key points:
- pass
pathProperties set custom shape for button - use
UIBezierPathCreate vector graphics isHiddenProperty can show or hide the button- Custom shapes should be simple and clear, suitable for quick recognition
DualSense Adaptive Trigger
The PlayStation DualSense controller’s adaptive trigger technology dynamically applies varying resistance based on player behavior, enhancing immersion.It can simulate the feeling of pulling a bow string, a slingshot under tension, etc.(10:45)
Steps to support adaptive triggers: (12:06)
import GameController

// Get the current controller
guard let controller = GCController.current else { return }

// Verify that this is a DualSense controller
guard let dualSense = controller.physicalInputProfile as? GCDualSenseGamepad else {
    return
}

// Get the right adaptive trigger
let rightTrigger = dualSense.rightAdaptiveTrigger

// Apply resistance while the player is aiming
func updateSlingshotResistance(isAiming: Bool, pullAmount: Float) {
    if isAiming {
        if pullAmount < 1.0 {
            // Not fully pulled back; apply a feedback effect
            // FeedbackEffect provides constant resistance
            let feedbackEffect = GCAdaptiveTriggerFeedbackEffect(
                strength: pullAmount
            )
            rightTrigger.applyEffect(feedbackEffect)
        } else {
            // Fully pulled back; apply a vibration effect
            // VibrationEffect makes the trigger vibrate to simulate held tension
            let vibrationEffect = GCAdaptiveTriggerVibrationEffect(
                strength: pullAmount,
                frequency: 0.5
            )
            rightTrigger.applyEffect(vibrationEffect)
        }
    } else {
        // Turn off the effect when not aiming
        rightTrigger.applyEffect(nil)
    }
}

// Turn off the effect after the player fires the slingshot
func fireSlingshot() {
    rightTrigger.applyEffect(nil)
}
Key points:
- examine
physicalInputProfileIs itGCDualSenseGamepadtype rightAdaptiveTriggerandleftAdaptiveTriggerAccess left and right adaptive triggersGCAdaptiveTriggerFeedbackEffectProvide constant resistanceGCAdaptiveTriggerVibrationEffectMake the trigger vibrate- Remember to call after use
applyEffect(nil)Turn off effect
App Store Tagging and Customization
Add Game Controllers capability in Xcode to mark the app as supporting game controllers: (03:10)
- Open project settings
- Select Signing & Capabilities
- Add the Game Controllers capability
This will add game controller capabilities to the app’s Info.plist, and the App Store will add a “Controller Support” badge to the app.Apps will also be included in the per-app customization section of the game controller preferences.(03:22)
Correct glyphs in UI
Displaying the correct button glyphs in the UI is important.Different controllers have different button layouts:
- MFi or Xbox controller: Show Y button
- PlayStation Controller: Show triangle button
The correct glyph should be displayed even if the player remaps the button in the system remapping UI.(03:36)
// Get the button associated with the action
guard let buttonA = controller.extendedGamepad?.buttonA else { return }

// Get the button's SF Symbols name
let symbolName = buttonA.sfSymbolsName

// Create the system image
if let symbolName = symbolName, let image = UIImage(systemName: symbolName) {
    // Show the image in the UI
    buttonImageView.image = image
}
Key points:
sfSymbolsNameProperty returns the system symbol name of the button- use
UIImage(systemName:)Create image - This will automatically reflect system remapping
- Another method is to display positional relationships (such as “top button”) instead of specific button names
Share button and screen capture
Controllers that support the Share button allow players to capture the screen and record video: (03:46)
- Double-click the Share button: capture screenshot to photo album
- Long press the Share button: start and stop ReplayKit recording
iOS 15 adds a 15-second highlight clip feature.Players can turn on automatic background buffering and long press to save the last 15 seconds of game footage at any time.(13:31)
Global or per-app settings can be toggled in the Game Controller preferences panel.If you want to trigger your own highlight clips at important moments in the game, there is a dedicated API available.
Core Takeaways
-
What to do: Create a unified control scheme for ported games
-
Why it’s worth it: Virtual controllers let touch input behave as
GCController, uses the same code path as the physical controller, reducing maintenance costs -
How to get started: Create
GCVirtualControllerConfiguration, set the rockers and buttons on the left and right sides, and callconnect()Connect the controller -
What: Enable immersion with DualSense adaptive triggers
-
Why it’s worth doing: The adaptive trigger can dynamically adjust resistance according to the game state, enhancing the realism of actions such as weapon bow pulling and slingshot pulling.
-
How to start: Check
physicalInputProfileIs itGCDualSenseGamepad, Get Adaptive Trigger, ApplyGCAdaptiveTriggerFeedbackEffectorGCAdaptiveTriggerVibrationEffect -
What: Support controller input remapping
-
Why it’s worth it: Players can remap buttons in system settings, making the game more accessible and customizable
-
How to start: Add Game Controllers capability in Xcode, use
sfSymbolsNameProperty showing correct button glyph -
What: Integrated screen capture functionality for the Share button
-
Why it’s worth doing: Players can easily capture the wonderful moments of the game and share them with friends to increase the spread of the game.
-
How to start: Support ReplayKit API, trigger 15-second highlight clip recording at important moments in the game
-
What to do: Design customizable control layouts for touch devices
-
Why it’s worth it: Different games require different control schemes, and the flexible configuration of virtual controllers can meet various needs.
-
How to get started: Choose the appropriate combination of joystick, direction keys and buttons according to the game type, and customize button shapes to improve recognizability
Related Sessions
- Discover rolling clips in ReplayKit — Learn new features in ReplayKit, including 15-second highlight clips
- What’s new in Game Center — Game Center updates
- Explore game audio with AVAudioEngine — Learn to use AVAudioEngine to build a game audio system
- Bring your game to iPad, Mac, and more — Port your game to more platforms
Comments
GitHub Issues · utterances