
Highlight
RealityKit 2 opens up custom Metal shaders, post-processing effects and dynamic mesh APIs, upgrading the visual expression of AR applications from “realistic” to “stylized”.
Core Content
RealityKit 1’s rendering pipeline is closed.Developers can adjust material parameters, but cannot interfere with vertex transformations and fragment shading.This limits creative expression.
RealityKit 2 opens three rendering extension points: Geometry Modifier (vertex animation), Surface Shader (custom surface shading), and Post Process (full-screen post-processing).A new dynamic mesh API has also been added, allowing geometry to be created and modified at runtime.
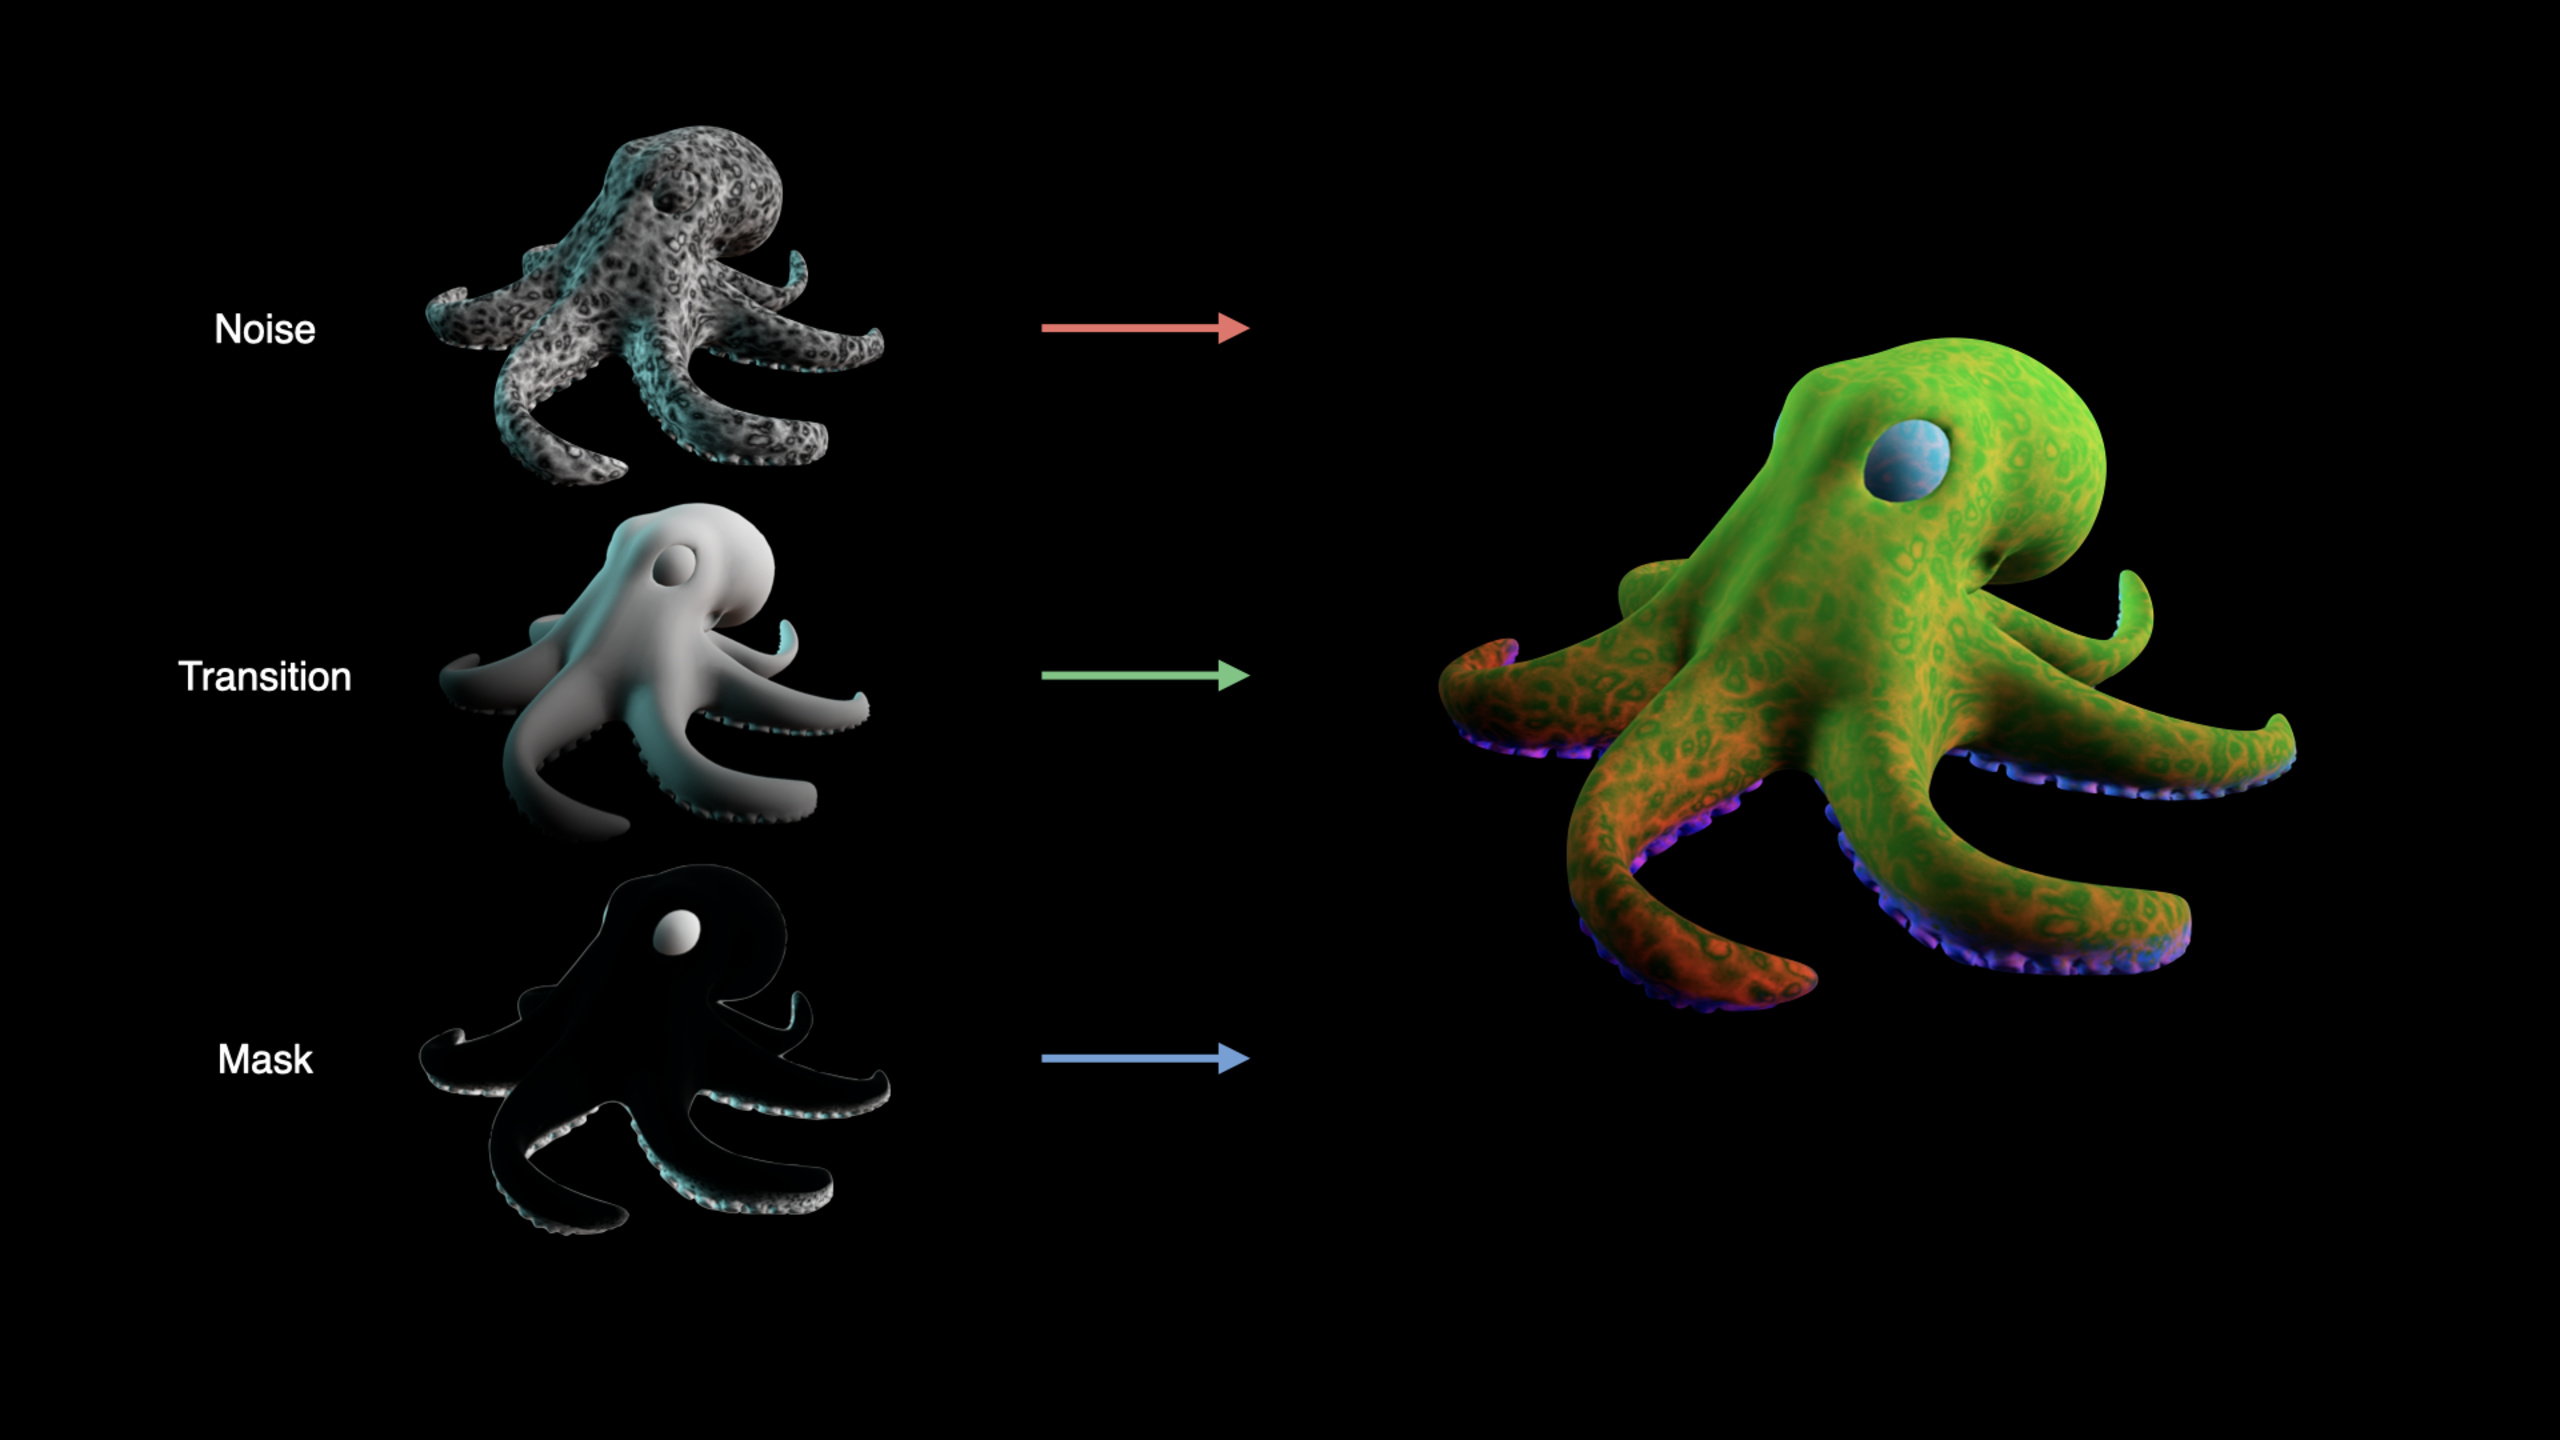
Session continues to use underwater demos to demonstrate these capabilities: seagrass swings with the current (Geometry Modifier), octopus color transition (Surface Shader), underwater depth fog (Compute Post Process), and spiral special effects surrounding divers (Dynamic Mesh).
Detailed Content
Geometry Modifier: Vertex animation
Geometry Modifier is a Metal program executed on the GPU that modifies the vertex positions of the model every frame.Suitable for environment animation, deformation, particle systems and bulletin board effects.
#include <RealityKit/RealityKit.h>

[[visible]]
void seaweedGeometry(realitykit::geometry_parameters params)
{
    float spatialScale = 8.0;
    float amplitude = 0.05;

    float3 worldPos = params.geometry().world_position();
    float3 modelPos = params.geometry().model_position();

    float phaseOffset = 3.0 * dot(worldPos, float3(1.0, 0.5, 0.7));
    float time = 0.1 * params.uniforms().time() + phaseOffset;

    float3 maxOffset = float3(
        sin(spatialScale * 1.1 * (worldPos.x + time)),
        sin(spatialScale * 1.2 * (worldPos.y + time)),
        sin(spatialScale * 1.2 * (worldPos.z + time))
    );

    float3 offset = maxOffset * amplitude * max(0.0, modelPos.y);
    params.geometry().set_model_position_offset(offset);
}
Key points:
- Function tags
[[visible]],take overrealitykit::geometry_parameters(04:52) params.uniforms().time()Get current timeparams.geometry().world_position()Get vertex world coordinates for spatially consistent animationsparams.geometry().model_position()Get the local coordinates of the model, used to control animation intensity (such as bottom fixation)set_model_position_offset()Set vertex offset
func assignSeaweedShader(to seaweed: ModelEntity) {
    let library = MTLCreateSystemDefaultDevice()!.makeDefaultLibrary()!
    let geometryModifier = CustomMaterial.GeometryModifier(
        named: "seaweedGeometry",
        in: library
    )

    seaweed.model!.materials = seaweed.model!.materials.map { baseMaterial in
        try! CustomMaterial(from: baseMaterial, geometryModifier: geometryModifier)
    }
}
Key points:
- Load shader from default Metal library (05:43)
CustomMaterial(from:geometryModifier:)Inherit the original material properties and only add geometric modifiers- Each material needs to be converted individually
Surface Shader: Customize surface appearance
The Surface Shader is executed at the fragment stage, defining the appearance of each visible pixel.Surface properties such as color, normal, roughness, metallicity, etc. can be modified.
The octopus in the demo transitions between two appearances: purple and red.The transition effect is controlled using a three-channel mask texture.
[[visible]]
void octopusSurface(realitykit::surface_parameters params)
{
    constexpr sampler bilinear(filter::linear);
    auto tex = params.textures();
    auto surface = params.surface();
    auto material = params.material_constants();

    // The Y axis of USD textures needs to be flipped
    float2 uv = params.geometry().uv0();
    uv.y = 1.0 - uv.y;

    // Sample the mask texture (noise + gradient + mask)
    half3 mask = tex.custom().sample(bilinear, uv).rgb;

    half blend, colorBlend;
    transitionBlend(params.uniforms().time(), mask, blend, colorBlend);

    // Sample and blend two color textures
    half3 baseColor1 = tex.base_color().sample(bilinear, uv).rgb;
    half3 baseColor2 = tex.emissive_color().sample(bilinear, uv).rgb;
    half3 blendedColor = mix(baseColor1, baseColor2, colorBlend);
    blendedColor *= half3(material.base_color_tint());
    surface.set_base_color(blendedColor);

    // Normal map
    half3 texNormal = tex.normal().sample(bilinear, uv).rgb;
    half3 normal = realitykit::unpack_normal(texNormal);
    surface.set_normal(float3(normal));

    // Material properties
    half roughness = tex.roughness().sample(bilinear, uv).r;
    half metallic = tex.metallic().sample(bilinear, uv).r;
    half ao = tex.ambient_occlusion().sample(bilinear, uv).r;

    roughness *= material.roughness_scale();
    roughness *= (1 + blend); // The red state is rougher
    metallic *= material.metallic_scale();

    surface.set_roughness(roughness);
    surface.set_metallic(metallic);
    surface.set_ambient_occlusion(ao);
}
Key points:
- Surface shader receives
realitykit::surface_parameters(09:21) params.textures()Access material textures, includingbase_color()、normal()、roughness()、custom()waitparams.material_constants()Access material parameters set by code- The Y coordinate of the USD texture needs to be flipped (
uv.y = 1.0 - uv.y) realitykit::unpack_normal()Decode normal map- Empty surface shader will make the model gray (09:30), the developer has full control over the output
func assignOctopusShader(to octopus: ModelEntity) {
    let color2 = try! TextureResource.load(named: "Octopus/Octopus_bc2")
    let mask = try! TextureResource.load(named: "Octopus/Octopus_mask")
    let surfaceShader = CustomMaterial.SurfaceShader(named: "octopusSurface", in: library)

    octopus.model!.materials = octopus.model!.materials.map { baseMaterial in
        let material = try! CustomMaterial(from: baseMaterial, surfaceShader: surfaceShader)
        material.emissiveColor.texture = .init(color2)
        material.custom.texture = .init(mask)
        return material
    }
}
Key points:
CustomMaterial.SurfaceShaderLoading the surface shader (11:41)- Additional textures assigned to
emissiveColorandcustomslot - Geometry Modifier and Surface Shader can be used in combination
Post Process: Customized post-processing
Post-processing is performed after each frame is rendered. The input is the color texture and the depth buffer, and the output is to the target color texture.
Core Image post-processing
func initPostEffect(arView: ARView) {
    arView.renderCallbacks.prepareWithDevice = { [weak self] device in
        self?.prepareWithDevice(device)
    }
    arView.renderCallbacks.postProcess = { [weak self] context in
        self?.postProcess(context)
    }
}

func prepareWithDevice(_ device: MTLDevice) {
    self.ciContext = CIContext(mtlDevice: device)
}

func postProcess(_ context: ARView.PostProcessContext) {
    let sourceColor = CIImage(mtlTexture: context.sourceColorTexture)!
    let thermal = CIFilter.thermal()
    thermal.inputImage = sourceColor

    let destination = CIRenderDestination(
        mtlTexture: context.targetColorTexture,
        commandBuffer: context.commandBuffer
    )
    destination.isFlipped = false

    _ = try? self.ciContext?.startTask(
        toRender: thermal.outputImage!,
        to: destination
    )
}
Key points:
prepareWithDeviceCalled once during initialization, suitable for creating textures and pipelines (14:13)postProcessCalled every framecontext.sourceColorTextureis the input color,context.targetColorTextureis the outputcontext.commandBufferProvides Metal command buffering- Core Image offers hundreds of ready-made effects
Metal Performance Shaders: Bloom effect
func postProcess(_ context: ARView.PostProcessContext) {
    if self.bloomTexture == nil {
        self.bloomTexture = self.makeTexture(matching: context.sourceColorTexture)
    }

    // 1. Threshold filter: zero pixels with luminance below 20%
    let brightness = MPSImageThresholdToZero(
        device: context.device,
        thresholdValue: 0.2,
        linearGrayColorTransform: nil
    )
    brightness.encode(
        commandBuffer: context.commandBuffer,
        sourceTexture: context.sourceColorTexture,
        destinationTexture: bloomTexture!
    )

    // 2. Gaussian blur
    let gaussianBlur = MPSImageGaussianBlur(device: context.device, sigma: 9.0)
    gaussianBlur.encode(
        commandBuffer: context.commandBuffer,
        inPlaceTexture: &bloomTexture!
    )

    // 3. Composite the original image and bloom
    let add = MPSImageAdd(device: context.device)
    add.encode(
        commandBuffer: context.commandBuffer,
        primaryTexture: context.sourceColorTexture,
        secondaryTexture: bloomTexture!,
        destinationTexture: context.targetColorTexture
    )
}
Key points:
- MPS provides highly optimized image processing operators (16:15)
MPSImageThresholdToZeroExtract highlighted areaMPSImageGaussianBlurblurry diffuse glowMPSImageAddOverlay bloom back to original image
SpriteKit post-processing
func prepareWithDevice(_ device: MTLDevice) {
    self.skRenderer = SKRenderer(device: device)
    self.skRenderer.scene = SKScene(fileNamed: "GameScene")
    self.skRenderer.scene!.scaleMode = .aspectFill
    self.skRenderer.scene!.backgroundColor = .clear
}

func postProcess(context: ARView.PostProcessContext) {
    // Copy the source texture to the destination
    let blitEncoder = context.commandBuffer.makeBlitCommandEncoder()
    blitEncoder?.copy(from: context.sourceColorTexture, to: context.targetColorTexture)
    blitEncoder?.endEncoding()

    // Update the SpriteKit scene
    self.skRenderer.update(atTime: context.time)

    // Render SpriteKit into the destination texture
    let desc = MTLRenderPassDescriptor()
    desc.colorAttachments[0].loadAction = .load
    desc.colorAttachments[0].storeAction = .store
    desc.colorAttachments[0].texture = context.targetColorTexture

    self.skRenderer.render(
        withViewport: CGRect(...),
        commandBuffer: context.commandBuffer,
        renderPassDescriptor: desc
    )
}
Key points:
- SpriteKit is suitable for overlaying 2D effects on 3D scenes (17:15)
- Make the background transparent to let 3D content show through
loadAction = .loadKeep existing content (3D rendering results)
Custom Compute Shader: Depth Fog
The depth fog of the underwater demo needs to combine the real scene depth of ARKit and the virtual content depth of RealityKit.
typedef struct {
    simd_float4x4 viewMatrixInverse;
    simd_float4x4 viewMatrix;
    simd_float2x2 arTransform;
    simd_float2 arOffset;
    float fogMaxDistance;
    float fogMaxIntensity;
    float fogExponent;
} DepthFogParams;

float linearizeDepth(float sampleDepth, float4x4 viewMatrix) {
    float d = max(1e-5f, sampleDepth);
    d = abs(-viewMatrix[3].z / d); // Reverse infinite-Z projection
    return d;
}

[[kernel]]
void depthFog(uint2 gid [[thread_position_in_grid]],
              constant DepthFogParams& args [[buffer(0)]],
              texture2d<half, access::sample> inColor [[texture(0)]],
              texture2d<float, access::sample> inDepth [[texture(1)]],
              texture2d<half, access::write> outColor [[texture(2)]],
              depth2d<float, access::sample> arDepth [[texture(3)]])
{
    const half4 fogColor = half4(0.5, 0.5, 0.5, 1.0);

    float2 coords = float2(gid) / float2(inDepth.get_width(), inDepth.get_height());
    float2 arDepthCoords = args.arTransform * coords + args.arOffset;

    float realDepth = arDepth.sample(textureSampler, arDepthCoords);
    float virtualDepth = linearizeDepth(inDepth.sample(textureSampler, coords)[0], args.viewMatrix);

    float depth = min(virtualDepth, realDepth);
    float fogAmount = saturate(depth / args.fogMaxDistance);
    float fogBlend = pow(fogAmount, args.fogExponent) * args.fogMaxIntensity;

    half4 nearColor = inColor.read(gid);
    half4 color = mix(nearColor, fogColor, fogBlend);
    outColor.write(color, gid);
}
Key points:
- ARKit
sceneDepthProvides real scene distance (meters), lower resolution (18:23) - RealityKit depth buffer uses Reverse Infinite-Z, 0 means infinity, 1 means near plane (19:40)
- Linearization formula:
abs(-viewMatrix[3].z / sampledDepth)(20:01) - Take the minimum of real depth and virtual depth to ensure both are fogged correctly
- use
saturateand power functions to control the density curve of fog
Dynamic Grid
Grid check
extension MeshResource.Contents {
    func forEachVertex(_ callback: (SIMD3<Float>) -> Void) {
        for instance in self.instances {
            guard let model = self.models[instance.model] else { continue }
            let instanceToModel = instance.transform
            for part in model.parts {
                for position in part.positions {
                    let vertex = instanceToModel * SIMD4<Float>(position, 1.0)
                    callback([vertex.x, vertex.y, vertex.z])
                }
            }
        }
    }
}
Key points:
MeshResource.ContentsContains instances and models (23:32)- Models store original vertex data, instances refer to the model and attach transformations
- Part is geometry grouped by material
- Apply instance transform when traversing vertices to get world coordinates
Create grid
extension MeshResource {
    static func generateSpiral(
        radiusAt: (Float)->Float,
        radiusAtIndex: (Float)->Float,
        thickness: Float,
        height: Float,
        revolutions: Int,
        segmentsPerRevolution: Int
    ) -> MeshResource {
        let totalSegments = revolutions * segmentsPerRevolution
        var positions: [SIMD3<Float>] = []
        var normals: [SIMD3<Float>] = []
        var indices: [UInt32] = []
        var uvs: [SIMD2<Float>] = []

        for i in 0..<totalSegments {
            let theta = Float(i) / Float(segmentsPerRevolution) * 2 * .pi
            let t = Float(i) / Float(totalSegments)
            let segmentY = t * height

            if i > 0 {
                let base = UInt32(positions.count - 2)
                indices.append(contentsOf: [
                    base, base + 3, base + 1, // First triangle
                    base, base + 2, base + 3  // Second triangle
                ])
            }

            let radialDirection = SIMD3<Float>(cos(theta), 0, sin(theta))
            let radius = radiusAtIndex(t)
            var position = radialDirection * radius
            position.y = segmentY

            positions.append(position)
            positions.append(position + [0, thickness, 0])
            normals.append(-radialDirection)
            normals.append(-radialDirection)
            uvs.append(.init(0.0, t))
            uvs.append(.init(1.0, t))
        }

        var mesh = MeshDescriptor()
        mesh.positions = .init(positions)
        mesh.normals = .init(normals)
        mesh.primitives = .triangles(indices)
        mesh.textureCoordinates = .init(uvs)

        return try! MeshResource.generate(from: [mesh])
    }
}
Key points:
MeshDescriptorDescribing geometric data: positions, normals, primitives, textureCoordinates (26:37)MeshResource.generate(from:)Call RealityKit’s grid processor to automatically optimize- The processor merges duplicate vertices, triangulates quads/polygons, and selects the most efficient format
- Normals and texture coordinates are optional, the processor automatically generates normals
Update grid
if var contents = spiralEntity?.model?.mesh.contents {
    contents.models = .init(contents.models.map { model in
        var newModel = model
        newModel.parts = .init(model.parts.map { part in
            let start = min(self.allIndices.count, max(0, numIndices - stripeSize))
            let end = max(0, min(self.allIndices.count, numIndices))
            var newPart = part
            newPart.triangleIndices = .init(self.allIndices[start..<end])
            return newPart
        })
        return newModel
    })
    try? spiralEntity?.model?.mesh.replace(with: contents)
}
Key points:
- Modify directly when updating frequently
MeshResource.ContentsMore efficient than regeneration (28:17) mesh.replace(with:)Replace existing grid with new content- NOTE: PASS
MeshDescriptorThe mesh created is optimized and the topology may change - Before updating, you need to understand the impact of optimization on the grid topology
Core Takeaways
-
Geometry Modifier implements environmental animation: the natural swing of seagrass, trees, flags and other objects does not require skeletal animation, and can be achieved with a sine wave shader.Using world coordinates as input ensures that adjacent objects animate consistently.
-
Surface Shader enables stylized rendering: From realistic to cartoon, from metal to crystal, Surface Shader gives you complete control over the final appearance of each pixel.Mask texture + time parameters can create complex transition effects.
-
Post-processing unifies real and virtual: The depth fog effect acts on both the real scene (ARKit depth) and the virtual object (RealityKit depth), making the two visually integrated.This is key to AR immersion.
-
Dynamic mesh is used for special effect geometry: Special effect geometry such as spirals, particle trajectories, and growth animations do not require preset model files.use
MeshDescriptorProcedurally generated usingreplaceEfficient updates. -
Combine multiple technologies to create a unique experience: Geometry Modifier + Surface Shader + Post Process + Dynamic Mesh can be combined to create unlimited possibilities.The underwater demo is an example of four technologies being used simultaneously.
Related Sessions
- Dive into RealityKit 2 — Updates to core features of RealityKit 2, including ECS, animations, and character controllers
- Create 3D models with Object Capture — Create 3D models from photos to provide materials for custom shaders
- Render with Metal — Metal rendering pipeline, laying the foundation for writing custom shaders
- Explore ARKit 5 — ARKit 5’s depth and scene understanding capabilities
Comments
GitHub Issues · utterances