
Highlight
Apple has connected Core Image preprocessing, Vision contour detection, and pixel-by-pixel optical flow into the same image pipeline in iOS 14, allowing apps to analyze image edges, punch card shapes, and video frame motion directly on the device.
Core Content
Many apps do not focus on computer vision, but they require it in a certain step. The banking app allows users to take pictures of checks, the receipt app can read the face information, and the QR code scanning function can save manual input. What users see is a few less lines to fill out, and developers face image preprocessing, analysis requests, result visualization, and performance costs.
This session does not introduce Vision, Core Image, and Core ML as separate frameworks. It first puts Core Image before and after Vision: the input image can be scaled, denoised, thresholded, and contrast adjusted first; the output of Vision can also be returned to Core Image or Core Graphics for drawing. The goal of this is clear: to keep the image in the system’s optimized pipeline and reduce matrix conversion and additional memory overhead.
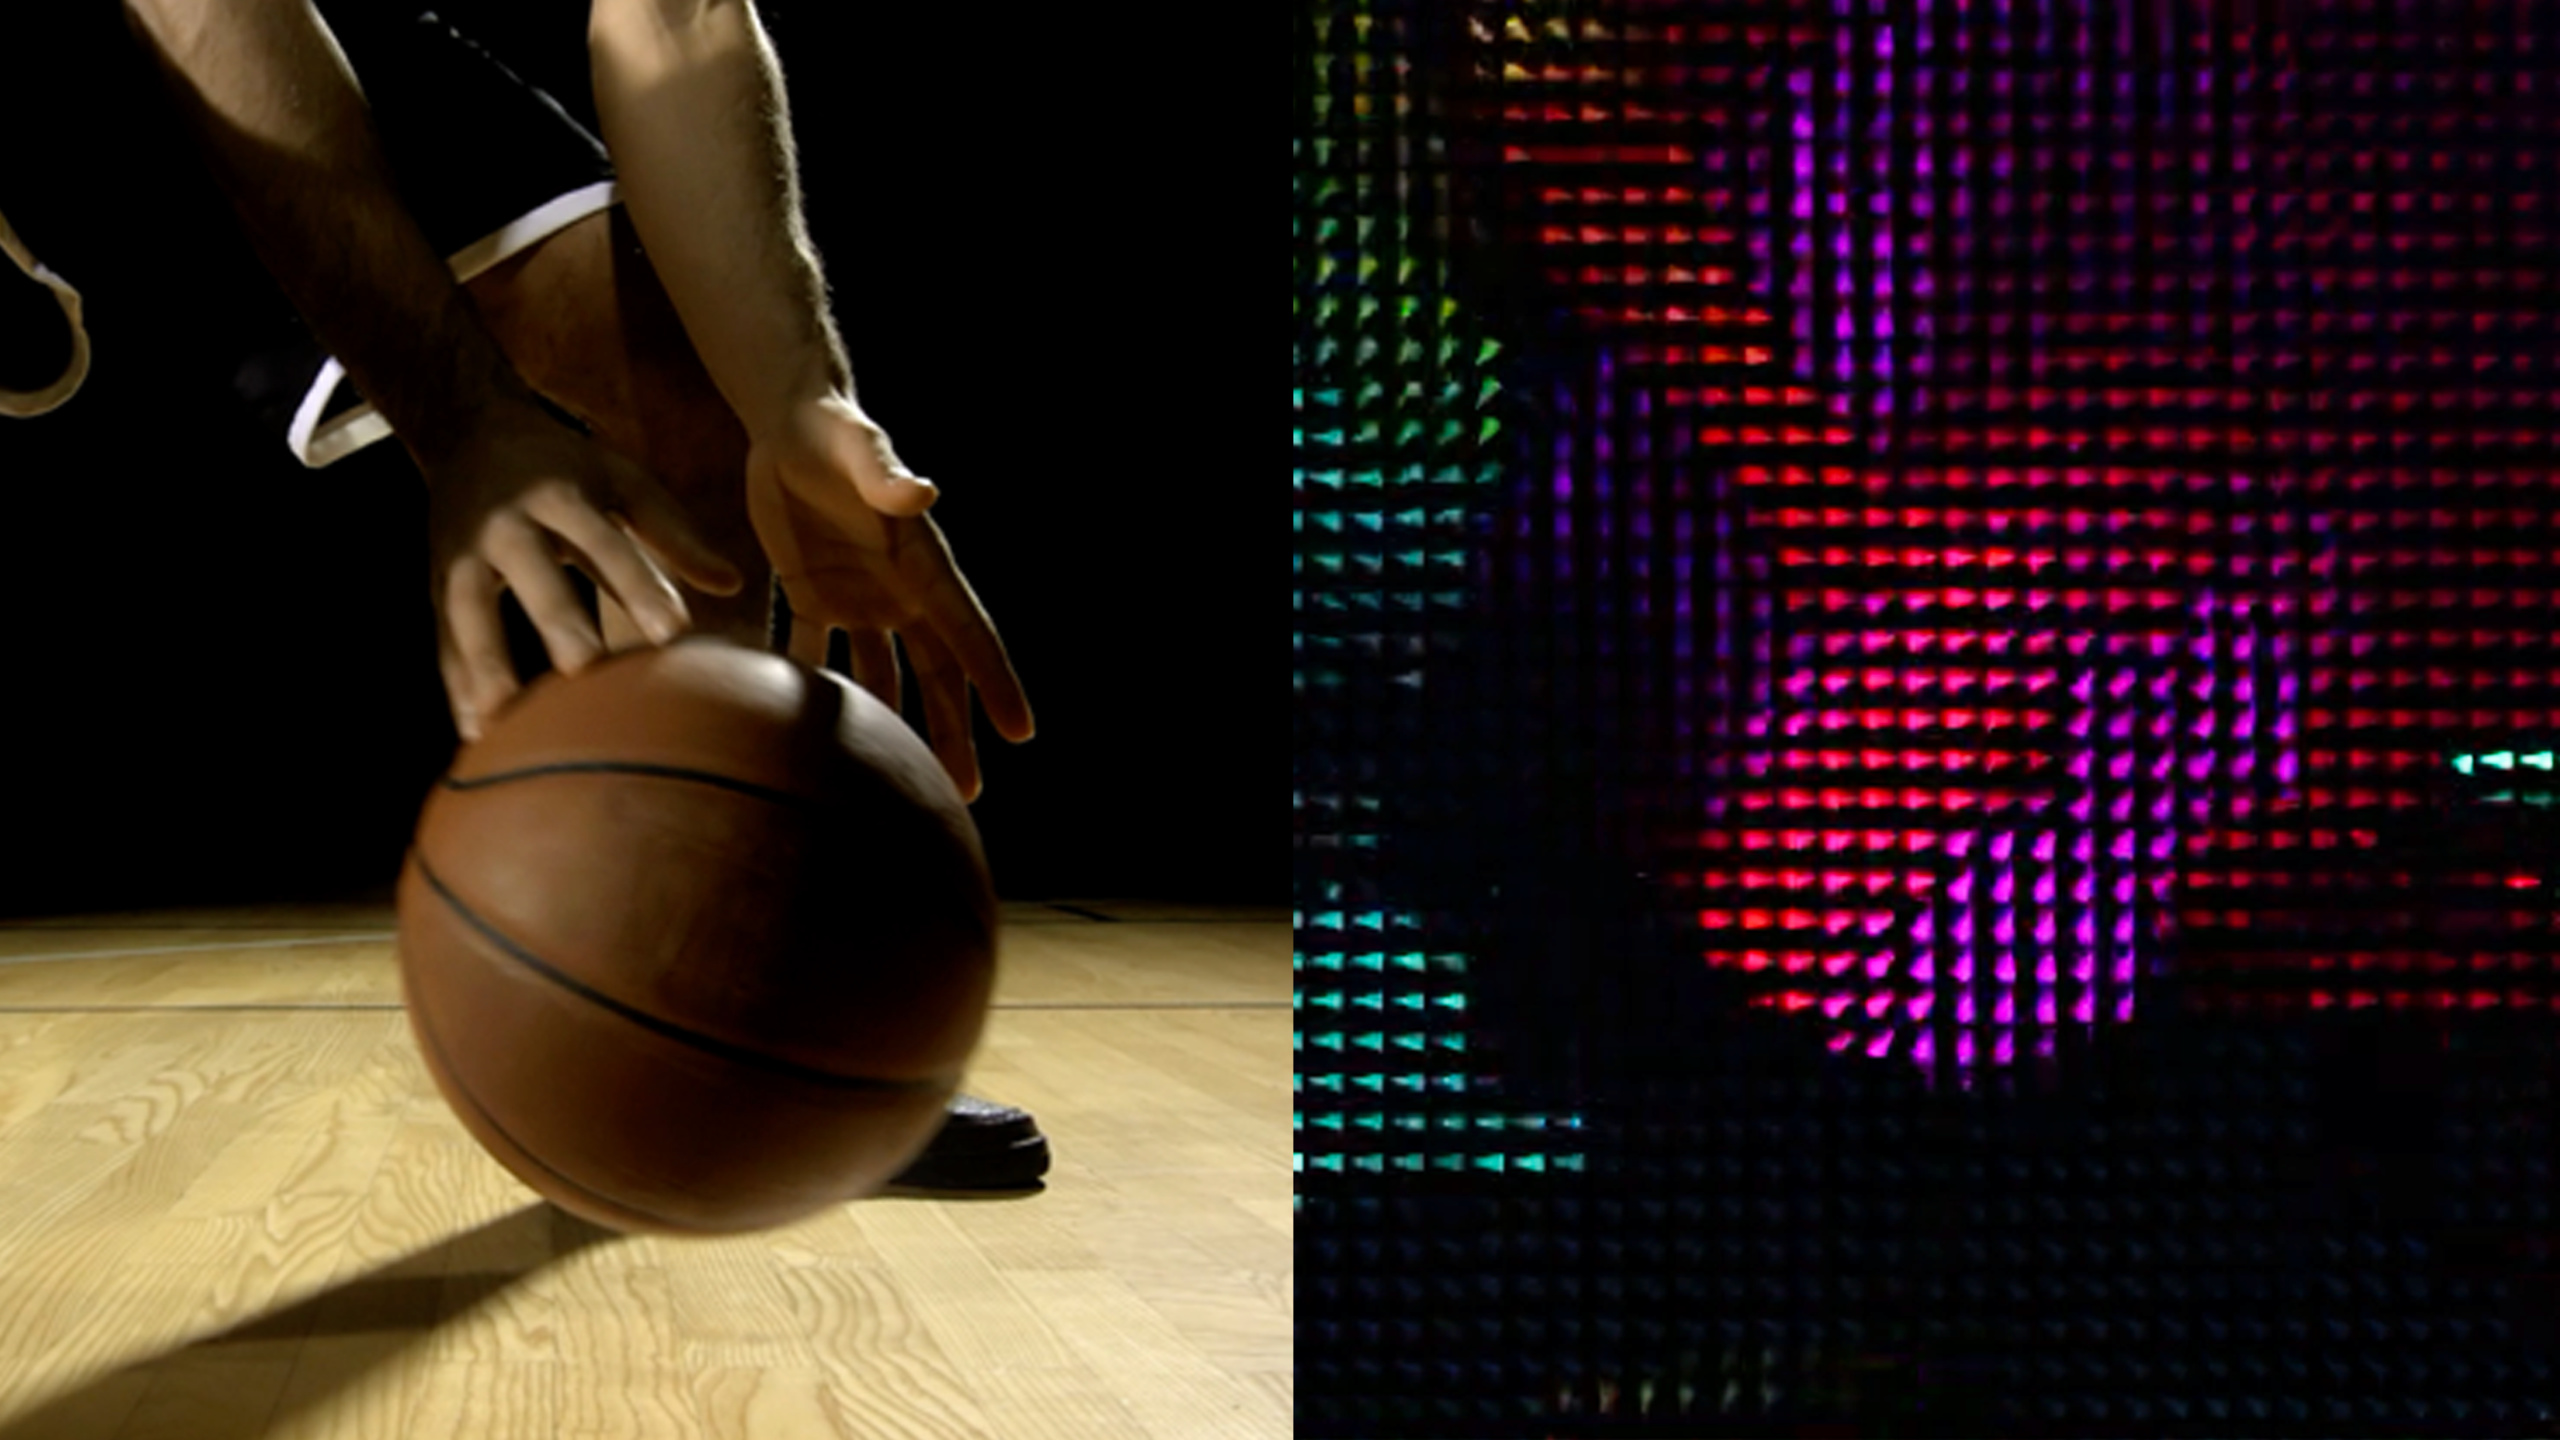
The protagonist has two new abilities. The first is Vision’s contour detection, which returnsVNContoursObservationand traversableVNContourLevel, suitable for finding edges, holes, outer contours and inner contours. The second is optical flow, which analyzes the X/Y displacement of each pixel between two frames. It is suitable for looking at the movement of local objects in the video picture, rather than just estimating the overall translation of the entire picture.
session uses a punch card example to clear this path. Direct detection of the original image results in 387 contours. After adding Core Image’s blur and color controls, the result was reduced to 32 outlines, which corresponded exactly to the holes we were looking for. This change is more important than the API name: developers can use business knowledge to sanitize input first, and then let Vision do the analysis.
Detailed Content
1. First use Core Image to improve Vision input (02:29)
Core Image does two types of work here. The first category is preprocessing: image scaling, morphological processing, grayscale conversion, noise reduction, edge detection, contrast enhancement, and thresholding. session is explicitly namedCILanczosScale、CIMorphologyRectangleMaximum、CIMorphologyRectangleMinimum、CIColorMatrix、CIMedianFilter、CIGaborGradients、CIColorThresholdandCIColorThresholdOtsu。
The second category is post-processing. After Vision returns a barcode observation, face observation, or vector field, Core Image can redraw the result into an image. Color space is also handled by Core Image: input will go into its working space, and when a special color space is needed, usematchedFromWorkingSpaceandmatchedToWorkingSpaceWrap your own algorithm.
Key points:
CIColorThresholdLet the app set its own threshold,CIColorThresholdOtsuAutomatically find the threshold based on the histogram. -CIColorAbsoluteDifferenceandCILabDeltaEUsed to compare two pictures, suitable for entering the subsequent motion detection process.- images stay first
CIImageIn the pipeline, it is then handed over to Vision to avoid the memory and computing costs of converting the image into a matrix.
2. Use Vision to find the outline, and then draw the result back into the image (19:24)
The request for contour detection isVNDetectContoursRequest. After the request is executed, the result isVNContoursObservation. it hastopLevelContours、contourCountandnormalizedPath. singleVNContourAlso comes with child contours, index path, normalized points, point count, aspect ratio and normalized path.
This official playground code shows the complete process: read the punch card image, create a contour request, and useVNImageRequestHandlerExecute the Vision request, and thennormalizedPathOverlay back to the original image.
import UIKit
import CoreImage
import CoreImage.CIFilterBuiltins
import Vision


public func drawContours(contoursObservation: VNContoursObservation, sourceImage: CGImage) -> UIImage {
	let size = CGSize(width: sourceImage.width, height: sourceImage.height)
	let renderer = UIGraphicsImageRenderer(size: size)

	let renderedImage = renderer.image { (context) in

		let renderingContext = context.cgContext

    // flip the context
    let flipVertical = CGAffineTransform(a: 1, b: 0, c: 0, d: -1, tx: 0, ty: size.height)
    renderingContext.concatenate(flipVertical)

		// draw the original image
		renderingContext.draw(sourceImage, in: CGRect(x: 0, y: 0, width: size.width, height: size.height))

		renderingContext.scaleBy(x: size.width, y: size.height)
		renderingContext.setLineWidth(3.0 / CGFloat(size.width))
		let redUIColor = UIColor.red
		renderingContext.setStrokeColor(redUIColor.cgColor)
		renderingContext.addPath(contoursObservation.normalizedPath)
		renderingContext.strokePath()
	}

	return renderedImage;
}

let context = CIContext()
if let sourceImage = UIImage.init(named: "punchCard.jpg")
{
	var inputImage = CIImage.init(cgImage: sourceImage.cgImage!)

	let contourRequest = VNDetectContoursRequest.init()

// Uncomment the follwing section to preprocess the image
//	do {
//			let noiseReductionFilter = CIFilter.gaussianBlur()
//			noiseReductionFilter.radius = 1.5
//			noiseReductionFilter.inputImage = inputImage
//
//			let monochromeFilter = CIFilter.colorControls()
//			monochromeFilter.inputImage = noiseReductionFilter.outputImage!
//			monochromeFilter.contrast = 20.0
//			monochromeFilter.brightness = 8
//			monochromeFilter.saturation = 50
//
//			let filteredImage = monochromeFilter.outputImage!
//
//			inputImage = filteredImage
//		}

	let requestHandler = VNImageRequestHandler.init(ciImage: inputImage, options: [:])

	try requestHandler.perform([contourRequest])
	let contoursObservation = contourRequest.results?.first as! VNContoursObservation
	print(contoursObservation.contourCount)
	_ = drawContours(contoursObservation: contoursObservation, sourceImage: sourceImage.cgImage!)
} else {
	print("could not load image")
}
Key points:
VNDetectContoursRequest.init()is the Vision task in this example, and the input image comes fromCIImage.- commented out
gaussianBlurandcolorControlsIs Core Image preprocessing. After opening this section in the demo, the number of contours dropped from 387 to 32. -VNImageRequestHandler.init(ciImage: inputImage, options: [:])Let Vision consume Core Image output directly. -contoursObservation.normalizedPathis renderableCGPath, the code scales it to the size of the source image and then draws it on the original image. - Vision uses normalized coordinates. The session is illustrated by the circle in the 1920x1080 picture. When making geometric judgments, the aspect ratio of the original image must be considered.
3. Analyze outline shapes, not just edge pixels (12:51)
VNContoursObservationThe hierarchical structure is suitable for describing the outer and inner contours. In the example of two boxes and two circles in the session, the boxes are top-level contours and the circles are child contours. Developers can use index path to traverse this contour map.
The result of contour detection is not a bunch of pixels.VNContourProvides normalized points and point count, describing the line segment path. Vision also offersVNGeometryUtils, can calculate bounding circle, area and perimeter. When you need to remove the small polylines caused by camera shake, you can use polygon approximation’s epsilon to simplify the noisy rectangle into four corner points.
Key points:
maximumImageDimensionIt’s the knob for performance and precision. Low resolution runs faster, and high resolution brings contours closer to the edges.- aspect ratio affects geometric judgment. In normalized coordinates, a circle with a height of 1.0 will have a width of 0.5625 in a 1920x1080 image.
- epsilon is suitable for pressing slightly curved boundaries in the real world into main corner points, so that the quadrilateral, circle or hole can be judged later.
4. Use optical flow to see the local motion between two frames (21:23)
Traditional image registration gives the alignment of the entire image. When the camera moves up as a whole, it can tell you how much the overall image has moved. Optical flow is even finer, it returns the X/Y displacement of each pixel. When two points are separated from each other, it is difficult for whole-image registration to express this change, and optical flow can preserve local motion.
The result of Vision isVNPixelBufferObservation, which contains floating point images and interleaved X/Y movement. This result is suitable for subsequent algorithm processing, and it is difficult to understand directly by looking at the numerical value. session therefore uses a Core Image custom filter to convert displacements into colors and arrows.
var requestHandler = VNSequenceRequestHandler()
            var previousImage:CIImage?
			if (self.previousImage == nil)
			{
				self.previousImage = request.sourceImage
			}
			let visionRequest = VNGenerateOpticalFlowRequest(targetedCIImage: source, options: [:])

			do {
				try self.requestHandler.perform([visionRequest], on: self.previousImage!)
				if let pixelBufferObservation = visionRequest.results?.first as? VNPixelBufferObservation
				{
					source = CIImage(cvImageBuffer: pixelBufferObservation.pixelBuffer)
				}
			} catch {
				print(error)
			}
			// store the previous image
			self.previousImage = request.sourceImage

			let ciFilter = OpticalFlowVisualizerFilter()
			ciFilter.inputImage = source
			let output = ciFilter.outputImage
Key points:
VNSequenceRequestHandlerUsed for cross-frame requests because optical flow compares the current frame with the previous frame. -VNGenerateOpticalFlowRequest(targetedCIImage: source, options: [:])Generate optical flow requests. -perform([visionRequest], on: self.previousImage!)Hand over the previous frame to the request for processing. -VNPixelBufferObservationThe pixel buffer is packed intoCIImage, continue to the Core Image visualization step. -self.previousImage = request.sourceImageSave the current frame and prepare a reference image for the next request.
5. Use Core Image filter to visualize optical flow (23:26)
The optical flow value given by Vision is biased as input to the algorithm. For debugging and display, a session is addedOpticalFlowVisualizerFilter. It is loaded from the App bundleOpticalFlowVisualizer.ci.metallib, the call namedflowView2The kernel maps X/Y movement to color shades and direction arrows.
class OpticalFlowVisualizerFilter: CIFilter {
	var inputImage: CIImage?

	let callback: CIKernelROICallback = {
			(index, rect) in
				return rect
			}

	static var kernel: CIKernel = { () -> CIKernel in
		let url = Bundle.main.url(forResource: "OpticalFlowVisualizer",
								  withExtension: "ci.metallib")!
		let data = try! Data(contentsOf: url)

		return try! CIKernel(functionName: "flowView2",
								  fromMetalLibraryData: data)
	}()

	override var outputImage : CIImage? {
		get {
			guard let input = inputImage else {return nil}
			return OpticalFlowVisualizerFilter.kernel.apply(extent: input.extent, roiCallback: callback, arguments: [input, 0.0, 100.0, 10.0, 30.0])
		}
	}
}
Key points:
Bundle.main.url(forResource:withExtension:)Loads the Core Image kernel artifacts provided in slide attachments. -CIKernel(functionName: "flowView2", fromMetalLibraryData: data)Bind a custom kernel. -kernel.applyThe parameters of include input image, min/max length, arrow unit size, and arrow angle.- This step shows that Core Image can both clean up the input before Vision and turn the results into images that users or developers can understand after Vision.
Core Takeaways
- Paper Work Order Hole Position Reading: What to do: Let the App take a picture of a punch card, equipment label, or fixed-format work order, and convert the hole location into a structured record. Why it’s worth doing: The session’s punch card demo proves that Core Image preprocessing can converge the number of contours from 387 to 32. How to get started: Convert photos to
CIImage, use firstgaussianBlurandcolorControlsClean the background and execute againVNDetectContoursRequest,usecontourCountandnormalizedPathCheck the results. - Video Movement Direction Overlay: What it does: Display the movement direction of parts of the frame in sports training or video editing apps. Why it’s worth doing:
VNGenerateOpticalFlowRequestReturns the pixel-by-pixel X/Y displacement, which can express the movement of local objects apart. How to start: UseVNSequenceRequestHandlerSave the previous frame and putVNPixelBufferObservationPackagedCIImage, and then access the custom Core Image filter. - Quality check panel before image analysis: What to do: Add a preview panel to the internal tools, showing thresholding, noise reduction, number of contours and the final overlay. Why it’s worth doing: Session has repeatedly emphasized that preprocessing will affect Vision’s speed and stability. How to start: put
CIColorThresholdOtsu、CIMedianFilter、CIColorControlsAs an adjustable step, shown next toVNContoursObservation.contourCount. - Shape Defect Detection: What to do: Check whether packaging, bill edges, or part contours deviate from the expected shape. Why it’s worth doing:
VNGeometryUtilsIt can calculate area, perimeter and bounding circle, and epsilon polygon approximation can simplify noise edges into main corner points. How to start: First detect contours, then filter out abnormal shapes by aspect ratio, point count, and area range. - Vision Result Debug View: What to do: Add a developer mode to the camera app and draw the Vision output directly back to the screen. Why it’s worth doing: session
drawContoursand optical flow visualizer both use visualization to shorten parameter adjustment feedback. How to start: Contour WalknormalizedPathOverlay, light flows awayVNPixelBufferObservationto Core Image filter.
Related Sessions
- Optimize the Core Image pipeline for your video app — Continue to see the video scene
CIContextMultiplexing, Metal command queue and Core Image performance. - Build Metal-based Core Image kernels with Xcode — Go deep into the background of this optical flow visualizer
.ci.metalKernel building and loading process. - Discover Core Image debugging techniques — Learn how to generate a Core Image graph and locate color, memory, and rendering issues.
- Detect Body and Hand Pose with Vision — Connected to the Vision 2020 human body pose and hand pose detection capabilities mentioned in this session.
- Explore the Action & Vision app — See how Vision, Create ML, and Core ML combine into a complete motion analysis app.
Comments
GitHub Issues · utterances