
Highlight
Vision added hand pose and human pose detection in 2020. The request will return key points with confidence, allowing the app to use camera frames to recognize pinch gestures, draw hand trajectories, and hand over continuous body poses to the Create ML action classifier.
Core Content
In the past, when apps wanted to understand the people in the picture, the most common entry point was faces. Vision already has Face Detection (face detection), Face Landmarks (face key points) and Human Torso Detection (human torso detection). These abilities can answer “Is there a face in the picture?”, but it is difficult to answer “Is the finger pinched?” “Is the person throwing?” “Which frame is the highest point of the jump?”
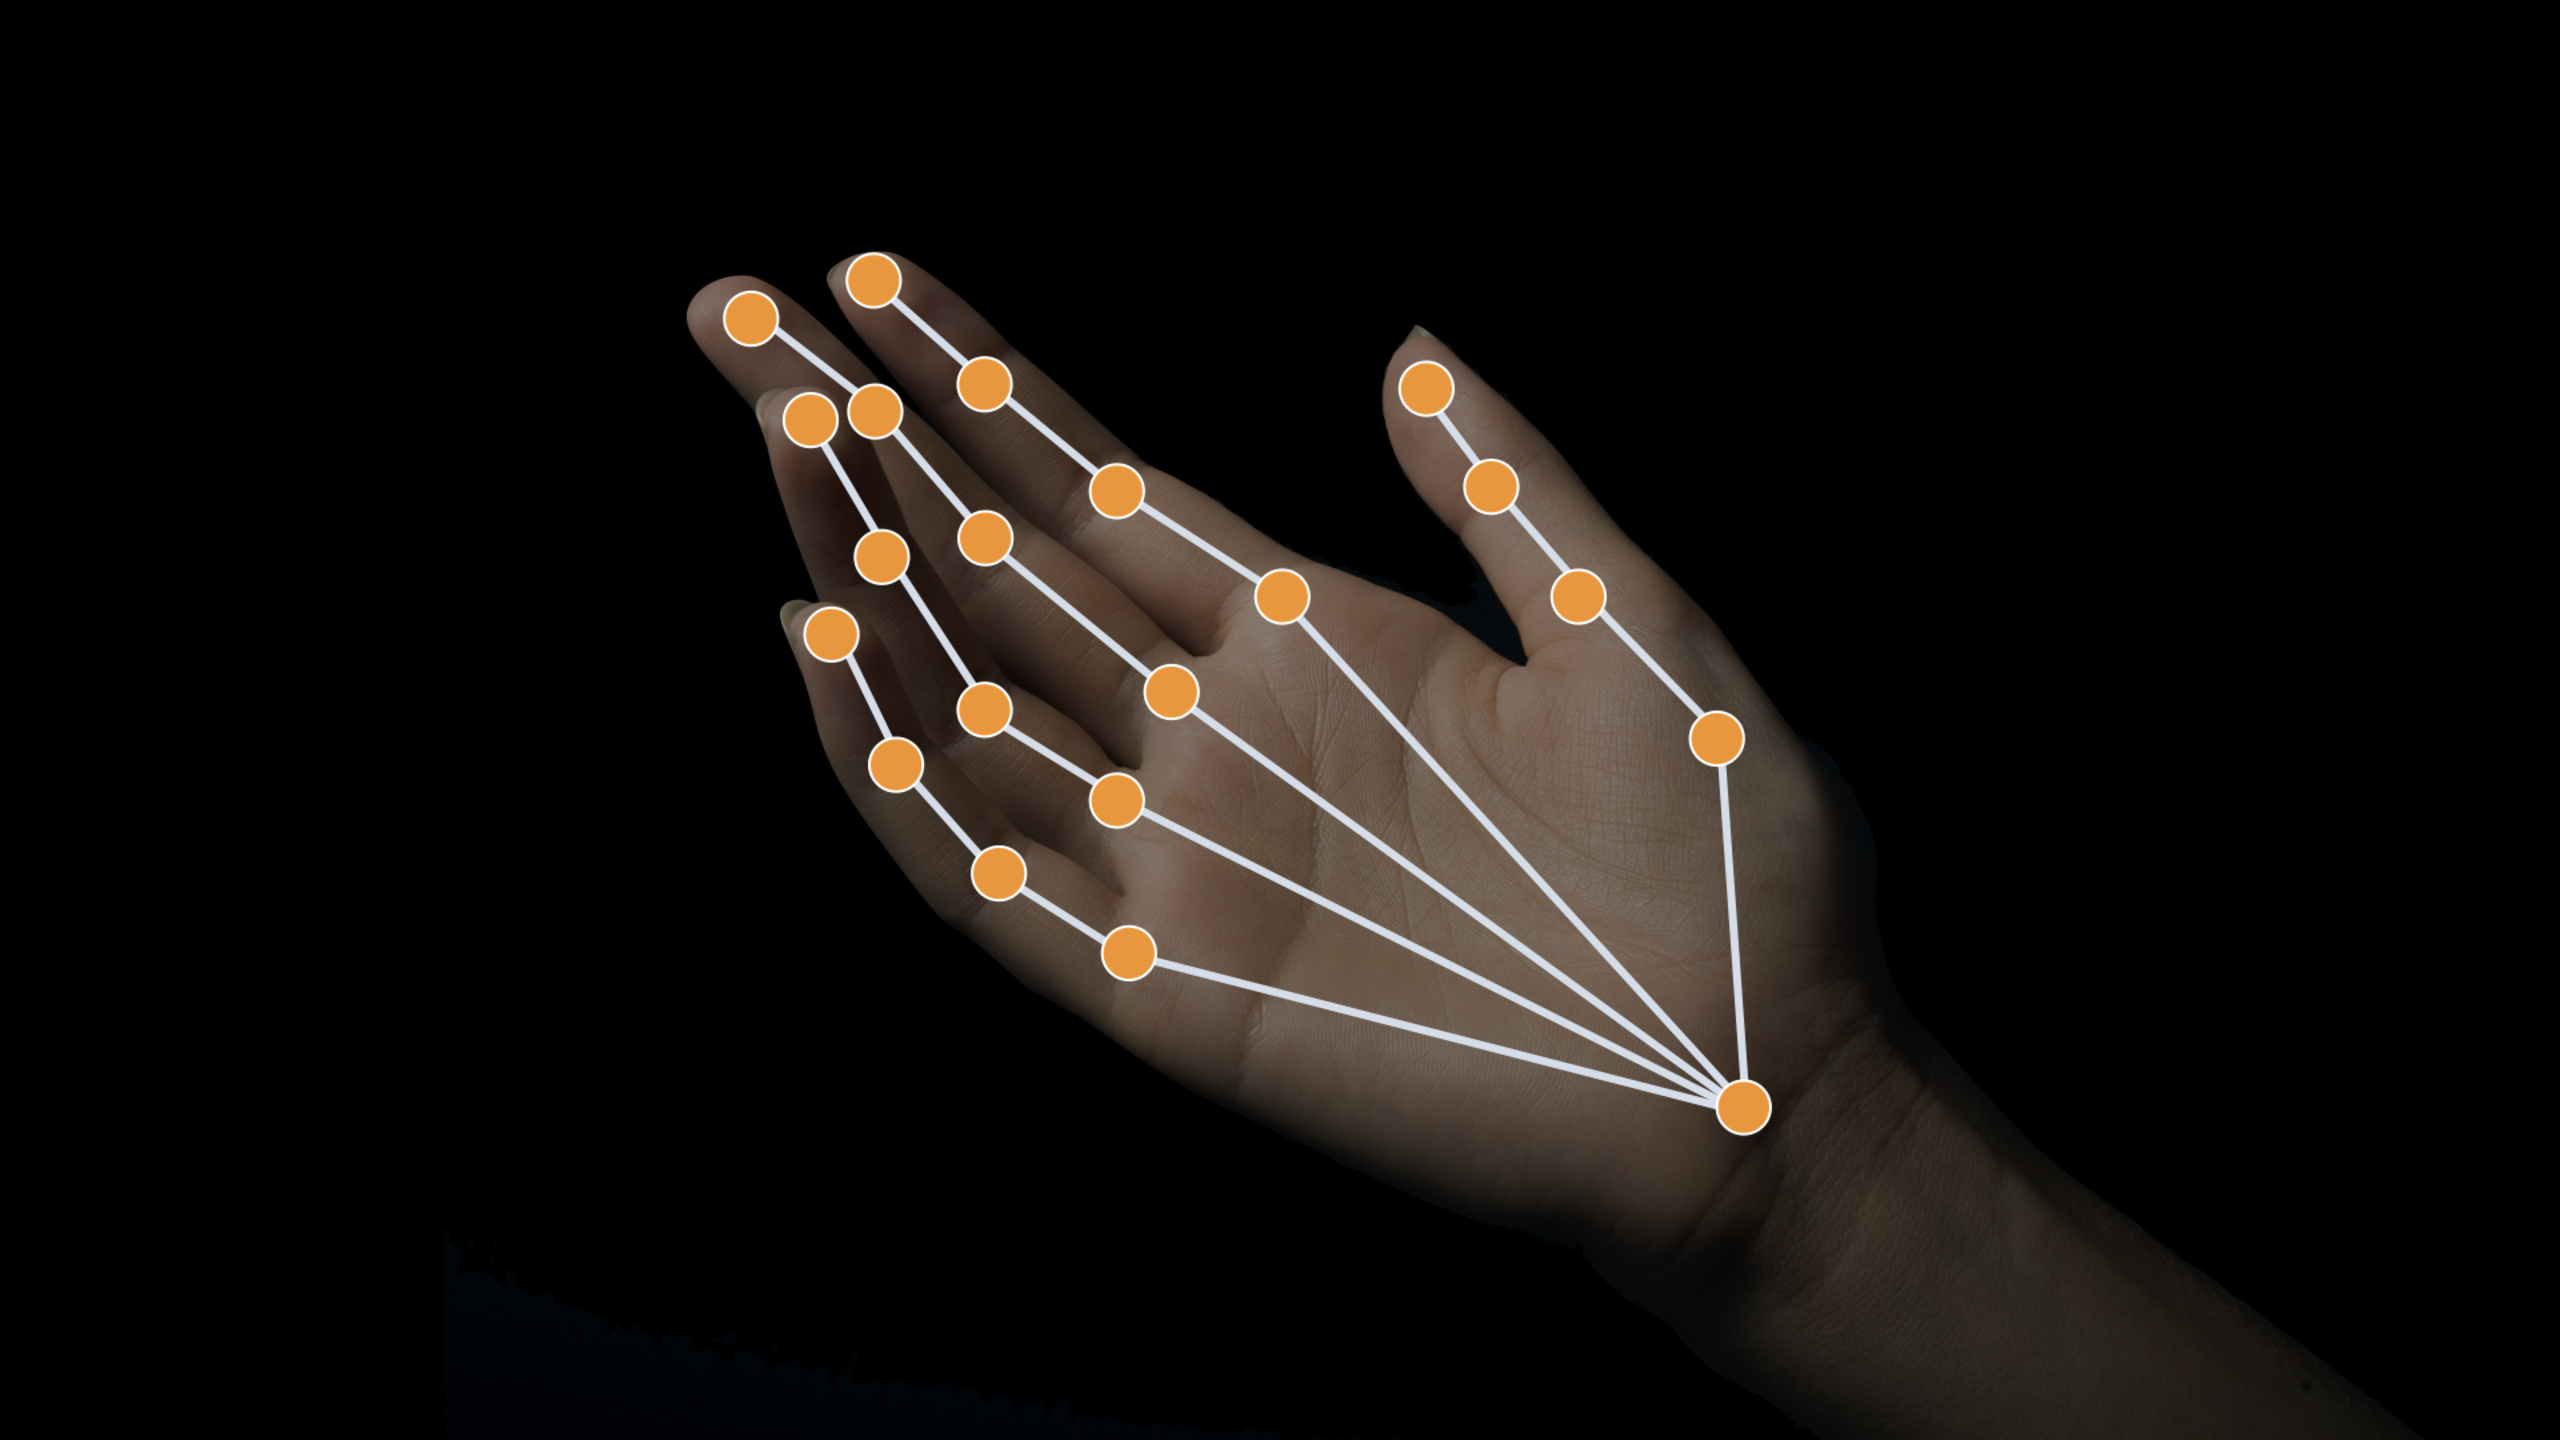
This WWDC 2020 session takes Vision’s People theme one step further: newVNDetectHumanHandPoseRequestandVNDetectHumanBodyPoseRequest. The former returns 21 landmarks (key points) on a single hand, and the latter returns key points on the human body’s face, arms, torso, and legs. Both types of results passVNRecognizedPointsObservationTake out, each point has normalized coordinates and confidence.
This changes the interaction method from “clicking buttons” to “watching actions”. In the hand posture example, the App reads the tip of the thumb and the tip of the index finger every frame, and starts drawing lines after the distance is close enough and stable for three consecutive frames. In the body posture example, the App saves the posture window before and after throwing and converts it intoMLMultiArray, and then hand it over to the Core ML model to determine the throwing type.
Session also gives boundaries. Hands close to the edge of the screen, palms oriented parallel to the direction of the camera, wearing gloves, and feet being mistakenly recognized as hands will all affect the hand posture. Body posture will also decrease when encountering handstands, bending down, loose blocking clothing, multiple people blocking each other, and close to the edge of the screen. When doing real-time inference, you should also pay attention to the delay of old equipment. It is best to sample body posture every frame, but classification inference can reduce the frequency to avoid occupying the camera buffer.
Detailed Content
Hand pose: Remove thumb and index finger from camera frame
(07:07) The real-time path for hand gestures is straightforward. Camera callback is obtainedCMSampleBufferAfter that, the code is createdVNImageRequestHandler,implementVNDetectHumanHandPoseRequest, and then start from the firstVNRecognizedPointsObservationTake two sets of points, thumb and index finger.
extension CameraViewController: AVCaptureVideoDataOutputSampleBufferDelegate {
    public func captureOutput(_ output: AVCaptureOutput, didOutput sampleBuffer: CMSampleBuffer, from connection: AVCaptureConnection) {
        var thumbTip: CGPoint?
        var indexTip: CGPoint?

        defer {
            DispatchQueue.main.sync {
                self.processPoints(thumbTip: thumbTip, indexTip: indexTip)
            }
        }

        let handler = VNImageRequestHandler(cmSampleBuffer: sampleBuffer, orientation: .up, options: [:])
        do {
            // Perform VNDetectHumanHandPoseRequest
            try handler.perform([handPoseRequest])
            // Continue only when a hand was detected in the frame.
            // Since we set the maximumHandCount property of the request to 1, there will be at most one observation.
            guard let observation = handPoseRequest.results?.first as? VNRecognizedPointsObservation else {
                return
            }
            // Get points for thumb and index finger.
            let thumbPoints = try observation.recognizedPoints(forGroupKey: .handLandmarkRegionKeyThumb)
            let indexFingerPoints = try observation.recognizedPoints(forGroupKey: .handLandmarkRegionKeyIndexFinger)
            // Look for tip points.
            guard let thumbTipPoint = thumbPoints[.handLandmarkKeyThumbTIP], let indexTipPoint = indexFingerPoints[.handLandmarkKeyIndexTIP] else {
                return
            }
            // Ignore low confidence points.
            guard thumbTipPoint.confidence > 0.3 && indexTipPoint.confidence > 0.3 else {
                return
            }
            // Convert points from Vision coordinates to AVFoundation coordinates.
            thumbTip = CGPoint(x: thumbTipPoint.location.x, y: 1 - thumbTipPoint.location.y)
            indexTip = CGPoint(x: indexTipPoint.location.x, y: 1 - indexTipPoint.location.y)
        } catch {
            cameraFeedSession?.stopRunning()
            let error = AppError.visionError(error: error)
            DispatchQueue.main.async {
                error.displayInViewController(self)
            }
        }
    }
}
Key points:
VNImageRequestHandler(cmSampleBuffer:orientation:options:)Process camera frames directly without converting them into image objects first. -handler.perform([handPoseRequest])Perform hand gesture request; examplemaximumHandCountSet to 1, so at most one observation is processed. -recognizedPoints(forGroupKey:)Points can be taken by grouping fingers; here we take thumb and index finger.- Examples only use
.handLandmarkKeyThumbTIPand.handLandmarkKeyIndexTIPTwo fingertips. -confidence > 0.3Filter low confidence points. - The origin of Vision coordinates is in the lower left corner. The example converts y into AVFoundation coordinates.
1 - y。
(10:39) If there may be multiple hands in the screen,maximumHandCountWill affect the number of results and latency. The default value is 2. The larger the value, the more Vision needs to calculate poses for more hands; if only the nearest or largest hand is needed, lowering this parameter is more appropriate.
Pinch Gesture: Eliminate Jitter with Continuous Frame Evidence
(08:29) The example does not only look at the single frame distance. It compares the distance between the tip of the thumb and the tip of the index finger to a threshold and uses a consecutive frame count to determine the state. The threshold is 40 and 3 frames of evidence are required for state triggering.
init(pinchMaxDistance: CGFloat = 40, evidenceCounterStateTrigger: Int = 3) {
        self.pinchMaxDistance = pinchMaxDistance
        self.evidenceCounterStateTrigger = evidenceCounterStateTrigger
    }

    func reset() {
        state = .unknown
        pinchEvidenceCounter = 0
        apartEvidenceCounter = 0
    }

    func processPointsPair(_ pointsPair: PointsPair) {
        lastProcessedPointsPair = pointsPair
        let distance = pointsPair.indexTip.distance(from: pointsPair.thumbTip)
        if distance < pinchMaxDistance {
            // Keep accumulating evidence for pinch state.
            pinchEvidenceCounter += 1
            apartEvidenceCounter = 0
            // Set new state based on evidence amount.
            state = (pinchEvidenceCounter >= evidenceCounterStateTrigger) ? .pinched : .possiblePinch
        } else {
            // Keep accumulating evidence for apart state.
            apartEvidenceCounter += 1
            pinchEvidenceCounter = 0
            // Set new state based on evidence amount.
            state = (apartEvidenceCounter >= evidenceCounterStateTrigger) ? .apart : .possibleApart
        }
    }
Key points:
pinchMaxDistanceis the pinch threshold, the example default is 40. -pointsPair.indexTip.distance(from: pointsPair.thumbTip)It is the only geometric input for gesture judgment.- Accumulated when the distance is less than the threshold
pinchEvidenceCounter, clear at the same timeapartEvidenceCounter. - Reverse accumulation when the distance reaches or exceeds the threshold
apartEvidenceCounter。 evidenceCounterStateTriggerRequires 3 consecutive frames to avoid single frame misdetection causing the line drawing status to jump.
(09:25) state enterspinchedFinally, the example writes the cache points into the drawing path. Enterapartorunknown, the cache is discarded and the last path is drawn.
private func handleGestureStateChange(state: HandGestureProcessor.State) {
        let pointsPair = gestureProcessor.lastProcessedPointsPair
        var tipsColor: UIColor
        switch state {
        case .possiblePinch, .possibleApart:
            // We are in one of the "possible": states, meaning there is not enough evidence yet to determine
            // if we want to draw or not. For now, collect points in the evidence buffer, so we can add them
            // to a drawing path when required.
            evidenceBuffer.append(pointsPair)
            tipsColor = .orange
        case .pinched:
            // We have enough evidence to draw. Draw the points collected in the evidence buffer, if any.
            for bufferedPoints in evidenceBuffer {
                updatePath(with: bufferedPoints, isLastPointsPair: false)
            }
            // Clear the evidence buffer.
            evidenceBuffer.removeAll()
            // Finally, draw current point
            updatePath(with: pointsPair, isLastPointsPair: false)
            tipsColor = .green
        case .apart, .unknown:
            // We have enough evidence to not draw. Discard any evidence buffer points.
            evidenceBuffer.removeAll()
            // And draw the last segment of our draw path.
            updatePath(with: pointsPair, isLastPointsPair: true)
            tipsColor = .red
        }
        cameraView.showPoints([pointsPair.thumbTip, pointsPair.indexTip], color: tipsColor)
    }
Key points:
.possiblePinchand.possibleApartIt’s just a transitional state, click AdvancedevidenceBuffer。.pinchedThe cache point and the current point will be written into the path together, and the finger has been steadily approaching. -.apartand.unknownThe cache will be cleared to avoid misjudged trajectories being drawn on the screen. -tipsColorFeed back the status to the UI: orange waiting, green drawing, red stopping.
Body posture: Analyze multiple people with the same Vision mode
(14:26) The mode of body posture request is consistent with the hand posture: create request handler, createVNDetectHumanBodyPoseRequest, execute the request, and then start fromVNRecognizedPointsObservationRead key points. The difference is that human body posture can analyze multiple people in the picture and organize landmarks according to group keys such as face, left arm, right arm, torso, left leg, right leg, etc.
(17:08) Session specifically compares Vision and ARKit. Both return the same set of human landmarks. Vision has confidence per point, can handle still images, camera feeds and offline gallery analysis, and does not require an AR session. ARKit is more suitable for live motion capture (real-time motion capture), which relies on rear cameras and supporting devices.
(20:48) The Action and Vision example puts body pose and trajectory detection in the same camera callback. In the throwing tracking state, the code will execute trajectory request; at the same time, it will continue to run.detectPlayerRequest, updating the player frame and joint overlays with the body pose results.
extension GameViewController: CameraViewControllerOutputDelegate {
    func cameraViewController(_ controller: CameraViewController, didReceiveBuffer buffer: CMSampleBuffer, orientation: CGImagePropertyOrientation) {
        let visionHandler = VNImageRequestHandler(cmSampleBuffer: buffer, orientation: orientation, options: [:])
        if self.gameManager.stateMachine.currentState is GameManager.TrackThrowsState {
            DispatchQueue.main.async {
                // Get the frame of rendered view
                let normalizedFrame = CGRect(x: 0, y: 0, width: 1, height: 1)
                self.jointSegmentView.frame = controller.viewRectForVisionRect(normalizedFrame)
                self.trajectoryView.frame = controller.viewRectForVisionRect(normalizedFrame)
            }
            // Perform the trajectory request in a separate dispatch queue
            trajectoryQueue.async {
                self.setUpDetectTrajectoriesRequest()
                do {
                    if let trajectoryRequest = self.detectTrajectoryRequest {
                        try visionHandler.perform([trajectoryRequest])
                    }
                } catch {
                    AppError.display(error, inViewController: self)
                }
            }
        }
        // Run bodypose request for additional GameConstants.maxPostReleasePoseObservations frames after the first trajectory observation is detected
        if !(self.trajectoryView.inFlight && self.trajectoryInFlightPoseObservations >= GameConstants.maxTrajectoryInFlightPoseObservations) {
            do {
                try visionHandler.perform([detectPlayerRequest])
                if let result = detectPlayerRequest.results?.first as? VNRecognizedPointsObservation {
                    let box = humanBoundingBox(for: result)
                    let boxView = playerBoundingBox
                    DispatchQueue.main.async {
                        let horizontalInset = CGFloat(-20.0)
                        let verticalInset = CGFloat(-20.0)
                        let viewRect = controller.viewRectForVisionRect(box).insetBy(dx: horizontalInset, dy: verticalInset)
                        self.updateBoundingBox(boxView, withRect: viewRect)
                        if !self.playerDetected && !boxView.isHidden {
                            self.gameStatusLabel.alpha = 0
                            self.resetTrajectoryRegions()
                            self.gameManager.stateMachine.enter(GameManager.DetectedPlayerState.self)
                        }
                    }
                }
            } catch {
                AppError.display(error, inViewController: self)
            }
        } else {
            // Hide player bounding box
            DispatchQueue.main.async {
                if !self.playerBoundingBox.isHidden {
                    self.playerBoundingBox.isHidden = true
                    self.jointSegmentView.resetView()
                }
            }
        }
    }
}
Key points:
VNImageRequestHandler(cmSampleBuffer:orientation:options:)Reuse camera buffer for Vision analysis. -trajectoryQueue.asyncPut trajectory requests into a separate queue to avoid being crowded with UI updates. -detectPlayerRequestIt is a body posture request, returnVNRecognizedPointsObservation。humanBoundingBox(for:)The player’s position is calculated based on the posture key points and then converted into view coordinates.- Track entry
inFlightFinally, the example only continues to save a limited number of post-release pose frames, controlling the action classification window.
(21:19) Human body frames are not detected individually. Example taken from observation.allGroup key points, filter low-confidence points, and then union the positions of these points into a normalized bounding box.
func humanBoundingBox(for observation: VNRecognizedPointsObservation) -> CGRect {
        var box = CGRect.zero
        // Process body points only if the confidence is high
        guard observation.confidence > 0.6 else {
            return box
        }
        var normalizedBoundingBox = CGRect.null
        guard let points = try? observation.recognizedPoints(forGroupKey: .all) else {
            return box
        }
        for (_, point) in points {
            // Only use point if human pose joint was detected reliably
            guard point.confidence > 0.1 else { continue }
            normalizedBoundingBox = normalizedBoundingBox.union(CGRect(origin: point.location, size: .zero))
        }
        if !normalizedBoundingBox.isNull {
            box = normalizedBoundingBox
        }
        // Fetch body joints from the observation and overlay them on the player
        DispatchQueue.main.async {
            let joints = getBodyJointsFor(observation: observation)
            self.jointSegmentView.joints = joints
        }
        // Store the body pose observation in playerStats when the game is in TrackThrowsState
        // We will use these observations for action classification once the throw is complete
        if gameManager.stateMachine.currentState is GameManager.TrackThrowsState {
            playerStats.storeObservation(observation)
            if trajectoryView.inFlight {
                trajectoryInFlightPoseObservations += 1
            }
        }
        return box
    }
Key points:
observation.confidence > 0.6First filter the entire human body observation. -recognizedPoints(forGroupKey: .all)Remove all body details.- Skip when single point confidence is less than or equal to 0.1.
-
normalizedBoundingBox.union(...)Construct a human body frame using the remaining key points. - Game entry
TrackThrowsStateAfter that, the example stores observation inplayerStats, these gestures will be used for subsequent action classification.
Action classification: Convert posture window to Core ML input
(18:23) Body posture can be matched with Create ML’s action classification. Session gave several training and reasoning suggestions: it is best to have only one target person in the training video; you can also use Vision directly without the video.keypointsMultiArrayObtain the ML MultiArray buffer; use the Vision pose for training, and the Vision pose for inference. You cannot feed the ARKit pose to a model trained with the Vision pose.
(21:58) The example uses ring buffer to save the latest body posture observation. When it is full, remove the oldest frame and add a new observation.
mutating func storeObservation(_ observation: VNRecognizedPointsObservation) {
        if poseObservations.count >= GameConstants.maxPoseObservations {
            poseObservations.removeFirst()
        }
        poseObservations.append(observation)
    }
Key points:
poseObservationsPreserve continuous body poses. -GameConstants.maxPoseObservationsLimit window size. -removeFirst()Discard the oldest observation.- New observations are always appended to the end of the window.
(22:42) Before classification, the code needs to convert up to 60 frames of observation intoMLMultiArray. If the number of frames is less than 60, zeros are added.
func prepareInputWithObservations(_ observations: [VNRecognizedPointsObservation]) -> MLMultiArray? {
    let numAvailableFrames = observations.count
    let observationsNeeded = 60
    var multiArrayBuffer = [MLMultiArray]()

    // swiftlint:disable identifier_name
    for f in 0 ..< min(numAvailableFrames, observationsNeeded) {
        let pose = observations[f]
        do {
            let oneFrameMultiArray = try pose.keypointsMultiArray()
            multiArrayBuffer.append(oneFrameMultiArray)
        } catch {
            continue
        }
    }

    // If poseWindow does not have enough frames (60) yet, we need to pad 0s
    if numAvailableFrames < observationsNeeded {
        for _ in 0 ..< (observationsNeeded - numAvailableFrames) {
            do {
                let oneFrameMultiArray = try MLMultiArray(shape: [1, 3, 18], dataType: .double)
                try resetMultiArray(oneFrameMultiArray)
                multiArrayBuffer.append(oneFrameMultiArray)
            } catch {
                continue
            }
        }
    }
    return MLMultiArray(concatenating: [MLMultiArray](multiArrayBuffer), axis: 0, dataType: MLMultiArrayDataType.double)
}
Key points:
observationsNeededis 60, the model expects a fixed length pose window. -pose.keypointsMultiArray()Convert a single frame of body pose into an array that Core ML can receive.- When the number of frames is insufficient, the sample creation shape is
[1, 3, 18]ofMLMultiArrayComplete. - The last line concatenates all frames along axis 0 into one input.
(22:21) When the window is ready, the example is createdPlayerActionClassifierInput, call the Core ML model to predict, and then take the throw type corresponding to the highest confidence level from the probability array.
mutating func getLastThrowType() -> ThrowType {
        let actionClassifier = PlayerActionClassifier().model
        guard let poseMultiArray = prepareInputWithObservations(poseObservations) else {
            return ThrowType.none
        }
        let input = PlayerActionClassifierInput(input: poseMultiArray)
        guard let predictions = try? actionClassifier.prediction(from: input),
            let output = predictions.featureValue(for: "output")?.multiArrayValue,
                let outputBuffer = try? UnsafeBufferPointer<Float32>(output) else {
            return ThrowType.none
        }
        let probabilities = Array(outputBuffer)
        guard let maxConfidence = probabilities.prefix(3).max(), let maxIndex = probabilities.firstIndex(of: maxConfidence) else {
            return ThrowType.none
        }
        let throwTypes = ThrowType.allCases
        return throwTypes[maxIndex]
    }
Key points:
PlayerActionClassifier().modelIt is the classification model that enters the App after training with Create ML. -prepareInputWithObservations(poseObservations)Turn the pose window into a model input. -prediction(from:)Run the classification.- Output via
"output"retrieveMLMultiArray, and then converted intoFloat32Probability array. -probabilities.prefix(3).max()Only look for the highest confidence in the first three throwing categories.
Core Takeaways
-
What to do: Make an air drawing or whiteboard annotation app. Why it’s worth doing: Take out the tip of your thumb and index finger with a stable hand posture, start drawing lines after pinching for three frames, and stop after releasing. How to start: Use
VNDetectHumanHandPoseRequestTake thumb tip and index tip, and reuse the distance threshold and evidence counter in the example. -
What to do: Make a buttonless camera shutter. Why it’s worth doing: The beginning of the session mentioned using specific gestures to trigger photography. Hand gestures allow users to operate even without the screen. How to start: Set lower first
maximumHandCountControl the delay, and then bind the target gesture classification logic to the photo action. -
What to do: Make a motion action classifier. Why it’s worth doing: Body posture observation can be done by
keypointsMultiArray()Convert toMLMultiArray, and then input the action classification model trained by Create ML. How to start: First refer to 10043 Training Action Classifier, save the 60-frame pose window in the App and fill in zeros according to this example. -
What to do: Make a best action frame picker in your photo or video. Why it’s worth doing: Body posture can analyze static pictures, camera feeds and offline galleries. Session gives examples of the highest point of jump, stromotion synthesis and sports posture selection. How to start: traverse video frames offline and execute
VNDetectHumanBodyPoseRequest, select candidate frames by joint position and confidence. -
What to do: Make a simple human pose quality hint layer. Why it’s worth doing: Session clearly lists edge occlusion, multiple people occluding each other, handstands, bending over, and loose clothing as reducing the effect. How to start: Check observation confidence and single-point confidence. When the value is lower than the threshold, prompt the user in the viewfinder to step back, adjust the position, or expose the complete body.
Related Sessions
- Build an Action Classifier with Create ML — Train an action classification model based on Vision body pose sequences.
- Explore the Action & Vision app — Combines body pose, trajectory detection, and Core ML classifiers into a complete motion analysis app.
- Explore Computer Vision APIs — Supplements how Vision, Core Image, and Core ML are combined in computer vision workflows.
- Get models on device using Core ML Converters — Learn about the deployment path for training models to be converted to Core ML and run on the device.
Comments
GitHub Issues · utterances