
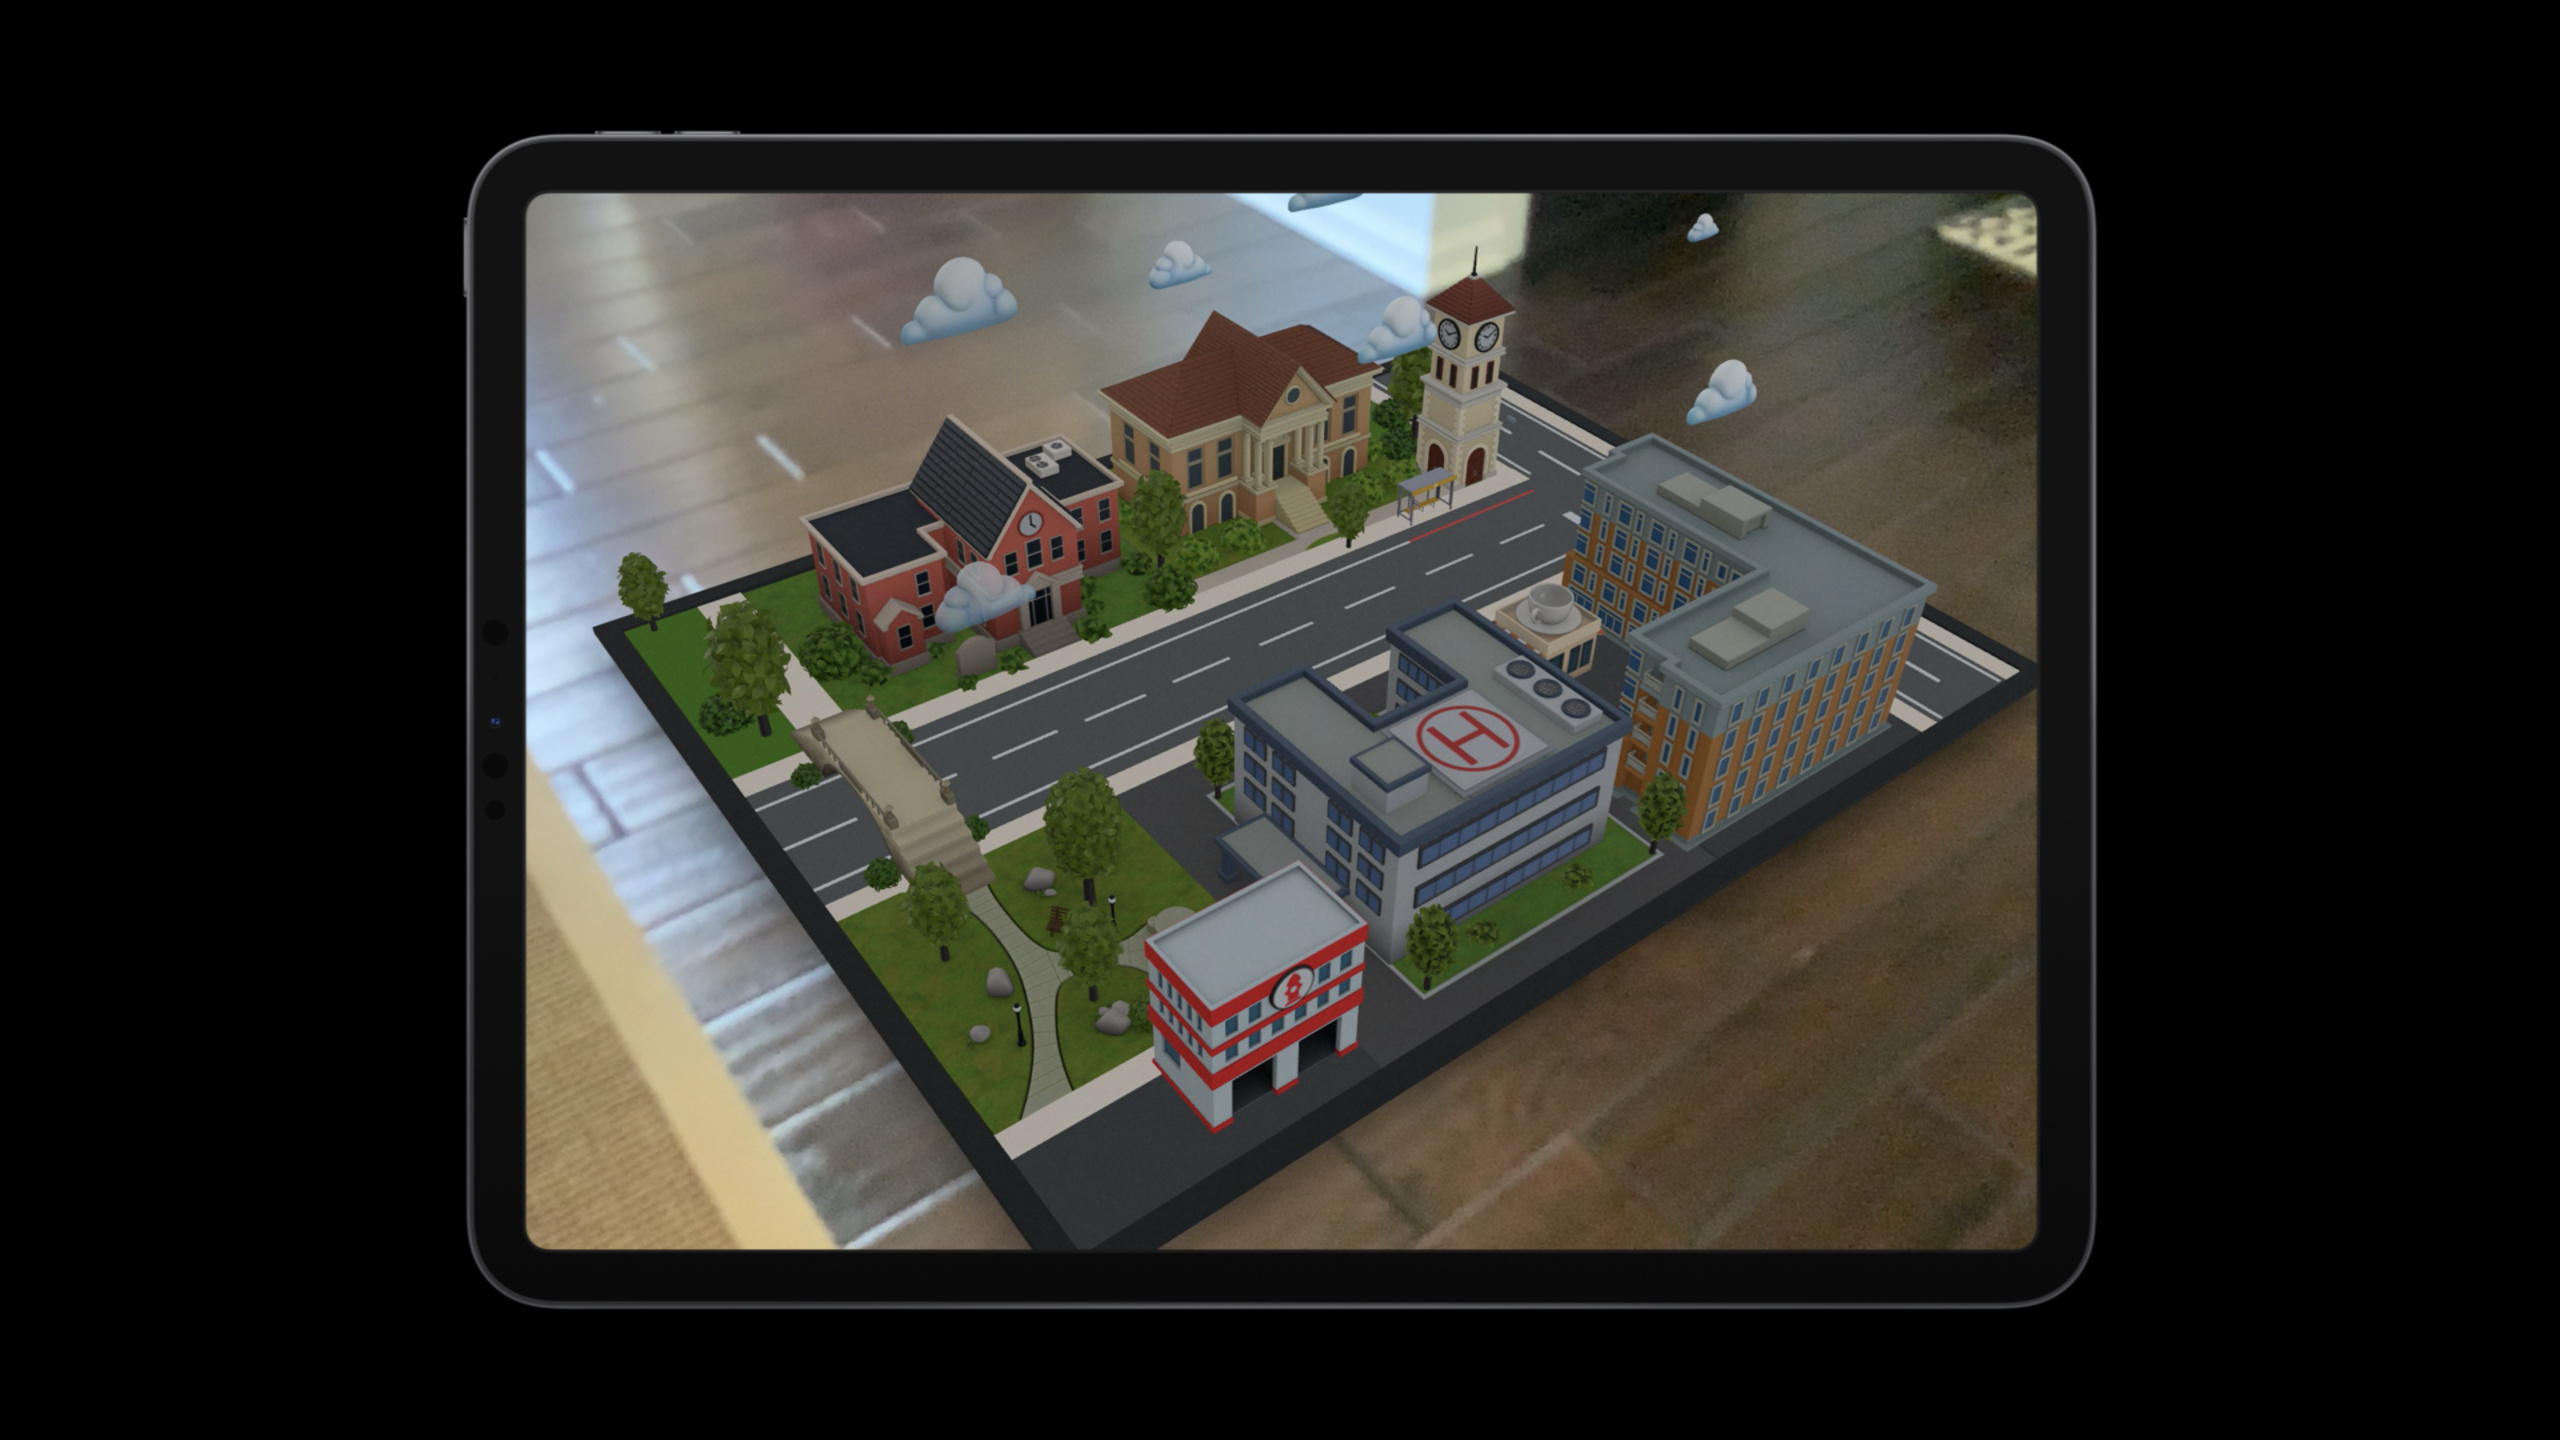
Highlight
Apple uses Reality Converter, Reality Composer, and AR Quick Look to connect the AR content production process from DCC export, USDZ conversion, behavior orchestration to real-device preview, allowing artists to deliver FBX, OBJ, USD, and GLTF assets into shareable AR experiences.
Core Content
When making AR content, the problems programmers encounter are usually in the code. The problem encountered by artists is earlier: the model is prepared in Houdini, Blender or KeyShot, but it has to go through format, material, unit, layer and preview before handing it over to the app. If the unit of an asset is wrong, it may be magnified 100 times in the AR scene. If a level is merged, it will not be possible to move only one cloud later.
This session breaks the road into a straight line. Start by exporting FBX, OBJ, USD or GLTF from DCC (Digital Content Creation). Then use Reality Converter to check the material, texture, unit and copyright information, and output USDZ that Reality Composer can accept. Then combine USDZ into scenes in Reality Composer, and use behavior cards to control animation, movement, display, hiding and switching scenes. Finally, hand the project over to the iPad for on-the-spot adjustments, or export it to AR Quick Look for viewing and sharing.
This process addresses team collaboration breakpoints rather than individual API calls. Artists can continue to use the familiar DCC; developers get USDZ or Reality files that are recognized by the Apple ecosystem; product, design, and testers can view proportion, speed, and spatial relationships directly on the iPad without waiting for Xcode integration to be completed.
Detailed Content
1. From DCC to Reality Converter
(00:47) The complete route is given at the beginning of the speech: DCC → Reality Converter → Reality Composer → Device. Reality Converter supports importing FBX, OBJ, USD and GLTF geometry formats, textures support PNG and JPEG, and the output target is valid USDZ.
Key points:
- Geometry input only includes FBX, OBJ, USD, and GLTF listed in the lecture, covering common tool chains such as Houdini, Blender, KeyShot, etc.
- Texture inputs only write PNG and JPEG because the talk explicitly lists them as texture types supported by Reality Converter.
- base units is a critical step. The Houdini example uses meters, and the following assets use centimeters. If the units are wrong, a 100-fold scale deviation will occur in Composer.
- USDZ is a prerequisite for entering Reality Composer, as the talk clearly states that Reality Composer only accepts USDZ files.
(03:46) Reality Converter’s work interface revolves around inspecting assets. The Models tab on the left manages imported models. The Environments tab on the right uses image-based lighting to check the effect under different lighting. The Materials tab is used to attach textures such as base color, normal map, and ambient occlusion. Properties tab is used to fill in copyright and set base units.
Key points:
Models tabUsed to confirm that multiple assets have entered the same conversion process.Environments tabThe grid can check the model size to avoid exporting centimeter assets as meter assets.Materials tabLet artists correct map connections during the conversion phase, rather than waiting in the app to discover that materials are missing.Properties tabThe base units will affect the relative proportions of each asset in subsequent Reality Composer.
(09:21) The speech also demonstrated a faster import method: directly drag the folder containing geometry and associated textures into Reality Converter, and the tool will automatically mount the textures. After multiple assets are ready, you can useFile > Export AllExport once.
Key points:
- Import by folder “faster way” from Lecture, suitable for batch processing of a set of scene assets.
Export AllAvoid exporting one by one, which is suitable for the artist’s workflow of repeatedly iterating assets every day.- Each export result is an independent USDZ, which can be dragged into the Reality Composer combination scene later.
2. Orchestrate behaviors in Reality Composer
(11:36) USDZ After importing into Reality Composer, the first thing is to check the scale. The speaker puts the schoolhouse, clock tower, and taxi together and confirms that they do not appear 100 times different in size. Static assets only need to look good; animated taxis need to create behaviors that tell Composer when to play the USDZ animation.
Key points:
Trigger: On Scene StartIndicates that the behavior is triggered at the beginning of the scene.Action: USDZ AnimationUse the USDZ animation that comes with the asset.Target: taxiis a controlled model. Since taxi has been selected during the speech, the behavior will be automatically applied to it.Loop: endlesslyChange the default one-time playback to loop, suitable for environmental animation.
(13:38) The Houdini cloud sample retains the USDZ hierarchy, so Reality Composer can select individual cloud entities via Hierarchy Select. In this way, the behavior can be applied to a certain sub-object rather than the entire cloud.
Key points:
- Cloud assets retain the USD level, which corresponds to the instance level emphasized earlier in the speech and is not merged into a whole piece of geometry.
Hierarchy SelectIt is the entry point into the USD scene level in Reality Composer.- After selecting a sub-entity, the behavior only affects this object, which is suitable for grouped assets such as clouds, vehicles, and decorations.
(15:08) More complex traffic animations are strung together by multiple behavior cards. The taxi in the speech first displays, moves, hides, returns to the starting point, and then loops to avoid jumping back instantly after moving directly. The Show and Hide cards also set direction, duration, distance, and easing.
Key points:
Show taxiAllow vehicles to enter from outside the screen to avoid appearing out of thin air.Move To end pointResponsible for the main movement, the speech emphasizes that the cards are executed in order from left to right.Hide taxiFade out at the end point and move backward, masking the movement back to the starting point.Move To start pointIt is the step to reset the position, because the previous step has been hidden, so the user cannot see the jump.RepeatTurn a short animation into continuous ambient traffic.
(18:23) Police car turning example uses Orbit cards to solve the problem of “cannot move in an arc when moving in a straight line”. Orbit requires an affected object and a center object. The speaker hid a small capsule-shaped geometry in the building as the center of the circle for the police car to turn, and set the orbit to 0.25 turns.
Key points:
Move To cornerSend the car to the entrance of the turn.OrbitUse the hidden geometry as the center of the circle to make the vehicle turn along the arc.amount: 0.25Corresponds to a quarter turn, which exactly shows the turning of the street corner.Move To next streetCatch the straight line after the turn.Hide police_carFollow the taxi disappearing technique to make the cycle more natural.
3. Real device editing, startup page and export
(20:49) AR content must be viewed in a real space. Reality Composer’s iOS Handoff allows selection on MacEdit on iOS, transfer the project to the iPad, view the size, speed and movement lines live on the desktop, and then transfer the changes back to the Mac.
Key points:
Edit on iOSHand over your Mac-side project to iPad to facilitate debugging in the real environment.place scene in ARUse a real surface such as a tabletop to check proportions and speed of movement.edit behavior timingIt is the specific modification in the speech: changing the display time of a certain taxi from 2 seconds to 5 seconds.DoneAfterwards, the behavior parameters on the Mac will be synchronized to the adjusted values on the iPad.
(23:16) AR Quick Look has sync and anchor times when loading content. The speaker uses the second scene as a splash page: Duplicate the entire scene, delete the objects you don’t want to appear when loading, keep only the static scene, and then use Change Scene to jump to the main scene with animation when it actually starts.
Key points:
- When copying the main scene and pasting it into a new scene, only the geometry will be brought without the original behavior, so it is suitable for making a static startup page.
- You can delete taxi or clouds to make the loading screen cleaner.
Change SceneJump immediately to the full version when the scene actually begins.- The target scene points to the final scene with traffic and cloud animations.
(25:10) Reality Composer has a new USDZ Export option in 2020, which needs to be enabled in Preferences. The talk gives export options: use USDZ for websites or News articles; use Reality export for Xcode projects or AR Quick Look. For viewing in AR Quick Look, the speaker chooses to export the Reality file and then send it to the iPad via AirDrop.
Key points:
USDZ exportFor embedded 3D/AR content in web pages and news articles.Reality exportFor Xcode projects and AR Quick Look.AirDropIt is the delivery method in the lecture, sending the exported Reality file to the device.open automatically in AR Quick LookComplete final verification: Once the file is saved, it loads on the desktop in AR Quick Look.
Core Takeaways
-
Make an internal AR asset acceptance checklist
-
What to do: Add the “Format, Texture, Unit, Level, Copyright, Export Format” check page to the art delivery process.
-
Why it’s worth doing: Every error in the session will be propagated to the back, especially at the base units and USD levels.
-
How to start: Using the three areas of Models, Materials, and Properties of Reality Converter as fields, each asset is required to take a screenshot or record the settings before exporting.
-
Make a reusable environment animation template
-
What to do: Make taxi’s Show → Move To → Hide → Reset cycle into a team template and use it on vehicles, crowds, clouds, and decorations.
-
Why It’s Worth Doing: The talk shows how the same set of action cards can be extended from a taxi to a set of clouds.
-
How to get started: Start by building a minimal scene in Reality Composer and save a sample project with trigger, Show, Hide, Move To and timing settings.
-
Do a “real machine parameter adjustment” session
-
What to do: Arrange iPad Handoff for each AR scene review to adjust size, movement speed and display time on the real desktop.
-
Why it’s worth doing: The 2-second to 5-second adjustment of the taxi in the speech is easy to judge only if it is placed in a real space.
-
How to get started: Get the Mac project approved
Edit on iOSSend it to iPad, modify the behavior duration on the spot, and then transfer the results back to Mac to save. -
Add a launch page to AR Quick Look content
-
What to do: Prepare a static splash scene for large AR scenes to make the loading and anchoring phases look more complete.
-
Why it’s worth doing: Users will see a preview of the content when AR Quick Look loads. Blank or cluttered images will affect the first impression.
-
How to start: Duplicate the main scene, delete moving objects and unnecessary elements, add
On Scene Start→Change SceneJump to the final scene. -
Split export strategy by delivery channel
-
What to do: Maintain different exports for web pages, News, Xcode projects, and AR Quick Look.
-
Why is it worth doing: session clearly distinguishes the applicable scenarios of USDZ export and Reality export.
-
How to start: Add in release script or delivery table
web/news: USDZ、Xcode/AR Quick Look: RealityTwo types of goals to avoid re-exporting near release.
Related Sessions
- Shop online with AR Quick Look — Continue to see how AR Quick Look enters the e-commerce webpage and purchase process.
- Explore ARKit 4 — Understand ARKit 4’s positional anchoring, depth, and scene geometry capabilities.
- What’s new in RealityKit — Learn about RealityKit’s AR runtime capabilities for rendering, animation, physics, and audio.
- What’s new in USD — Supplement the format background of USD and USDZ in AR content exchange.
Comments
GitHub Issues · utterances