
Highlight
ResearchKit 2020 update integrates informed consent signature, HealthKit permission request, questionnaire review, 3D model display and customized active task into the same set of research task processes, so developers can collect more accurate research data with fewer self-built interfaces.
Core Content
The first hurdle in a medical research app is often the process, not just the algorithm. Participants must understand the purpose of the research, complete informed consent, authorize health data, answer questionnaires, and perform some active tasks. Each step requires interpretation, input, verification and result saving. In the past, developers often had to add a custom interface outside ResearchKit to connect authorization, signature, review and multimedia interaction.
The change shown in this session is to restore these breakpoints to ResearchKit’s task flow.ORKInstructionStepCan carry richer explanatory content,ORKWebViewStepSignatures can be collected below the same HTML consent page, a new HealthKit permission step brings health data authorization into the research process, and the questionnaire adds a “don’t know” option, a character count prompt, a clear button, and a review page. (02:54)
In the second half, the boundary of the active task continues to be expanded. Research apps are availableORK3DModelStepDisplay USDZ or BioDigital 3D human models to visually explain body parts and lesions; developers can also useORKActiveStepStart implementing your own front camera task, collect video files, record the number of retries, and then hand back the resultsORKTaskViewController。(12:24)
ResearchKit here serves as the skeleton of the research process. Developers still decide what to study, what to model, and how to handle the results, but they don’t have to rewrite a set of interfaces for every common link. Participants saw a continuous task, and the research team received structured results.
Detailed Content
Onboarding: Use instruction step and web view step to lower the threshold for joining
(03:24) To research the onboarding (joining process) of the App, you must first explain clearly what research is. For SessionORKInstructionStepCreate a welcome page with a title, description and image.
let instructionStep = ORKInstructionStep(identifier: "InstructionStepIdentifier")
instructionStep.title = "Welcome!"
instructionStep.detailText = "Thank you for joining our study. Tap Next to learn more before signing up."
instructionStep.image =  UIImage(named: "health_blocks")!
Key points:
ORKInstructionStepis a step in ResearchKit used to describe content.identifierGive this step a stable identity, and subsequent results and processes will depend on it.titleanddetailTextResponsible for explaining the purpose of the current step.imageLet the research description be more than just a paragraph of text. It is suitable to put a research topic picture or a guidance picture.
(04:08) The same instruction step can also be addedORKBodyItem. Demonstrate using SF Symbols’ heart-shaped icon to break down pre-informed consent instructions into easier-to-scan items.
let informedConsentInstructionStep = ORKInstructionStep(identifier: "ConsentStepIdentifier")
informedConsentInstructionStep.title = "Before You Join"
informedConsentInstructionStep.image = UIImage(named: "informed_consent")!

let heartBodyItem = ORKBodyItem(text: exampleText,
                                detailText: nil,
                                image: UIImage(systemName: "heart.fill"),
                                learnMoreItem: nil,
                                bodyItemStyle: .image)

informedConsentInstructionStep.bodyItems = [heartBodyItem]
Key points:
ORKBodyItemEncapsulate a piece of description content, icons and styles into a reusable project.UIImage(systemName:)Note that SF Symbols can be used directly here.bodyItemStyle: .imageMake the icon appear as a picture.bodyItemsIt is an array, suitable for splitting risks, returns, and data usage into multiple instructions.
(05:04) Informed consent signatures have also been incorporatedORKWebViewStep. Displaying a consent form and collecting a signature used to require two steps; now you can set a property to display the signature area below the HTML content.
let webViewStep = ORKWebViewStep(identifier: String(describing: Identifier.webViewStep), html: exampleHtml)
webViewStep.showSignatureAfterContent = true
Key points:
ORKWebViewStepResponsible for displaying consent forms or documentation in HTML format.htmlThe parameters are passed in the content to be displayed.showSignatureAfterContent = trueA signature view will appear after the content.- Participants read the document and sign on one page, which results in a shorter process and one less custom interface.
(05:25) HealthKit authorization also goes into onboarding. Transcript explicitly mentions the new request permission step: developers pass in the content they want to writeHKSampleTypeCollection and want to readHKObjectTypecollection, creationORKHealthKitPermissionType, and then putORKHealthKitPermissionStep. In this way, health data authorization does not need to be implemented separately from the ResearchKit process.
HealthKit permission flow in ResearchKit
1. Create a set of HKSampleTypes for data the app wants write access to.
2. Create a set of HKObjectTypes for data the app wants read access to.
3. Create ORKHealthKitPermissionType with those two sets.
4. Create ORKHealthKitPermissionStep with the permission type array.
Key points:
HKSampleTypeCorresponding to write permission, it is suitable for research apps to save collected health samples.HKObjectTypeCorresponding to read permission, it is suitable for reading existing health data as research context.ORKHealthKitPermissionTypeCombine reading and writing types.ORKHealthKitPermissionStepPut the system authorization request into the ResearchKit task flow.
Survey: Reduce invalid answers and allow participants to review
(07:43) Questionnaire section newly addedORKSESAnswerFormat. It is suitable for displaying a stepped scale, allowing participants to choose between “Optimal Health” and “Poor Health” which is closer to their own state.
let sesAnswerFormat = ORKSESAnswerFormat(topRungText: "Optimal Health",
                                         bottomRungText: "Poor Health")

let sesFormItem = ORKFormItem(identifier: "sesIdentifier",
                                      text: exampleText,
                                      answerFormat: sesAnswerFormat)
Key points:
ORKSESAnswerFormatResponsible for ladder scale issues.topRungTextandbottomRungTextDefine the semantics of the two ends of the scale.ORKFormItemCombine question text and answer formatting into a form.- These questions are suitable for subjective health status, quality of life or self-rating scales.
(08:47) Scale questions also have a new “Don’t know” button. In a research setting, forcing participants to answer an uncertain question can create noise.shouldShowDontKnowButtonandcustomDontKnowButtonTextAsk participants to make it clear that they cannot answer.
let scaleAnswerFormat = ORKScaleAnswerFormat(maximumValue: 10, minimumValue: 1, defaultValue: 11, step: 1)
scaleAnswerFormat.shouldShowDontKnowButton = true
scaleAnswerFormat.customDontKnowButtonText = "Prefer not to answer"

let scaleAnswerFormItem = ORKFormItem(identifier: "ScaleAnswerFormItemIdentifier",
                                      text: "What is your current pain level?",
                                      answerFormat: scaleAnswerFormat)
Key points:
ORKScaleAnswerFormatDefine a pain intensity scale from 1 to 10.shouldShowDontKnowButton = trueShow “Don’t know” entry.customDontKnowButtonTextThe default copy can be replaced, suitable for privacy-sensitive issues.ORKFormItemTie this answer format to a specific question.
(09:47) Free text input has also been updated. Session mentions the maximum character number prompt and the clear button, so that participants know how much more content can be entered and can quickly clear and rewrite.
let textAnswerFormat = ORKAnswerFormat.textAnswerFormat()
textAnswerFormat.multipleLines = true
textAnswerFormat.maximumLength = 280;
textAnswerFormat.hideWordCountLabel = false
textAnswerFormat.hideClearButton = false
Key points:
textAnswerFormat()Create a text answer format.multipleLines = trueLong text answers are allowed.maximumLength = 280Limit input length.hideWordCountLabel = falseDisplay character number prompt.hideClearButton = falseShow clear button.
(11:00) Before submitting the questionnaire,ORKReviewViewControllerLet participants review all questions and answers and update answers via edit. Session puts it in the context of “improving data accuracy”: people will fill in the wrong information, and the system should give it a chance to check.
let reviewVC = ORKReviewViewController(task: taskViewController.task,
                                       result: taskViewController.result,
                                       delegate: self)
reviewVC.reviewTitle = "Review your response"
reviewVC.text = "Please take a moment to review your responses below. If you need to change any answers just tap the edit button to update your response."
Key points:
taskViewController.taskProvide original task structure.taskViewController.resultProvide responses that have been collected so far.delegate: selfIt is required to implement methods related to updating results and selecting unfinished cells.reviewTitleandtextResponsible for explaining the purpose of the review page.
Active Tasks: From listening tasks to 3D models
(11:48) ResearchKit’s hearing task update is biased towards experience details. The environment SPL meter adds a new animation to prompt whether the background noise is within the threshold; the dB HL tone audiometry step updates the buttons, tactile feedback and progress display, and adds AirPods Pro calibration data support. There are no official code snippets here. The core is to reduce misoperation and uncertainty during the listening test.
Hearing task updates
- Environment SPL meter shows a clearer threshold animation.
- dB HL tone audiometry step updates button UI and haptics.
- Progress indicator changes to a label.
- Calibration data supports AirPods Pro.
Key points:
- The animation of the SPL meter helps participants judge whether the test environment is qualified.
- Buttons and tactile feedback reduce operating costs during testing.
- Textual progress is easier to understand than abstract progress bars.
- AirPods Pro calibration data allows this type of hardware to be used for relevant listening tasks.
(14:30) 3D models are a greater expansion of capabilities. ResearchKit NewORK3DModelStepandORKUSDZModelManager. The developer adds the USDZ file to the Xcode project, creates a model manager, and then submits it to the 3D step for display.
let usdzModelManager = ORKUSDZModelManager(usdzFileName: "toy_drummer")
usdzModelManager.allowsSelection = false
usdzModelManager.highlightColor = .yellow
usdzModelManager.enableContinueAfterSelection = false
usdzModelManager.identifiersOfObjectsToHighlight = arrayOfIdentifiers

let threeDimensionalModelStep = ORK3DModelStep(identifier: drummerModelIdentifier,
                                               modelManager: usdzModelManager)
Key points:
ORKUSDZModelManagerRead the USDZ model in the project.allowsSelectionControls whether the user can select model parts.highlightColorSet highlight color.enableContinueAfterSelectionControls whether the continue button relies on selection behavior.identifiersOfObjectsToHighlightSpecified objects in the model can be pre-highlighted.ORK3DModelStepConnect the model manager to the ResearchKit task flow.
(15:31)ORK3DModelManageris an abstract parent class that Apple explicitly wants the community to inherit. Session showcases what BioDigital providesORKBioDigitalModelManager: Models are loaded via the web and can be updated in the admin or SDK, and labels, colors and annotations can be added. Demonstration scenarios include having users point out painful areas on a mannequin and using a heart model to explain the location of coronary artery blockages.
BioDigital model manager workflow
1. Import ResearchKit and BioDigital's HumanKit.
2. Create an ORKBioDigitalModelManager instance.
3. Set inherited properties such as highlight color and identifiers to highlight.
4. Use BioDigital-specific APIs to hide objects, load a model ID, and annotate an object.
5. Create ORK3DModelStep with that manager.
Key points:
ORK3DModelManagerResponsibilities are common capabilities required to abstract 3D model experiences.ORKBioDigitalModelManagerIt’s a community extension, not Apple’s built-in USDZ manager.- The advantage of the web loading model is that content updates do not necessarily require the release of a new version of the app.
- Labels and annotations are suitable for medical education, pain localization and physician interpretation of test results.
Custom active task: the structure of the front camera task
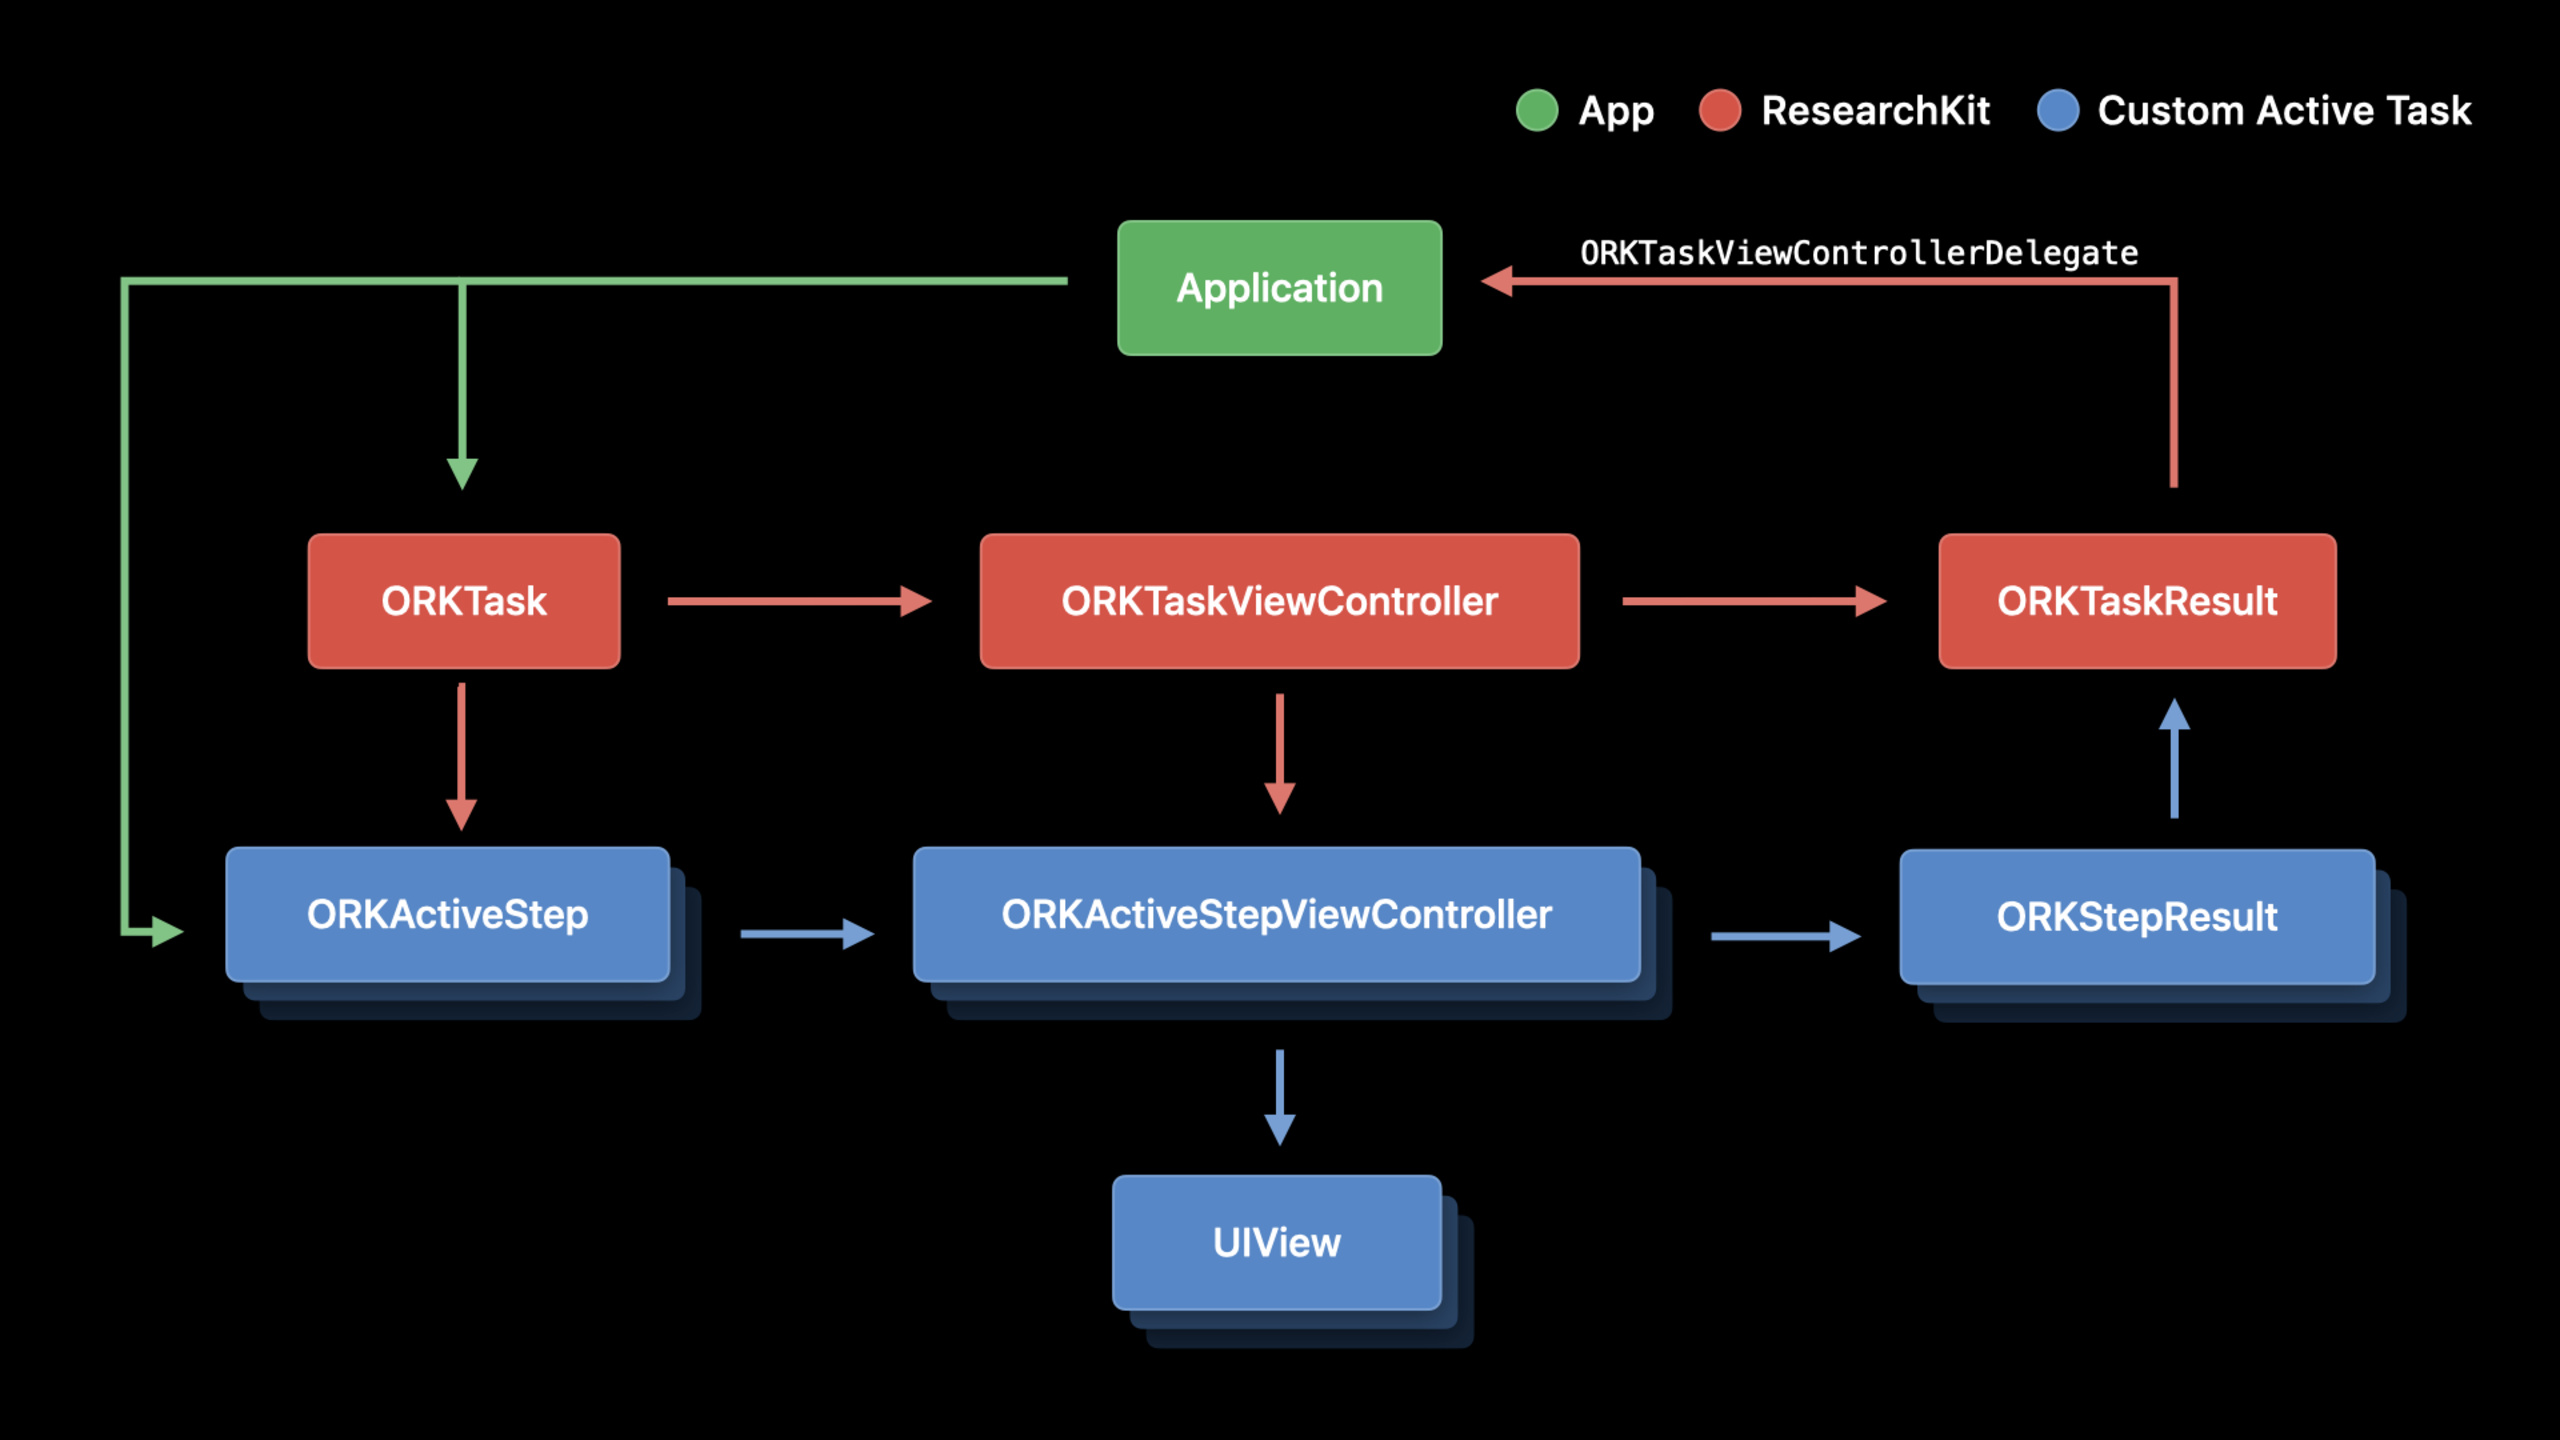
(20:35) The basic path to customize the active task is: App creationORKTask, hand over a set of steps toORKTaskViewControllerDisplay, get it through delegate after completionORKTaskResult. An example of a Session is the front camera task, where users can preview in real time, start recording, stop recording, review the video and try again.
ResearchKit task roundtrip
1. The app creates an ORKTask object.
2. ORKTaskViewController receives the task and presents each step.
3. Each active step collects its own result.
4. ORKTaskViewControllerDelegate returns ORKTaskResult to the app.
Key points:
ORKTaskIs a collection of steps.ORKTaskViewControllerResponsible for displaying step, App does not need to inherit it.ORKTaskResultSummarize the results of each step.- delegate is ResearchKit’s exit back to business code.
(21:51) When implementing the front camera task, the speaker createsORKFrontFacingCameraStep, inherited fromORKActiveStep, and add three configuration items: maximum recording duration, whether to allow review, and whether to allow retries. Then let this step return your own view controller class.
ORKFrontFacingCameraStep design
- subclass ORKActiveStep
- add maximumDuration
- add allowsReview
- add allowsRetry
- override stepViewControllerClass
- return ORKFrontFacingCameraStepViewController
Key points:
ORKActiveStepSuitable for tasks that require active collection of sensors, timing, audio and video recording, etc.- The configuration items are placed on the step to facilitate the decision of the behavior of this task when the task is assembled.
stepViewControllerClassConnect the data model to the presentation logic.- Custom view controller inheritance
ORKActiveStepViewController。
(23:23) The interface layer uses customizationUIView. it receivesAVCaptureSessionDisplays a live preview, returns button events to the view controller, and provides timers and post-recording options. The important point here is: the camera code is still managed by the App, and ResearchKit provides slots for active task results, processes, and presentation.
Front-facing camera content view responsibilities
- receive AVCaptureSession
- set up an AVCaptureVideoPreviewLayer
- pass view events back through a block
- start a timer with the maximum duration
- show review and retry options before submission
Key points:
AVCaptureSessionStill from AVFoundation.- The content view is only responsible for preview, timing and interaction events.
- The event is returned through the block, and the view controller decides how to respond.
- Review and retry capabilities come from step configuration, and the interface displays options according to configuration.
(24:46) Result layer inheritanceORKFileResult. In the exampleORKFrontFacingCameraStepResultRecord the video file URL and also addretryCount, used to record the number of times a user deletes and re-enters. view controller overrideresultMethod to append custom results to the current result collection.
Front-facing camera result
- subclass ORKFileResult
- store contentType
- store fileURL
- add retryCount
- append ORKFrontFacingCameraStepResult to the current results collection
Key points:
- Video is the file result, use
ORKFileResultCloser to the data form. fileURLLet the app find the recording file after the task ends.retryCountis valuable behavioral data in research and can reflect task difficulty or user hesitation.- coverage
resultMethods are the key to handing custom acquisition data back to ResearchKit.
(25:49) The final Xcode demonstration strings together the three steps: Welcome to useORKInstructionStep, just createdORKFrontFacingCameraStep, the completion step used to end. put them inORKOrderedTask, then injectORKTaskViewControllerand show. After completion, the delegate reads the custom results, prints the recording file URL and the number of retries.
Demo task composition
1. Create an instruction step.
2. Create ORKFrontFacingCameraStep.
3. Set the maximum recording limit to 15 seconds.
4. Allow review and retry.
5. Add a completion step.
6. Create ORKOrderedTask with all steps.
7. Present ORKTaskViewController.
8. Read ORKFrontFacingCameraStepResult in the delegate.
Key points:
ORKOrderedTaskSuitable for linear processes.- The 15 second upper limit, review and retry are all configurations exposed in the previous step.
ORKTaskViewControllerDelegateIt is a unified entry point for handling completion, cancellation and failure.- Custom active tasks ultimately still adhere to ResearchKit’s task-result model.
Core Takeaways
-
What to do: Make a complete joining process for the Chronic Disease Research App. Why it’s worth doing:
ORKInstructionStep、ORKBodyItem、ORKWebViewStepand signature displays can overlay instructions, consent forms, and signatures. How to start: First use the instruction step to write down the research purpose, then use the web view step to display the HTML consent form, and putshowSignatureAfterContentOpen. -
What to do: Embed health data authorization into the research enrollment process. Why it’s worth doing: The new HealthKit permission step eliminates the need to exit ResearchKit for authorization and requires less custom interfaces. How to start: Organize what you want to write
HKSampleTypeand to be readHKObjectType,createORKHealthKitPermissionType, and then putORKHealthKitPermissionStep。 -
What to do: Add a review page and a “Don’t know” option to the symptom questionnaire. Why it’s worth doing:
ORKDontKnowButtons reduce dirty data caused by forced answers,ORKReviewViewControllerHave participants correct errors before submitting. How to get started: Turn on Scale Answer FormatshouldShowDontKnowButton, initialized with task and result after the questionnaire is completedORKReviewViewController。 -
What to do: Do a human body part selection or disease education task. Why it’s worth doing:
ORK3DModelStepandORKUSDZModelManagerAbility to place interactive 3D models into ResearchKit flows, suitable for interpreting pain locations, muscle groups or test results. How to start: Prepare the USDZ model, collect the object identifiers that need to be highlighted into an array, and createORKUSDZModelManagerhanded over laterORK3DModelStep。 -
What to do: Build a video capture active task. Why it’s worth doing: Session shows the complete structure of the front camera task, and both the video file and the number of retries can be returned as ResearchKit results. How to get started: Inheritance
ORKActiveStepDefine configuration, inheritanceORKActiveStepViewControllermanageAVCaptureSession,useORKFileResultSave the recording file URL.
Related Sessions
- What’s new in CareKit — CareKit 2020 update explains how study data enters care plans, SwiftUI task cards, and the HealthKit/FHIR data layer.
- What’s new in HealthKit — HealthKit adds new symptom, ECG, and mobility data that can serve as the health data basis for ResearchKit research tasks.
- Synchronize health data with HealthKit — Explains HealthKit data synchronization, versioning and anchoring queries, which is suitable for research on the subsequent processing of long-term health data by apps.
- Getting started with HealthKit — Basics of HealthKit authorization, reading, writing, and statistics, suitable for developers who are ready to access ResearchKit HealthKit permission steps.
- Handling FHIR without getting burned — FHIRModels introduces clinical data models and validations that connect research, care, and health system data.
Comments
GitHub Issues · utterances