
Highlight
Apple demonstrates using pinned previews,
@StateObject, Development Assets, simple input and protocol abstraction refactor SwiftUI views, allowing Xcode Previews to skip heavy startup logic and override the real interface state.
Core Content
When SwiftUI Previews fails, the common root cause is that the view drags too many runtime dependencies into the canvas; modifier errors are easier to locate. A thumbnail preview is required to start the network model, an editor preview is required to construct a CloudKit record, and a status bar preview is missingEnvironmentObjectIt cannot be rendered. Such a view can run in the app, but it is difficult to quickly try and make mistakes in the preview.
This session uses a photo collage app throughout the presentation. Kevin starts with the lightest workflow: pin a preview and then switch back to the file being edited. In this way, developers do not have to leave the actual usage scenario when changing the thumbnail color, the dark mode color of the Asset Catalog, and the dynamic font size.
Next, session advances the problem into the app structure. SwiftUI app life cycle makes the app startup entry also become SwiftUI type, but the preview should not initialize the complete network layer for a leaf view.@StateObjectThe value here is to let SwiftUI manage the creation of expensive models, and let preview skip the initialization work that is not required for the current screen.
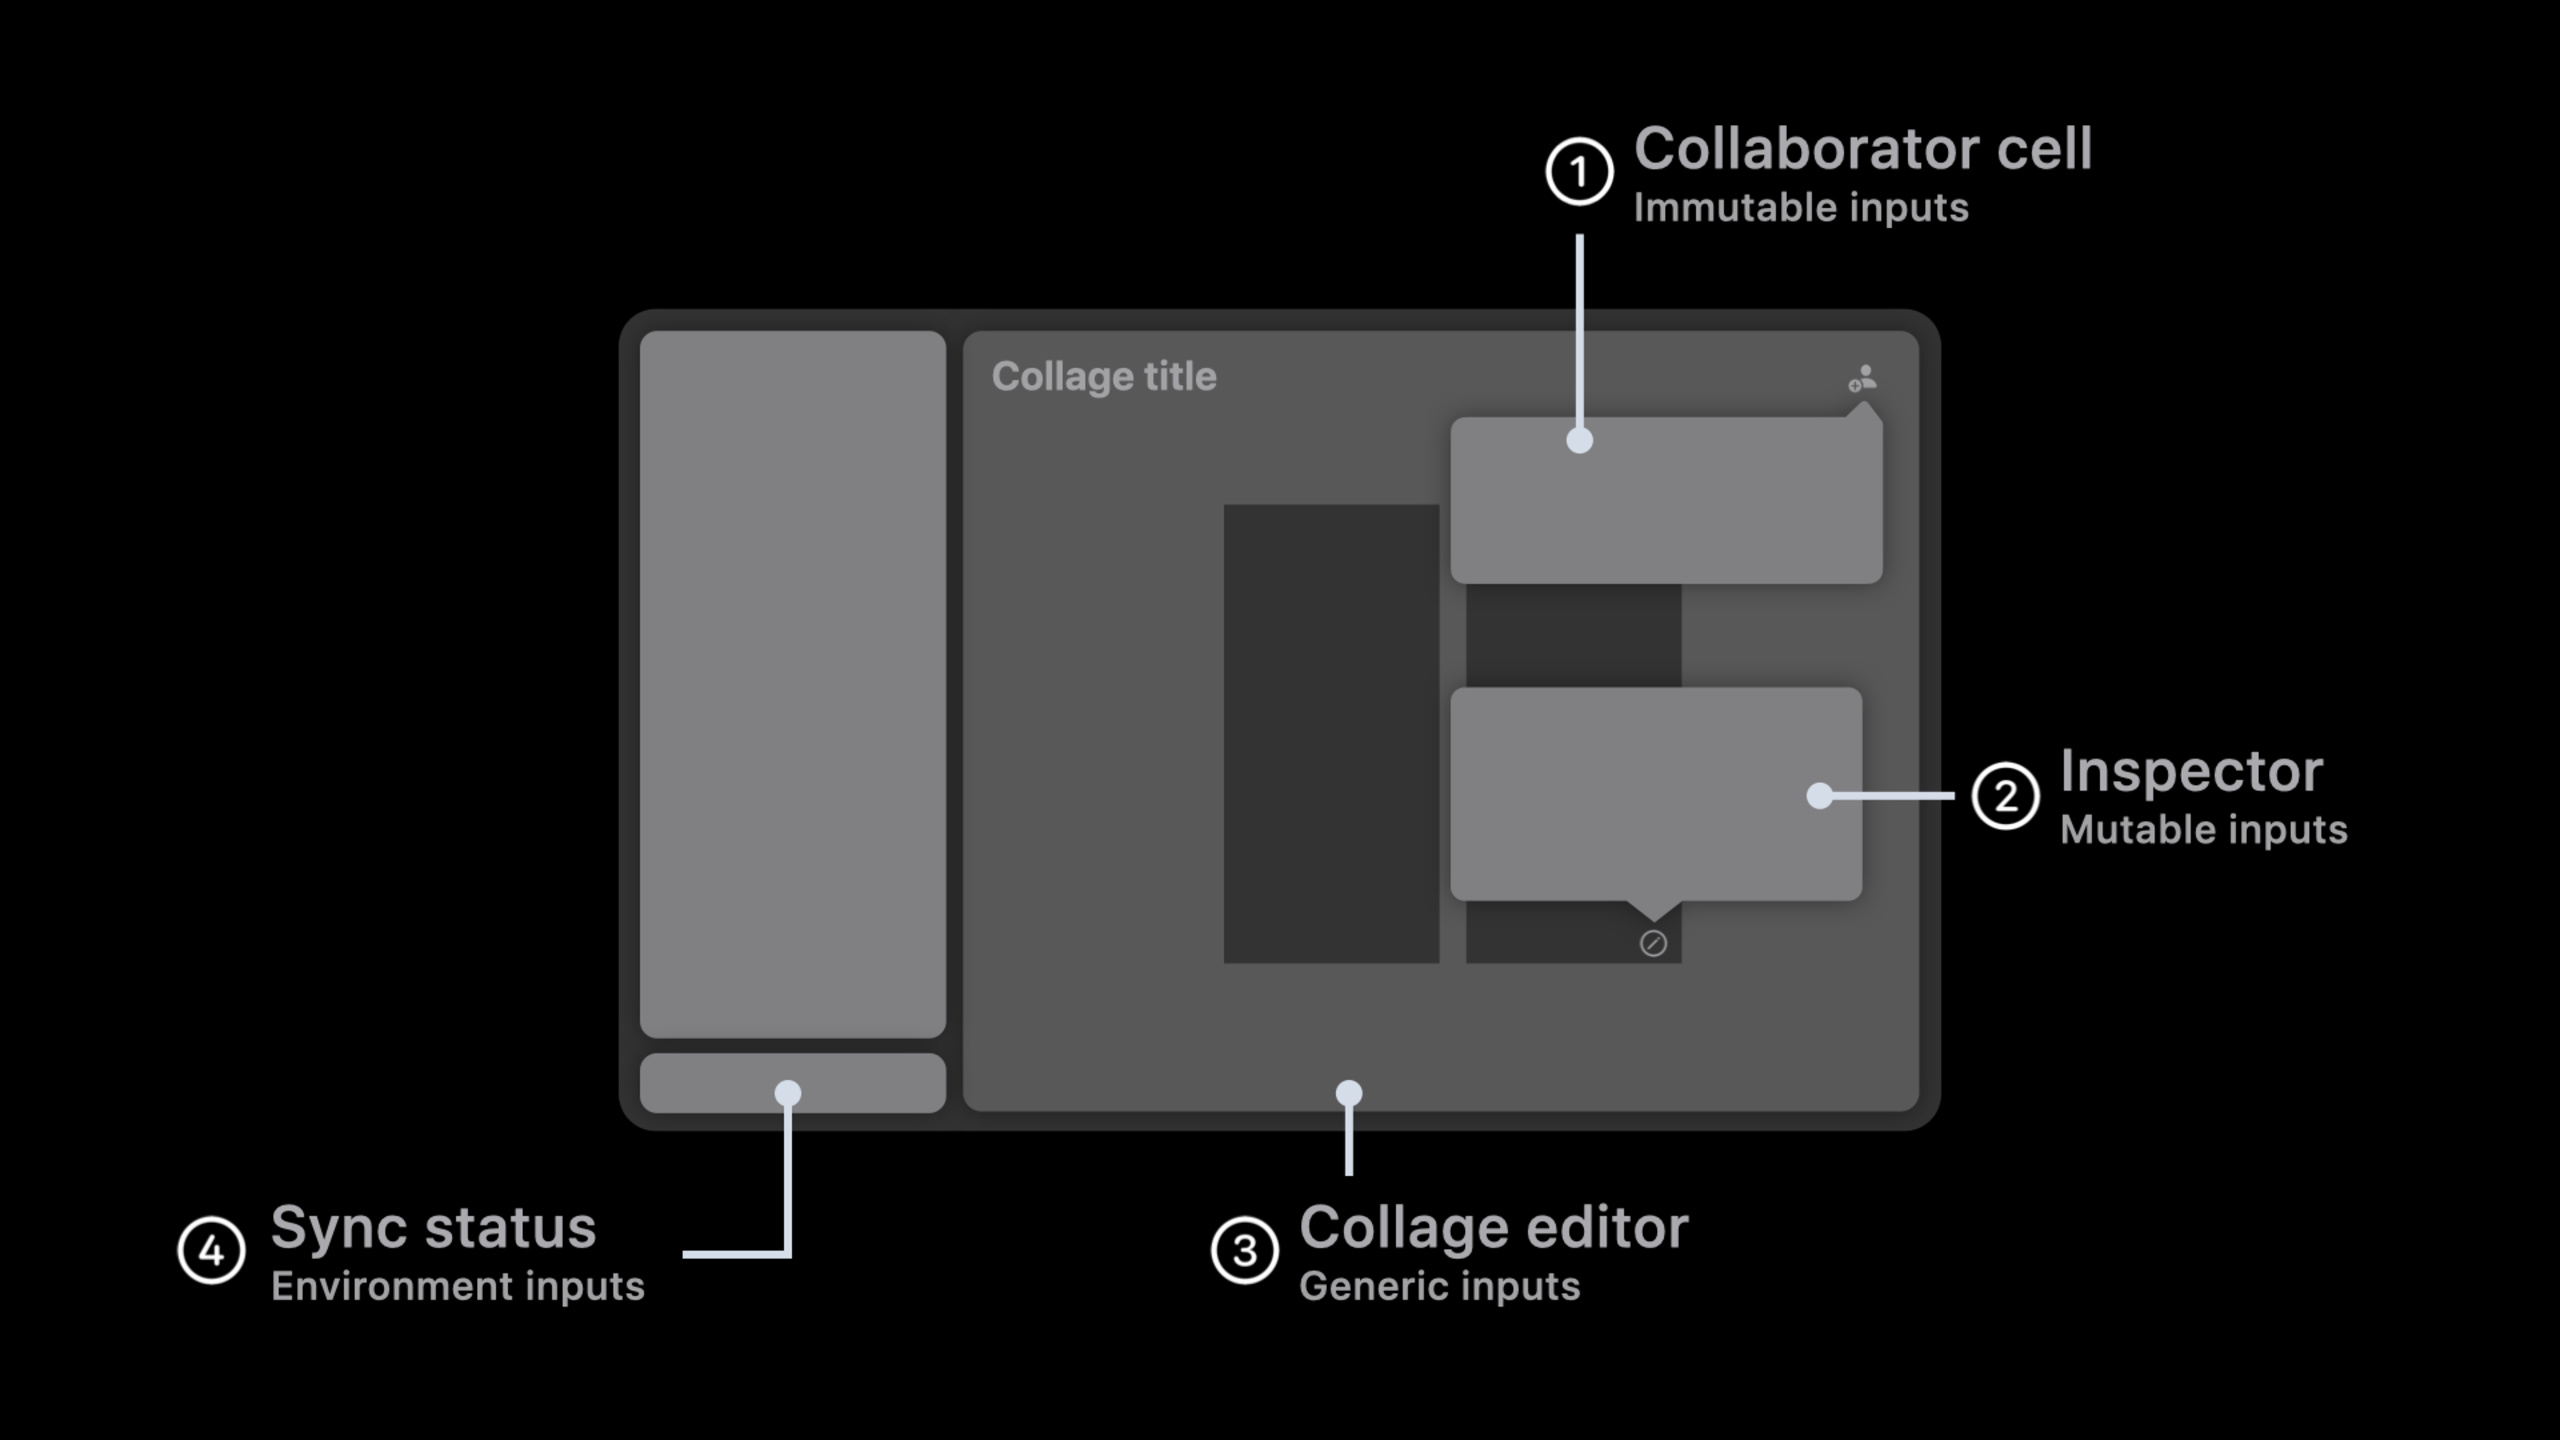
Finally, Apple puts previewability into view input design. If you can pass a simple immutable value, don’t pass the entire CloudKit-backed model; when you need to modify the value, useBinding; When complex data must be passed down, use protocol abstraction and design-time model; when it is really suitable for cross-layer transfer, use environment. By doing this, the entire app process can be run in canvas without launching the real CloudKit data model.
Detailed Content
Pin preview, preserving context
(02:31) The first demonstration solves a specific problem: when looking at the layout thumbnail alone, the gray rectangle is normal, but it disappears when placed on the selector with photo content sliding over it. Xcode allows you to hold the preview pin of the selector and then switch back to the thumbnail file to continue editing.
Note: The Resources and Code snippets of this session are both 0. All Swift code blocks below are minimal examples compiled based on the demonstration steps in the transcript to express the structure and API usage, and are not the original snippets of the Apple Code tab.
struct LayoutThumbnail_Previews: PreviewProvider {
    static var previews: some View {
        Group {
            LayoutThumbnail()
                .previewDisplayName("Default")

            LayoutThumbnail()
                .environment(\.colorScheme, .dark)
                .previewDisplayName("Dark")
        }
    }
}
Key points:
GroupCorresponds to the operation of copying multiple previews in transcript, making it easy to see the default appearance and dark appearance at the same time. -environment(\.colorScheme, .dark)Corresponding to the purpose of switching dark appearance in the inspector, the state can be returned repeatedly after being fixed with code. -previewDisplayNameMake multiple configurations distinguishable in canvas, suitable for inspecting context with pinned preview.
(05:15) In the example of dynamic fonts, thumbnail reads the size category from the environment, and then uses the app’s own defined scale to adjust the size and spacing. Fixing a certain value cannot solve this kind of problem. The same small view needs to be checked under multiple accessibility sizes at the same time.
struct LayoutThumbnail: View {
    @Environment(\.sizeCategory) private var sizeCategory

    var body: some View {
        RoundedRectangle(cornerRadius: 6)
            .frame(
                width: 44 * sizeCategory.previewScale,
                height: 44 * sizeCategory.previewScale
            )
    }
}
Key points:
@Environment(\.sizeCategory)From the practice of “passing in size category through environment” in transcript. -previewScaleIt is an extension defined by the app for its own layout to avoid having multiple sets of magic numbers scattered in the view.- After connecting size and spacing to the same scale, pinned accessibility previews can immediately expose layout problems.
use@StateObjectAvoid preview startup rework
(06:11) Common initializations when an app starts include reading documents, connecting to CloudKit, accessing devices, or pulling network data. The advantage of preview is to jump directly to a small view. This scene should not bear the full startup cost.
@main
struct MosaicApp: App {
    @StateObject private var networkModel = NetworkModel()

    var body: some Scene {
        WindowGroup {
            RootView()
                .environmentObject(networkModel)
        }
    }
}
Key points:
- In transcript, first put the network model on the app type attribute, and then change it to
@StateObject。 @StateObjectLet SwiftUI take care of the model lifecycle and let changes drive UI updates.- Session clearly shows Debug Preview and debug gauges: before the transformation, the preview triggers CPU and network work, and after the transformation, it no longer does startup work that is not required for the current preview.
Put sample data into Development Assets
(09:22) Photos apps require a large number of sample images to test layout and effects, but these images should not make it into the release package. The Development Assets of the Xcode target supports marking the folder path as only for the development version, and both Asset Catalog and Swift files can be placed there.
protocol CollageSlot {
    associatedtype ImagePublisher

    var imagePublisher: ImagePublisher { get }
    var effects: SlotEffects { get set }
}

struct DesignTimeSlot<ImagePublisher>: CollageSlot {
    var imagePublisher: ImagePublisher
    var effects: SlotEffects
}

struct DesignTimeCollage<ImagePublisher> {
    var name: String
    var layout: CollageLayout
    var slots: [DesignTimeSlot<ImagePublisher>]
}
Key points:
- The preview content folder in transcript contains preview images and two Swift files.
-
DesignTimeCollageandDesignTimeSlotCorresponds to the design-time model in the demo, used to replace the CloudKit-backed model. - Development Assets are responsible for packaging boundaries, and the view still consumes these sample data through ordinary input.
Make view input simple
(13:08) Collaborator cell originally received aObservedObjectcollaborator, and most of collaborator’s content comes fromCKUserIdentity. It is not necessary to construct CloudKit queries for a cell preview. Apple’s approach is to first look at what the UI really needs, and then reduce the input to name, image, and connection status.
struct CollaboratorCell: View {
    let name: PersonNameComponents
    let image: Image
    let status: ConnectionStatus

    private static let nameFormatter = PersonNameComponentsFormatter()

    var body: some View {
        HStack {
            image
            Text(Self.nameFormatter.string(from: name))
            StatusBadge(status: status)
        }
    }
}
Key points:
- name, image, and status all come from the minimum input of the cell listed in transcript.
- session is used first
StringShow simple input and then change it toPersonNameComponentsto let the system handle the name format according to the locale. - preview Because it does not rely on CloudKit, you can quickly create configurations such as online, offline, long name, and avatar.
(17:47) If the view needs to modify the value, pass in a simple typeBinding. The inspector example just needs to be editedSlotEffects, there is no need to get the complete image slot record.
struct EffectsInspector: View {
    @Binding var effects: SlotEffects
    var replacePhotoHandler: () -> Void

    var body: some View {
        VStack {
            Slider(value: $effects.saturation)
            Button("Replace Photo", action: replacePhotoHandler)
        }
    }
}

struct EffectsInspectorPreviewHost: View {
    @State private var effects = SlotEffects()

    var body: some View {
        EffectsInspector(effects: $effects) {
            effects.saturation -= 0.1
        }
    }
}
Key points:
@BindingCorresponds to the middle part of transcriptSlotEffectsPass in the inspector’s approach. -EffectsInspectorPreviewHostCorresponds to “the intermediate view stores the state, and then passes the binding to the view under test”. -replacePhotoHandlerCorresponding to the closure in the session that hands the button behavior to the caller, preview can use it to verify that the button is indeed triggered.
Handle complex boundaries with protocols and environments
(22:41) The collage editor requires name, layout, and slot data. The slot image may come from the cloud, disk, or error state, so Apple definesCollageProtocoland slot abstraction, and then let the editor make generics for the collage type and image picker type.
protocol CollageProtocol {
    associatedtype Slot

    var name: String { get set }
    var layout: CollageLayout { get set }
    var slots: [Slot] { get set }
}

struct CollageEditor<Collage: CollageProtocol, ImagePicker: View>: View {
    var collage: Collage
    var makeImagePicker: () -> ImagePicker

    var body: some View {
        EditorCanvas(collage: collage, makeImagePicker: makeImagePicker)
    }
}
Key points:
CollageProtocolCorresponding to the abstraction of “only describing the data required for UI editing” in transcript. -ImagePickerGeneric corresponding to the design-time photo picker, preview does not need to open the full photo library.- Real app models and design-time models can conform to the protocol at the same time, and the editor code does not need to know whether the data comes from CloudKit or preview resources.
(27:34) environment is suitable for sharing state across layers. Cloud sync status view useEnvironmentObject, so each preview must explicitly provide a status. This can cover online, offline, recent synchronization and other statuses.
struct CloudSyncStatusView_Previews: PreviewProvider {
    static var previews: some View {
        Group {
            CloudSyncStatusView()
                .environmentObject(CloudSyncStatus.online)

            CloudSyncStatusView()
                .environmentObject(CloudSyncStatus.offline)

            CloudSyncStatusView()
                .environmentObject(CloudSyncStatus.lastSynced(hoursAgo: 2))
        }
    }
}
Key points:
environmentObjectAttach each preview in the corresponding transcriptCloudSyncStatusoperation.- Multiple previews cover different sync states to avoid only verifying normal paths.
- Session also reminds: explicit input is preferred when dependencies can be defined as view input; environment is used in states that really need to be passed across layers.
Core Takeaways
-
Make a preview matrix: Create light, dark, accessibility size, long text, empty data and other configurations for the core cell. Why it’s worth doing: pinned previews can put small views back into their real context. How to start: Write common states into
PreviewProviderofGroup, and add to each statepreviewDisplayName。 -
Unpack the design-time model: Make a set of lightweight types that only serve preview for CloudKit, Core Data or network models. Why it’s worth doing: The collage editor in the session is fully interactive, but does not create a CloudKit-backed model. How to start: First define the protocol that the view really needs, and then make the real model and preview model conform respectively.
-
Move preview assets into Development Assets: Prepare a rich enough set of images, JSON or Swift sample data. Why it’s worth doing: Development Assets only enter the development version and do not increase the size of the release package. How to start: Add to target’s Development Assets
Preview Contentfolder and put the preview image and design-time Swift files in it. -
Create host view for interactive preview: When the view under test needs
Bindingor callback, use the middle view to hold it@State. Why it’s worth doing: The slider and replace button of the effects inspector can be directly operated in the canvas and on-device preview. How to start: Write onePreviewHost,Bundle$stateand test closure is passed to the target view. -
Audit the input bounds of each view: Translate rich models into simple types as early as possible. Why it’s worth doing: Collaborator cell No need to know
CKUserIdentityThe acquisition method only needs to be able to render the name, avatar and connection status. How to start: Start with a view that is difficult to preview, list the fields that the UI actually reads, and then delete the model dependencies that are not used in the preview.
Related Sessions
- Visually edit SwiftUI views — Continue to talk about the visual editing, environment switching and SwiftUI iteration workflow of Xcode Previews canvas.
- App essentials in SwiftUI — Explanation
App、Scene、WindowGroupThe basics of SwiftUI app life cycle are in this session.@StateObjectStart the prepended content of the boundary. - Data Essentials in SwiftUI — System explanation
@State、@Binding、ObservableObject, corresponding to the preview data flow design of this session. - Add custom views and modifiers to the Xcode Library — Added how to expose custom SwiftUI views and modifiers to the Xcode Library for use with the Previews canvas.
Comments
GitHub Issues · utterances