
Highlight
This is a complete tutorial for push notification beginners.Session starts from the most basic concepts: what is remote push, why Device Token is needed, how APNs works, and how to implement the push function on the client and server respectively.
Core Content
Many apps will encounter the same problem after they go online: the user does not open the app, but the server has a new piece of information about him.Restaurants have today’s specials, e-commerce has order status, and content apps have the latest data.Relying on the user to actively refresh will miss the opportunity, and relying on the application to run in the background for a long time does not comply with the system’s power model.
This session splits push notifications into two categories.Alert notification is used to display interactive reminders. The system will display it when the application is not running.Background notification gives the application a period of background running time so that it can update the content before the user opens it.Both start from the same entrance: the application registers with APNs, gets the device token, and then sends the token to its own provider server.
What really goes wrong is the boundaries.Alert push requires permission after a contextual user action, the payloadapsThe dictionary is responsible for system display, and custom data is placed inapsoutside.Background push only requirescontent-available, but the system will limit the number of background runs, and the application may not be launched under conditions such as low battery.The completion handler must be called at the end of each callback to let the system know the result of this processing.
Detailed Content
Register APNs and get device token
(02:02) The first step in the push link is to register for remote notifications.registerForRemoteNotifications()Will cause the device to register with APNs and return the device token to the application.For alert notification,AppDelegatestill have to beUNUserNotificationCenterDelegate, so that the application can receive a callback when the user clicks on the notification.
class AppDelegate: UIResponder, UIApplicationDelegate, UNUserNotificationCenterDelegate {

    func application(_ application: UIApplication,
                     didFinishLaunchingWithOptions launchOptions: [UIApplication.LaunchOptionsKey: Any]?) -> Bool {
        UIApplication.shared.registerForRemoteNotifications()
        UNUserNotificationCenter.current().delegate = self
        return true
    }
}
Key points:
UIApplicationDelegateResponsible for receiving remote notification registration results.UNUserNotificationCenterDelegateOnly related to interactive processing of alert notification.registerForRemoteNotifications()Trigger the APNs registration process.UNUserNotificationCenter.current().delegate = selfLet’s get back to the app code when the notification is opened.
(02:36) After the registration is completed, the system will only take one of the two callbacks.Get the error on failure; get the error on successDatadevice token in the form.The session explicitly requires this token to be sent to its backend push server, because APNs needs it to locate the target device.
func application(_ application: UIApplication,
                   didFailToRegisterForRemoteNotificationsWithError error: Error) {
    // The token is not currently available.
    print("Remote notification is unavailable: \(error.localizedDescription)")
}

func application(_ application: UIApplication,
                   didRegisterForRemoteNotificationsWithDeviceToken deviceToken: Data) {
     // Forward the token to your provider, using a custom method.
     self.forwardTokenToServer(token: deviceToken)
}
Key points:
didFailToRegisterForRemoteNotificationsWithErrorIs the registration failure path.didRegisterForRemoteNotificationsWithDeviceTokenIs the path to successful registration.deviceTokenIt is not for local storage, it needs to be entered into the device table of the provider server.- The session example encapsulates the forwarding action as
forwardTokenToServer(token:)。
(03:05) The device token is Data. The example first converts each byte into a hexadecimal string, then joins it into one string and sends it to the server with URLSession.
func forwardTokenToServer(token: Data) {
    let tokenComponents = token.map { data in String(format: "%02.2hhx", data) }
    let deviceTokenString = tokenComponents.joined()
    let queryItems = [URLQueryItem(name: "deviceToken", value: deviceTokenString)]
    var urlComps = URLComponents(string: "www.example.com/register")!
    urlComps.queryItems = queryItems
    guard let url = urlComps.url else {
        return
    }

    let task = URLSession.shared.dataTask(with: url) { data, response, error in
        // Handle data
    }

    task.resume()
}
Key points:
token.mapIterate over each byte.String(format: "%02.2hhx", data)Convert bytes to two-digit hexadecimal text.joined()Get the device token string commonly used by provider server.URLQueryItemPut the token into the registration request.URLSession.shared.dataTaskInitiate a network request.task.resume()Actually initiate the request.
Request notification permission
(03:47) alert notification also requires user authorization.Session specifically emphasizes that requesting authorization should occur after contextual actions.The example places it inside the subscribe button because the user has just expressed their intent to receive notifications.
@IBAction func subscribeToNotifications(_ sender: Any) {
    let userNotificationCenter = UNUserNotificationCenter.current()
    userNotificationCenter.requestAuthorization(options: [.alert, .sound, .badge]) { (granted, error) in
        print("Permission granted: \(granted)")
    }
}
Key points:
UNUserNotificationCenter.current()Get Notification Center.requestAuthorizationA system permission pop-up window will be triggered..alert、.sound、.badgeCorrespond to reminders, sounds and badges respectively.grantedRepresents the user’s choice.- Subsequent calls will return to the status in the settings, and the window will not pop up repeatedly.
Organize alert payload and handle clicks
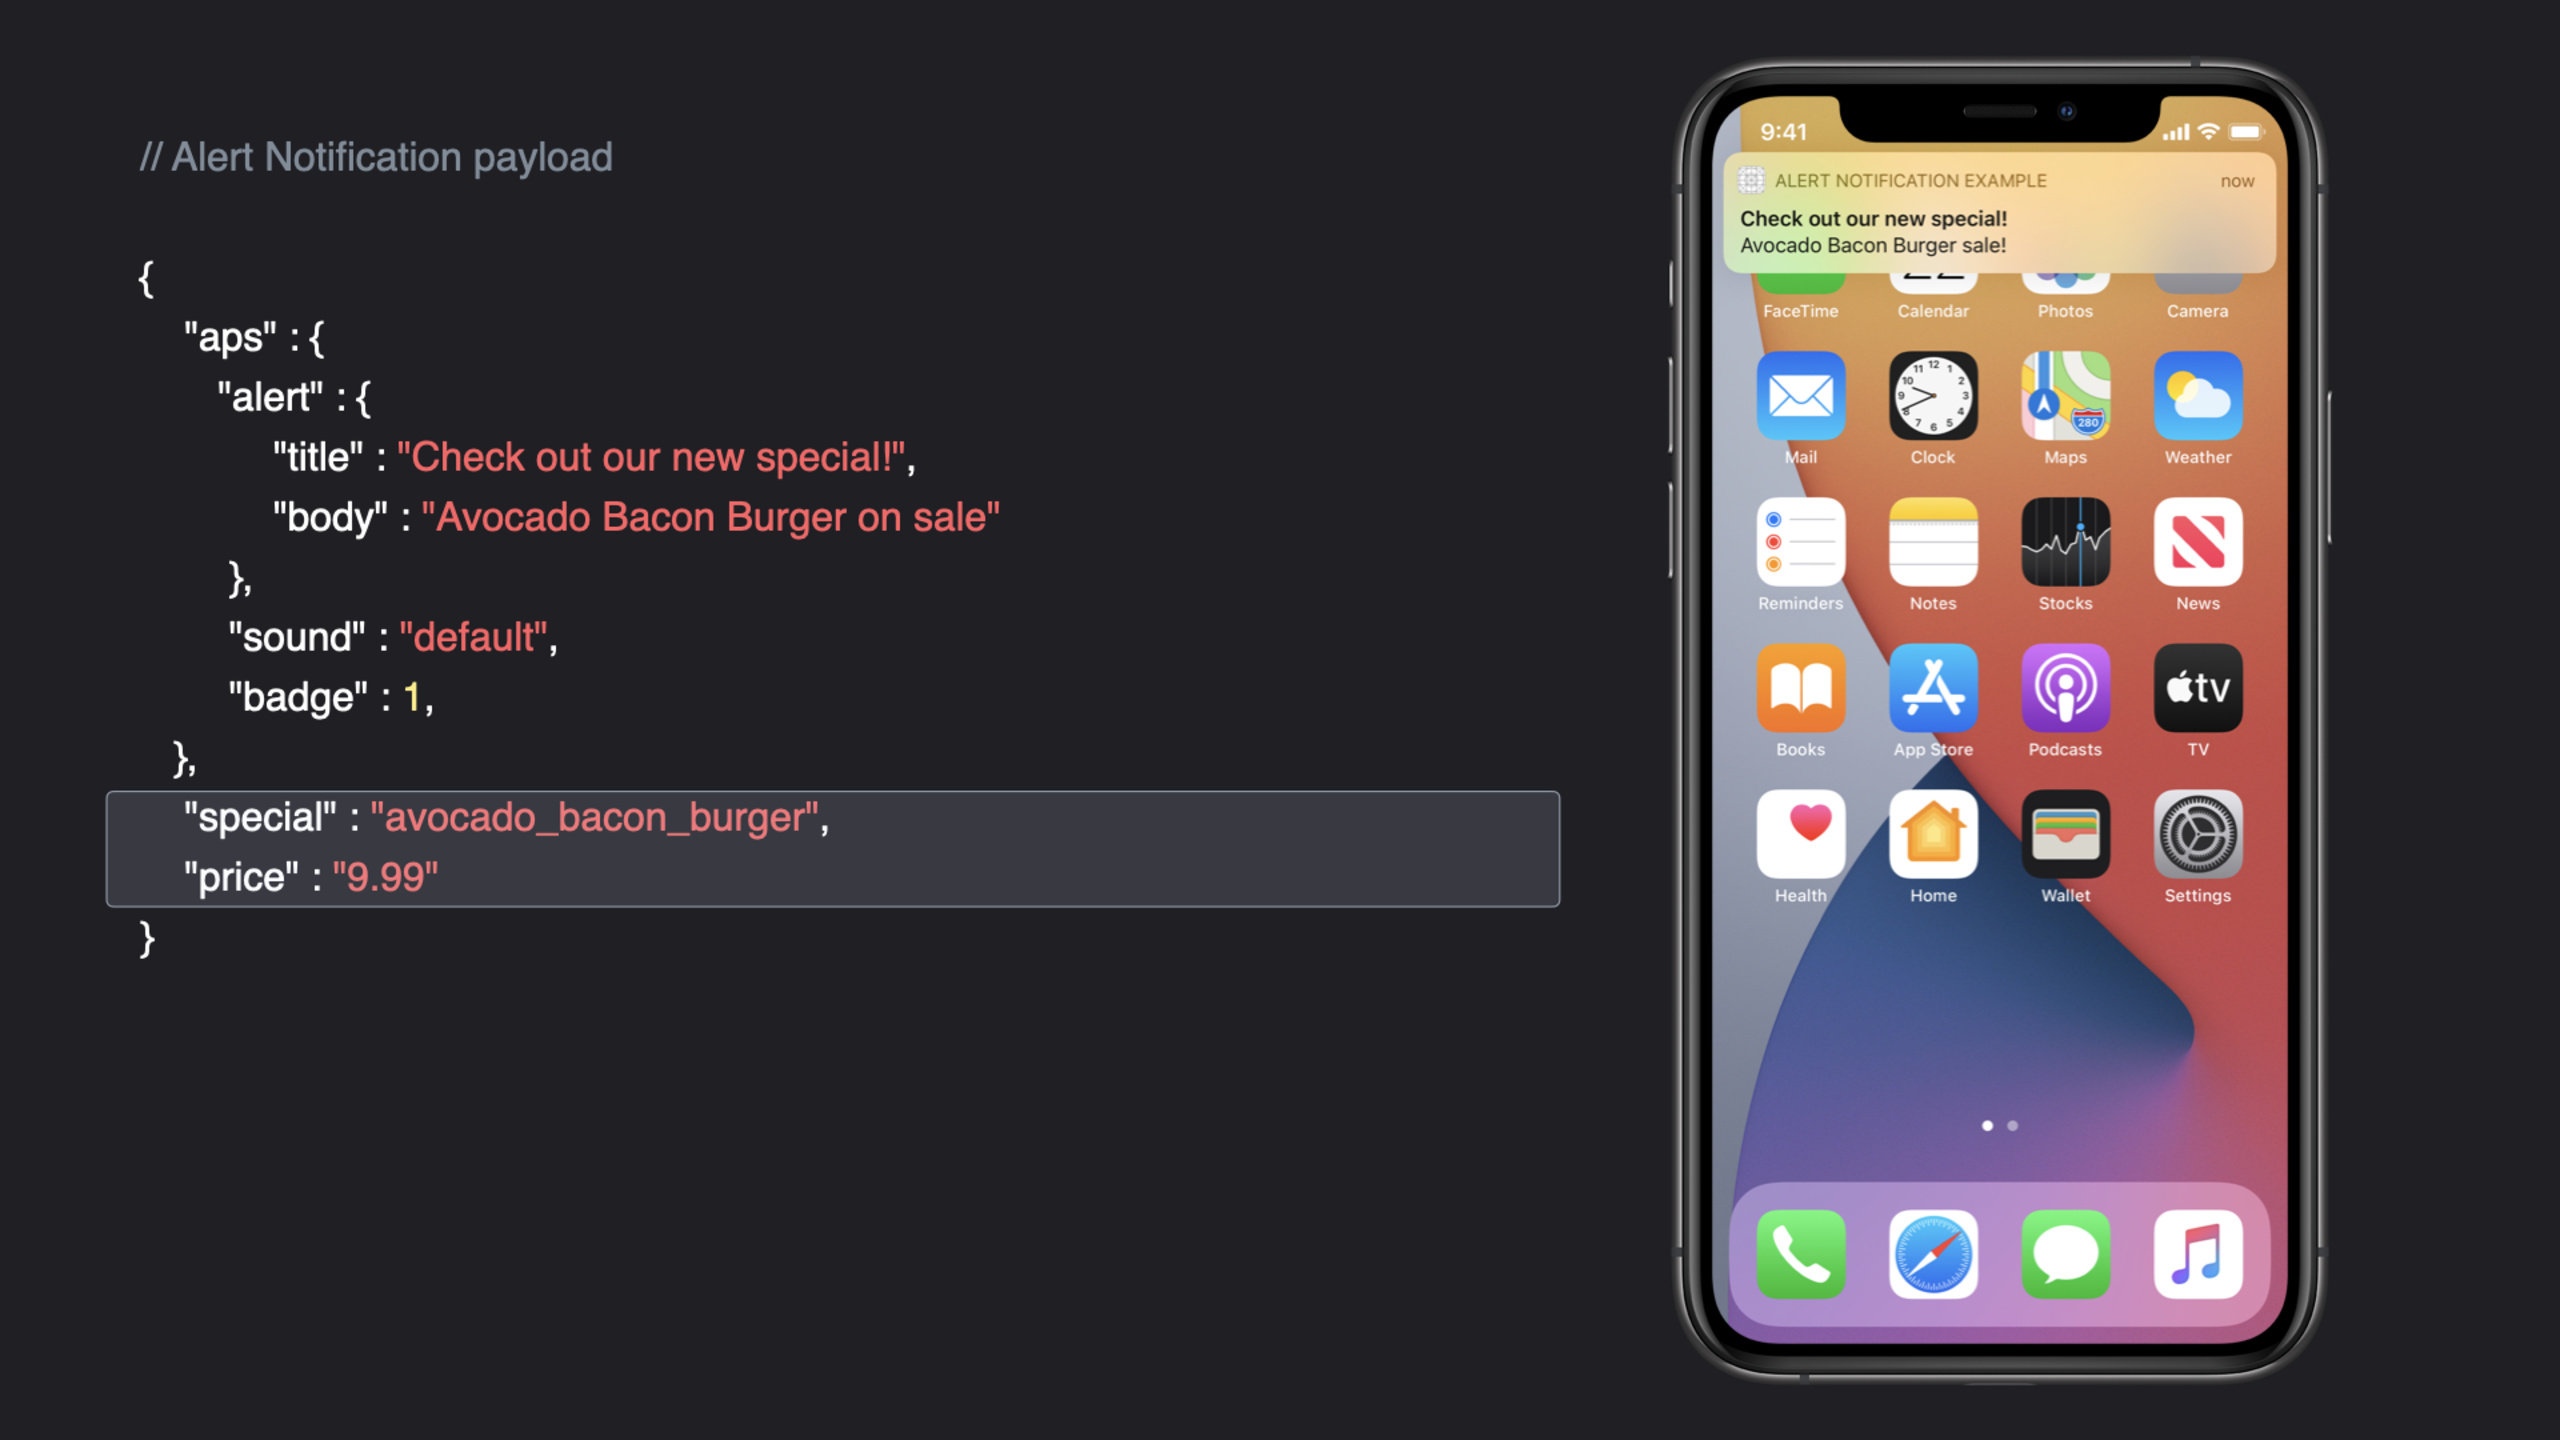
(04:43) The payload sent by the provider server to APNs is divided into two layers.apsThe dictionary tells the system how to display notifications; business fields are placed inapsIn addition, the app reads the notification after the user clicks on it.
{
    "aps" : {
       "alert" : {
            "title" : "Check out our new special!",
            "body" : "Avocado Bacon Burger on sale"
        },
        "sound" : "default",
        "badge" : 1,
   },
    "special" : "avocado_bacon_burger",
    "price" : "9.99"
}
Key points:
apsIs the notification dictionary recognized by the system.alert.titleis a short title.alert.bodyis the complete prompt text.sounduse"default"The default sound is played.badgeIs the absolute value of the application icon’s subscript.specialandpriceIt is the application’s own business data.
(06:11) When the user opens alert notification,UNUserNotificationCenterDelegateofdidReceive responsewill be called.Examples fromuserInfoTake out the business field, add the restaurant specials to the shopping cart, and then open the shopping cart interface.
func userNotificationCenter(_ center: UNUserNotificationCenter,
                            didReceive response: UNNotificationResponse,
                            withCompletionHandler completionHandler: @escaping () -> Void) {
    let userInfo = response.notification.request.content.userInfo
    guard let specialName = userInfo["special"] as? String,
          let specialPriceString = userInfo["price"] as? String,
          let specialPrice = Float(specialPriceString) else {
        // Always call the completion handler when done.
        completionHandler()
        return
    }

    let item = Item(name: specialName, price: specialPrice)
    addItemToCart(item)
    showCartViewController()
    completionHandler()
}
Key points:
response.notification.request.content.userInfoRemove the complete payload.guardVerify whether the custom field exists and the format is correct.- Also called when the data does not meet expectations
completionHandler()。 Item(name:price:)Convert the payload into an in-app model.showCartViewController()Open the notification-related interface.- The successful path must also be called at the end
completionHandler()。
Use background push to pre-update data
(08:16) background notification also needs to register for remote notification and get device token, but no setting is requiredUNUserNotificationCenterDelegate.The reason given by session is very straightforward: this delegate only handles alert notification interactions.
class AppDelegate: UIResponder, UIApplicationDelegate {

    func application(_ application: UIApplication,
                     didFinishLaunchingWithOptions launchOptions: [UIApplication.LaunchOptionsKey: Any]?) -> Bool {
       UIApplication.shared.registerForRemoteNotifications()
       return true
    }
}
Key points:
- Background push still uses the device token of APNs.
registerForRemoteNotifications()Still the entrance.- When there is no alert interaction, there is no need to set AppDelegate as the notification center delegate.
(09:05) The payload of a background notification is smaller. aps.content-available is the key field that tells the system this notification is for background updates.
{
    "aps" : {
       "content-available" : 1
    },
    "myCustomKey" : "myCustomData"
}
Key points:
content-availableput onapsin the dictionary.- The value is
1, the system will treat it as a background notification. myCustomKeyRepresents the application’s own data.- background payload not required
alertdictionary.
(09:33) After the device receives the remote notification, the application candidReceiveRemoteNotificationperform background updates.An example is a restaurant app that downloads the day’s menu and usesUIBackgroundFetchResultTell the system the result.
func application(_ application: UIApplication,
                     didReceiveRemoteNotification userInfo: [AnyHashable : Any],
                     fetchCompletionHandler completionHandler:
                     @escaping (UIBackgroundFetchResult) -> Void) {
    guard let url = URL(string: "www.example.com/todays-menu") else {
        completionHandler(.failed)
        return
    }

    let task = URLSession.shared.dataTask(with: url) { data, response, error in
        guard let data = data else {
            completionHandler(.noData)
            return
        }

        updateMenu(withData: data)
        completionHandler(.newData)
    }
}
Key points:
userInfoContains background notification payload.fetchCompletionHandlerThe parameters areUIBackgroundFetchResult。- Returned when URL creation fails
.failed。 - Return when no data is obtained
.noData。 - Return after updating the menu successfully
.newData。 - The system will use these results to determine when to give the app background time in the future.
Core Takeaways
Limited time offer direct to purchase page
What to do: Create an alert push for a restaurant, e-commerce or ticketing application. After the user clicks on it, they will directly enter the corresponding product or order page.
Why it’s worth doing: Session’s restaurant example showsaps.alertResponsible for notification display,specialandpriceResponsible for the data required for business jump.
How to start: Register for remote notification, get the device token and send it to the provider server; the server sends a payload containing business fields; the clientuserNotificationCenter(_:didReceive:withCompletionHandler:)analysisuserInfoand open the target page.
Prefetch the latest content before opening the app
What to do: After the news, menu, inventory or itinerary application receives the background push, it first pulls the latest data, so that the user can see the new content when they open it.
Why it’s worth doing: Background notification will give a running time when the application is not in the foreground, which is suitable for processing data that needs to be kept fresh.
How to start: The server sends a message containingaps.content-available = 1The payload; client implementationapplication(_:didReceiveRemoteNotification:fetchCompletionHandler:),useURLSessionPull data and return when completed.newData、.noDataor.failed。
Device token health check
What to do: Make a background diagnostic panel to record the last time each device registered APNs, token upload results and failure reasons.
Why it’s worth doing: session uses device token as the key identifier of the push link.If the registration fails or the token is not synchronized to the provider server, the subsequent payload cannot be delivered to the target device no matter how correct it is.
How to start: IndidRegisterForRemoteNotificationsWithDeviceTokenUpload token; indidFailToRegisterForRemoteNotificationsWithErrorRecords errors; the server saves tokens, users, devices and update times to facilitate troubleshooting delivery problems.
Split alert push and background push by scene
What to do: Establish two sets of push strategies for the same type of business events: use alert push for events that require users to process immediately, and use background push for events that only need to update local data.
Why it’s worth doing: session clearly distinguishes between two types of notifications.Alert notification displays interactive reminders; background notification is used to refresh content and is subject to system background running policies.
How to start: Add event type field to provider server; decide to write when generating payloadaps.alertstillaps.content-available;The client implements alert click processing and background fetch processing respectively.
Related Sessions
- Build local push connectivity for restricted networks — Extend push notifications to restricted networks without Internet connectivity, suitable for continuing to understand the local server to device notification link.
- Streamline your App Clip — Explains App Clip notification, location confirmation and lightweight transaction process, and shows how notifications are used in real-time experience.
- Keep your complications up to date — Introducing watchOS complication’s background refresh, URLSession, and well-timed push notifications.
- Boost performance and security with modern networking — Supplements the basics of modern protocols, security, and energy consumption related to push server and client network requests.
Comments
GitHub Issues · utterances