
Highlight
UITextView 和 NSTextView 现在开放了 TextKit 的内部钩子,开发者可以在不放弃框架提供的编辑功能(选择、撤销、语音输入等)的前提下,添加行号、折叠区块等自定义行为。
核心内容
在 Apple 平台上做文本编辑,长期以来是个二选一的问题:用 UITextView/NSTextView,还是自己造轮子。
用框架的文本视图,开箱即用。文本输入、选择、无障碍、撤销重做、听写、行内预测——这些都免费送给你。但代价是定制能力有限。你想改变行号的绘制方式?想在文本旁边加自定义视图?很难。
另一种选择是用 TextKit 从零开始构建自定义文本视图。设置 NSTextLayoutManager、自己处理视口布局、自己渲染所有内容。控制权全在你手里,但那些框架送你的功能也都没了——自己实现一个生产级文本编辑器不是小工程。
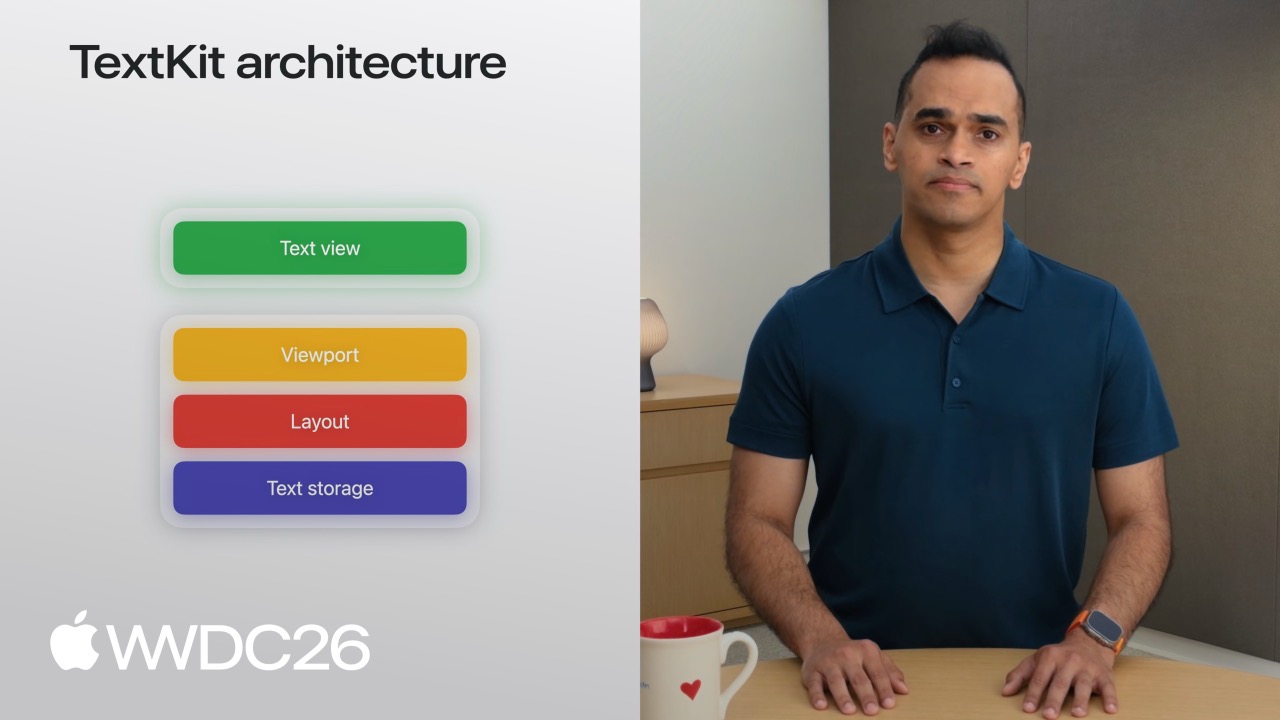
TextKit 的四层架构解释了这个困境:存储层(文本数据)、布局层(分块)、视口层(追踪可见内容)、视图层(实际渲染)。前三层是跨框架共享的,但视图层是你自己的。
2027 年的更新打破了这道墙。UITextView 和 NSTextView 现在遵循 NSTextViewportLayoutControllerDelegate,你可以子类化它们并覆写视口布局的回调方法。这意味着你可以在保留框架所有功能的同时,注入自己的绘制逻辑。
详细内容
TextKit 架构回顾
TextKit 的渲染流程分为四层(00:17):
- 存储层:NSTextContentStorage 将 NSAttributedString 分解为 NSTextParagraph 对象
- 布局层:NSTextLayoutManager 测量字形并创建不可变的 NSTextLayoutFragment
- 视口层:NSTextViewportLayoutController 追踪可见区域,只渲染用户看得到的内容
- 视图层:实际渲染文本的 UIView/NSView 或 CALayer
这个架构的核心思想是”按需渲染”——视口布局过程只处理与当前滚动位置相交的布局片段。
新的 Rendering Surface API
在 2027 年之前,TextKit 没有统一的方式来引用渲染目标视图(09:47)。新增的两个协议解决了这个问题:
class MyView: UIView, NSTextViewportRenderingSurface {}关键点:
NSTextViewportRenderingSurface:表示视口内可绘制的视觉元素NSTextViewportRenderingSurfaceKey:唯一标识一个渲染表面的键,NSTextLayoutFragment可作为键使用
配合使用 NSMapTable 缓存:
var cache: NSMapTable<NSTextLayoutFragment, MyView>这样你可以在视口布局过程中追踪每个布局片段对应的渲染视图。
在 SwiftUI 中使用 UITextView
SwiftUI 的 TextEditor 适合简单场景,但有时你需要 UITextView 的完整功能(12:39):
import SwiftUI

struct MyTextView: View {
    var body: some View { TextViewRepresentable() }
}

#if os(macOS)
struct TextViewRepresentable: NSViewRepresentable {
    func makeNSView(context: Context) -> NSTextView {
      NSTextView()
    }
    func updateNSView(_ nsView: NSTextView, context: Context) {}
}
#else
struct TextViewRepresentable: UIViewRepresentable {
    func makeUIView(context: Context) -> UITextView {
        UITextView()
    }
    func updateUIView(_ uiView: UITextView, context: Context) {}
}
#endif关键点:
- macOS 使用 NSViewRepresentable,iOS/macCatalyst 使用 UIViewRepresentable
- 在 make 方法中初始化文本视图
- update 方法保持视图同步
添加行号功能
演讲的第一个例子是为 iPad 构建代码编辑器,添加行号(13:33):
import UIKit

class TextView: UITextView {}

class ContainerView: UIView {
    let textView = TextView()
    let lineNumberView = UIView()

    textView.font = UIFont.monospacedSystemFont
}
核心是覆写 TextView 的三个视口控制器委托方法(14:42):
class TextView: UITextView {
    // 设置阶段:重置状态,计算起始行号
    override func textViewportLayoutControllerWillLayout(_ textViewportLayoutController: NSTextViewportLayoutController) {
        super.textViewportLayoutControllerWillLayout(textViewportLayoutController)
        // ...
    }

    // 收集每个段落的位置信息
    override func textViewportLayoutController(_ textViewportLayoutController: NSTextViewportLayoutController, configureRenderingSurfaceFor textLayoutFragment: NSTextLayoutFragment) {
        super.textViewportLayoutController(textViewportLayoutController, configureRenderingSurfaceFor: textLayoutFragment)
        // ...
    }

    // 将累积的信息传给 ContainerView
    override func textViewportLayoutControllerDidLayout(_ textViewportLayoutController: NSTextViewportLayoutController) {
        super.textViewportLayoutControllerDidLayout(textViewportLayoutController)
        // ...
    }
}
计算起始行号使用 enumerateTextElements(15:59):
func startingLineNumber(for viewportRange: NSTextRange?) -> Int {
    guard let viewportRange,
          let storage = textLayoutManager?.textContentManager as? NSTextContentStorage else { return 0 }
    let startLocation = storage.documentRange.location
    var count = 1
    storage.enumerateTextElements(from: startLocation) { element in
        guard let range = element.elementRange else { return true }
        if range.location.compare(viewportRange.location) != .orderedAscending { return false }
        count += 1
        return true
    }
    return count
}关键点:
- enumerateTextElements 遍历文本元素,返回 false 停止遍历
- 通过比较位置判断是否到达视口起始位置
- 实际实现中应加入缓存避免每次布局都重新计算
DidLayout 方法需要将坐标从文本容器转换到视口(17:02):
class TextView: UITextView {
    private var lines: [CGRect] = []
    private var startingLineNumber = 0
    var onDidLayout: ((Int, [CGRect]) -> Void)?

    override func textViewportLayoutControllerDidLayout(_ textViewportLayoutController: NSTextViewportLayoutController) {
        super.textViewportLayoutControllerDidLayout(controller)
        let origin = controller.viewportBounds.origin
        onDidLayout?(startingLineNumber, lines.map { $0.offsetBy(dx: 0, dy: -origin.y) })
    }
}
在 ContainerView 中绘制行号(17:16):
class ContainerView: UIView {
    let textView = TextView()
    let lineNumberView = UIView()

    func setup() {
        textView.onDidLayout = { startingLineNumber, lines in
            let attributes: [NSAttributedString.Key: Any] = [
                .font: UIFont.monospacedSystemFont(ofSize: 11, weight: .regular),
                .foregroundColor: UIColor.secondaryLabel
            ]
            for (i, frame) in lines.enumerated() {
                let number = "\(startingLineNumber + i)" as NSString
                number.draw(at: CGPoint(x: 8, y: frame.minY), withAttributes: attributes)
            }
        }
    }
}关键点:
- onDidLayout 闭包将 TextView 的布局信息传递给 ContainerView
- 使用 NSString.draw(withAttributes:) 直接绘制文本
- frame.minY 对齐行号与对应行
实现可折叠区块
第二个例子是食谱应用,将多段落食谱折叠为仅标题(19:22):
class TextView: UITextView, NSTextContentStorageDelegate {
    var collapsedSections: Set<Int> = []

    override func textViewportLayoutControllerWillLayout(_ textViewportLayoutController: NSTextViewportLayoutController) {
        super.textViewportLayoutControllerWillLayout(textViewportLayoutController)
        // ...
    }

    override func textViewportLayoutController(_ textViewportLayoutController: NSTextViewportLayoutController, configureRenderingSurfaceFor textLayoutFragment: NSTextLayoutFragment) {
        super.textViewportLayoutController(textViewportLayoutController, configureRenderingSurfaceFor: textLayoutFragment)
        // ...
    }

    override func textViewportLayoutControllerDidLayout(_ textViewportLayoutController: NSTextViewportLayoutController) {
        super.textViewportLayoutControllerDidLayout(textViewportLayoutController)
        // ...
    }

    // 跳过被折叠段落的布局
    func textContentManager(shouldEnumerate textElement: NSTextElement, options: NSTextContentManager.EnumerationOptions) -> Bool {
        // ...
    }

    // 处理区块折叠切换
    func toggleSection(headerOffset: Int) {
        if collapsedSections.contains(headerOffset) {
            collapsedSections.remove(headerOffset)
        } else {
            collapsedSections.insert(headerOffset)
        }
        guard let textLayoutManager = textLayoutManager else { return }

        let textViewportLayoutController = textLayoutManager.textViewportLayoutController
        textViewportLayoutController.delegate?.textViewportLayoutControllerReceivedSetNeedsLayout?(textViewportLayoutController)
    }
}关键点:
- NSTextContentStorageDelegate 的 shouldEnumerate 方法控制是否对某个文本元素执行布局
- collapsedSections 用 Set 存储被折叠的段落偏移量
- 切换折叠状态后调用 textViewportLayoutControllerReceivedSetNeedsLayout 触发重新布局
文本附件视图提供者复用
文本附件(如内联图片、贴纸)的渲染通过 NSTextAttachmentViewProvider 完成。由于这些对象不可变,编辑段落时会重建,导致动画等状态丢失。
2027 年新增的注册 API 允许指定复用策略(22:06):
import UIKit

class ViewController: UIViewController {
    var textView: UITextView

    func setupTextView() {
        textView = UITextView()
        textView.register(
            [.onEditingInlineParagraphs],
            forTextAttachmentViewProviderType: AnimatedAttachmentViewProvider.self
        )
    }
}关键点:
- onEditingInlineParagraphs:编辑段落时保留视图提供者
- onScrollingOutOfViewport:滚出视口时缓存,滚回时恢复
- 两种策略可组合使用
核心启发
-
代码编辑器增强:基于行号示例,进一步实现语法高亮、代码折叠、错误提示。覆写 configureRenderingSurfaceFor 可识别特定文本范围并应用不同渲染样式。
-
富文本文档编辑器:可折叠区块的思路可用于长文档的章节管理。配合 NSTextContentStorageDelegate,实现大纲视图与内容同步、章节导航、渐进式加载。
-
协作式笔记应用:利用文本附件复用策略,构建支持实时协作的笔记应用。光标位置指示器、用户头像、内联评论都可以作为文本附件,复用策略保证编辑时这些元素不闪烁。
-
自定义文本特效:通过 Rendering Surface API,为特定文本范围添加背景动画、边框高亮、手势响应。适合创意写作应用或教育场景的文本互动。
-
多视图同步编辑:将多个 NSTextLayoutManager 连接到同一个 NSTextContentStorage。实现主编辑区与预览区实时同步,或左右对照阅读模式。
关联 Session
- What’s new in SwiftUI — SwiftUI 文本控件的新特性
- Meet SwiftUI — SwiftUI 视图与 UIKit/AppKit 集成
- What’s new in AppKit — AppKit 现代 NSTextView 更新
- SwiftUI + UIKit integration — ViewRepresentable 最佳实践
- Advanced UI techniques — 自定义视图控制器交互
评论
GitHub Issues · utterances