
Highlight
Core AI 为 Apple Silicon 端侧 AI 部署提供了完整的 Python 工具链:从 PyTorch 模型导出、配置驱动压缩,到可视化调试和自定义 Metal 内核打包,全部在一个工作流内完成。
核心内容
端侧模型部署的老问题
把深度学习模型搬上 iPhone 或 Mac,开发者一直面临三个麻烦:模型太大装不下、量化后精度掉点找不到原因、自定义算子难以和模型一起打包分发。以前用 Core ML,转完模型上机一跑,精度掉了只能靠猜是哪一层出了问题,或者写大量脚本逐层 dump 张量对比。自定义算子更麻烦,需要额外管理 Metal 库文件和编译管线。(00:14)
Core AI 的完整工作流
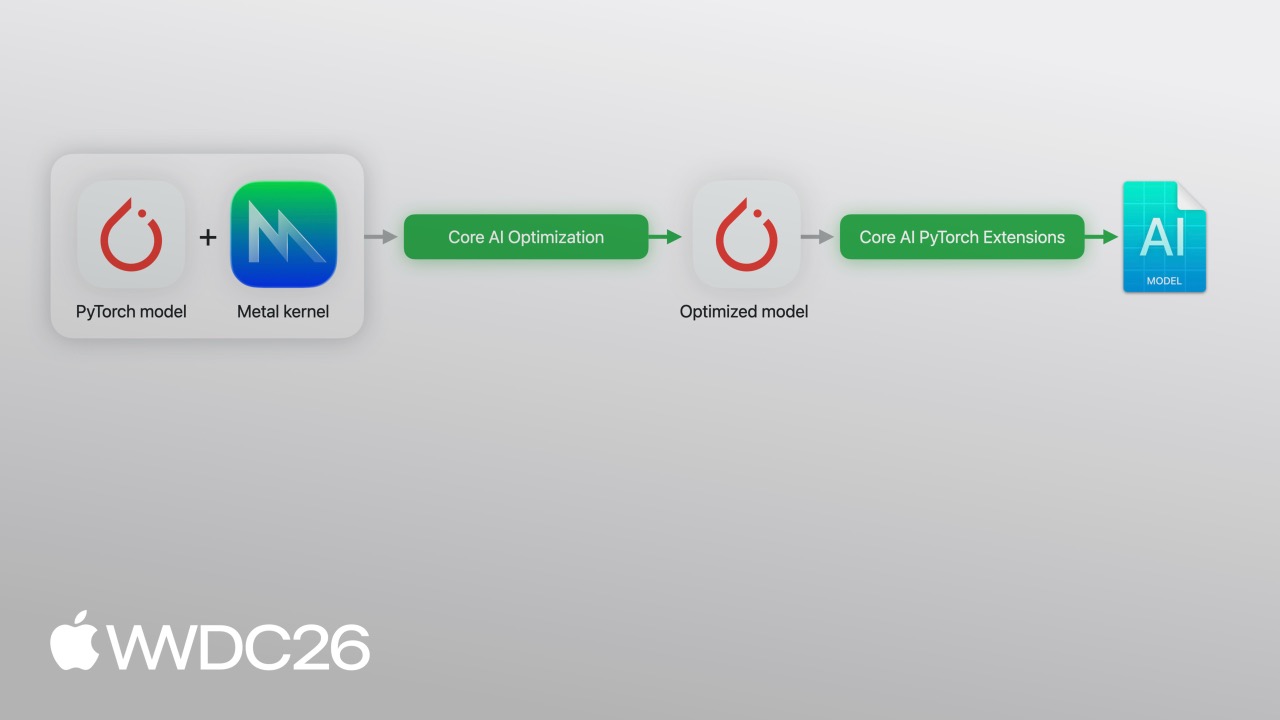
Apple 这次把 PyTorch 到 Apple Silicon 的部署链路彻底打通了。安装 pip install coreai-torch 后,你手头的 PyTorch 模型可以直接走一条完整的流水线:用 torch.export 捕获计算图,经 TorchConverter 转成 Core AI 内部表示,再经 optimize() 生成 .aimodel 资产,最后从 Python 直接加载推理。整个过程不需要离开熟悉的 Python 环境。(03:27)
量化掉点怎么查
压缩是把大模型搬上设备的关键。以 SAM3(Segment Anything Model 3)为例,这个 8.5 亿参数的图像分割模型,原始大小超过 3GB。用 coreai-opt 的 presets.w4 做 4-bit 全量化后,模型压到了 430MB,但一个被遮挡的花朵检测不到了。(06:02)
问题出在哪?Core AI Debugger 登场。它在 Mac 上运行,能可视化模型结构、在真机上执行推理,还能把 Core AI 的中间张量和 PyTorch 参考运行结果逐层对比。Debugger 自动识别同步点,用 PSNR(峰值信噪比)指标给每层打分,绿色表示吻合,黄色表示轻度偏离,红色表示严重差异。排序后发现,低 PSNR 的层几乎全部来自 detector decoder —— 这个只占模型 4% 参数的模块对量化极其敏感。把它从量化配置里剔除后,精度恢复,模型仍然只有原来的很小一部分。(10:40)
自定义 Metal 内核随模型打包
标准算子库永远覆盖不了所有需求。Core AI 允许你手写 Metal Shading Language(MSL)内核,和 PyTorch 参考实现一起注册到 TorchMetalKernel,转换时直接嵌入 .aimodel 资产。部署时 App 只加载一个文件,不需要额外管理 Metal 库。(21:12)
模型重写让推理快 76%
把模型拆成多个独立函数是另一个高级技巧。SAM3 的图像编码器、文本编码器和检测头被拆成三个入口。用户换了一个提示词(从”花”换成”蝴蝶”),只需要重新运行文本编码器和检测头,图像编码结果直接复用。第二次推理比完整跑一遍快了 76%。(24:56)
详细内容
PyTorch 模型导出与 Core AI 转换
(03:27)
第一步是用 torch.export 捕获模型的完整计算图,包括权重、操作和形状信息。
import torch
import torch.nn as nn

class MLP(nn.Module):
    def __init__(self):
        super().__init__()
        self.fc1 = nn.Linear(256, 512)
        self.fc2 = nn.Linear(512, 10)

    def forward(self, x):
        return self.fc2(torch.relu(self.fc1(x)))

model = MLP().eval()
example_input = (torch.randn(1, 256),)
exported_program = torch.export.export(model, example_input)
关键点:
torch.export.export()捕获静态计算图,权重、操作和形状全部冻结在exported_program中example_input用于推导张量形状,模型中不能有依赖输入数据的动态控制流.eval()关闭 dropout 等训练专用层,确保推理行为一致
第二步用 TorchConverter 转成 Core AI 表示,优化并保存为 .aimodel。
import coreai
import coreai_torch
from coreai.runtime import NDArray

converter = coreai_torch.TorchConverter()
converter.add_exported_program(
    exported_program,
    input_names=["features"], output_names=["logits"])
core_ai_program = converter.to_coreai()

core_ai_program.optimize()
asset = core_ai_program.save_asset("mlp.aimodel")

specialized_model = await AIModel.load("mlp.aimodel")
specialized_function = specialized_model.load_function("main")
result = await specialized_function({"features": NDArray(example[0].numpy())})
关键点:
TorchConverter是 PyTorch 到 Core AI 的桥梁,API 设计和 Core ML Tools 类似optimize()根据目标平台做算子融合和内存优化save_asset()生成.aimodel文件,这是 Apple Silicon 的原生执行格式- 推理输入用
NDArray包装 numpy 数组,通过字典按名称映射
配置驱动的模型压缩
(05:54)
coreai-opt 支持 int4、int8、FP4、FP8 多种压缩粒度,通过配置文件决定哪些层压缩、哪些层保留原精度。
import coreai_opt

# 使用预设的 4-bit 每通道对称量化
config = coreai_opt.presets.w4
config.execution_mode = coreai_opt.ExecutionMode.EAGER

quantizer = coreai_opt.Quantizer(config)
quantizer.initialize(model, example_inputs)
compressed_model = quantizer.finalize()
关键点:
presets.w4是一行配置的快捷方式,背后对应每通道 4-bit 对称量化ExecutionMode.EAGER适合权重量化,GRAPH模式适合激活量化initialize()需要传入示例输入用于校准统计- 也可以传入大量数据做量化感知训练(QAT),精度损失更小
Core AI Debugger 定位量化问题
(10:40)
Debugger 的核心能力是对比 PyTorch 参考运行和 Core AI 端侧运行的中间张量。首先在 Python 中保存 PyTorch 的中间结果:
# 保存 PyTorch 中间张量
intermediates = coreai_torch.save_intermediates(
    original_model,
    quantized_model,
    example_inputs
)
然后在 Debugger 中加载这个文件作为参考运行,启动对比会话。Debugger 自动对齐两个计算图的节点,生成同步点,并计算 PSNR。绿色节点表示张量相似度高,黄色表示中度偏离,红色表示严重差异。按 PSNR 排序后,可以快速定位问题层。(15:00)
关键点:
save_intermediatesAPI 在 PyTorch 端捕获每个操作的输出张量- Debugger 自动识别同步点,不需要手动对齐节点
- PSNR 是默认相似度指标,可以根据模型类型切换其他指标
- 左侧导航器按 PyTorch 模块分组,大型模型的导航体验和代码结构一致
自定义 Metal 内核
(21:12)
以 SiLU(Sigmoid Linear Unit)激活函数为例,同时提供 PyTorch 参考实现和 MSL 内核:
import torch
from coreai_torch.dsl import TorchMetalKernel, MetalParameter

def silu_torch(x):
    return x * torch.sigmoid(x)

SILU_MSL = """
float val = float(x[gid]);
float sig = 1.0f / (1.0f + exp(-val));
y[gid] = TYPE(val * sig);
"""

silu_kernel = TorchMetalKernel(
    name="fused_silu",
    input_names=["x"],
    result_names=["y"],
    src=SILU_MSL,
    torch_defn=silu_torch,
    metal_params=[MetalParameter("gid", "uint", "thread_position_in_grid")],
    template_dtypes={"x": "TYPE"},
)
在模型中使用这个内核:
class MyModel(torch.nn.Module):
    def __init__(self):
        super().__init__()
        self.linear = torch.nn.Linear(256, 256)

    def forward(self, x):
        h = self.linear(x)
        n = h.numel()
        return silu_kernel(
            h,
            threads_per_grid_size=(n, 1, 1),
            threads_per_thread_group=(min(n, 256), 1, 1),
            result_shapes=[h.shape],
        )

exported_program = torch.export.export(MyModel(), (torch.randn(1, 256),))

converter = coreai_torch.TorchConverter()
converter.register_custom_kernels([silu_kernel])
converter.add_exported_program(exported_program,
                               input_names=["x"], output_names=["y"])
deployable = converter.to_coreai()
关键点:
torch_defn是给torch.export看的参考实现,用于形状推导和 Debugger 对比src是实际在 GPU 上执行的 MSL 代码,TYPE宏由template_dtypes注入实际数据类型MetalParameter把 MSL 中的变量绑定到 Metal 的内置属性,如thread_position_in_gridresult_shapes在每次调用时传入,支持动态形状输入- MSL 代码随模型一起打包进
.aimodel,部署时无需额外文件
模型重写成多个独立函数
(24:56)
把 SAM3 拆成 image_encode、text_encode、detect 三个入口,每个可以独立压缩和调用:
# 三个模块分别导出
image_exported = torch.export.export(image_encoder, image_input)
text_exported = torch.export.export(text_encoder, text_input)
detect_exported = torch.export.export(detector, detect_input)

converter = coreai_torch.TorchConverter()
converter.add_exported_program(image_exported,
                               input_names=["image"], output_names=["image_emb"],
                               entrypoint_name="image_encode")
converter.add_exported_program(text_exported,
                               input_names=["text"], output_names=["text_emb"],
                               entrypoint_name="text_encode")
converter.add_exported_program(detect_exported,
                               input_names=["image_emb", "text_emb"], output_names=["masks"],
                               entrypoint_name="detect")

deployable = converter.to_coreai()
asset = deployable.save_asset("sam3_split.aimodel")
加载后按需调用:
model = await AIModel.load("sam3_split.aimodel")

# 第一次:完整流程
image_fn = model.load_function("image_encode")
text_fn = model.load_function("text_encode")
detect_fn = model.load_function("detect")

image_emb = await image_fn({"image": image_ndarray})
text_emb = await text_fn({"text": text_ndarray})
masks = await detect_fn({"image_emb": image_emb, "text_emb": text_emb})

# 换提示词后:只跑 text_encode + detect
text_emb_new = await text_fn({"text": new_text_ndarray})
masks_new = await detect_fn({"image_emb": image_emb, "text_emb": text_emb_new})
关键点:
- 每个
add_exported_program用entrypoint_name定义独立入口 - 一个
.aimodel资产可以包含多个可调用函数 - 图像编码结果
image_emb可以缓存复用,换提示词时跳过最重的计算 - 每个入口可以独立配置压缩策略,detector 保持原精度,两个 encoder 做 4-bit 压缩
核心启发
1. 给现有 App 加一个端侧图像分割功能
用 coreai-models 仓库里的 SAM3 示例,配合 coreai-opt 的混合精度配置,把模型压到 500MB 以内。用 Core AI Debugger 验证分割精度满足产品要求后,直接集成到照片编辑 App 中。入口 API 是 AIModel.load() 和 load_function(),和加载普通模型没有区别。
2. 做一个”换提示词实时重分割”的交互体验
参考 Session 中的三函数拆分思路,把图像编码和文本编码拆开。用户画一个框或输入一个提示词,图像只编码一次,后续每次改提示词只跑文本编码和检测头。实现思路:缓存 image_encode 的输出张量,复用到后续的 text_encode + detect 调用中。
3. 把自定义激活函数打包进模型资产
如果你的模型用了论文里新提出的激活函数,而 Core AI 的标准算子库还没覆盖,用 TorchMetalKernel 手写一个 MSL 实现。PyTorch 参考实现负责形状推导和调试对比,MSL 负责实际执行。转换后一个 .aimodel 文件搞定部署。
4. 用 AI Skills 加速团队上手 Core AI
coreai-models 仓库附带了一套 Agent Skills,可以安装到 Cursor 或 Copilot 中。这些 Skills 包含 Apple 工程师的最佳实践,能直接把”我想把 SAM3 部署到 iPhone 上”这种自然语言需求翻译成具体的转换、压缩、拆分脚本。团队新人不需要翻完整文档就能产出可运行的代码。
5. 用 Debugger 建立量化回归测试流水线
在 CI 中集成 save_intermediates + Debugger 对比:每次模型更新后,自动对比 PyTorch 参考输出和量化后的 Core AI 输出,用 PSNR 阈值判断是否通过。把以前靠人眼检查的环节变成自动化的数值门禁。
关联 Session
- 324 - Meet Core AI — Core AI 框架的整体介绍,325 的深入技术补充
- 326 - Integrate Core AI into your app — 把 Core AI 模型集成到 App 中的具体实践
- 328 - Deploy local AI with MLX Swift — 另一个 Apple Silicon 本地 AI 框架,可与 Core AI 对比选型
- 330 - Optimize custom ML operations with Metal tensors — 更深入讲解自定义 Metal 内核的优化技巧
- 298 - Build robust model evaluations — 模型评估方法论,配合 Debugger 的对比功能使用
评论
GitHub Issues · utterances